Page 49 of 126

Technology for comfort, convenience and safety
48
Switching off DSC
Press the button; the indicator lamp in the
instrument cluster lights up continuously.
DSC is now deactivated.
Stabilizing interventions of the chassis control
system DSC are no longer available. However,
the braking interventions that simulate the
function of the differential lock continue to be
active.
In the following exceptional circumstances, it
may be useful to switch off DSC for a short
period:
>When rocking the vehicle and starting off in
deep snow or on loose road surfaces
>On sandy road surfaces
>On poor surfaces with deep ruts
>If the wheels spin on muddy surfaces
>When driving with snow chains
As a result of the braking interventions,
the brakes may be subjected to additional
loads when the system is switched off. In order
to limit the brake temperature, brief automatic
suppression of the brake activation is possible.
To maintain vehicle stability, always drive with
the system switched on when possible.<
Reactivating DSC
Press the button again; the indicator lamp in the
instrument cluster goes out. DSC is now acti-
vated.
xDrive
xDrive is the all-wheel drive system of your X3.
The combined effects of xDrive and DSC fur-
ther optimize the traction and dynamic driving
characteristics. The all-wheel drive system
xDrive variably distributes the drive torque to
the front and rear axle depending on the driving
situation and prevailing road conditions.
HDC Hill Descent Control
The concept
HDC is a system for hill descent assistance that
reduces the speed on steep downward inclines
and makes it even easier to control the driving
characteristics of your BMW under these condi-
tions. The vehicle moves at slightly more than
walking speed without active intervention from
the driver.
HDC is available for activation at vehicle speeds
below approx. 20 mph/35 km/h. When driving
down steep hills with a speed below approx.
20 mph/35 km/h, the vehicle reduces speed
automatically down to slightly more than walk-
ing speed, approx. 5 mph/8 km/h, and then
maintains this speed at a constant.
You can use the accelerator or brakes to vary
this automatically controlled speed within a
range extending from approx. 3 mph/5 km/h to
15 mph/25 km/h.
You can specify a target speed within the same
range by using the +/– buttons of the cruise
control on the steering wheel.
Page 50 of 126

Reference
At a glance
Controls
Driving tips
Mobility
49
Activating system
Press the button; the indicator lamp comes on.
The indicator lamp flashes when the brakes are
applied automatically.
Deactivating system
Press the button again; the indicator lamp goes
out.
HDC is deactivated immediately above approx.
35 mph/60 km/h and after approx. 10 seconds
when the ignition is switched off.
Using HDC
In vehicles with manual transmission:
Use HDC in first gear and in reverse gear, as in
the higher gears the engine's braking action
diminishes.
On vehicles with automatic transmission:
You can use HDC in every drive position.
Malfunction
If the indicator lamp in the button goes out in the
HDC mode or fails to light up when the button is
pressed:
HDC is temporarily not available, as the brake
temperature is too high.
Malfunction in vehicle stability control
systems
The warning lamp lights up yellow.
DBC Dynamic Brake Control is defec-
tive. Have the system checked as soon
as possible.
Display of the previously described
malfunction on Canadian models.If one of the malfunctions described
below occurs, proceed cautiously and
defensively. When driving on poor roads, avoid
using the full throttle or kick-down positions of
the accelerator as well as heavy and panic brak-
ing. Otherwise the drive train may be damaged
or accidents can occur.<
The red brake warning lamp lights up
together with the warning lamps for
ABS and DSC/xDrive. In addition, a
warning signal sounds. ABS, DSC,
HDC and xDrive have failed. Drive may
then only be carried out via the rear
axle. If the brake warning lamp lights up
yellow in the described combination,
the EBV Electronic brake-force distribution is
still available. Have the system checked as soon
as possible.
Display of the previously described
malfunction on Canadian models.
The warning lamp lights up continu-
ously and a warning signal sounds:
DSC or the xDrive all-wheel system has
failed.
The stabilizing interventions of DSC or the all-
wheel drive system xDrive are no longer avail-
able. It is then possible to exert driving force
only via the rear axle. Have the system checked
as soon as possible.
Flat Tire Monitor
The concept
The Flat Tire Monitor keeps track of the infla-
tion pressures in the four mounted tires as you
drive. The system provides an alert whenever
the inflation pressure drops significantly in rela-
tion to the pressure in another tire.
Page 51 of 126

Technology for comfort, convenience and safety
50 The check of the tire inflation pressure is based
on monitoring the relative speeds of the wheels.
A flat tire is detected and reported on the basis
of a deviation in certain speed ratios.
Functional requirement
So that the Flat Tire Monitor can learn the cor-
rect inflation pressure, please perform the fol-
lowing steps:
1.Check the inflation pressures in all tires
2.Compare with the inflation pressure table
on page83 and correct if necessary
3.Initialize the system.
System limits
The Flat Tire Monitor cannot indicate
sudden severe tire damage caused by
outside factors and does not detect a natural,
even pressure drop in all four tires.<
In the following situations, on the other hand,
there can be delays in detecting tire pressure
losses, and even system failure:
>When driving on snow-covered or slippery
road surfaces.
>In the case of performance-oriented driving:
slip in the drive wheels, high lateral acceler-
ation.
>False alarms and undetected loss of pres-
sure may occur when you are driving with
snow chains fitted.
>When driving with a compact wheel, the Flat
Tire Monitor cannot operate.
Initializing system
Perform the initialization immediately
every time you correct the inflation pres-
sure, change a tire or change a wheel or all
wheels. This requires a trip.<1.Start the engine, but do not begin to drive.
2.Press the button until the yellow indicator
lamp in the instrument cluster lights up for a
few seconds.
3.Begin driving.
It takes a few minutes until the Flat Tire Monitor
can detect and indicate a flat tire.
Do not initialize the system when driving
with snow chains or with a compact
wheel.<
Indication of a flat tire
The warning lamp lights up yellow.
There is a flat tire or extensive inflation
pressure loss.
1.Reduce speed and stop the vehicle care-
fully. Avoid sudden braking and steering
maneuvers.
2.Identify damaged tire.
If identification is not possible, con-
tact your BMW Sports Activity Vehi-
cle Center.<
3.Replace the damaged wheel, refer to
Changing a wheel on page99.
Brake Force Display
The Brake Force Display lights up in two
stages, depending on how heavily you brake.
Page 52 of 126

Reference
At a glance
Controls
Driving tips
Mobility
51
The display consists of two stages:
>Normal braking:
The brake lamps 1 and the center brake
lamp light up.
>Heavy braking and braking with ABS:
The brake lamps 1 and 2 light up together
with the center brake lamp.
Airbags
The following airbags are located beneath the
marked covers:
1Front airbags for driver and front passenger
2Head airbags in front and rear
3Side airbags in front and rear
*
Protective action
To ensure that the safety systems con-
tinue to provide optimal protection,
please follow the instructions on page24.<
The front airbags help protect the driver and
front passenger by responding to frontal
impacts in which safety belts alone cannot pro-
vide adequate restraint. When needed, the
head and side airbags help provide protection in
the event of side impact. The relevant side air-bag supports the side upper body area. The
respective head air bag supports the head.
The airbags are deliberately not triggered in
every impact situation, e.g. less severe acci-
dents, certain roll-over situations or rear-end
collisions.
Labels in the rear door opening should
indicate the status of your rear seat side
airbags. If you are uncertain of their status, or
wish to have the airbags activated or deacti-
vated, please contact your BMW Sports Activity
Vehicle Center.<
For information on the correct sitting position,
refer to page24.
Do not apply adhesive materials to the
cover panels of the airbags, cover them or
modify them in any other way.
Do not attempt to remove the airbag retention
system from the vehicle. Never modify or
tamper with either the wiring or the individual
components in the airbag system. This cate-
gory includes the upholstery in the center of the
steering wheel, on the instrument cluster, the
side trim panels on the doors, and the roof pil-
lars along with the sides of the headliner. Do not
attempt to remove or dismantle the steering
wheel.
Do not touch the individual components
directly after the system has been triggered,
because there is a danger of burns. When there
are malfunctions, when deactivating, or after
the triggering of the airbag restraint system,
have the testing, repair, removal, and disposal
of the airbag generators executed only by your
BMW Sports Activity Vehicle Center or at a
workshop that works according to BMW repair
procedures with correspondingly trained per-
sonnel and has the required explosives
licenses. Unprofessional attempts to service
the system could lead to failure in an emer-
gency or undesired airbag activation, either of
which could result in personal injury.<
Airbag warning information is also provided on
the sun visors.
Page 53 of 126

Technology for comfort, convenience and safety
52
Automatic deactivation of front
passenger airbags
Your BMW has a seat occupation detection
system. By evaluating the weight on the front
passenger's seat, the system detects whether
or not the seat is occupied by a child in the
child-restraint system or an adult.
>When a child is seated in the child-restraint
system or with an empty seat, the front and
side airbags are deactivated on the passen-
ger side.
>When an adult is traveling in the front seat,
the front and side airbags remain active on
the passenger side.
Although not desired, it can occur in the
case of heavier children that the front
passenger airbags remain active or in the case
of very light adults or young persons that the
front passenger airbags are deactivated. In
these cases, have the person ride in the rear
seat, refer to Passenger airbag status lamp
below. Do not load the passenger seat with any
items in addition to the person to be trans-
ported. Do not fit seat covers, seat cushion pad-
ding, ball mats or other items onto the front pas-
senger seat unless they are specifically
r e c o m m e n d e d b y B M W . D o n o t p l a c e a n y i t e m s
under the seat. Otherwise, the function of the
seat occupation detection could be impaired.<
Operational readiness of airbag system
As of ignition key position 1, the warning lamp
lights up briefly, thus indicating the operational
readiness of the entire airbag system and the
safety belt tensioners.
Airbag system malfunction
>The warning lamp does not light up as of
ignition key position 1.
>The warning lamp lights up continuously.
Have the airbag system checked immedi-
ately if a malfunction occurs, as otherwise
there is a danger of the system failing to
respond in the expected manner to an impact
occurring within its normal response range.<
Passenger airbag status lamp
One of the illustrated indicator lamps is located
above the interior rearview mirror.
The indicator lamp indicates whether the front
passenger airbag system is active or not active/
OFF.
The indicator lamp is used only for the
front passenger airbag system. The indi-
cator lamp illuminates to show that the front
passenger airbag system is OFF/not active.<
>The indicator lamp goes out after a few sec-
onds.
The front passenger airbags are active, e.g.
when transporting an adult.
>The indicator lamp lights up continuously.
The front passenger airbags are deacti-
vated, e.g. when a child is traveling in the
vehicle in the child-restraint system or
when the seat is empty.
Find more information about passenger airbag
system and seat occupancy detection in sec-
tion Automatic deactivation of front passenger
airbags above.
Page 54 of 126

Reference
At a glance
Controls
Driving tips
Mobility
53
Lamps
Parking lamps/low beams
Parking lamps
The front, rear and side vehicle lighting
is switched on. You can use the parking
lamps for parking. For lighting on one
side for parking as an additional feature, refer to
page54.
Low beams
When you switch off the ignition with
the headlamps on, the headlamps go
out and only the parking lamps remain
on.
Lamp defective
The indicator lamp lights up.
At least one bulb of the exterior lighting
on the vehicle is defective.
Replacing bulbs, refer to page95.
Pathway lighting
When you activate the headlamp flasher after
parking the vehicle and switching off the lamps,
the low beams will come on for a brief period.
You may also have this function deacti-
vated if you wish.<
Lights on warning
If you turn the ignition key to position 0, an
acoustic signal sounds when you open the
driver's door for a few seconds to remind you
that the lights have not yet been switched off
.
Daytime driving lamps*
You can leave the light switch in the second
position: all external lamps go out when you
switch off the ignition.
Always observe all applicable laws governing
the use of daytime driving lamps.
You can switch on the parking lamps when
needed using the standard procedure
described under Parking lamps.
You can have the daytime driving lamps
activated on your vehicle.<
Automatic headlamp control*
When you set the switch to this posi-
tion, the system activates and switches
on and off the low beams in response to
changes in ambient light conditions, for
instance, in tunnels, at dawn and dusk, and in
rain and snow.
The low beams remain switched on
regardless of the ambient light when you
switch on the front fog lamps.<
Automatic headlamp control cannot
serve as a substitute for the driver's judg-
ment in determining when the vehicle lamps
should be switched on. For example, the sys-
tem cannot detect fog. To avoid safety risks,
you should always switch on the lamps manu-
ally under these conditions.<
You can have the sensitivity of the head-
lamp control adjusted.<
Adaptive Head Light*
The concept
Adaptive Head Light is a variable headlamp
control system that enables better illumination
of the road surface. Depending on the steering
angle and other assumptions, the light from the
headlamp follows the course of the road.
Page 55 of 126

Lamps
54
Activating Adaptive Head Light
In ignition key position 2, turn the light
switch to the position Automatic head-
lamp control, refer to page53.
To avoid blinding oncoming traffic, the Adaptive
Head Light
>is not active when driving in reverse
>i s o n l y a c t i v e t o w a r d p a s s e n g e r ' s s i d e w h e n
stationary
Malfunction
The LED next to the symbol for automatic head-
lamp control flashes. Adaptive Head Light is
faulty or has failed. Have the system checked as
soon as possible.
High beams/roadside parking
lamps
1High beams
2Headlamp flasher
3Roadside parking lamps
Roadside parking lamps, left or right*
You also enjoy the option of lighting up just one
side of your vehicle when parking. When using
this function, comply with national regulations:
In ignition key position 0 or with ignition key
removed:
Move the lever into the corresponding turn sig-
nal position.
The roadside parking lamps drain the bat-
tery. Avoid using for longer periods, as
otherwise it may not be possible to start the
engine.<
Fog lamps*
Briefly press the button once again to switch
on/off.
The parking lamps or low beams must
be switched on for the fog lamps to
operate. The green indicator lamp
lights up when the fog lamps are.
If the automatic headlamp control is acti-
vated, the low beams will come on auto-
matically when you switch on the fog lamps.<
Instrument lighting
Turn the serrated dial to adjust the illumination
intensity.
Page 56 of 126
Reference
At a glance
Controls
Driving tips
Mobility
55
Interior lamps
The interior lamps operate automatically.
If you desire, the interior lamps are
switched on after mechanical unlocking
of the vehicle. You may have this function acti-
vated/deactivated if you wish.<
If the interior lamps remain switched on
after locking the vehicle, one of the doors
or the tailgate may not be completely closed.<
Switching interior lamps on and off
Briefly press button 1.
If you want the interior lamps to remain off all
the time, press and hold the button for approx.
3seconds.
Press the button briefly to revert to normal
operation.
You can have soft dimming of the interior
lamps set.<
Front reading lamps*
Switch on and off with buttons 2.
Rear reading lamps*
Switch on and off with the button.To avoid discharging the battery, all of the
vehicle's interior lamps are automatically
extinguished approx. 15 minutes after the igni-
tion is switched off.<
 1
1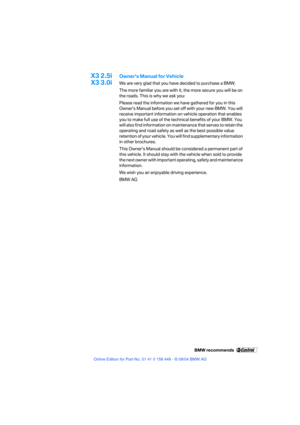 2
2 3
3 4
4 5
5 6
6 7
7 8
8 9
9 10
10 11
11 12
12 13
13 14
14 15
15 16
16 17
17 18
18 19
19 20
20 21
21 22
22 23
23 24
24 25
25 26
26 27
27 28
28 29
29 30
30 31
31 32
32 33
33 34
34 35
35 36
36 37
37 38
38 39
39 40
40 41
41 42
42 43
43 44
44 45
45 46
46 47
47 48
48 49
49 50
50 51
51 52
52 53
53 54
54 55
55 56
56 57
57 58
58 59
59 60
60 61
61 62
62 63
63 64
64 65
65 66
66 67
67 68
68 69
69 70
70 71
71 72
72 73
73 74
74 75
75 76
76 77
77 78
78 79
79 80
80 81
81 82
82 83
83 84
84 85
85 86
86 87
87 88
88 89
89 90
90 91
91 92
92 93
93 94
94 95
95 96
96 97
97 98
98 99
99 100
100 101
101 102
102 103
103 104
104 105
105 106
106 107
107 108
108 109
109 110
110 111
111 112
112 113
113 114
114 115
115 116
116 117
117 118
118 119
119 120
120 121
121 122
122 123
123 124
124 125
125