Page 25 of 126

Adjustments
24
Adjustments
Sitting safely
The ideal sitting position can make a vital con-
tribution to relaxed driving that is as fatigue-free
as possible. The sitting position plays an impor-
tant role together with the safety belts, head
restraints and airbags in providing occupants
with maximum levels of passive safety in an
accident. Therefore, observe the following
instructions, as otherwise the protective func-
tion of the safety systems may be impaired.
For additional information on transporting chil-
dren safely, refer to page31.
Airbags
Always maintain an adequate distance
between yourself and the airbags. Always
hold the steering wheel by its rim with hands at
the 9 o'clock and 3 o'clock positions, to mini-
mize the risk of injuries to your hands and arms
in the event of airbag deployment.
No one and nothing is to come between the air-
bags and the seat occupant.
Do not use the cover of the front airbag on the
front passenger side as a storage area. Make
sure that the front passenger is correctly seated
and does not place feet or legs against the
instrument panel, as otherwise leg injuries can
result if the front airbag is triggered. Never let an
occupant's head rest near or on a side airbag
because the inflating airbag could cause a seri-
ous or fatal injury.<
Even if you adhere to all the instructions, inju-
ries resulting from contact with airbags cannot
be fully excluded, depending on the circum-
stances. The ignition and inflation noise may
provoke a mild – usually temporary – hearing
loss in extremely sensitive individuals.
For airbag locations and additional information
on airbags, refer to page31.
Safety belts
Make sure the safety belts are worn in all occu-
pied seats every time you drive. Although air-
bags enhance safety by providing added pro-
tection, they are not a substitute for safety
belts.
Your vehicle has five seats that are all equipped
with a safety belt.
Occupants should sit upright and be
properly restrained at all times: infants
and small children in appropriate child-restraint
systems; larger children and adults using the
safety belts.
Never allow more than one person to wear a sin-
gle safety belt. Infants and children must not
ride on a lap.
Expectant mothers should always wear their
safety belts, taking care to position the lap belt
against the lower hips, where it will not exert
pressure against the abdominal area. The
safety belt must not rest against the neck, nor
be wedged in any way or permitted to rub
against sharp edges. Avoid twisting the belt
while routing it snugly across the hips and
shoulder, as close to the body as possible, with-
out resting against hard or fragile objects. Oth-
erwise, in the event of a frontal impact, a loose
lap belt could slide over your hips, leading to
abdominal injury. Avoid wearing clothing that
prevents the belt from fitting properly and pull
the shoulder belt upward periodically to read-
just the tension across your lap in order to avoid
a reduction in the restraining action of the
safety belt.<
If the middle safety belt in the rear is used, then
the wider backrest must be secured, refer to
page67, otherwise, the safety belt cannot exert
any restraining action.
For fastening safety belts, refer to page27.
Page 26 of 126

Reference
At a glance
Controls
Driving tips
Mobility
25
Seats
Note before adjusting
Never try to adjust your seat while operat-
ing the vehicle. The seat could respond
with unexpected movement, and the ensuing
loss of vehicle control could lead to an accident.
On the passenger side as well, do not recline
the backrest too far while the vehicle is being
driven, as otherwise there is a danger of sliding
under the safety belt during an accident, elimi-
nating the protection normally provided by the
belt.<
Please observe the information on using safety
belts provided on page27 and the information
on the head restraints on page25.
Seat adjustment
To ensure that the safety systems con-
tinue to provide optimized protection,
please observe the adjustment instructions
above.<
1Longitudinal direction
Pull the lever and slide the seat into the
desired position.
After you release the lever, move the seat
forward or backward slightly so that it
engages fully.
2Height
Pull the lever and apply weight to or remove
weight from the seat as required.3Backrest
Pull the lever and apply weight to or remove
weight from the backrest as required.
Adjusting sports seat*
You can also adjust the tilt and the thigh
support:
1Upward tilt
Pull the lever as many times as required to
set the desired tilt.
2Downward tilt
Press the lever as many times as required to
set the desired tilt.
3Thigh support
Pull the lever and move the thigh support in
a longitudinal direction.
Head restraints
Head restraints reduce the risk of injury to
cervical vertebrae when accidents occur.
Adjust the head restraints so that their middles
are approximately at ear height.<
Page 27 of 126

Adjustments
26
Adjustments
Height adjustment:
>To raise: pull upward.
>To lower: press button, arrow 1, and slide
head restraint downward.
Front head restraint tilt angle: adjust by tilting.
Removing front head restraint
1.Pull the head restraint upward to the stop.
2.Press button, arrow 1, and pull head
restraint all the way out.
Installing front head restraint
1.Press button, arrow1, and slide the head
restraint into its sockets.
2.Adjust the head restraint.
Power seat*
To ensure that the safety systems con-
tinue to provide optimal protection,
please observe the adjustment instructions on
page24.<
1Tilt
2Longitudinal direction
3Height
4Backrest Setting the head restraint manually, refer to
above paragraph.
Lumbar support*
You can also adjust the contours of the backrest
to obtain additional support in the lumbar
region.
The upper hips and spinal column receive sup-
plementary support to help you maintain a
relaxed, upright sitting position.
>To increase or decrease curvature: press
switch forward or back.
>To move curvature up or down: press
switch up or down.
Seat and mirror memory*
You can store and select three different adjust-
ment settings for the driver's seat and exterior
mirrors.
The adjustment of the lumbar support is not
stored in the memory.
Storing
1.Turn the ignition key to position 1 or 2.
2.Set the desired seat and exterior mirror
position.
Page 28 of 126

Reference
At a glance
Controls
Driving tips
Mobility
27
3.Press the MEMORY button:
The indicator lamp in the button lights up.
4.Press the desired memory button 1, 2 or3:
The indicator lamp goes out.
Requesting a stored setting
Do not request a position from the mem-
ory while the vehicle is moving, as other-
wise there is a risk of accident from unexpected
seat movement.<
Convenience mode
1.Open the driver's door after unlocking or
turn the ignition key to position 1.
2.Briefly press the desired memory button 1,
2 or3.
The system immediately cancels the
adjustment procedure when you press one
of the seat adjustment buttons or use one of
the memory buttons.
Safety feature
1.Close the driver's door and turn the ignition
key to position 0 or 2.
2.Press the desired memory button 1, 2 or3
and maintain pressure until the adjustment
process has been completed.
If you press the
MEMORY button acci-
dentally:
Press the button a second time – the indicator
lamp goes out.<
You can have your vehicle programmed
to automatically recall your own individual
adjustment settings for the seat and exterior
mirror position whenever you use your personal
remote control to unlock the vehicle.<
If you make use of this adjustment, be
sure that the footwell behind the driver's
seat is unobstructed before unlocking the vehi-
cle. If you fail to do so, any persons, animals or
objects behind the seat could be injured or
damaged by a rearward movement of the
seat.<
Heated seats*
The seat cushion and backrest can be heated
when the ignition key is in position 2.
To request different temperature levels: press
the button repeatedly.
To switch off from a higher heat setting: press
the button and hold it slightly longer.
Safety belts
To ensure that the safety systems con-
tinue to provide optimal protection,
please follow the instructions on page24.<
Make sure the safety belts are worn in all occu-
pied seats every time you drive. Although air-
bags enhance safety by providing added pro-
tection, they are not a substitute for safety
belts.
Fastening
Make sure you hear the latch plate engage in
the belt buckle.
Releasing
1.Press the red button in the belt buckle.
2.Hold the belt firmly.
Page 29 of 126

Adjustments
28 3.Guide the belt back into its reel.
The upper shoulder strap's anchorage point will
be in the correct position for seat occupants of
every build if the seat is correctly adjusted, refer
to page24.
The two rear safety belt buckles integrated into
the rear seat are for passengers sitting on the
left and right. The belt buckle embossed with
the word CENTER is intended exclusively for
use by passengers riding in the center posi-
tion.<
Safety belt reminder for front seats
The indicator lamp flashes or lights up.
In addition, a signal sounds. Please
make sure that the safety belts are
being worn correctly.
The safety belt reminder is activated if the
safety belt on the driver's side has not yet been
fastened.
At speeds greater than 5 mph/8 km/h, the
safety belt reminder is also activated if the pas-
senger side safety belt has not yet been fas-
tened, if heavy objects are placed on the pas-
senger's seat, or if the front passenger's safety
belt is released.
Damage to safety belts
If the safety belts are damaged or
stretched in an accident: have the entire
belt system, including the tensioning mecha-
nisms, replaced at your BMW Sports Activity
Vehicle Center or at a workshop that works
according to BMW repair procedures with cor-
respondingly trained personnel. Have the belt
anchorage points inspected for damage at the
same time. Failure to observe this precaution
may prevent the safety belts from effectively
providing optimal protection when needed. If a
child-restraint system was in the vehicle during
an accident, consult the manufacturer's
instructions regarding replacement.<
Steering wheel
Adjustments
Do not adjust the steering wheel while the
vehicle is moving. There is a risk of acci-
dent from unexpected movement.<
1.Fold the clamping lever downward.
2.Adapt the steering wheel in the longitudinal
direction and height of the seat position.
3.Fold the clamping lever back up.
Steering wheel heater*
The button for steering wheel heater is located
on the steering wheel, refer to page12.
Steering wheel heater: switching on/off
The steering wheel heater operates as of igni-
tion key position 2.
Press the button to activate or deactivate this
system.
The indicator lamp within the button lights up
when the steering wheel heater is in operation.
Mirrors
Exterior mirrors
The mirror on the passenger side fea-
tures a lens with a more convex surface
than the mirror installed on the driver's side.
When estimating the distance between yourself
and other traffic, bear in mind that the objects
reflected in the mirror are closer than they
appear. This means that estimations of the
Page 30 of 126

Reference
At a glance
Controls
Driving tips
Mobility
29
distance to following traffic should not be
regarded as precise.<
1Adjustments
2Switching over to the other mirror or to the
automatic parking function
*
Storing the mirror positions, refer to Seat and
mirror memory on page26.
To prevent the exterior mirrors on this
vehicle from being damaged, always fold
them in by hand before entering an automatic
car wash.<
Manual adjustments
You can also adjust the mirrors manually if need
be: by pressing the edges of the mirror glass.
Automatic heating
When the outside temperature falls below a
specified temperature, both outside mirrors are
automatically heated whenever the engine is
running or the ignition is switched on.
Tilting down passenger's mirror,
automatic parking function*
Activating
1.Select the driver's exterior mirror with
switch 1.
2.When you shift into reverse or move the
selector-lever into position R, the exterior
mirror glass on the front passenger side tilts
downward slightly. This allows the driver to
see the area immediately adjacent to the
vehicle – such as a curb – when parking, etc.
You can have the angle of downward tilt
set to depend on the key used.<
Deactivating
Select the front passenger's exterior mirror with
switch 1.
Interior rearview mirror
To reduce the dazzle effect of following vehi-
cles at night, turn the knob.
Page 31 of 126

Adjustments
30
Vehicle Memory, Key Memory
How the system functions
You have probably frequently wished that you
could configure individual functions of your
vehicle to reflect your own personal require-
ments. In developing your vehicle, BMW has
incorporated a number of options for personal
adjustment. You can have these programmed
at your BMW Sports Activity Vehicle Center.
There are vehicle-related and person-related
adjustments: Vehicle Memory and Key Mem-
ory. You can configure up to four different basic
adjustments for four different persons. The only
requirement is that each person uses his or her
own master key with remote control.
When your vehicle is unlocked with the remote
control, the vehicle recognizes the individual
user by means of a data exchange with the key,
and makes adjustments accordingly.
In order for you to distinguish between the mas-
ter keys with remote control, color-coded
decals are supplied together with the keys.
What the system can do
Your BMW Sports Activity Vehicle Center can
provide you with details on the capabilities of
the Vehicle Memory and Key Memory systems.
You will see this symbol throughout the
Owner's Manual. It is to remind you at
appropriate places of the settings that are avail-
able to you.<
Following configuration of memory func-
tions, vehicle operation may differ from
the description in the Owner's Manual. Should
you want to sell your BMW some day, please
remember to have the memory functions reset
to the factory default settings.<
Examples of Vehicle Memory functions
>Different acknowledgment signals to con-
firm locking/unlocking of the vehicle, refer
to page16.
>Activating/deactivating function for path-
way lighting, refer to page53.
>Activating/deactivating daytime driving
lamps, refer to page53.
>Setting measurement units for displays in
the instrument cluster for time, outside
temperature, distance driven and fuel con-
sumption, refer to page44.
>Active PDC Park Distance Control is indi-
cated by an acoustic sound signal when
reverse gear or selector lever position R is
engaged, refer to page46.
>The rear window defroster switches on
automatically, refer to page57.
>Different acknowledgment signals to con-
firm arming/disarming the alarm system,
refer to page22.
>After an ice warning has been issued, the
computer display returns to the previous
adjustment, refer to page44.
>Acoustic warning if the ignition key remains
in the ignition lock after the driver's door has
been opened, refer to page19.
Examples of Key Memory functions
>When unlocking, first unlock the driver's
door, then the entire vehicle, refer to
page17.
>Locking the vehicle after moving off, refer to
page18.
>Automatic adjustment of the driver's seat
and exterior mirror position for each person
when unlocking the vehicle, refer to
page27.
>Angle of downward tilt of mirror on passen-
ger side, refer to page29.
Page 32 of 126

Reference
At a glance
Controls
Driving tips
Mobility
31
Transporting children safely
The right place for children
Children always in the rear
Accident research shows that the safest place
for children in a vehicle is in the rear seat.
Older children should be tightly secured with a
safety belt, after they have outgrown a booster
seat that is appropriate for their age, height and
weight.
If your vehicle is equipped with rear side
airbags, do not allow children to lean
toward the door trim, as serious injuries could
occur if the side airbags are deployed and chil-
dren are too close to the airbags.<
Deactivating side airbags in the rear
Labels in the rear door opening should indicate
the status of your rear seat side airbags. If you
are uncertain of their status, or wish to have the
airbags activated or deactivated, please contact
your BMW Sports Activity Vehicle Center.
Child-restraint system in rear
Children under 13 years of age and chil-
dren less than 5 ft/150 cm tall should
always ride in the rear and the restraint systems
should be properly secured.<
Younger children should be secured in an
appropriate child restraint system that has been
first properly secured to the vehicle.
All rear seating positions in your vehicle meet
the recommendations of SAE J1819, an indus-
try-recommended practice for securing child-
restraint systems in motor vehicles.
Exception for the front passenger seat
Should it become necessary to use a
child-restraint system on the front pas-
senger seat, the airbags on the passenger side
must be deactivated. The passenger airbag
indicator lamp above the interior rearview mirror
must light up continuously. Otherwise, the front
passenger airbags remain active and there is considerable risk of injury to children if the air-
bags are triggered, even with a child-restraint
system. In this case, children should be seated
in the rear and the system should be checked at
your BMW Sport Activity Vehicle Center.<
Never install a rearward-facing child-
restraint system in the front passenger
seat of this vehicle if the passenger airbag is not
deactivated. If you do so, the child could be
severely injured when the airbag is triggered.
Your vehicle is equipped with an airbag supple-
mental restraint system for the front passenger.
Because the backrest on any rearward-facing
child-restraint system – of the kind designed for
infants under 1 year and 20 Ibs./9 kg – would be
within the airbag's deployment range, you
should never mount such a system in the front
passenger seat, since the impact of the airbag
against the child restraint's backrest could lead
to serious or fatal injuries.<
More information on automatic deactivation of
the front passenger airbags, refer to page52.
Installing child-restraint
systems
Before installing any child-restraint system or
child seat, read the following:
Observe the child-restraint system man-
ufacturer's instructions for selection,
installation and use of the child-restraint sys-
tem. Otherwise the degree of protection can be
reduced.
After an accident, have all parts of the relevant
vehicle safety belt system checked by a BMW
Sports Activity Vehicle Center and replaced if
necessary.<
Commercially-available child-restraint systems
are designed to be secured with a lap belt or
with the lap belt portion of a combination lap/
shoulder belt. Improperly or inadequately
installed restraint systems can increase the risk
 1
1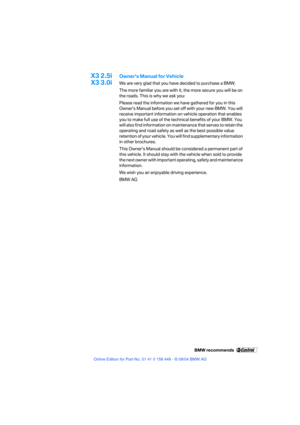 2
2 3
3 4
4 5
5 6
6 7
7 8
8 9
9 10
10 11
11 12
12 13
13 14
14 15
15 16
16 17
17 18
18 19
19 20
20 21
21 22
22 23
23 24
24 25
25 26
26 27
27 28
28 29
29 30
30 31
31 32
32 33
33 34
34 35
35 36
36 37
37 38
38 39
39 40
40 41
41 42
42 43
43 44
44 45
45 46
46 47
47 48
48 49
49 50
50 51
51 52
52 53
53 54
54 55
55 56
56 57
57 58
58 59
59 60
60 61
61 62
62 63
63 64
64 65
65 66
66 67
67 68
68 69
69 70
70 71
71 72
72 73
73 74
74 75
75 76
76 77
77 78
78 79
79 80
80 81
81 82
82 83
83 84
84 85
85 86
86 87
87 88
88 89
89 90
90 91
91 92
92 93
93 94
94 95
95 96
96 97
97 98
98 99
99 100
100 101
101 102
102 103
103 104
104 105
105 106
106 107
107 108
108 109
109 110
110 111
111 112
112 113
113 114
114 115
115 116
116 117
117 118
118 119
119 120
120 121
121 122
122 123
123 124
124 125
125