Page 52 of 165
Press right-hand turn indic-
ator button2.
The turn indicators are
cancelled automatically
after you have ridden for ap-
proximately 10 seconds, or
covered a distance of about
200 m.
Right-hand turn indicators
switched on.
Telltale light for right-hand
turn indicator flashes.
Cancelling the turn indic-
atorsPress cancel button 3.
Flashing turn indicators
switched off.
Turn indicator telltale light is
off.SeatRemoving the seatMake sure the ground is
level and firm and place the
motorcycle on its stand. Turn the key counter-
clockwise in the seat
lock.
Press the seat down at the
same time.
450zOperation
Page 78 of 165

Refuelling
Fuel is highly flammable.
A naked flame close to
the fuel tank can cause a fire
or explosion.
Do not smoke. Never bring
a naked flame near the fuel
tank.
Fuel expands when hot.
Fuel escaping from an
overfilled tank could make its
way onto the rear tyre. This
could cause a fall.
Do not fill the tank past the
bottom edge of the filler
neck.
Fuel attacks plastics,
which become dull or
unsightly.
Wipe off plastic parts immedi-
ately if they come into contact
with fuel. Leaded fuel will destroy
the catalytic converter.
Use only unleaded fuel.
Make sure the ground is
level and firm and place the
motorcycle on its stand.
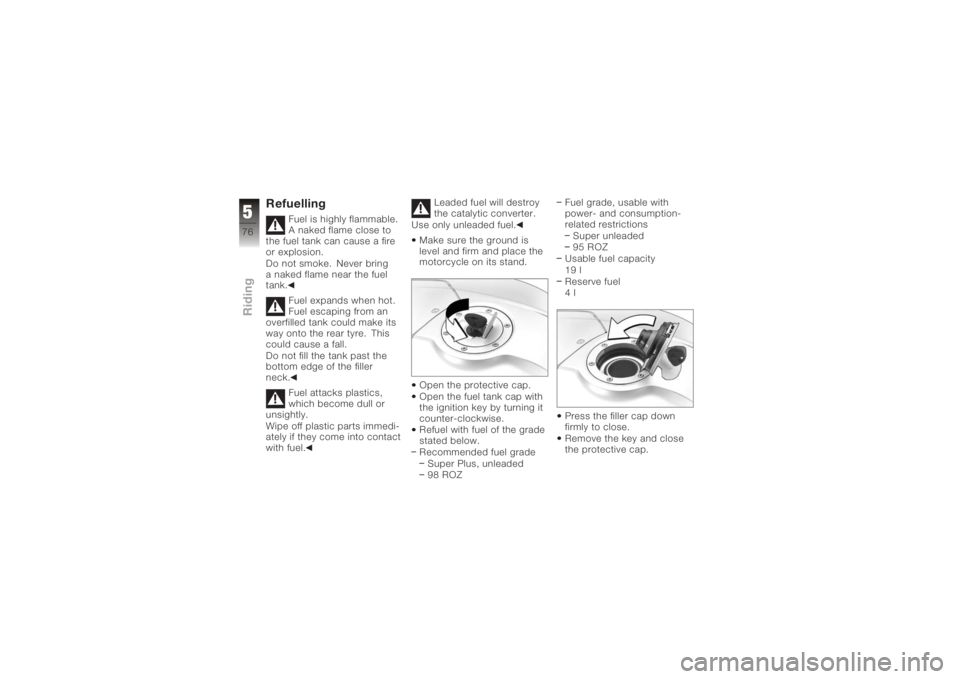
Open the protective cap.
Open the fuel tank cap with
the ignition key by turning it
counter-clockwise.
Refuel with fuel of the grade
stated below.
Recommended fuel gradeSuper Plus, unleaded
98 ROZ Fuel grade, usable with
power- and consumption-
related restrictions
Super unleaded
95 ROZ
Usable fuel capacity
19 l
Reserve fuel
4l
Press the filler cap down
firmly to close.
Remove the key and close
the protective cap.
576zRiding
Page 115 of 165
Make sure the ground is
level and firm and place the
motorcycle on its stand.
Switch off the ignition.
Turn cover1counter-
clockwise and remove
it. Disconnect plug
2.
Release spring clip 3at left
and right and swing it up. Remove bulb
4.
Installation of the bulb is the
reverse of the removal pro-
cedure.
Use a clean, dry cloth to
hold the new bulb.
7113zMaintenance
Page 116 of 165
When installing, make sure
that tab5is pointing up.Replacing high-beam
headlight bulb
If it is not standing firmly,
the motorcycle could
topple in the course of the
operations described below.
Always make sure that the
motorcycle is stable and
firmly supported.
Turn the handlebars to
the left to facilitate ac-
cess. Make sure the ground is
level and firm and place the
motorcycle on its stand.
Switch off the ignition.
Turn cover
1counter-
clockwise and remove
it. Disconnect plug
2.
Release spring clip 3at left
and right and swing it up.
7114zMaintenance
Page 118 of 165

Remove the bulb holder4
from the headlight hous-
ing by turning it counter-
clockwise.
Twist the bulb 5to remove
it from the bulb holder.
Installation of the bulb is the
reverse of the removal pro-
cedure.
Use a clean, dry cloth to
hold the new bulb.Replacing the brake light
and rear light bulbs
If it is not standing firmly,
the motorcycle could
topple in the course of the
operations described below.
Always make sure that the
motorcycle is stable and
firmly supported.
Make sure the ground is
level and firm and place the
motorcycle on its stand.
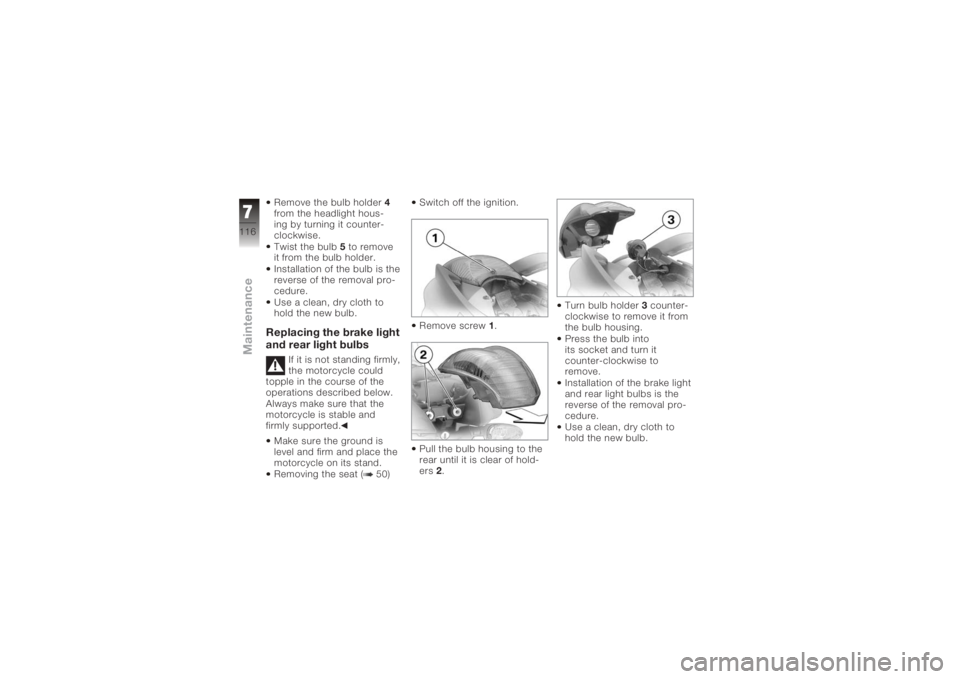
Removing the seat ( 50) Switch off the ignition.
Remove screw
1.
Pull the bulb housing to the
rear until it is clear of hold-
ers 2. Turn bulb holder
3counter-
clockwise to remove it from
the bulb housing.
Press the bulb into
its socket and turn it
counter-clockwise to
remove.
Installation of the brake light
and rear light bulbs is the
reverse of the removal pro-
cedure.
Use a clean, dry cloth to
hold the new bulb.
7116zMaintenance
Page 119 of 165
Replacing front turn in-
dicator bulb
If it is not standing firmly,
the motorcycle could
topple in the course of the
operations described below.
Always make sure that the
motorcycle is stable and
firmly supported.
Make sure the ground is
level and firm and place the
motorcycle on its stand.
Switch off the ignition.
Remove screw 1. Pull the bulb housing out
of the mirror housing at the
threaded-fastener side.
Remove the bulb holder
2
from the bulb housing by
turning it counter-clockwise. Remove the bulb
3from the
bulb holder.
Installation of the bulb is the
reverse of the removal pro-
cedure.
Use a clean, dry cloth to
hold the new bulb.
Replacing rear turn in-
dicator bulb
If it is not standing firmly,
the motorcycle could
topple in the course of the
operations described below.
Always make sure that the
motorcycle is stable and
firmly supported.
Make sure the ground is
level and firm and place the
motorcycle on its stand.
Switch off the ignition.
7117zMaintenance
Page 120 of 165

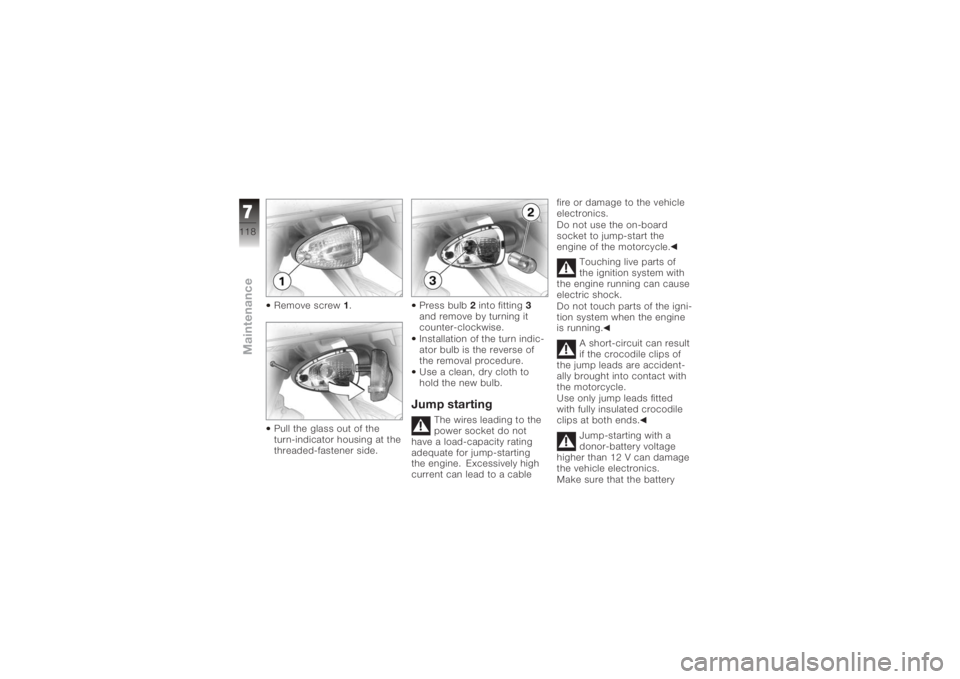
Remove screw1.
Pull the glass out of the
turn-indicator housing at the
threaded-fastener side. Press bulb
2into fitting 3
and remove by turning it
counter-clockwise.
Installation of the turn indic-
ator bulb is the reverse of
the removal procedure.
Use a clean, dry cloth to
hold the new bulb.
Jump starting
The wires leading to the
power socket do not
have a load-capacity rating
adequate for jump-starting
the engine. Excessively high
current can lead to a cable fire or damage to the vehicle
electronics.
Do not use the on-board
socket to jump-start the
engine of the motorcycle.
Touching live parts of
the ignition system with
the engine running can cause
electric shock.
Do not touch parts of the igni-
tion system when the engine
is running.
A short-circuit can result
if the crocodile clips of
the jump leads are accident-
ally brought into contact with
the motorcycle.
Use only jump leads fitted
with fully insulated crocodile
clips at both ends.
Jump-starting with a
donor-battery voltage
higher than 12 V can damage
the vehicle electronics.
Make sure that the battery
7118zMaintenance
Page 122 of 165

Be sure to read and com-
ply with the instructions for
charging the battery on the
following pages
Do not turn the battery up-
side downIf the battery is not dis-
connected, the on-board
electronics (e.g. clock, etc.)
gradually drain the battery.
This can cause the battery to
run flat. If this happens, war-
ranty claims will not be ac-
cepted.
If the motorcycle is to be out
of use for more than four
weeks, disconnect the battery
or connect a suitable trickle
charger to the battery.
BMW Motorrad
has developed a
trickle-charger specially
designed for compatibility
with the electronics of your
motorcycle. Using this charger, you can keep the
battery charged during long
periods of disuse, without
having to disconnect the
battery from the motorcycle's
on-board systems. You can
obtain additional information
from your authorised
BMW Motorrad dealer.
Charging battery when
connected
Charging the connec-
ted battery directly at the
battery terminals can damage
the vehicle electronics.
Always disconnect the battery
from the on-board circuits be-
fore recharging it with a char-
ger connected directly to the
battery posts.
If you switch on the ig-
nition and the multifunc-
tion display and telltale lights
fail to light up, the battery is
completely flat. Attempting to charge a completely flat bat-
tery via the on-board socket
can cause damage to the mo-
torcycle's electronics.
If a battery has discharged to
the extent that it is completely
flat, it has to be disconnec-
ted from the on-board circuits
and charged with the char-
ger connected directly to the
battery posts.
Only chargers suitable
for this mode of char-
ging can be used to recharge
the battery via the on-board
socket. Unsuitable chargers
could cause damage to the
motorcycle's on-board elec-
trics.
Use BMW chargers with
the part numbers 71 60
7 688 864 (220 V) or, as
applicable, 71 60 7 688 865
(110 V). If you are in doubt,
disconnect the battery from
the on-board systems and
7120zMaintenance