2005 BMW 645CI CONVERTIBLE check control message
[x] Cancel search: check control messagePage 13 of 217
Cockpit
12
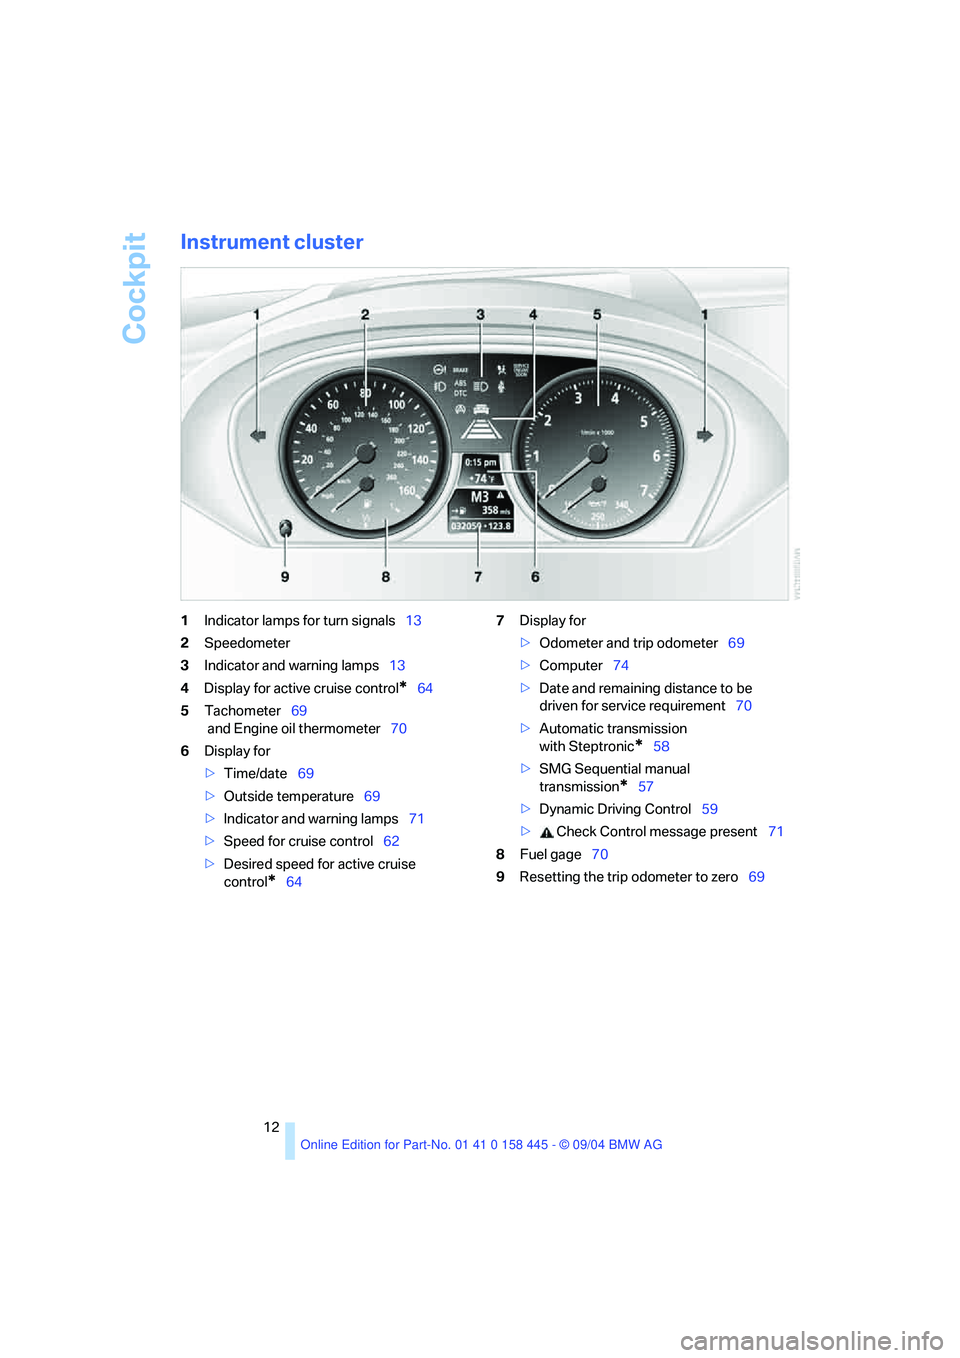
Instrument cluster
1Indicator lamps for turn signals13
2Speedometer
3Indicator and warning lamps13
4Display for active cruise control
*64
5Tachometer69
and Engine oil thermometer70
6Display for
>Time/date69
>Outside temperature69
>Indicator and warning lamps71
>Speed for cruise control62
>Desired speed for active cruise
control
*647Display for
>Odometer and trip odometer69
>Computer74
>Date and remaining distance to be
driven for service requirement70
>Automatic transmission
with Steptronic
*58
>SMG Sequential manual
transmission
*57
>Dynamic Driving Control59
> Check Control message present71
8Fuel gage70
9Resetting the trip odometer to zero69
Page 14 of 217
At a glance
13Reference
Controls
Driving tips
Communications
Navigation
Entertainment
Mobility
Indicator and warning lamps
The concept
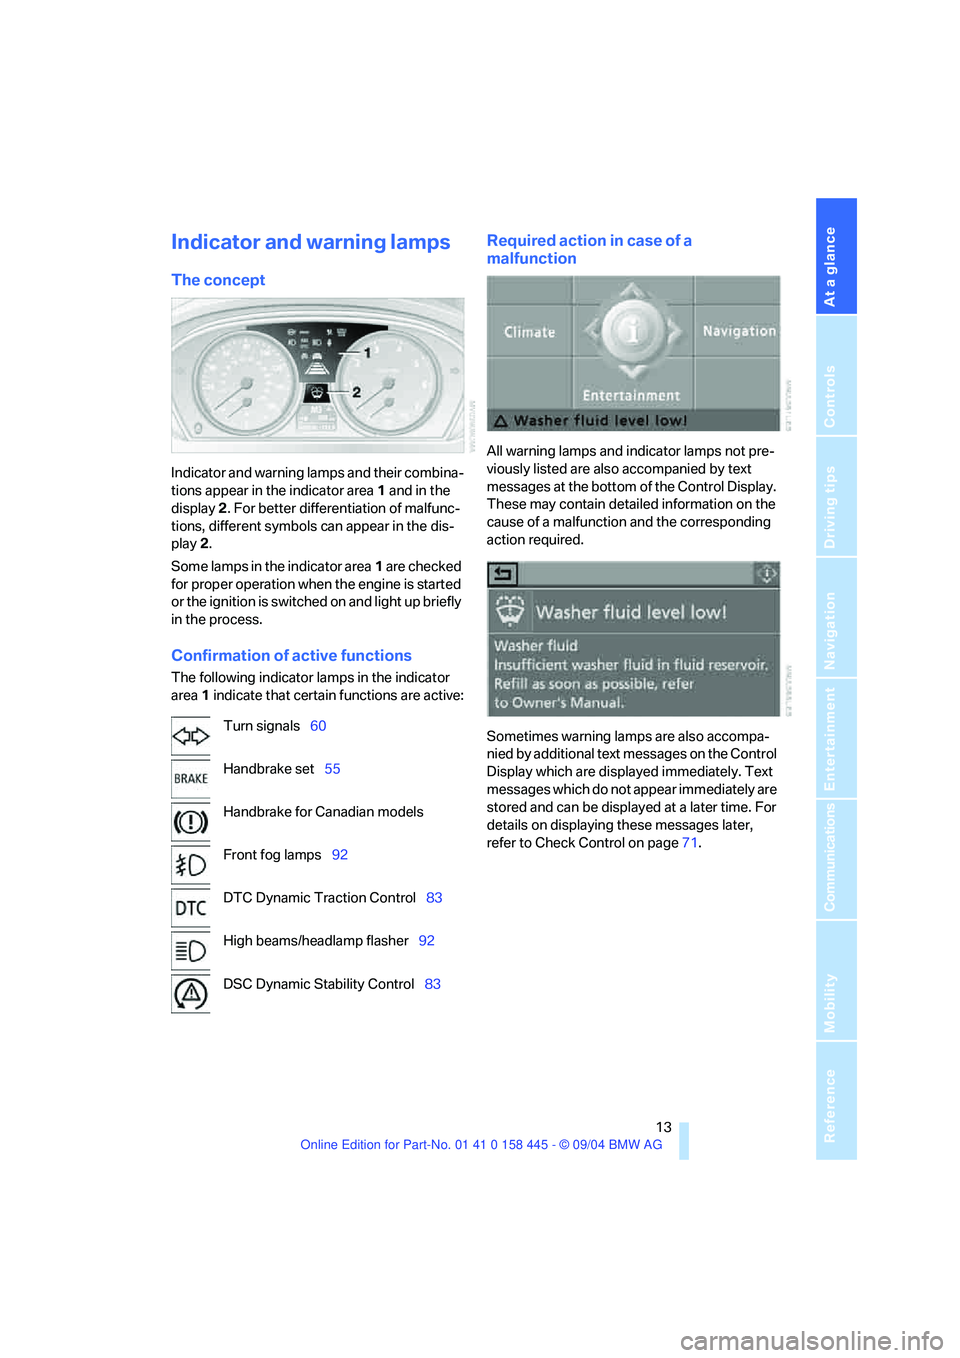
Indicator and warning lamps and their combina-
tions appear in the indicator area1 and in the
display2. For better differentiation of malfunc-
tions, different symbols can appear in the dis-
play 2.
Some lamps in the indicator area1 are checked
for proper operation when the engine is started
or the ignition is switched on and light up briefly
in the process.
Confirmation of active functions
The following indicator lamps in the indicator
area1 indicate that certain functions are active:
Required action in case of a
malfunction
All warning lamps and indicator lamps not pre-
viously listed are also accompanied by text
messages at the bottom of the Control Display.
These may contain detailed information on the
cause of a malfunction and the corresponding
action required.
Sometimes warning lamps are also accompa-
nied by additional text messages on the Control
Display which are displayed immediately. Text
messages which do not appear immediately are
stored and can be displayed at a later time. For
details on displaying these messages later,
refer to Check Control on page71. Turn signals60
Handbrake set55
Handbrake for Canadian models
Front fog lamps92
DTC Dynamic Traction Control83
High beams/headlamp flasher92
DSC Dynamic Stability Control83
Page 21 of 217
Control Center
20
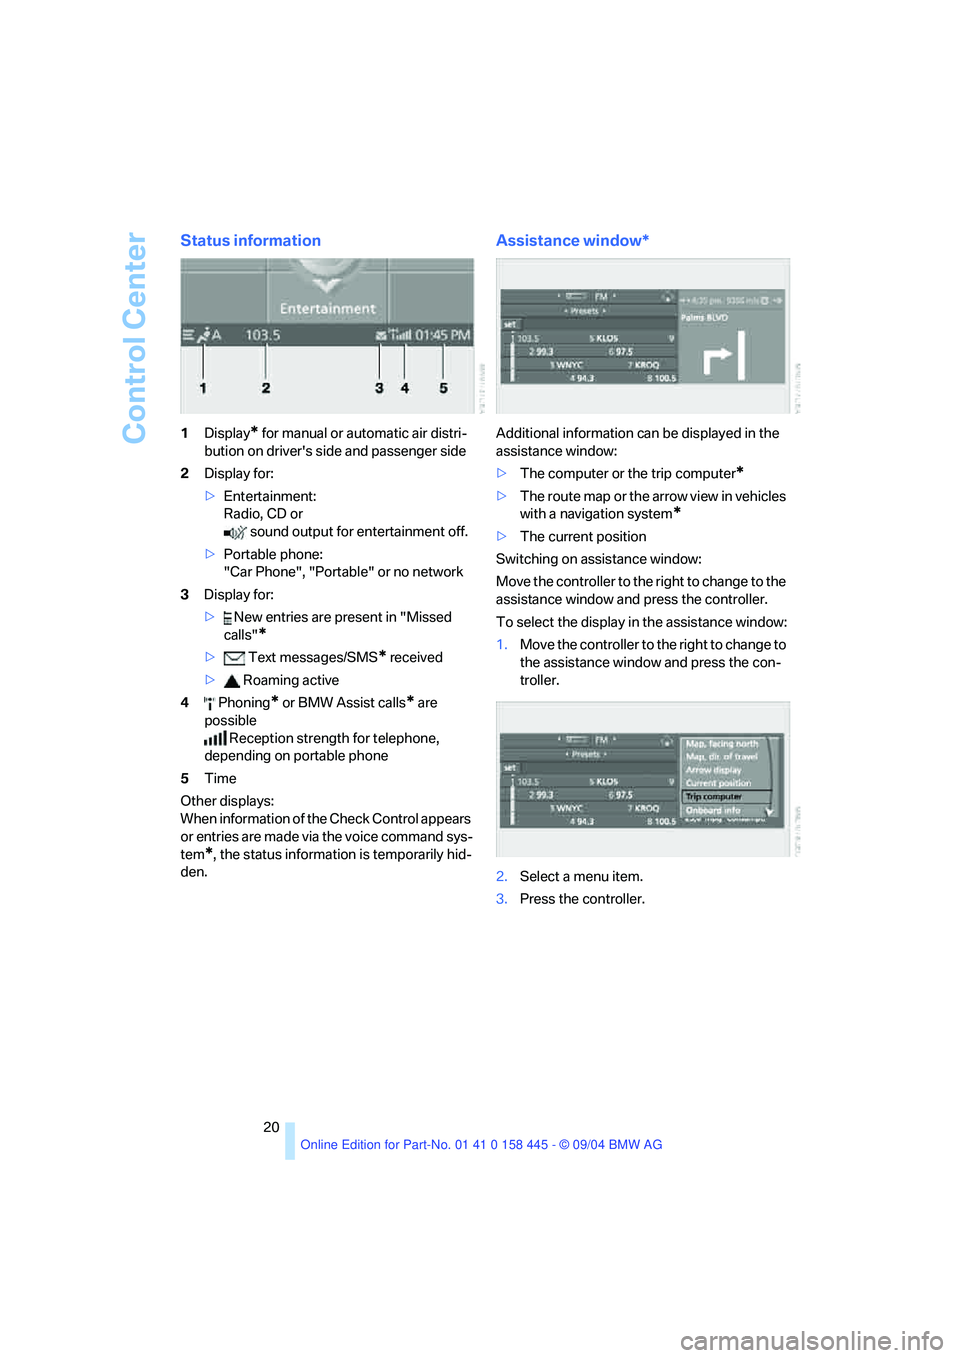
Status information
1Display* for manual or automatic air distri-
bution on driver's side and passenger side
2Display for:
>Entertainment:
Radio, CD or
sound output for entertainment off.
>Portable phone:
"Car Phone", "Portable" or no network
3Display for:
> New entries are present in "Missed
calls"
*
> Text messages/SMS* received
> Roaming active
4 Phoning
* or BMW Assist calls* are
possible
Reception strength for telephone,
depending on portable phone
5Time
Other displays:
When information of the Check Control appears
or entries are made via the voice command sys-
tem
*, the status information is temporarily hid-
den.
Assistance window*
Additional information can be displayed in the
assistance window:
>The computer or the trip computer
*
>The route map or the arrow view in vehicles
with a navigation system
*
>The current position
Switching on assistance window:
Move the controller to the right to change to the
assistance window and press the controller.
To select the display in the assistance window:
1.Move the controller to the right to change to
the assistance window and press the con-
troller.
2.Select a menu item.
3.Press the controller.
Page 50 of 217
Controls
49Reference
At a glance
Driving tips
Communications
Navigation
Entertainment
Mobility
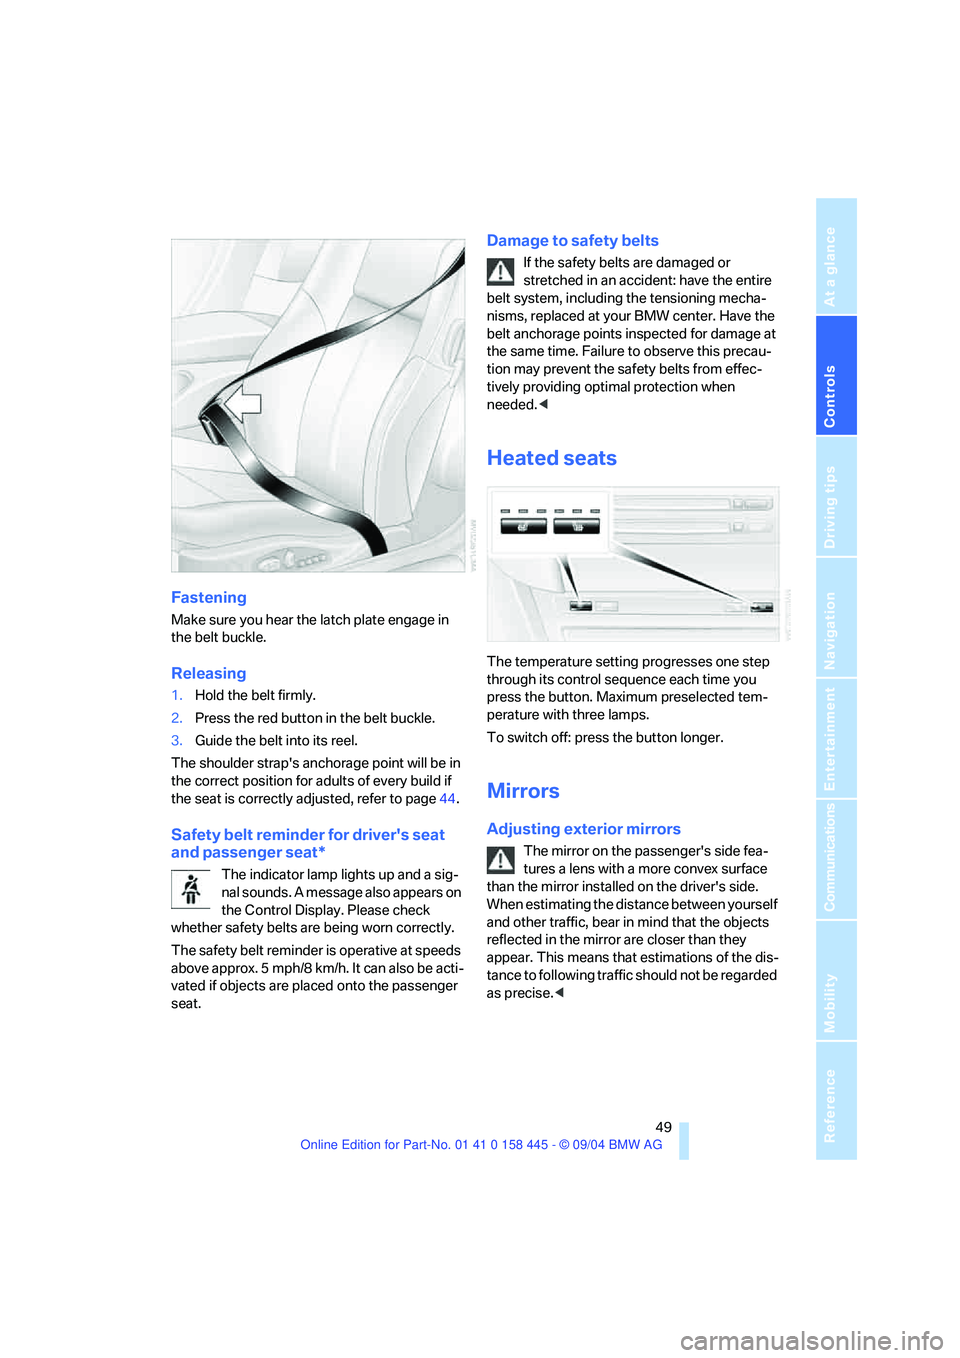
Fastening
Make sure you hear the latch plate engage in
the belt buckle.
Releasing
1.Hold the belt firmly.
2.Press the red button in the belt buckle.
3.Guide the belt into its reel.
The shoulder strap's anchorage point will be in
the correct position for adults of every build if
the seat is correctly adjusted, refer to page44.
Safety belt reminder for driver's seat
and passenger seat*
The indicator lamp lights up and a sig-
nal sounds. A message also appears on
the Control Display. Please check
whether safety belts are being worn correctly.
The safety belt reminder is operative at speeds
above approx. 5 mph/8 km/h. It can also be acti-
vated if objects are placed onto the passenger
seat.
Damage to safety belts
If the safety belts are damaged or
stretched in an accident: have the entire
belt system, including the tensioning mecha-
nisms, replaced at your BMW center. Have the
belt anchorage points inspected for damage at
the same time. Failure to observe this precau-
tion may prevent the safety belts from effec-
tively providing optimal protection when
needed.<
Heated seats
The temperature setting progresses one step
through its control sequence each time you
press the button. Maximum preselected tem-
perature with three lamps.
To switch off: press the button longer.
Mirrors
Adjusting exterior mirrors
The mirror on the passenger's side fea-
tures a lens with a more convex surface
than the mirror installed on the driver's side.
When estimating the distance between yourself
and other traffic, bear in mind that the objects
reflected in the mirror are closer than they
appear. This means that estimations of the dis-
tance to following traffic should not be regarded
as precise.<
Page 65 of 217
Driving
64
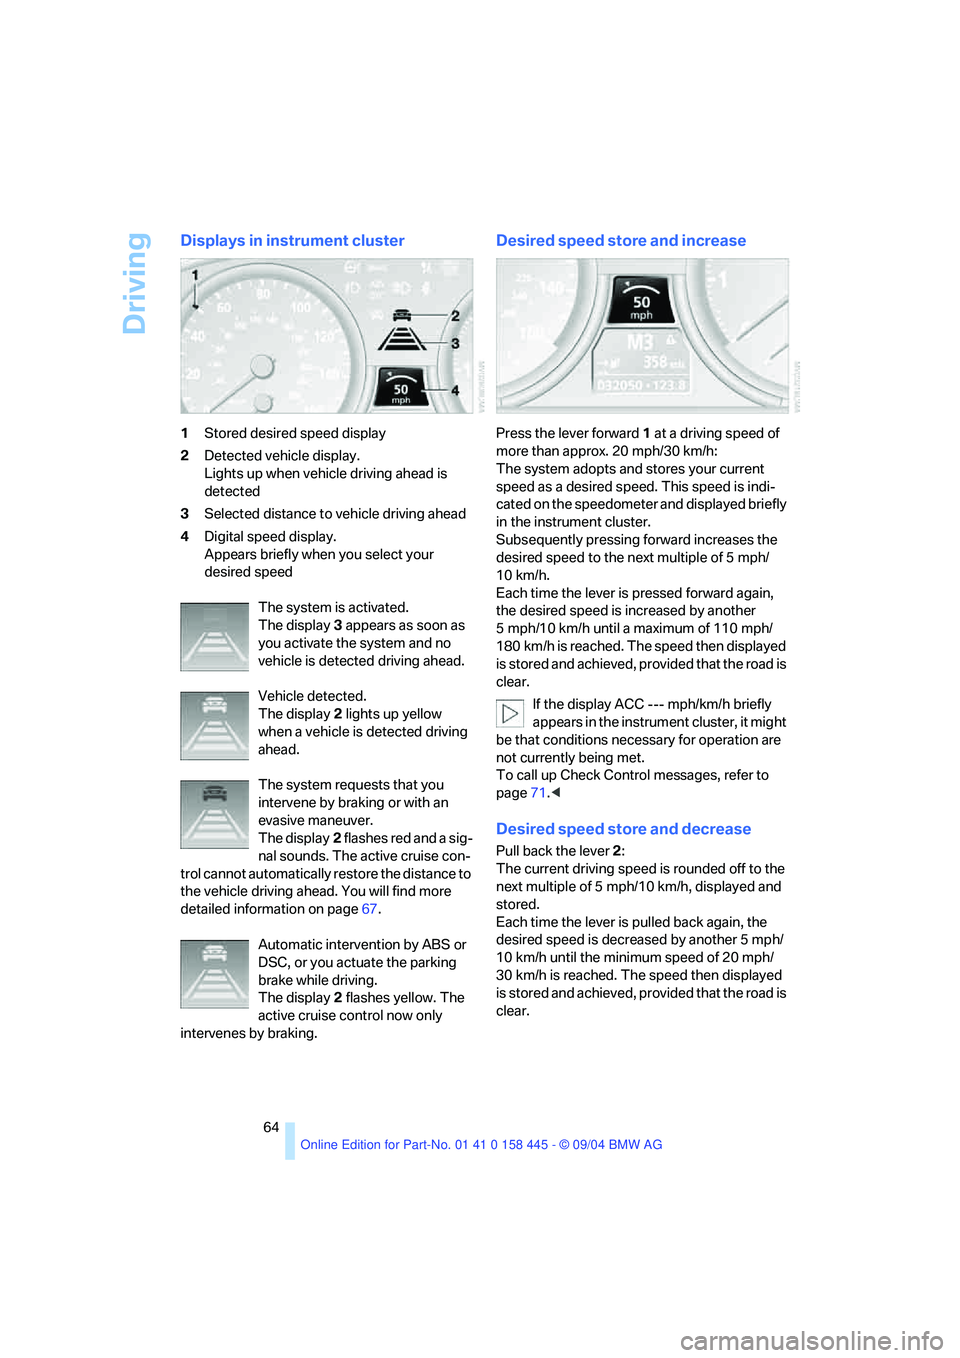
Displays in instrument cluster
1Stored desired speed display
2Detected vehicle display.
Lights up when vehicle driving ahead is
detected
3Selected distance to vehicle driving ahead
4Digital speed display.
Appears briefly when you select your
desired speed
The system is activated.
The display3 appears as soon as
you activate the system and no
vehicle is detected driving ahead.
Vehicle detected.
The display2 lights up yellow
when a vehicle is detected driving
ahead.
The system requests that you
intervene by braking or with an
evasive maneuver.
The display2 flashes red and a sig-
nal sounds. The active cruise con-
trol cannot automatically restore the distance to
the vehicle driving ahead. You will find more
detailed information on page67.
Automatic intervention by ABS or
DSC, or you actuate the parking
brake while driving.
The display2 flashes yellow. The
active cruise control now only
intervenes by braking.
Desired speed store and increase
Press the lever forward1 at a driving speed of
more than approx. 20 mph/30 km/h:
The system adopts and stores your current
speed as a desired speed. This speed is indi-
cated on the speedometer and displayed briefly
in the instrument cluster.
Subsequently pressing forward increases the
desired speed to the next multiple of 5 mph/
10 km/h.
Each time the lever is pressed forward again,
the desired speed is increased by another
5 mph/10 km/h until a maximum of 110 mph/
180 km/h is reached. The speed then displayed
is stored and achieved, provided that the road is
clear.
If the display ACC --- mph/km/h briefly
appears in the instrument cluster, it might
be that conditions necessary for operation are
not currently being met.
To call up Check Control messages, refer to
page71.<
Desired speed store and decrease
Pull back the lever2:
The current driving speed is rounded off to the
next multiple of 5 mph/10 km/h, displayed and
stored.
Each time the lever is pulled back again, the
desired speed is decreased by another 5 mph/
10 km/h until the minimum speed of 20 mph/
30 km/h is reached. The speed then displayed
is stored and achieved, provided that the road is
clear.
Page 69 of 217
Driving
68
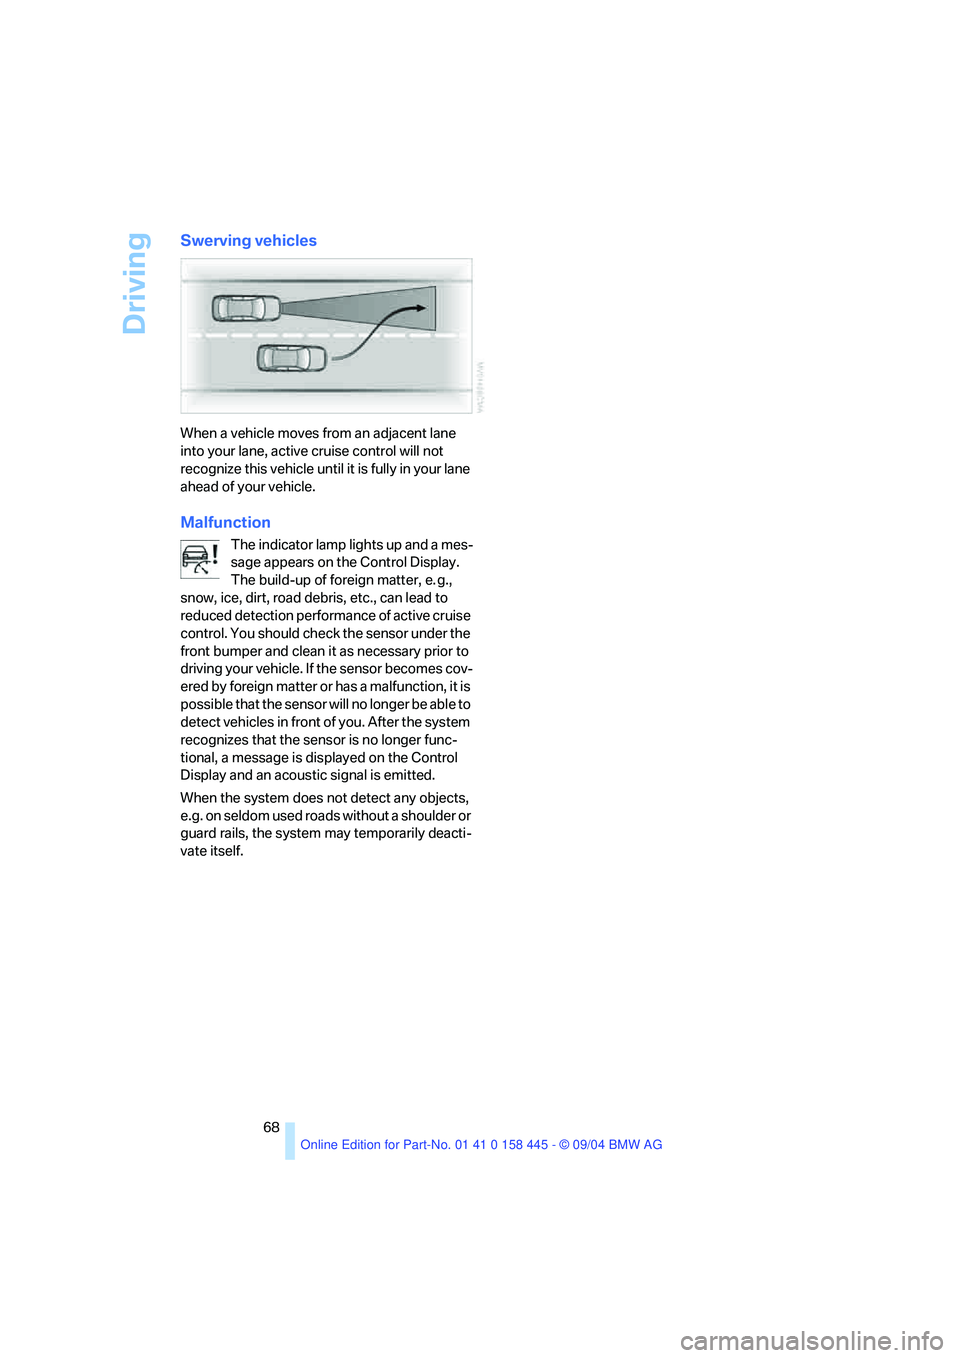
Swerving vehicles
When a vehicle moves from an adjacent lane
into your lane, active cruise control will not
recognize this vehicle until it is fully in your lane
ahead of your vehicle.
Malfunction
The indicator lamp lights up and a mes-
sage appears on the Control Display.
The build-up of foreign matter, e. g.,
snow, ice, dirt, road debris, etc., can lead to
reduced detection performance of active cruise
control. You should check the sensor under the
front bumper and clean it as necessary prior to
driving your vehicle. If the sensor becomes cov-
ered by foreign matter or has a malfunction, it is
possible that the sensor will no longer be able to
detect vehicles in front of you. After the system
recognizes that the sensor is no longer func-
tional, a message is displayed on the Control
Display and an acoustic signal is emitted.
When the system does not detect any objects,
e.g. on seldom used roads without a shoulder or
guard rails, the system may temporarily deacti-
vate itself.
Page 70 of 217
Controls
69Reference
At a glance
Driving tips
Communications
Navigation
Entertainment
Mobility
Everything under control
Odometer, outside
temperature display, clock
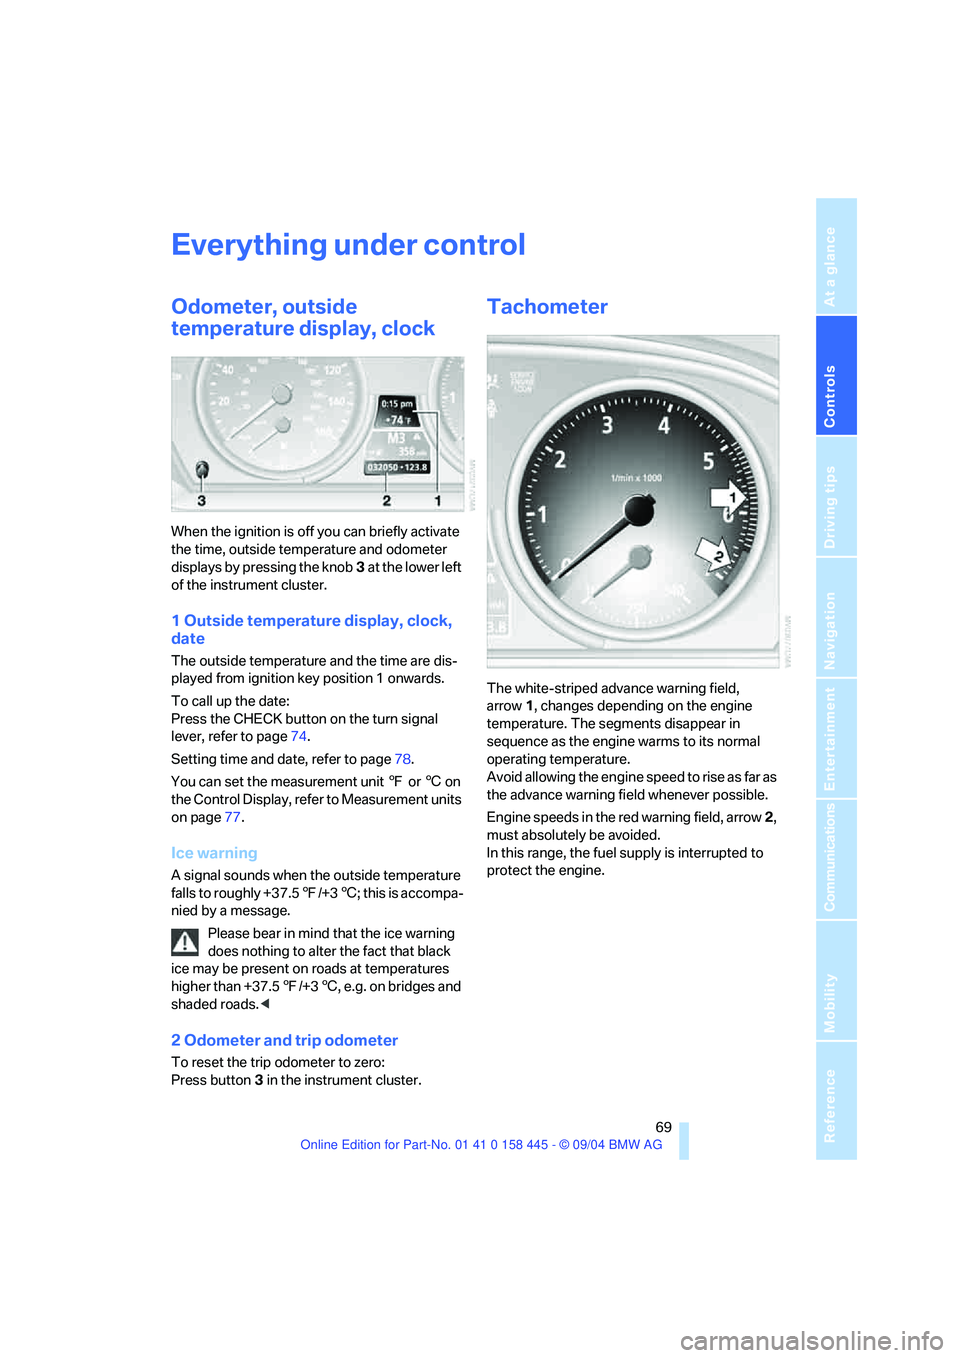
When the ignition is off you can briefly activate
the time, outside temperature and odometer
displays by pressing the knob3 at the lower left
of the instrument cluster.
1 Outside temperature display, clock,
date
The outside temperature and the time are dis-
played from ignition key position 1 onwards.
To call up the date:
Press the CHECK button on the turn signal
lever, refer to page74.
Setting time and date, refer to page78.
You can set the measurement unit 7 or 6 on
the Control Display, refer to Measurement units
on page77.
Ice warning
A signal sounds when the outside temperature
falls to roughly +37.57/+36; this is accompa-
nied by a message.
Please bear in mind that the ice warning
does nothing to alter the fact that black
ice may be present on roads at temperatures
higher than +37.57/+36, e.g. on bridges and
shaded roads.<
2 Odometer and trip odometer
To reset the trip odometer to zero:
Press button3 in the instrument cluster.
Tachometer
The white-striped advance warning field,
arrow1, changes depending on the engine
temperature. The segments disappear in
sequence as the engine warms to its normal
operating temperature.
Avoid allowing the engine speed to rise as far as
the advance warning field whenever possible.
Engine speeds in the red warning field, arrow2,
must absolutely be avoided.
In this range, the fuel supply is interrupted to
protect the engine.
Page 72 of 217
Controls
71Reference
At a glance
Driving tips
Communications
Navigation
Entertainment
Mobility
Symbols
No service is currently required.
The deadline for service or an official
inspection is approaching. Please
arrange a service appointment soon.
The service deadline has already passed.
You can request more detailed information on
every entry.
Select the entry and press the controller.
To exit from the menu:
Select the arrow and press the controller.
Entering dates for state emission and
vehicle inspections
Make sure the date in the Control Center is
always set correctly, refer to page78, as other-
wise the effectiveness of CBS Condition Based
Service is not ensured.
Control Center, for principle details, refer to
page16.
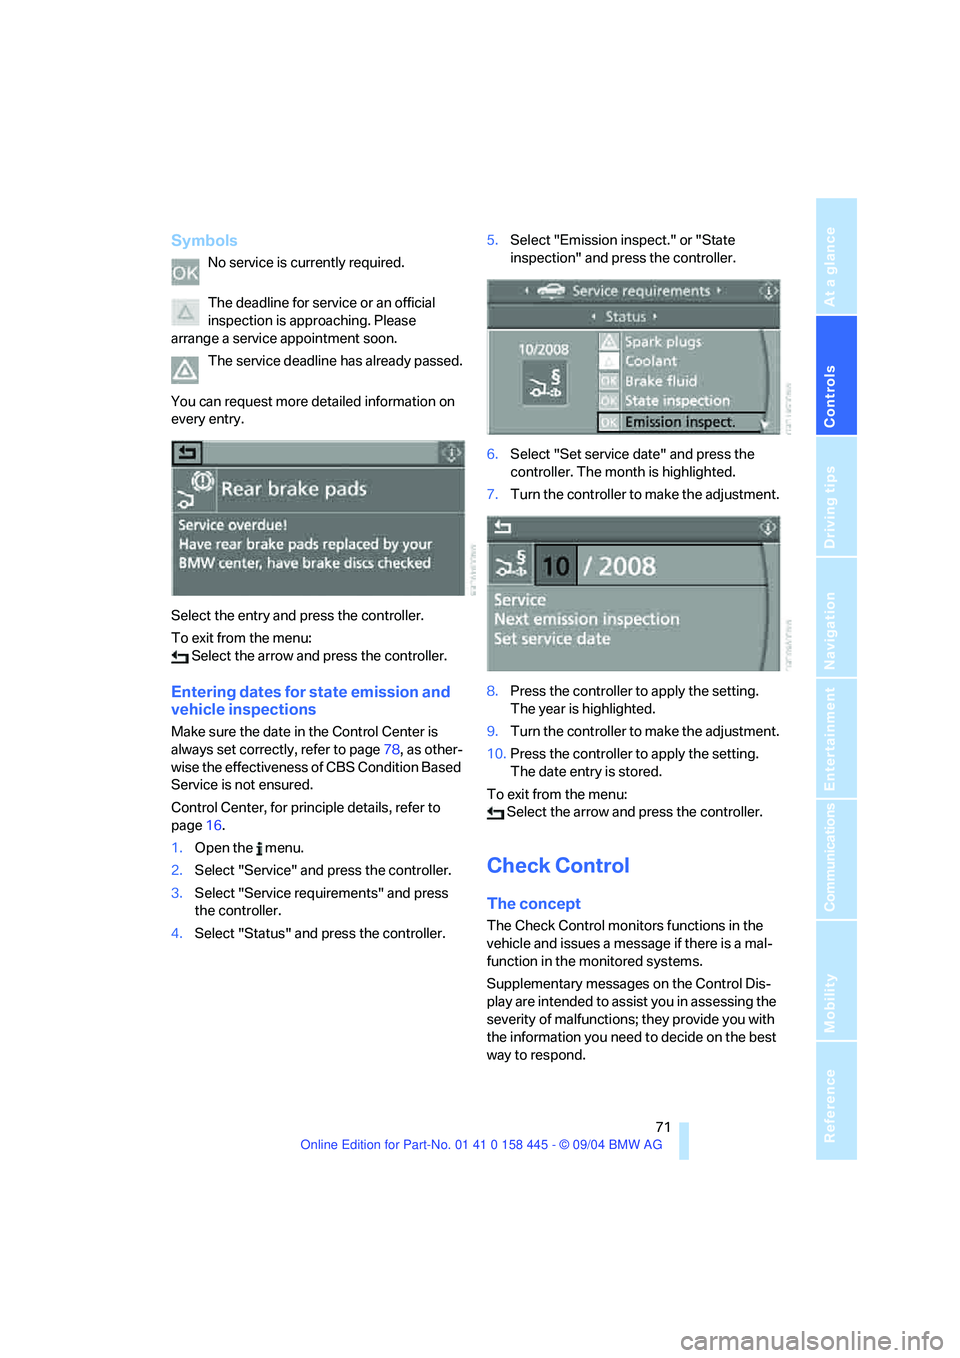
1.Open the menu.
2.Select "Service" and press the controller.
3.Select "Service requirements" and press
the controller.
4.Select "Status" and press the controller.5.Select "Emission inspect." or "State
inspection" and press the controller.
6.Select "Set service date" and press the
controller. The month is highlighted.
7.Turn the controller to make the adjustment.
8.Press the controller to apply the setting.
The year is highlighted.
9.Turn the controller to make the adjustment.
10.Press the controller to apply the setting.
The date entry is stored.
To exit from the menu:
Select the arrow and press the controller.
Check Control
The concept
The Check Control monitors functions in the
vehicle and issues a message if there is a mal-
function in the monitored systems.
Supplementary messages on the Control Dis-
play are intended to assist you in assessing the
severity of malfunctions; they provide you with
the information you need to decide on the best
way to respond.