2005 BMW 645CI CONVERTIBLE steering wheel adjustment
[x] Cancel search: steering wheel adjustmentPage 12 of 217
At a glance
11Reference
Controls
Driving tips
Communications
Navigation
Entertainment
Mobility
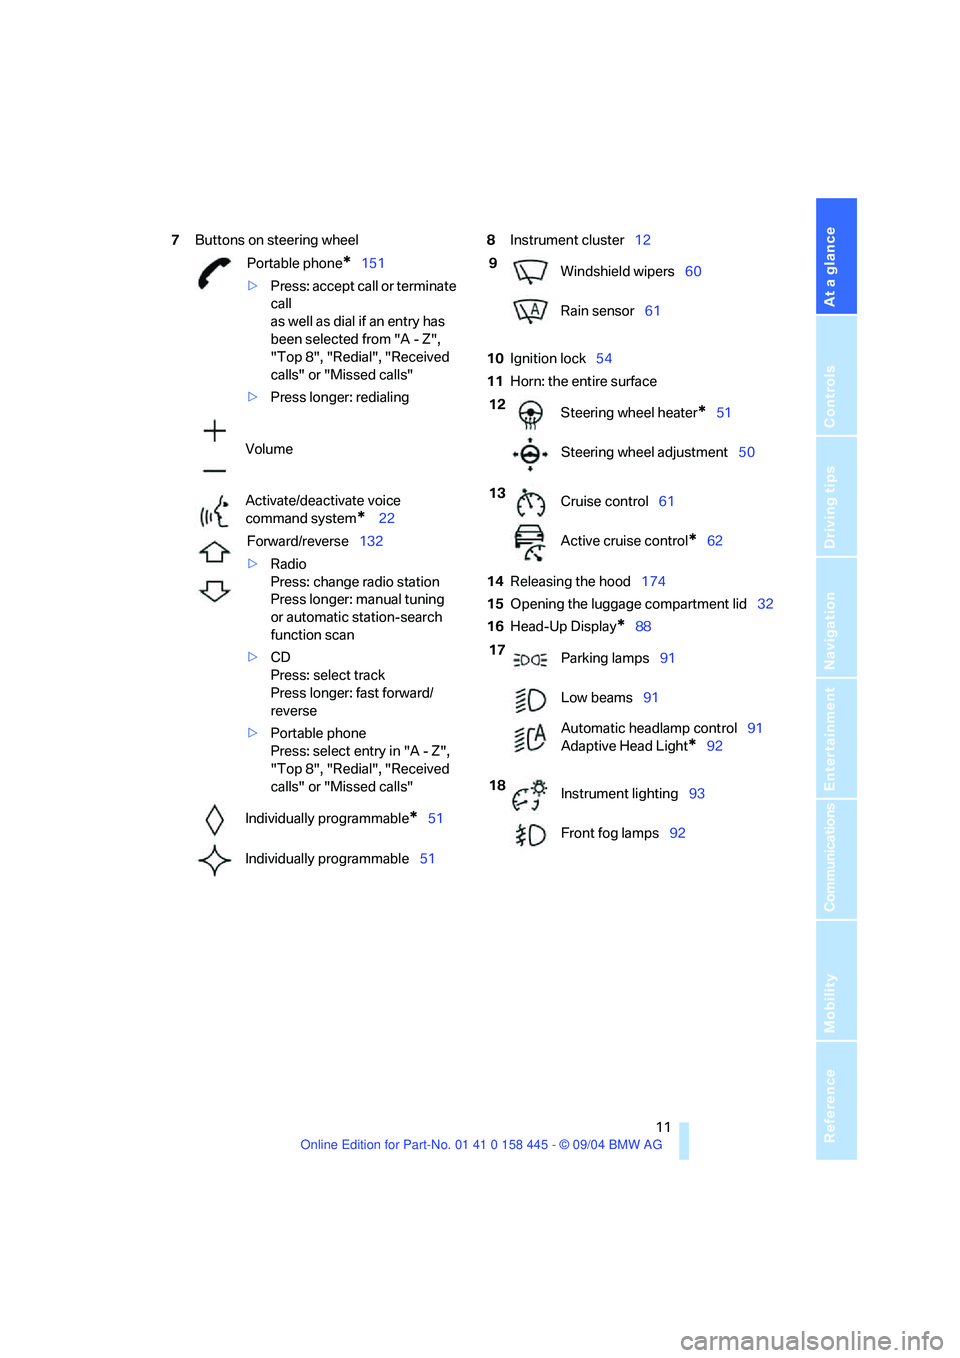
7Buttons on steering wheel8Instrument cluster12
10Ignition lock54
11Horn: the entire surface
14Releasing the hood174
15Opening the luggage compartment lid32
16Head-Up Display
*88 Portable phone
*151
>Press: accept call or terminate
call
as well as dial if an entry has
been selected from "A - Z",
"Top 8", "Redial", "Received
calls" or "Missed calls"
>Press longer: redialing
Volume
Activate/deactivate voice
command system
* 22
Forward/reverse132
>Radio
Press: change radio station
Press longer: manual tuning
or automatic station-search
function scan
>CD
Press: select track
Press longer: fast forward/
reverse
>Portable phone
Press: select entry in "A - Z",
"Top 8", "Redial", "Received
calls" or "Missed calls"
Individually programmable
*51
Individually programmable51
9
Windshield wipers60
Rain sensor61
12
Steering wheel heater
*51
Steering wheel adjustment50
13
Cruise control61
Active cruise control
*62
17
Parking lamps91
Low beams91
Automatic headlamp control91
Adaptive Head Light
*92
18
Instrument lighting93
Front fog lamps92
Page 29 of 217
Opening and closing
28
Opening and closing
The key set
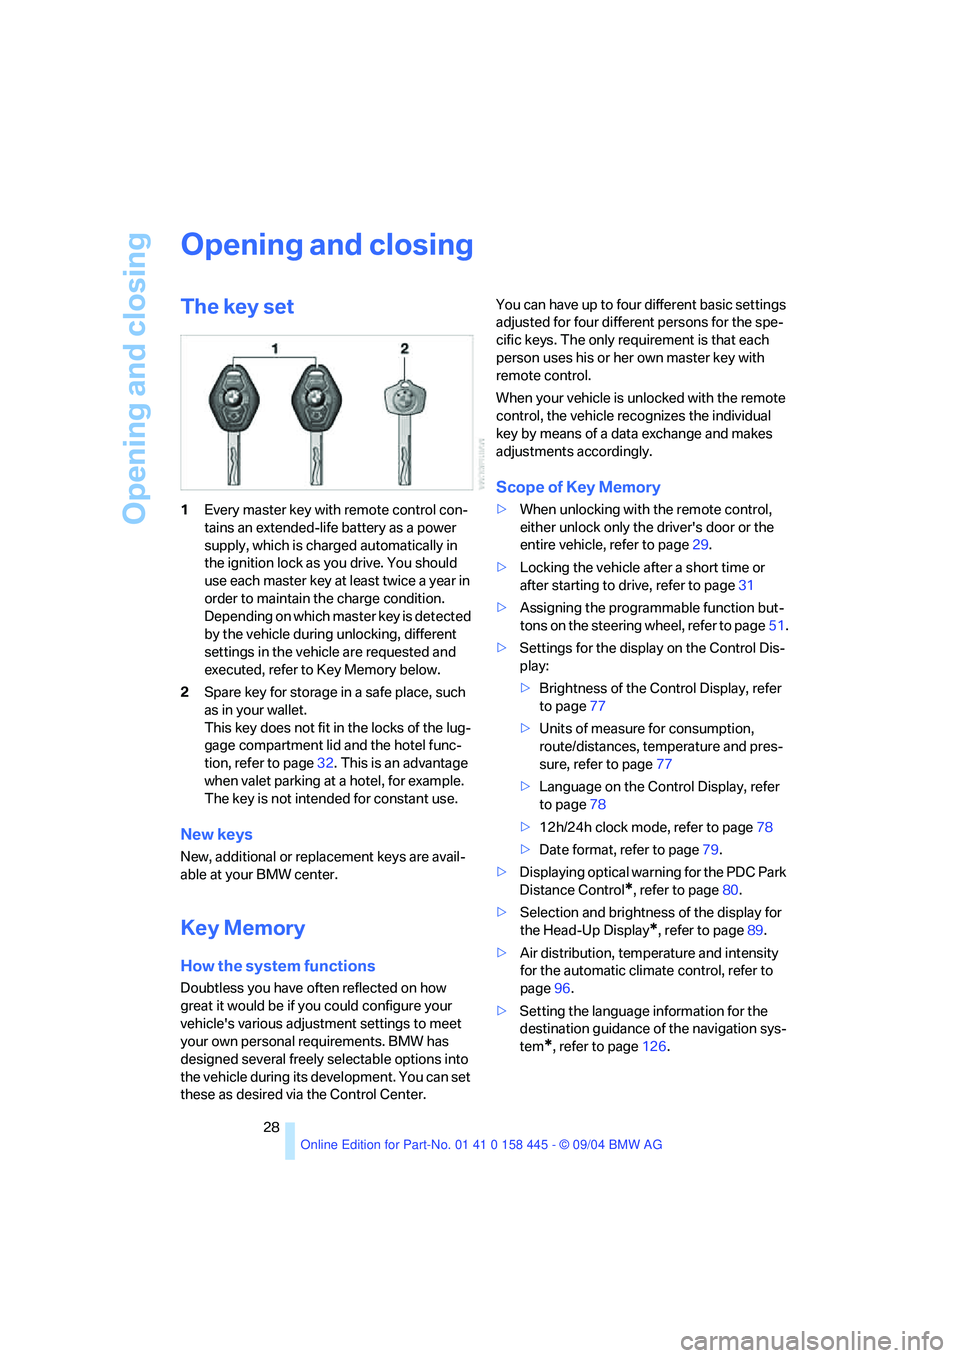
1Every master key with remote control con-
tains an extended-life battery as a power
supply, which is charged automatically in
the ignition lock as you drive. You should
use each master key at least twice a year in
order to maintain the charge condition.
Depending on which master key is detected
by the vehicle during unlocking, different
settings in the vehicle are requested and
executed, refer to Key Memory below.
2Spare key for storage in a safe place, such
as in your wallet.
This key does not fit in the locks of the lug-
gage compartment lid and the hotel func-
tion, refer to page32. This is an advantage
when valet parking at a hotel, for example.
The key is not intended for constant use.
New keys
New, additional or replacement keys are avail-
able at your BMW center.
Key Memory
How the system functions
Doubtless you have often reflected on how
great it would be if you could configure your
vehicle's various adjustment settings to meet
your own personal requirements. BMW has
designed several freely selectable options into
the vehicle during its development. You can set
these as desired via the Control Center.You can have up to four different basic settings
adjusted for four different persons for the spe-
cific keys. The only requirement is that each
person uses his or her own master key with
remote control.
When your vehicle is unlocked with the remote
control, the vehicle recognizes the individual
key by means of a data exchange and makes
adjustments accordingly.
Scope of Key Memory
>When unlocking with the remote control,
either unlock only the driver's door or the
entire vehicle, refer to page29.
>Locking the vehicle after a short time or
after starting to drive, refer to page31
>Assigning the programmable function but-
tons on the steering wheel, refer to page51.
>Settings for the display on the Control Dis-
play:
>Brightness of the Control Display, refer
to page77
>Units of measure for consumption,
route/distances, temperature and pres-
sure, refer to page77
>Language on the Control Display, refer
to page78
>12h/24h clock mode, refer to page78
>Date format, refer to page79.
>Displaying optical warning for the PDC Park
Distance Control
*, refer to page80.
>Selection and brightness of the display for
the Head-Up Display
*, refer to page89.
>Air distribution, temperature and intensity
for the automatic climate control, refer to
page96.
>Setting the language information for the
destination guidance of the navigation sys-
tem
*, refer to page126.
Page 45 of 217
Adjustments
44
Adjustments
Sitting safely
The ideal sitting position can make a vital con-
tribution to relaxed, fatigue-free driving. The sit-
ting position also plays an important role
together with the safety belts and airbags in
providing occupants with maximum levels of
passive safety in an accident. To ensure that
the safety systems operate with optimal effi-
ciency, we strongly urge you to observe the
instructions contained in the following section.
For additional information on transporting chil-
dren safely, refer to page52.
Airbags
Always maintain an adequate distance
between yourself and the airbags. Always
hold the steering wheel by its rim with hands at
the 9 o'clock and 3 o'clock positions, to mini-
mize the risk of injuries to your hands and arms
in the event of airbag deployment.
No one and nothing is to come between the air-
bags and the seat occupant.
Do not use the cover of the front airbag on the
front passenger side as a storage area. Make
sure that the front passenger is sitting correctly
and does not rest feet or legs on the instrument
panel, otherwise leg injuries can occur if the
knee and front airbags are triggered.
Never let an occupant's head rest near or on a
side airbag because the inflating airbag could
cause a serious or fatal injury.<
Even if you adhere to all the instructions, inju-
ries resulting from contact with airbags cannot
be fully excluded, depending on the circum-
stances. The ignition and inflation noise may
provoke a mild hearing loss in extremely sensi-
tive individuals. This effect is usually only tem-
porary.
For airbag locations and additional information
on airbags, refer to page86.
Safety belt
Fasten your safety belt before starting any trip.
Airbags complement the safety belt as an addi-
tional safety device, but they do not represent a
substitute.
Your vehicle has four seats that are all equipped
with a safety belt.
At all times, occupants should sit upright
and be properly restrained: infants and
small children in appropriate child-restraint sys-
tems; larger children and adults using the safety
belts.
Never allow more than one person to wear a sin-
gle safety belt. Never allow infants or small chil-
dren to ride in a passenger's lap.
Expectant mothers should always wear their
safety belts, taking care to position the lap belt
against the lower hips, where it will not exert
pressure against the abdominal area.
Do not route the belt across your neck, or run it
across sharp edges. Be sure that the belt does
not become caught or jammed. Avoid twisting
the belt while routing it firmly across the hips
and shoulder. Do not allow the belt to rest
against hard or fragile objects. Otherwise, in the
event of a frontal impact, a loose lap belt could
slide over your hips, leading to abdominal injury.
Avoid wearing clothing that prevents the belt
from fitting properly and pull the shoulder belt
periodically to readjust the tension across your
lap in order to avoid a reduction in the retention
effect of the safety belt.<
For instructions on operating safety belts, refer
to page48.
Seats
Note before adjusting
Never attempt to adjust your seat while
operating the vehicle. The seat could
respond with unexpected movement, and the
ensuing loss of vehicle control could lead to an
accident.
Page 47 of 217
Adjustments
46
Seat, mirror and steering
wheel memory
You can store and select three different adjust-
ment settings for the driver's seat, exterior mir-
rors and steering wheel.
The adjustment of the lumbar support is not
stored in the memory.
Storing
1.Turn ignition key to position 1 or 2, refer to
page54.
2.Adjust the desired seat, exterior mirror and
steering-wheel positions.
3.Press the button:
The indicator lamp in the button lights up.
4.Press the desired memory button 1, 2 or3:
The indicator lamp goes out.
Requesting
Do not request a position from the mem-
ory while the vehicle is moving. There is a
risk of accident from unexpected movement of
the seat or steering wheel.<
Convenience mode
1.Open the driver's door after unlocking or
turn the ignition key to position 1, refer to
page54.
2.Briefly press the desired memory button 1,
2 or3.
The system immediately cancels the adjust-
ment procedure when you briefly press one of
the seat adjustment switches or one of the
memory buttons.The adjusting procedure for the steering wheel
is immediately interrupted if you operate the
switch for the steering wheel adjustment in any
direction, refer to page50.
Safety feature
1.Close the driver's door and turn the ignition
key to position 0 or 2, refer to page54.
2.Press the desired memory button 1, 2 or3
and maintain pressure until the adjustment
process has been completed.
If the button was pressed inadvertently:
Press the button again; the indicator lamp goes
out.
Position stored in key
The positions of the driver's seat, the external
rearview mirrors, and steering wheel are stored
for the remote key currently in use.
You can choose when the position is requested:
>Request when unlocking vehicle
>Request when opening driver's door
Control Center, for principle details, refer to
page16.
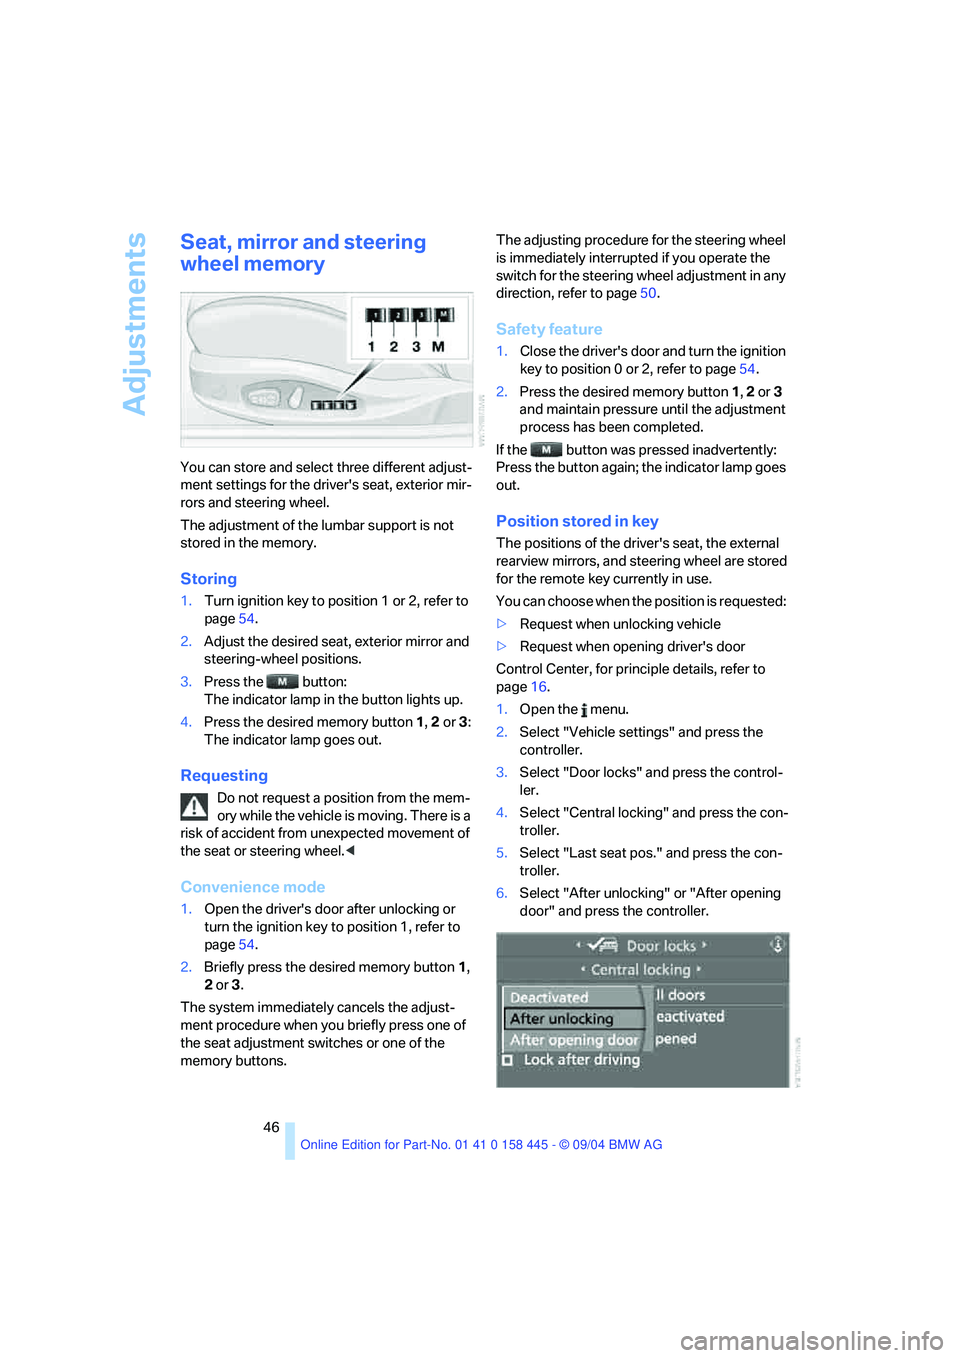
1.Open the menu.
2.Select "Vehicle settings" and press the
controller.
3.Select "Door locks" and press the control-
ler.
4.Select "Central locking" and press the con-
troller.
5.Select "Last seat pos." and press the con-
troller.
6.Select "After unlocking" or "After opening
door" and press the controller.
Page 51 of 217
Adjustments
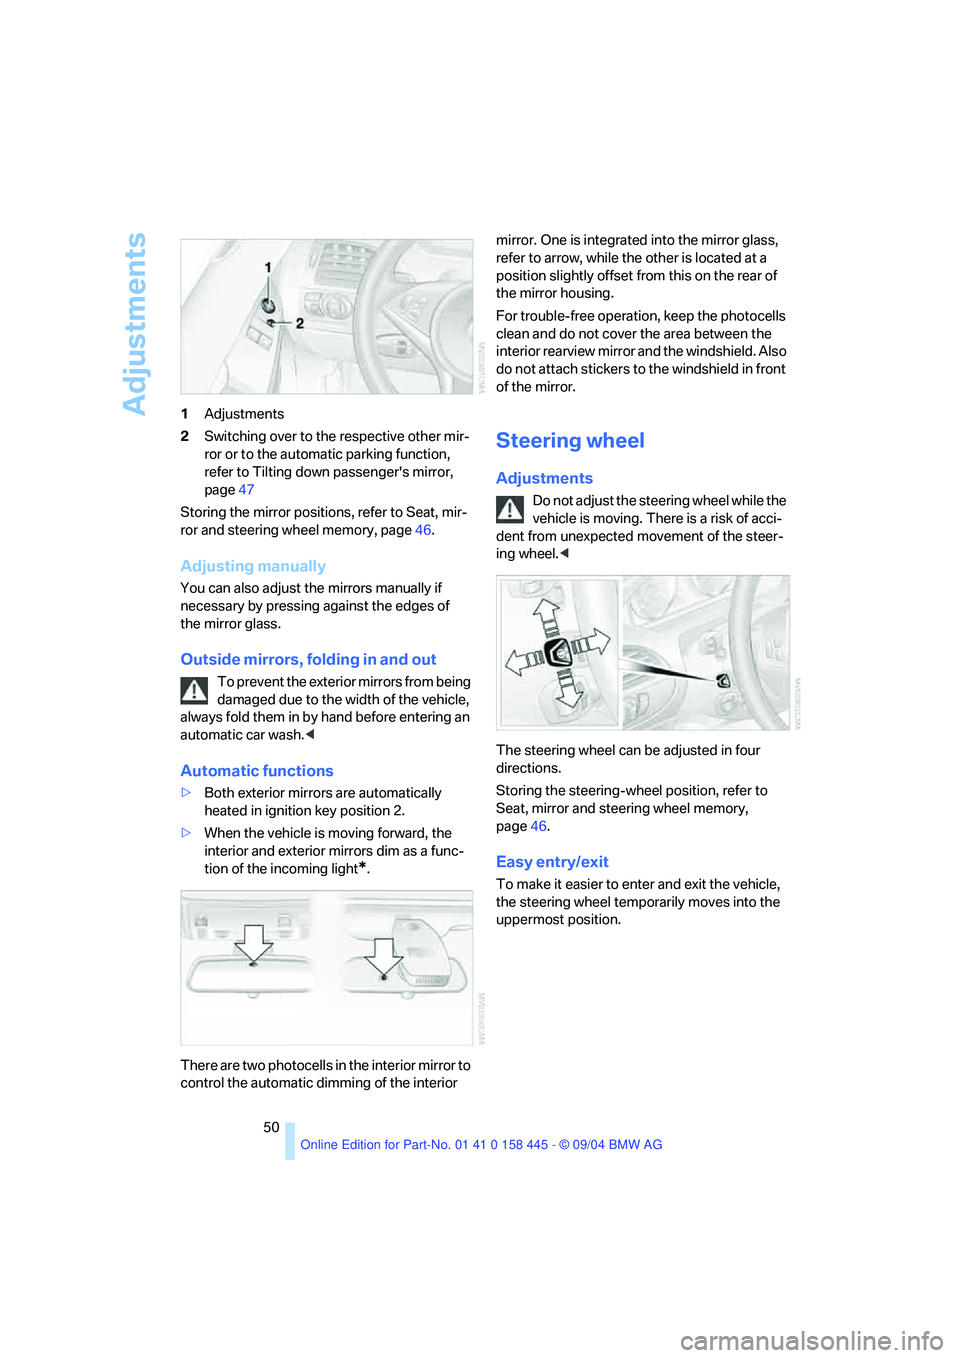
50 1Adjustments
2Switching over to the respective other mir-
ror or to the automatic parking function,
refer to Tilting down passenger's mirror,
page47
Storing the mirror positions, refer to Seat, mir-
ror and steering wheel memory, page46.
Adjusting manually
You can also adjust the mirrors manually if
necessary by pressing against the edges of
the mirror glass.
Outside mirrors, folding in and out
To prevent the exterior mirrors from being
damaged due to the width of the vehicle,
always fold them in by hand before entering an
automatic car wash.<
Automatic functions
>Both exterior mirrors are automatically
heated in ignition key position 2.
>When the vehicle is moving forward, the
interior and exterior mirrors dim as a func-
tion of the incoming light
*.
There are two photocells in the interior mirror to
control the automatic dimming of the interior mirror. One is integrated into the mirror glass,
refer to arrow, while the other is located at a
position slightly offset from this on the rear of
the mirror housing.
For trouble-free operation, keep the photocells
clean and do not cover the area between the
interior rearview mirror and the windshield. Also
do not attach stickers to the windshield in front
of the mirror.
Steering wheel
Adjustments
Do not adjust the steering wheel while the
vehicle is moving. There is a risk of acci-
dent from unexpected movement of the steer-
ing wheel.<
The steering wheel can be adjusted in four
directions.
Storing the steering-wheel position, refer to
Seat, mirror and steering wheel memory,
page46.
Easy entry/exit
To make it easier to enter and exit the vehicle,
the steering wheel temporarily moves into the
uppermost position.
Page 87 of 217
Technology for comfort, convenience and safety
86
Initializing system
1.Start the engine.
2.With the vehicle stationary, turn the steer-
ing wheel from the straight-ahead position
to the left as far as it will go and then back to
the straight-ahead position.
3.Switch off the engine.
When you start the engine again, all the func-
tions of the active steering will be available once
again.
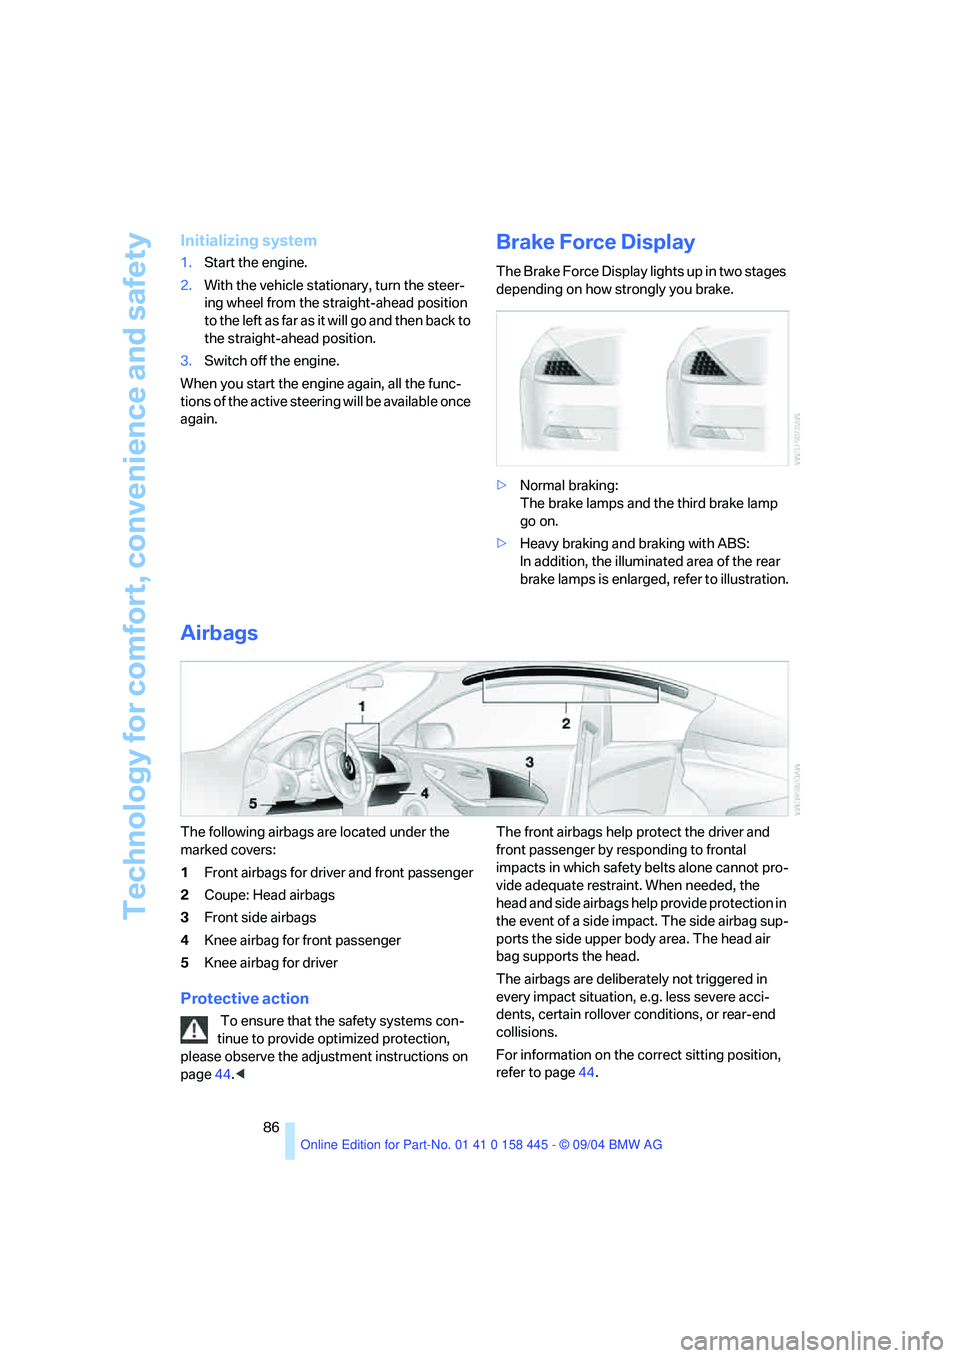
Brake Force Display
The Brake Force Display lights up in two stages
depending on how strongly you brake.
>Normal braking:
The brake lamps and the third brake lamp
go on.
>Heavy braking and braking with ABS:
In addition, the illuminated area of the rear
brake lamps is enlarged, refer to illustration.
Airbags
The following airbags are located under the
marked covers:
1Front airbags for driver and front passenger
2Coupe: Head airbags
3Front side airbags
4Knee airbag for front passenger
5Knee airbag for driver
Protective action
To ensure that the safety systems con-
tinue to provide optimized protection,
please observe the adjustment instructions on
page44.
impacts in which safety belts alone cannot pro-
vide adequate restraint. When needed, the
head and side airbags help provide protection in
the event of a side impact. The side airbag sup-
ports the side upper body area. The head air
bag supports the head.
The airbags are deliberately not triggered in
every impact situation, e.g. less severe acci-
dents, certain rollover conditions, or rear-end
collisions.
For information on the correct sitting position,
refer to page44.
Page 152 of 217
151
Entertainment
Reference
At a glance
Controls
Driving tips Communications
Navigation
Mobility
your portable phone.
To avoid possible short circuits, after removing
a battery you should never allow it to come into
contact with metallic surfaces of any kind.<
Disposing of used batteries
Return used batteries to a recycling col-
lection point or to your BMW center.<
Care instructions
You can find what you need to know about car-
ing for your portable phone in the Caring for
your vehicle brochure and in the separate porta-
ble phone Owner's Manual.
Operating options
You can operate the portable phone* with:
>The steering wheel, refer to page11
>The Control Center, refer to page152
>Voice commands, refer to page156
Information on operating the portable phone is
contained in the separate Owner's Manual on
the Full Preparation Package Cellphone.
Telephoning with car phone:
BMW Assist calls
You can use the car phone via the hands-free
system for BMW Assist calls.
When the status information "Car Phone" is
displayed in "Communication", only BMW
Assist calls are possible.
Hands-free system
The microphone is located:
>In the Coupe near the interior rearview mir-
ror, refer to page14
>In the Convertible on the steering columnThe hands-free system is activated whenever
you establish or receive a call using:
>The button on the steering wheel
>The Control Center
>Voice commands
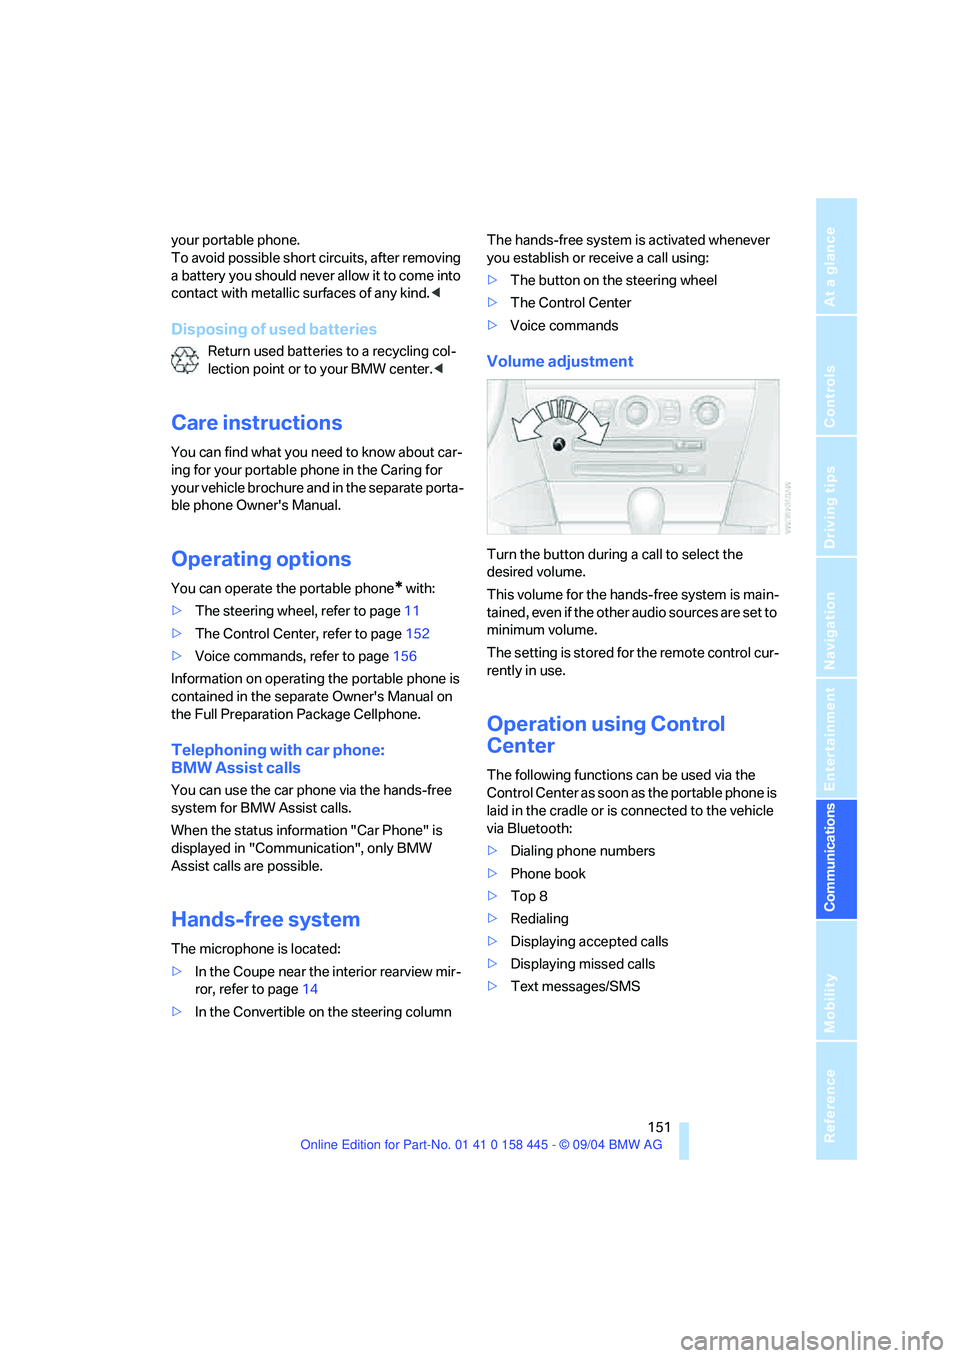
Volume adjustment
Turn the button during a call to select the
desired volume.
This volume for the hands-free system is main-
tained, even if the other audio sources are set to
minimum volume.
The setting is stored for the remote control cur-
rently in use.
Operation using Control
Center
The following functions can be used via the
Control Center as soon as the portable phone is
laid in the cradle or is connected to the vehicle
via Bluetooth:
>Dialing phone numbers
>Phone book
>Top 8
>Redialing
>Displaying accepted calls
>Displaying missed calls
>Text messages/SMS
Page 201 of 217
Everything from A to Z
200 Audio132
– controls132
– switching on/off132
– tone control133
– volume133
Automatic
– air distribution95
– air volume95
– cruise control61,62
– headlamp control91
– service notification160
– steering wheel adjustment,
refer to Easy entry/exit50
– storing stations138
Automatic car washes110
– also refer to the Caring for
your vehicle brochure
Automatic climate control94
– automatic air distribution95
– convertible program97
– settings using Control
Center96
– switching off96
Automatic curb monitor47
"Automatic programs"97
Automatic recirculated-air
control AUC95
Automatic station search137
Automatic transmission with
Steptronic58
– convenience start55
– Dynamic Driving Control59
– interlock54
– kick-down58
– selector lever interlock58
– shiftlock58
– starting engine55
– towing188
– tow-starting189
"Automatic ventilation"98
AUTO program with
automatic climate control95
"Autostore" on the
radio136,138
Average fuel consumption74
– setting units77
Average speed74"Avoid ferries" for
navigation123
Avoid freeways for
navigation122
"Avoid highways" for
navigation122
Avoiding unintentional
alarms35
"Avoid tollroads" for
navigation123
Axle loads, refer to
Weights192
"A - Z"153
B
Backrests, refer to Seats44
Backup lamps, refer to
Reverse gear56
Balance, refer to Tone
control134
Balance adjustment in audio
mode, right/left134
Bandages, refer to First-aid
kit186
"Bass", refer to Tone
control134
Bass, refer to Tone
control133
Battery
– jump starting186
– refer to Vehicle battery183
Being towed188
Belts, refer to Safety belts48
Beverage holder, refer to Cup
holders103
Black ice, refer to Ice
warning69
Blower, refer to Air volume95
BMW Assist159
– enabling159
– services offered160
BMW maintenance
system178
"BMW Service"161
"BMW Service settings"159
Bottle holder, refer to Cup
holders103Brake Assistant, refer to DBC
Dynamic Brake Control81
Brake fluid177
– warning lamp177
Brake Force Display86
Brake hydraulic system177
Brake lamps
– Brake Force Display86
– replacing bulbs182
Brake pads177
– breaking-in108
Brake rotors110
Brakes109
– ABS Antilock Brake
System81
– brake fluid177
– Brake Force Display86
– brake pads108,177
– breaking-in108
– CBC Cornering Brake
Control81
– handbrake55
Brake system108
– brake fluid level177
– brake pads108,177
– brake rotors110
– breaking-in108
– warning lamp13,83,177
Brake wear warning
– brake pads177
Braking
– electronic brake-force
distribution81
– refer to Braking safely109
Breakdown assistance161
Breakdown services, refer to
Roadside Assistance186
Breaking-in108
– clutch108
– differential108
Break wear warning
– warning lamp177
"Brightness"77
Buttons on steering wheel11
Bypassing route sections128