Page 49 of 223

Transporting children safely
48 Then push the center head restraint into the
lowest position again.
Adjust the tether strap according to the
child-restraint manufacturer's instruc-
tions.<
LATCH child-restraint fixing system
LATCH: Lower Anchor and Tethers for CHil-
dren.
The rear outer sitting positions are provided
with anchors for a LATCH child-restraint fixing
system.
To attach a child-restraint system with
the LATCH system, follow the operating
and safety instructions of the child-restraint
system manufacturer.<
Rear seat anchorages, with through-
loading system equipment
The anchorage points for the LATCH child-
restraint fixing system are located behind the
indicated protective caps. Flip up the corre-
sponding caps.
Before attaching the LATCH child-restraint fix-
ing system, pull the belt out of the area of the
child-restraint fixing system.
Rear seat anchorages, without
through-loading system
The anchorage points for the LATCH child-
restraint fixing system are located underneath
the identifying symbols.
Before attaching the LATCH child-restraint fix-
ing system, pull the belt out of the area of the
child-restraint fixing system.
On journeys
Child-safety locks for rear doors
Slide down the safety lever on the rear doors:
The door can now be opened from the outside
only.
Safety switch for power windows
Press the safety switch for the power windows,
refer to page36, if children are traveling on the
rear seat.
Page 50 of 223

Controls
49Reference
At a glance
Driving tips
Communications
Navigation
Entertainment
Mobility
Driving
Ignition lock
Insert the remote control all the way into the
ignition lock.
>Radio readiness switches on.
Individual electrical consumers can operate.
>The electric steering wheel lock disen-
gages audibly.
Insert the remote control into the ignition
lock before you move the vehicle, as oth-
erwise the electric steering wheel lock will not
disengage and you will not be able to steer the
car.<
Removing the remote control from the
ignition lock
Press the remote control in briefly; it is ejected a
short way.
At the same time:
>The ignition switches off if it was on before-
hand.
>The electric steering wheel lock engages
audibly.
Automatic transmission
You cannot take out the remote control unless
the selector lever is in the P position: interlock.
Start/stop button
7
Each time the start/stop button is pressed,
radio readiness or the ignition is switched on or
off.
Do not depress the brake pedal or the
clutch pedal, otherwise the engine will
start.<
Radio readiness
Individual electrical consumers can operate.
The time and the outside temperature are dis-
played in the instrument cluster.
Radio readiness is switched off automatically:
>Immediately when the remote control is
removed from the ignition lock
Ignition on
Most of the indicator and warning lamps in the
indicator area1 of the instrument cluster, refer
to page13, light up and remain on for different
lengths of time.
Radio readiness and ignition switched
off
All indicator and warning lamps in the instru-
ment cluster go out.
Starting the engine
Do not run the engine in closed rooms, as
otherwise the inhaling of toxic exhaust
gases can cause unconsciousness and death.
Page 51 of 223

Driving
50 The exhaust gases contain carbon monoxide,
an odorless and colorless, but highly toxic gas.
Never leave an unattended vehicle with the
engine running, as such a vehicle represents a
potential safety hazard.
Before leaving the car with the engine running,
place the transmission in idle or move the
selector lever to position P and apply the hand-
brake to prevent the car from moving.<
When starting the engine, do not press the
accelerator pedal.
Do not allow the engine to warm up by leaving it
running while the vehicle remains stationary.
Instead, begin to drive immediately at a moder-
ate engine speed.
Do not press either the brake pedal or the
clutch pedal until you are ready to start
the engine. The engine is started immediately
when you briefly touch the start/stop button
and depress the brake pedal if the car has auto-
matic transmission, or the clutch pedal if the car
has manual transmission.<
7
Manual transmission
1.Apply the handbrake.
2.Press the clutch pedal.
If the clutch pedal is not depressed,
the engine will not start.<
3.Briefly press the start/stop button.
The starter is operated automatically for a cer-
tain time, and operation ceases automatically as
soon as the engine has started.
Automatic transmission
1.Press the brake pedal.
2.Move the selector lever to position P or, if
the ignition is switched on, to position N.3.Briefly press the start/stop button.
The starter is operated automatically for a cer-
tain time, and operation ceases automatically as
soon as the engine has started.
Special starting conditions
In the following situations, press the accelerator
pedal halfway down when starting the engine:
>If the engine does not start on the first
attempt, for instance when it is extremely
hot or cold.
>The engine is started at very low tempera-
tures, below approx. + 57/–156, at high
altitudes, above approx. 3,300 ft/1,000 m.
Avoid frequent starting in quick succes-
sion or repeated start attempts in which
the engine does not start. Otherwise, the fuel is
not burned or inadequately burned and there is
a danger of overheating and damaging the cat-
alytic converter.<
Switching off the engine
Do not take the remote control out of the
ignition lock while the vehicle is rolling, as
otherwise the steering wheel lock will engage
when you turn the steering wheel.
Always take the remote control with you when
you leave the vehicle.
When parking on a downhill incline, apply the
handbrake, as otherwise the vehicle could roll
away.<
Manual transmission
1.Apply the handbrake.
2.With the car at a standstill, briefly press the
start/stop button.
3.Shift into first gear or reverse.
Automatic transmission
1.With the car at a standstill, move the selec-
tor lever to position P.
2.Briefly press the start/stop button.
3.Apply the handbrake.
Page 52 of 223

Controls
51Reference
At a glance
Driving tips
Communications
Navigation
Entertainment
Mobility
Handbrake
The handbrake is primarily intended to prevent
the vehicle from rolling while parked; it brakes
the rear wheels.
Indicator lamp
The indicator lamp is lit, and when you
drive off an acoustic signal sounds in
addition. The handbrake is still applied.
Indicator lamp for Canadian models.
Applying
The lever locks in position automatically.
Releasing
Pull slightly upwards, press the button and
lower the lever.
In exceptional cases, if the handbrake has
to be used to slow or stop the car, do not
pull the lever up too hard. In doing so, continu-
ously press the button of the handbrake lever.
Too violent an application of the handbrake
could lock the rear wheels and cause the rear of
the car to swerve.
The brake lamps do not light up when the hand-
brake is applied.<
To prevent corrosion and one-sided brak-
ing action, occasionally apply the hand-
brake lightly when the vehicle is slowly coming
to a stop if the traffic conditions are suitable.<
Manual transmission
When shifting into 5th or 6th gear, press
the gearshift lever to the right. Otherwise
the engine could be damaged if you inadvert-
ently shift into 3rd or 4th gear.<
Reverse gear
Select only when the vehicle is stationary.
When the gearshift lever is pressed to the left, a
slight resistance has to be overcome.
Automatic transmission with
Steptronic*
In addition to fully automatic operation, you can
also manually shift with the Steptronic, refer to
page52.
Vehicle parking
To prevent the vehicle from rolling,
always select position P and apply the
handbrake before leaving the vehicle with the
engine running.<
Disengaging the remote control
In order to remove the remote control from the
ignition lock, you must first move the selector
lever to position P and switch off the engine:
interlock.
Selector lever positions
P R N D M/S + –
Page 53 of 223

Driving
52
Displays in the instrument cluster
P R N D DS M1 to M6
The selector lever position is displayed, or the
current gear in the manual mode.
Changing selector lever positions
>With the ignition switched on or the engine
running, the selector lever can be moved
out of position P: interlock.
>Before moving the lever away from P or N
with the vehicle stationary, first depress the
brake pedal, otherwise the selector lever
will refuse to move: shiftlock.
To prevent the vehicle from creeping
after you select a driving position,
maintain pressure on the brake pedal until
you are ready to start.<
A lock prevents you from inadvertently engag-
ing selector lever positions R and P. To cancel
the lock, press the button on the front of the
selector lever knob, refer to arrow.
P Park
Select only when the vehicle is stationary. The
rear wheels are locked.
R Reverse
Select only when the vehicle is stationary.
N Neutral
You can select this in a car wash, for example.
The vehicle can roll.
D Drive, automatic position
Position for normal vehicle operation. All for-
ward gears are selected automatically.
Kick-down
Kick-down enables you to achieve maximum
performance.
Press the accelerator pedal beyond the full-
throttle resistance point.
Manual operation and Sport program
M/S
Move selector lever from position D toward the
left into the M/S shifting slot:
The sport program is activated and DS appears
in the instrument cluster. This position is rec-
ommended for a performance-oriented driving
style.
When you briefly press the selector lever in the
+ or – direction, the manual mode is activated
and Steptronic changes gear. The instrument
cluster shows M1 through M6.
Upshifts and downshifts are executed only
when they will result in a plausible combination
of engine and vehicle speed; thus, for example,
a downshift that would cause the engine to
overrev will not be executed by the system. The
gear selected appears briefly in the instrument
cluster, followed by the gear actually in use.
Page 54 of 223

Controls
53Reference
At a glance
Driving tips
Communications
Navigation
Entertainment
Mobility
To use the automatic function again, move the
selector lever to the right into position D.
Overriding selector lever lock
You can manually override the selector lever
lock in case a defect occurs in which the selec-
tor lever remains in position P although the but-
ton on the selector lever is pressed:
1.Unclip the sleeve of the selector lever.
2.Pull the sleeve up over the selector lever
until the sleeve is inside out.
3.Using the screwdriver from the onboard
tool kit, refer to page187, hold down the red
lever and move the selector lever to the
desired position in the usual way.
Turn signals/
headlamp flasher
1High beams
2Headlamp flasher
3Turn signals
Using turn signals
Press the lever beyond the resistance point.To turn off manually, press the lever to the
resistance point.
Unusually rapid flashing of the indicator
lamp indicates that a turn signal bulb
needs to be replaced.
After switching off the ignition, make sure that
the roadside parking lamps are not switched
on.<
Signaling for a short time
Press and hold the lever as far as the resistance
point for as long as you wish to indicate a turn.
Triple turn signal activation
Press the lever as far as the resistance point.
The turn signals flash three times.
You can activate or deactivate this function.
iDrive concept, refer to page16.
1.Open the start menu.
2.Press the controller to open the menu.
3.Select "Vehicle settings" and press the
controller.
4.Select "Lighting" and press the controller.
5.Select "Triple turn signal activation" and
press the controller.
Triple turn signaling is activated.
Page 55 of 223

Driving
54
Wiper system
1Switching on wipers
2Switching off wipers or brief wipe
3Activating/deactivating intermittent wipe or
rain sensor
*
4Cleaning windshield and headlamps*
5Setting speed for intermittent wipe, or sen-
sitivity of the rain sensor
Switching on wipers
The lever automatically returns to its initial posi-
tion when released.
Normal wiper speed
Press once.
The system switches to operation in the inter-
mittent mode when the vehicle is stationary.
Fast wiper speed
Press twice or press beyond the resistance
point.
The system switches to normal speed when the
vehicle is stationary.
Intermittent wipe or rain sensor*
If the car is not equipped with a rain sensor, the
intermittent-wipe time is a preset.
If the car is equipped with a rain sensor, the time
between wipes is controlled automatically and
depends on the intensity of the rainfall. The
sensor is mounted on the windshield, directly in
front of the interior rearview mirror.
Activating intermittent wipe or rain
sensor
Press button 3. The LED in the button lights up.
Setting speed for intermittent wipe or
sensitivity of the rain sensor
Slide switch5 up or down.
Deactivating intermittent wipe or rain
sensor
Press button 3 again. The LED goes out.
Deactivate the rain sensor before enter-
ing an automatic car wash. Failure to do
so could result in damage caused by undesired
wiper activation.<
Cleaning windshield and headlamps*
Pull lever 4.
Washer fluid is sprayed onto the windshield and
the wipers are operated for a short time.
When the vehicle lighting system is switched
on, the headlamps are cleaned at regular and
appropriate intervals.
Do not use the washers if there is any
danger that the fluid will freeze on the
windshield. If you do, your vision could be
obscured. Antifreeze should therefore be
added to the fluid, refer to Washer fluid.
Do not use the washers when the washer fluid
reservoir is empty, otherwise you will damage
the washer pump.<
Windshield washer nozzles
The windshield washer nozzles are heated
automatically while the engine is running or the
ignition switched on.
Page 56 of 223

Controls
55Reference
At a glance
Driving tips
Communications
Navigation
Entertainment
Mobility
Washer fluid
Washer fluid antifreeze is flammable.
Always keep it well away from sparks and
open flames, and store it in tightly closed con-
tainers well out of the reach of children. Comply
with the instructions on the container.<
Washer fluid reservoir
Fill with water and, if required, with a washer
antifreeze, according to manufacturer's recom-
mendations.
Mix the water and antifreeze before filling
the washer fluid reservoir to make sure
the correct concentration is maintained.<
Capacity
Approx. 6.3 US quarts/6 liters.
Cruise control*
The concept
Cruise control is available for use at speeds of
approx. 20 mph or 30 km/h. The car then mem-
orizes and maintains the speed that you specify
using the lever on the steering column. In order
to maintain the specified speed, the system brakes the vehicle when the engine braking
effect is insufficient on downhill gradients.
Do not use cruise control when driving
conditions are unfavorable for driving at a
constant speed. Otherwise you could lose con-
trol of the vehicle and cause an accident as a
result. Unfavorable driving conditions include,
for example, winding roads, heavy traffic or a
poor road surface, e.g. snow, rain, ice or loose
material.<
Manual transmission
You can shift gears while cruise control is acti-
vated. An indicator lamp notifies you that you
should shift gears when you drive for an
extended period at very high or very low engine
speeds, or the system is deactivated.
One lever for all functions
1Storing and maintaining speed or accelerat-
ing
2Storing and maintaining speed or deceler-
ating
3Deactivating cruise control
4Resuming a speed stored beforehand
Maintaining current speed
Tap the lever, arrow 1, or pull it briefly, arrow 2.
The car's current speed is stored and main-
tained. It is displayed in the speedometer and
briefly in the instrument cluster.
On uphill gradients, it may prove impossible to
maintain the set speed if current engine power
output is insufficient. If the engine braking
effect is insufficient on downhill slopes, the sys-
tem will brake the vehicle slightly.
 1
1 2
2 3
3 4
4 5
5 6
6 7
7 8
8 9
9 10
10 11
11 12
12 13
13 14
14 15
15 16
16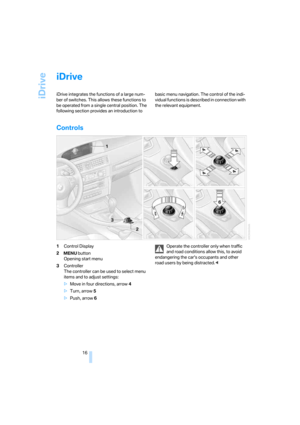 17
17 18
18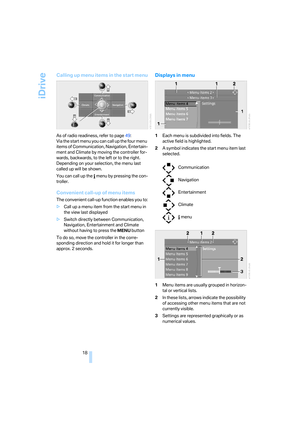 19
19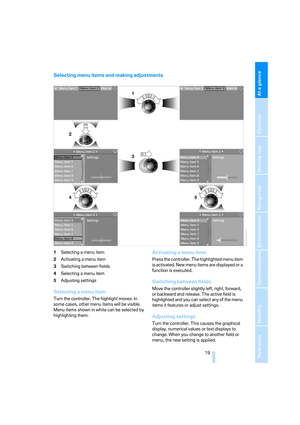 20
20 21
21 22
22 23
23 24
24 25
25 26
26 27
27 28
28 29
29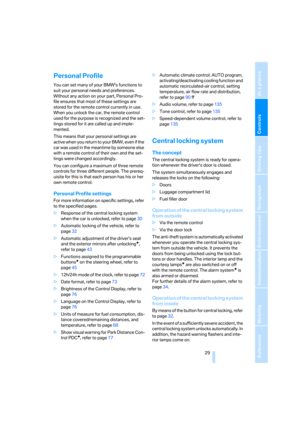 30
30 31
31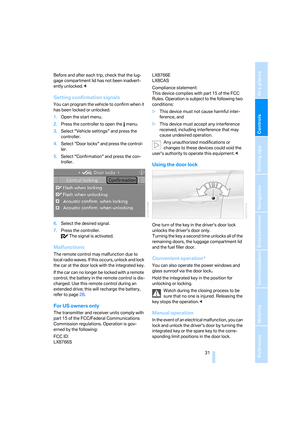 32
32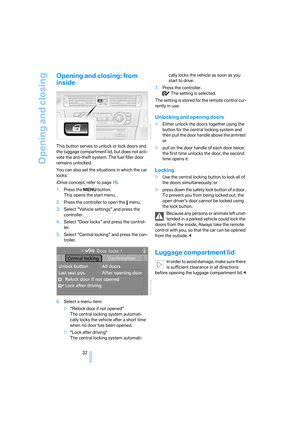 33
33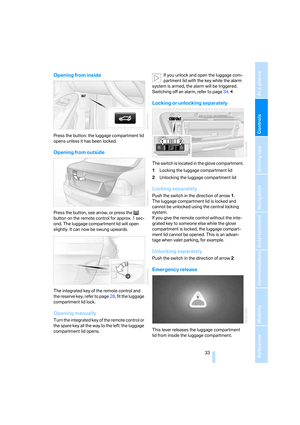 34
34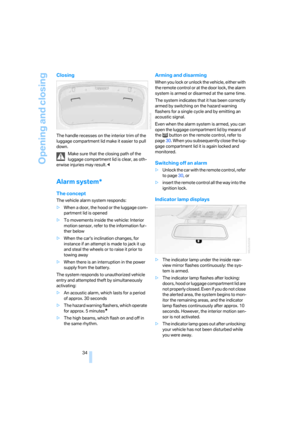 35
35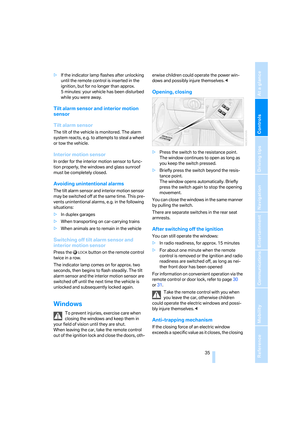 36
36 37
37 38
38 39
39 40
40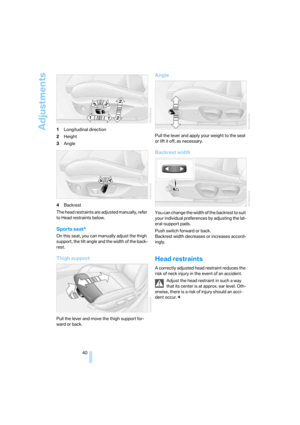 41
41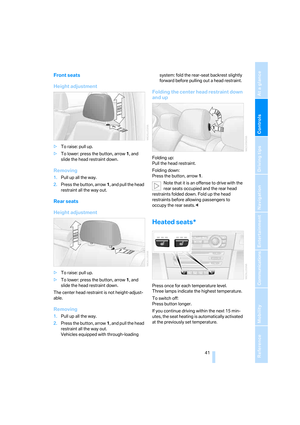 42
42 43
43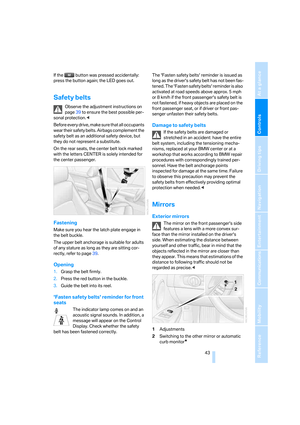 44
44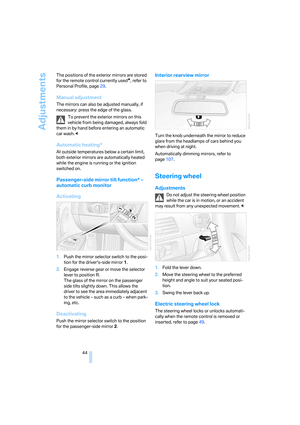 45
45 46
46 47
47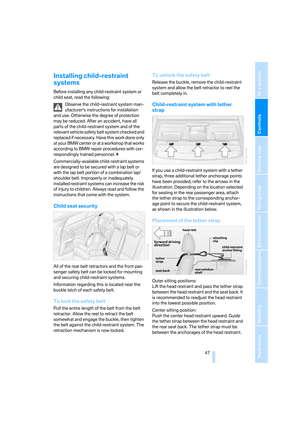 48
48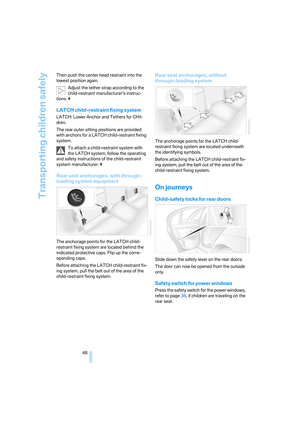 49
49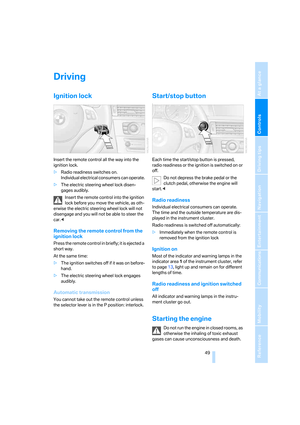 50
50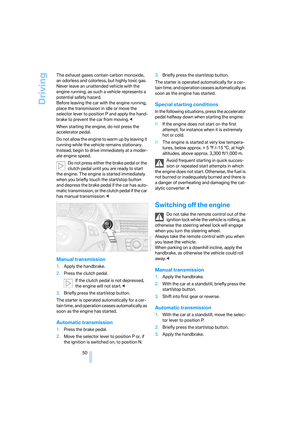 51
51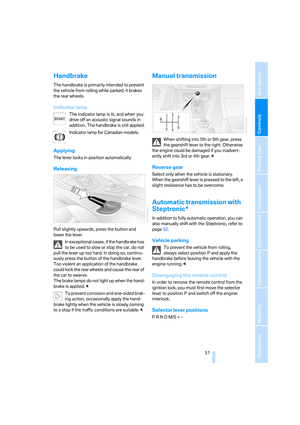 52
52 53
53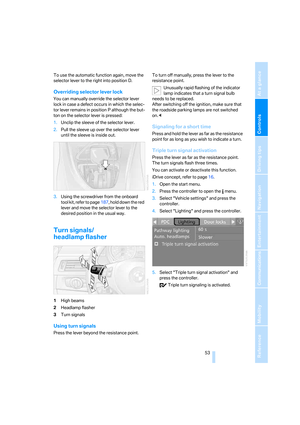 54
54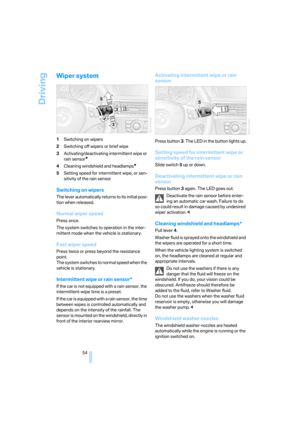 55
55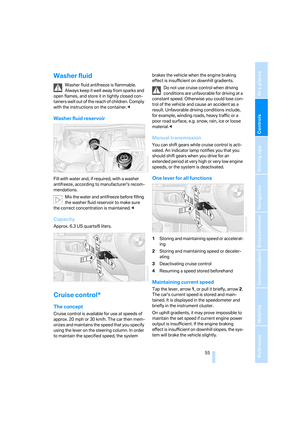 56
56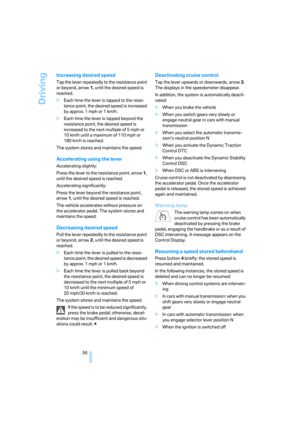 57
57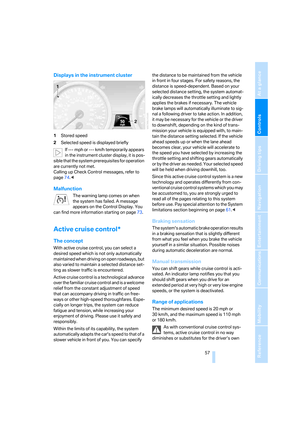 58
58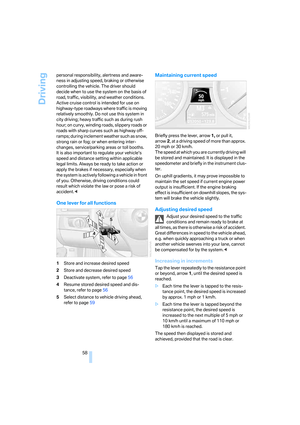 59
59 60
60 61
61 62
62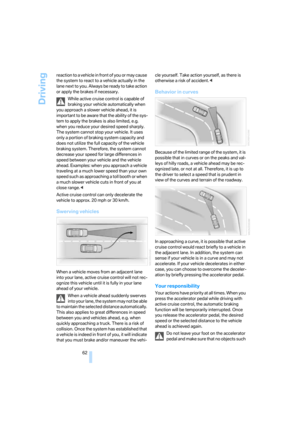 63
63 64
64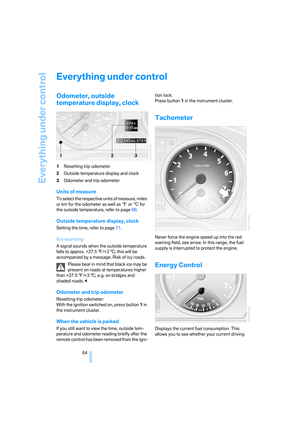 65
65 66
66 67
67 68
68 69
69 70
70 71
71 72
72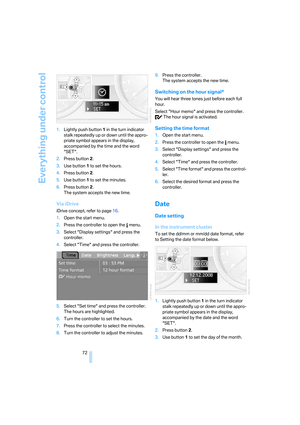 73
73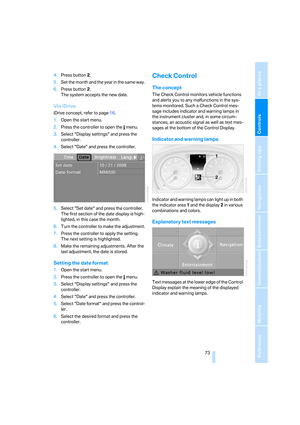 74
74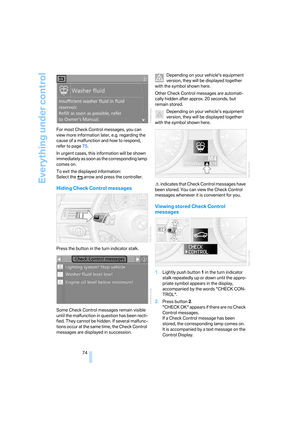 75
75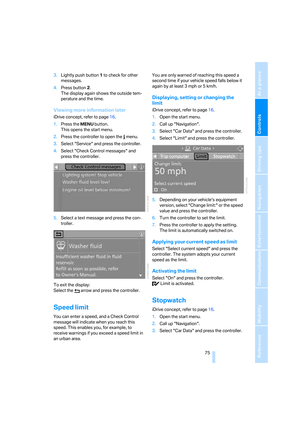 76
76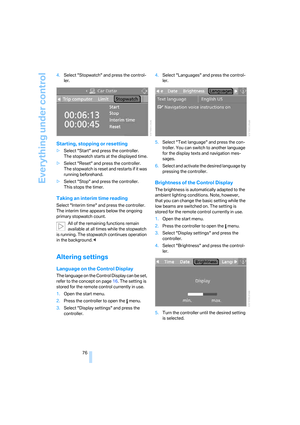 77
77 78
78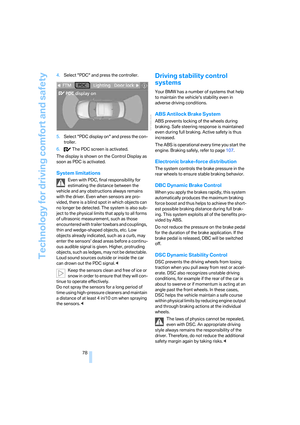 79
79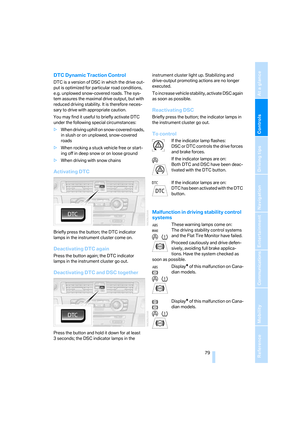 80
80 81
81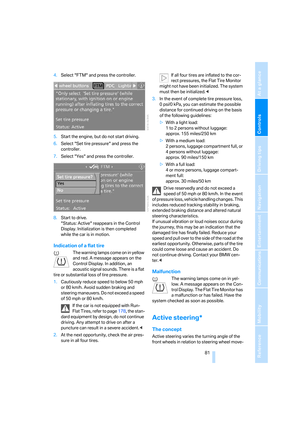 82
82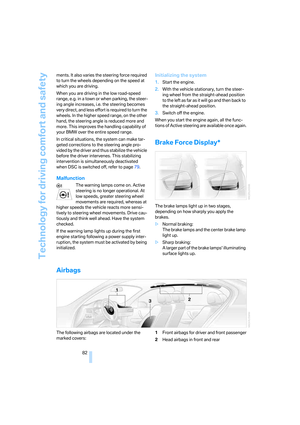 83
83 84
84 85
85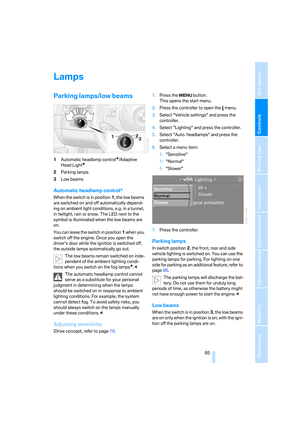 86
86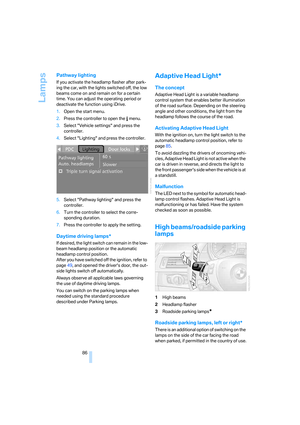 87
87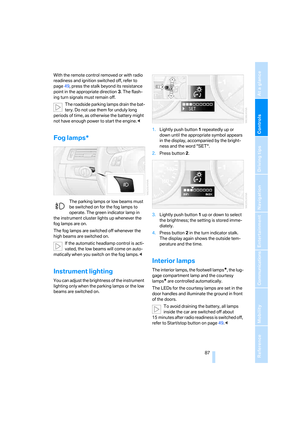 88
88 89
89 90
90 91
91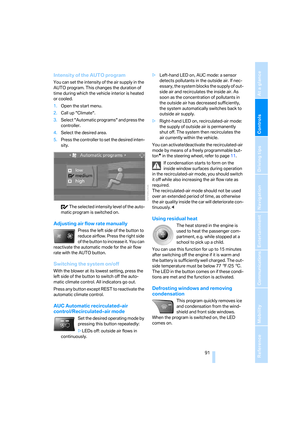 92
92 93
93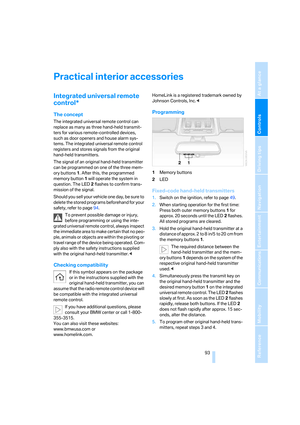 94
94 95
95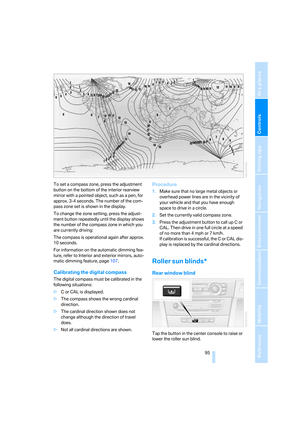 96
96 97
97 98
98 99
99 100
100 101
101 102
102 103
103 104
104 105
105 106
106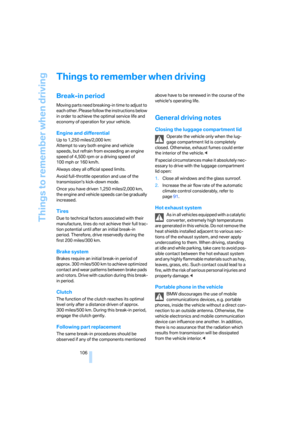 107
107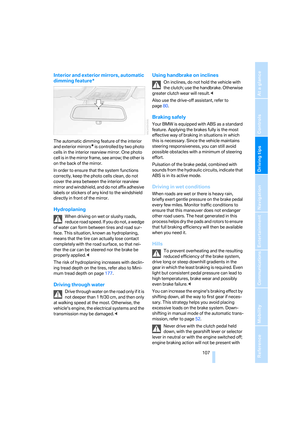 108
108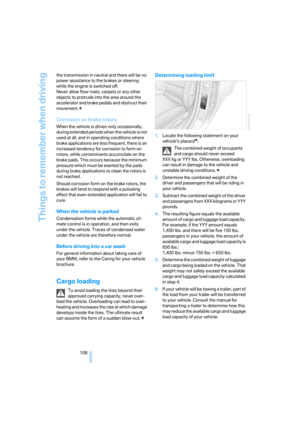 109
109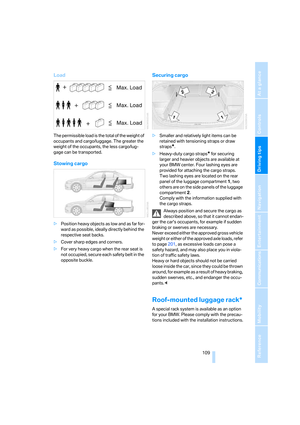 110
110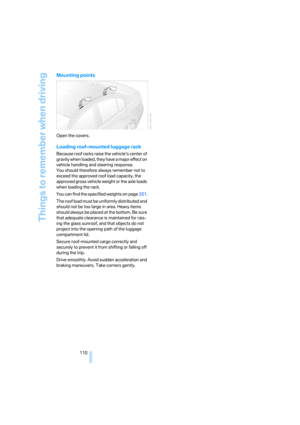 111
111 112
112 113
113 114
114 115
115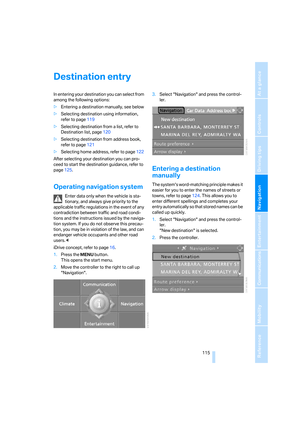 116
116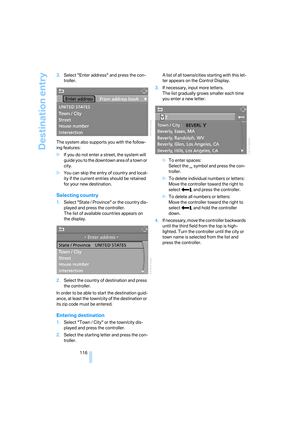 117
117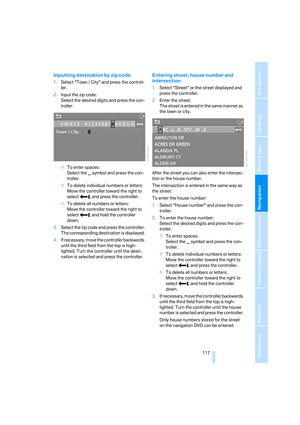 118
118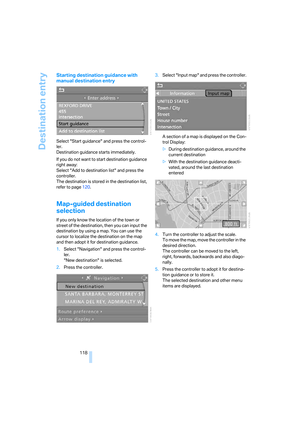 119
119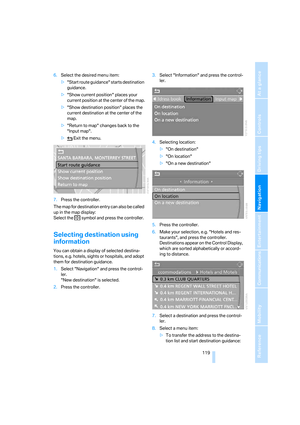 120
120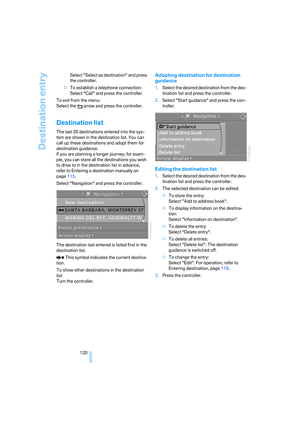 121
121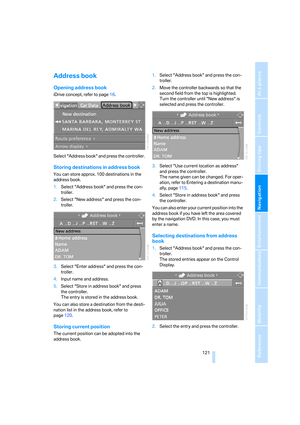 122
122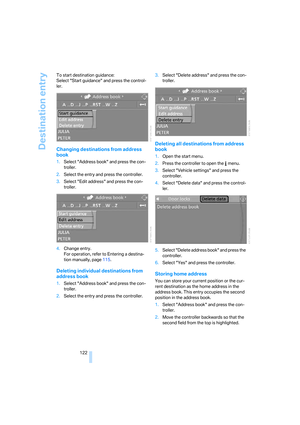 123
123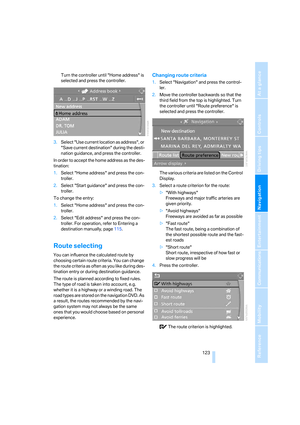 124
124 125
125 126
126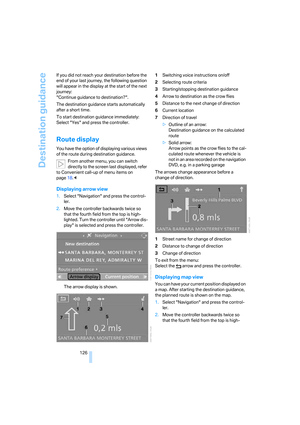 127
127 128
128 129
129 130
130 131
131 132
132 133
133 134
134 135
135 136
136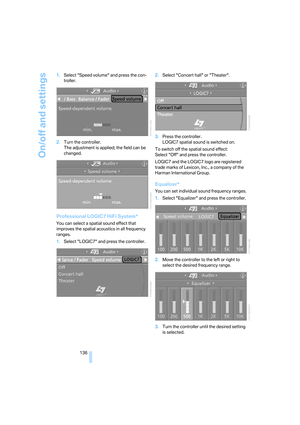 137
137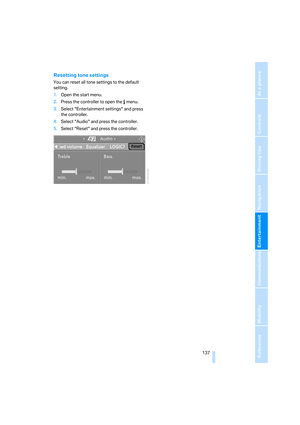 138
138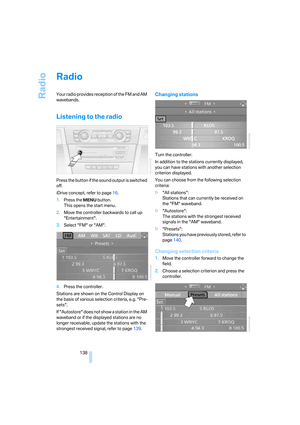 139
139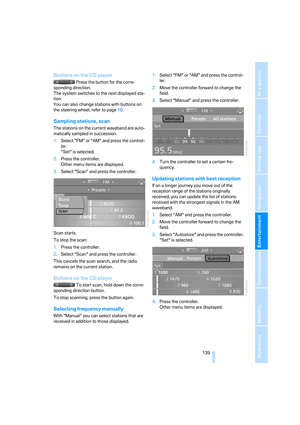 140
140 141
141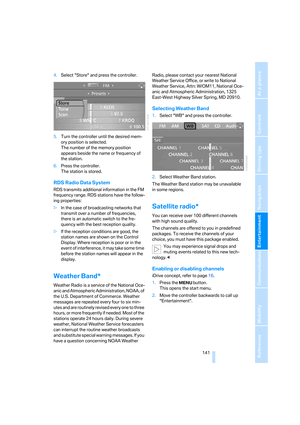 142
142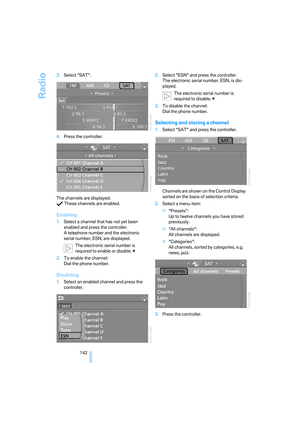 143
143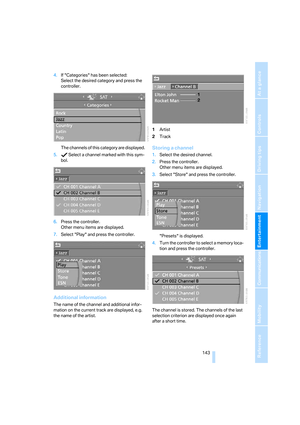 144
144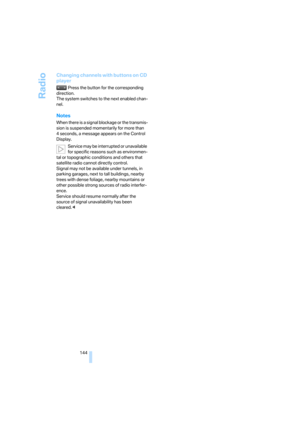 145
145 146
146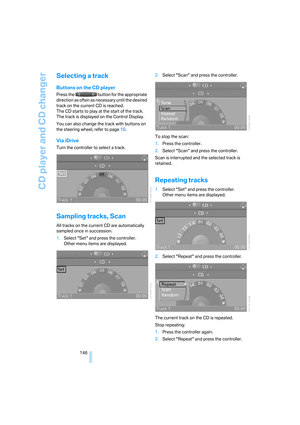 147
147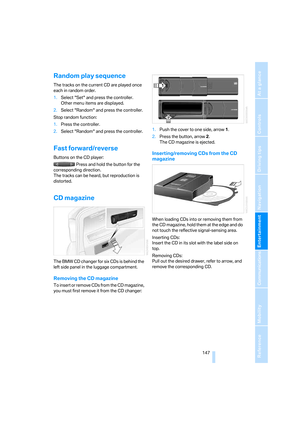 148
148 149
149 150
150 151
151 152
152 153
153 154
154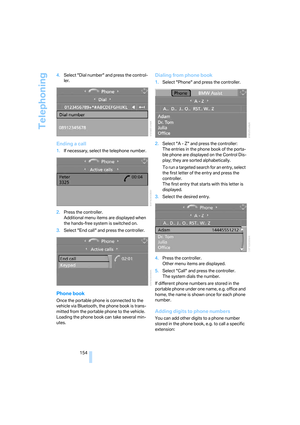 155
155 156
156 157
157 158
158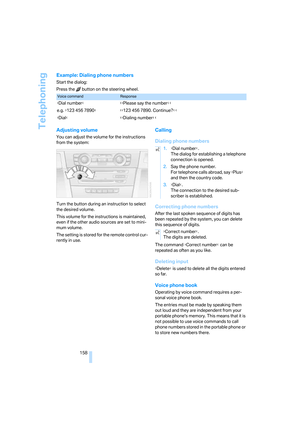 159
159 160
160 161
161 162
162 163
163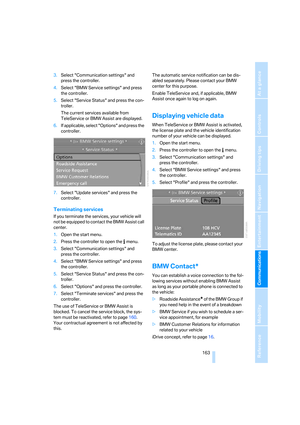 164
164 165
165 166
166 167
167 168
168 169
169 170
170 171
171 172
172 173
173 174
174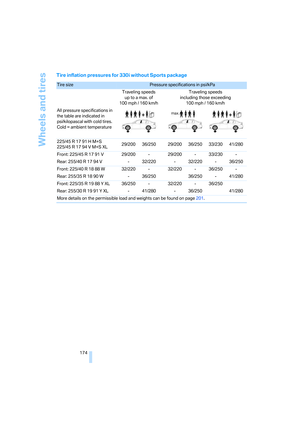 175
175 176
176 177
177 178
178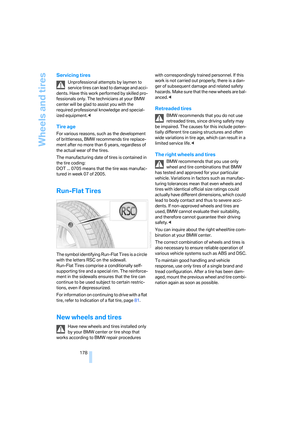 179
179 180
180 181
181 182
182 183
183 184
184 185
185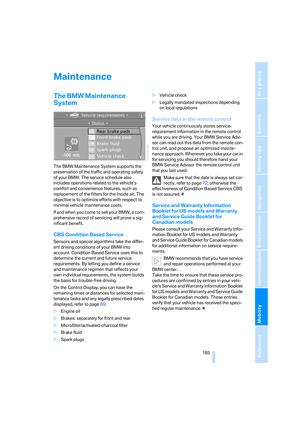 186
186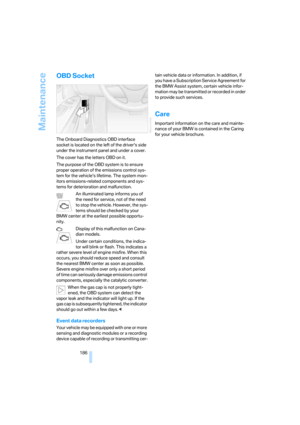 187
187 188
188 189
189 190
190 191
191 192
192 193
193 194
194 195
195 196
196 197
197 198
198 199
199 200
200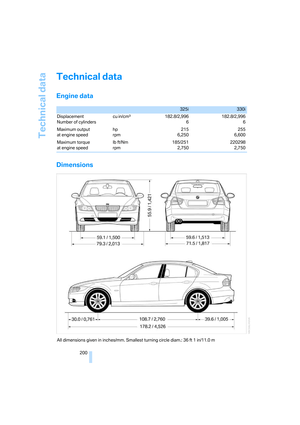 201
201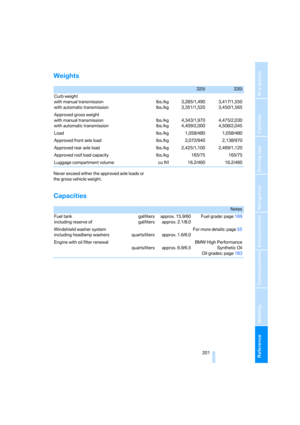 202
202 203
203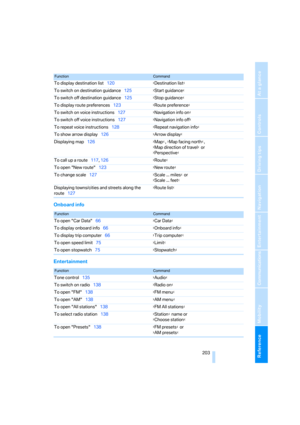 204
204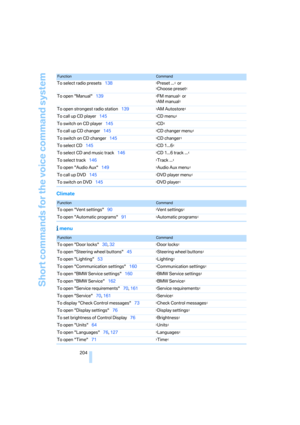 205
205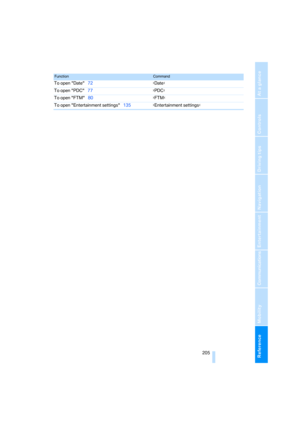 206
206 207
207 208
208 209
209 210
210 211
211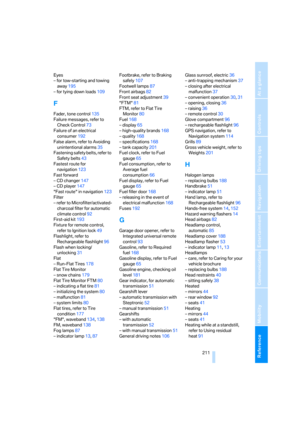 212
212 213
213 214
214 215
215 216
216 217
217 218
218 219
219 220
220 221
221 222
222