Page 217 of 291
IN AN EMERGENCY
215
40
40
40
15
15
25
7.5
15
15
20
15
15
7.5
30
50 A/C (MAXI-FUSE)
FAN1 (MAXI-FUSE)
FAN2 (MAXI-FUSE)
F3
F4
F60 (*)
F11
F61 (*)
F62 (*)
F63 (*)
F46
F10
F12
EFI (MAXI-FUSE)
JB3 (MAXI-FUSE) 54
54
54
53
53
52
53
52
52
52
52
53
53
54
54
SERVICES FIGURE FUSE AMPERES
(*) Fuse behind dashboard control box on an auxiliary bracket.
Climate control fan
Radiator fan
Radiator fan
Horn
Fuel pump
Tailgate electric unlocking
Electronic injection system
Bose system
Bose system
Sunroof
Sun roof
Petrol/ignition coil injectors
Services
Electronic injection
Engine compartment fuse carrier module
Page 218 of 291

IN AN EMERGENCY
216
IN THE EVENT OF A FLAT BATTERY
Before anything else, you are advised to
read the precautions for preventing the bat-
tery from draining and for ensuring long life
in the “Vehicle maintenance” chapter.
CHARGING THE BATTERY
IMPORTANTThe battery charging pro-
cedure is described only for information pur-
poses. This operation should be carried out
by Alfa Romeo Authorised Services.
Charging should be slow at a low amp rat-
ing for 24 hours. Charging for a longer time
may damage the battery.Charge the battery as follows:
– Disconnect the battery negative termi-
nal (–).
– Connect the charger cables to the bat-
tery terminals ensuring that the bias is cor-
rect.
– Turn on the charger.
– After charging, turn off the charger be-
fore disconnecting it from the battery.
– Re-connect the battery negative termi-
nal (–).
STARTING WITH AN
AUXILIARY BATTERY
See “Starting with an auxiliary battery” in
this chapter.
Strictly avoid using a bat-
tery charger to start the
engine: you may damage
the electronic systems, in particu-
lar the ignition and fuel supply con-
trol units.
The liquid contained in the
battery is poisonous and
corrosive. Avoid contact with the
skin or eyes. The battery should be
charged in a well ventilated place,
away from naked flames or pos-
sible sources of sparks: danger of
explosion and fire.
WARNING
Do not attempt to charge a
frozen battery: it must
firstly be thawed, otherwise it
may burst. If freezing has occurred,
the battery should be checked by
skilled personnel to make sure that
the internal elements are not dam-
aged and that the body is not
cracked, with the risk of leaking
poisonous and corrosive acid.
WARNING
Page 219 of 291

IN AN EMERGENCY
217
IF THE VEHICLE IS TO BE TOWED
The tow ring supplied with the vehicle is
housed in the tool box under the boot mat.
Front towing
To install the tow ring, proceed as follows:
– Take the tow ring from the tool box.
– Remove the cover (A) snap-fitted on
the front bumper (fig. 55). To do this use
the flat-bladed screwdriver provided, protect
the tip with a soft cloth to avoid damaging
the car.
– Firmly screw the ring in its housing.Back towing
To install the tow ring, just screw the ring
firmly in its housing (fig. 56).
fig. 55
A0A0456m
fig. 56
A0A0457m
Before tightening the ring
carefully clean the thread-
ed housing. Before beginning to
tow the car, make sure that the
ring is firmly tightened in its
threaded housing.
WARNING
Do not start the engine
when towing the car. Before
starting to tow, turn the ignition key
to MAR and back to STOP again
without removing it. Removing the
key automatically engages the
steering lock resulting in the impos-
sibility to steer the wheels. When
towing remember that without the
help of the engine brake and pow-
er steering greater effort is required
on the pedal and steering wheel. Do
not use flexible cables for towing
and avoid jerks. During towing op-
erations make sure that fastening
the joint to the car does not damage
the components in contact with it.
When towing the car, it is compul-
sory to follow specific traffic regu-
lations concerning both the towing
device and behaviour on the road.
WARNING
Page 220 of 291
Take care when position-
ing the arms of the lift or
workshop lift to avoid
damaging the side strips.
fig. 57
A0A0458m
IN AN EMERGENCY
218
USING AN ARM LIFT OR
WORKSHOP LIFT
The vehicle should be lifted only at the side
setting the ends of the arms or the work-
shop lift in the area shown in fig. 57.
IF THE VEHICLE IS TO BE LIFTED
Page 221 of 291

IN AN EMERGENCY
219
IN THE EVENT
OF AN ACCIDENT
– It is important to keep calm.
– If you are not directly involved, stop at
least a few dozen metres away from the ac-
cident.
– On motorways, stop without blocking
the emergency lane.
– Turn the engine off and the hazard warn-
ing lights on.
– At night, illuminate the place of the ac-
cident with the headlights.
– Take care, do not risk being run over.– Signal the accident placing the triangle
at regulation distance in a clearly visible
place.
– Call the emergency organisation, giving
the most accurate information possible. On
motorways use the special phones provid-
ed.
– In motorway pileups, especially with
poor visibility, the risk of being involved in
other crashes is high. Leave the car imme-
diately and go beyond the guard-rail.
– If the doors are blocked, do not try to
get out of the car breaking the windscreen
which is stratified. The windows and rear
screen are easier to break.
– Remove the ignition key of the vehi-
cles involved.– If you note a smell of fuel or other chem-
ical products, do not smoke and have ciga-
rettes stubbed out.
– To put out fires, even small ones, use
the extinguisher, blankets, sand, or earth.
Never use water.
– If use of the lighting system is not nec-
essary, disconnect the battery negative ter-
minal (–).
Page 222 of 291
IN AN EMERGENCY
220
IF PEOPLE ARE INJURED
– An injured person must never be aban-
doned. Helping is compulsory also for per-
sons not directly involved in the accident.
– Do not crowd around injured people.
– Reassure the injured person that help
is on the way, and stay near to overcome
any panic.
– Release or cut the seat belt restraining
injured persons.
– Do not give injured persons anything
to drink.
– An injured person should never be
moved except in the following circum-
stances.
– Remove an injured person from the car
only in danger of fire, sinking or falling.
When removing an injured person: do not
pull the limbs or bend the head and keep
the body as horizontal as possible.
FIRST AID KIT
It is advisable to have also a fire extin-
guisher and a blanket besides the first-aid
kit.
Page 223 of 291

VEHICLE MAINTENANCE
221
It is however wise to remember that Pro-
grammed Maintenance does not complete-
ly cover all the car’s requirements: also in
the initial period before the 20,000 km ser-
vice coupon and later, between one coupon
and another, ordinary care is still necessary
such as for example routinely checking and
topping up the level of fluids, checking the
tyre pressure, etc...
IMPORTANTThe Programmed Mainte-
nance coupons are specified by the Manu-
facturer. The failure to have them carried out
may invalidate the warranty.
The Programmed Maintenance service is
carried out by all Alfa Romeo Authorised Ser-
vices, at pre-established times.If during each operation, in addition to the
ones programmed, the need arises for fur-
ther replacements or repairs, these may be
carried out only with the explicit agreement
of the customer.
IMPORTANTYou are advised to contact
Alfa Romeo Authorised Services in the event
of any minor operating faults, without wait-
ing for the next service coupon. SCHEDULED
SERVICING
Correct maintenance is determinate in en-
suring long vehicle life under the best con-
ditions.
This is why Alfa Romeo has programmed
a series of checks and maintenance opera-
tions every 20,000 km.
IMPORTANTOn versions fitted with re-
configurable multifunction display, at 2000
km from the maintenance deadline, the dis-
play will show “REFER TO SERVICE MANU-
AL” which is shown again turning the igni-
tion key to MAR, every 200 km. For fur-
ther details, see “Service” in the “Recon-
figurable multifunction display” paragraph.
V V
E E
H H
I I
C C
L L
E E
M M
A A
I I
N N
T T
E E
N N
A A
N N
C C
E E
Page 224 of 291

●●●●●●●●●
●●●●●●●●●
●●●●●●●●●
●●●●●●●●●
●●●●●●●●●
●●●●
●●●●●●●●●
●●●●●●●●●
●●
●●●●
●●
●●●●
●●●●●●●●●
●●●●●●●●●
●●
VEHICLE MAINTENANCE
222
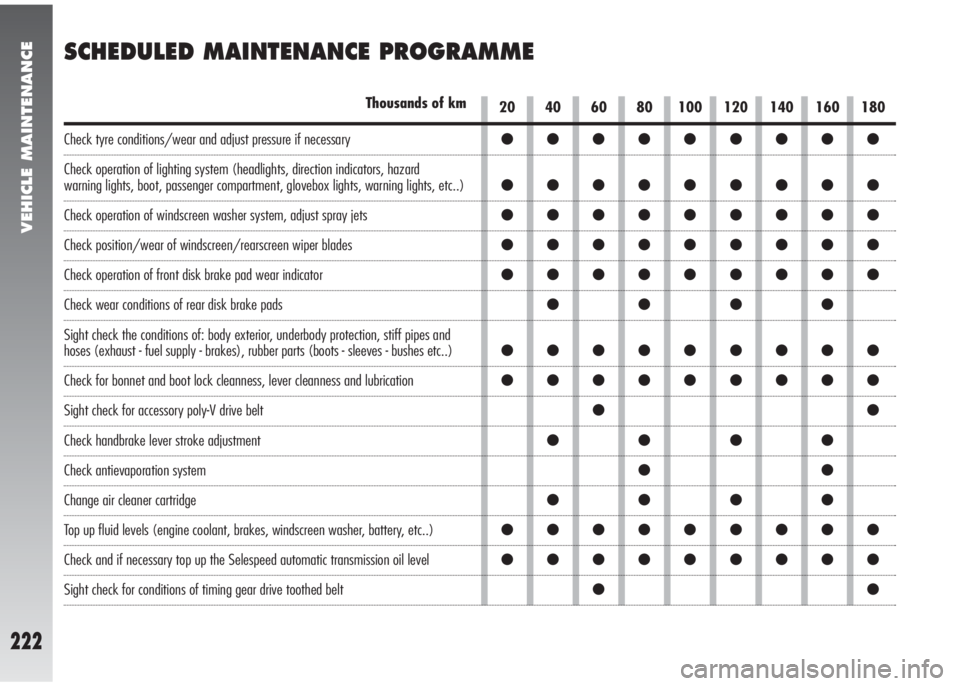
SCHEDULED MAINTENANCE PROGRAMME
20 40 60 80 100 120 140 160 180Thousands of km
Check tyre conditions/wear and adjust pressure if necessary
Check operation of lighting system (headlights, direction indicators, hazard
warning lights, boot, passenger compartment, glovebox lights, warning lights, etc..)
Check operation of windscreen washer system, adjust spray jets
Check position/wear of windscreen/rearscreen wiper blades
Check operation of front disk brake pad wear indicator
Check wear conditions of rear disk brake pads
Sight check the conditions of: body exterior, underbody protection, stiff pipes and
hoses (exhaust - fuel supply - brakes), rubber parts (boots - sleeves - bushes etc..)
Check for bonnet and boot lock cleanness, lever cleanness and lubrication
Sight check for accessory poly-V drive belt
Check handbrake lever stroke adjustment
Check antievaporation system
Change air cleaner cartridge
Top up fluid levels (engine coolant, brakes, windscreen washer, battery, etc..)
Check and if necessary top up the Selespeed automatic transmission oil level
Sight check for conditions of timing gear drive toothed belt