Page 1 of 86
PRINTED ON RECYCLED PAPER
YAMAHA MOTOR CO., LTD.
PRINTED IN JAPAN
2003.09-0.3×1 CR
(E)5SC-28199-E1
XVS650A
OWNER’S MANUAL
Page 2 of 86
EAU26941
DECLARATION of CONFORMITY
We
Hereby declare that the product:
is in compliance with following norm(s) or documents: Type-designation:
5SL-00, 5VS-00, 5VX-00, 3HT-00, 5UX-00, 5UX-10, 5KS-00 and 5KS-10
R&TTE Directive(1999/5/EC)
EN300 330-2 v1.1.1(2001-6), EN60950(2000)
Two or Three-Wheel Motor Vehicles Directive(97/24/EC: Chapter 8, EMC)
Place of issue: Shizuoka, Japan
Date of issue: Aug. 1
st 2002 Kind of equipment: IMMOBILIZER Address: 1450-6 Mori Mori-Machi Shuchi-gun Shizuoka 437-0292 Japan Company: MORIC CO., LTD.
Kazuji Kawai
representative name and signature
U5SCE1E0.book Page 1 Monday, September 8, 2003 11:32 AM
Page 3 of 86
INTRODUCTION
EAU10100
Welcome to the Yamaha world of motorcycling!
As the owner of the XVS650A, you are benefiting from Yamaha’s vast experience and newest technology regarding the de-
sign and manufacture of high-quality products, which have earned Yamaha a reputation for dependability.
Please take the time to read this manual thoroughly, so as to enjoy all advantages of your XVS650A. The owner’s manual
does not only instruct you in how to operate, inspect and maintain your motorcycle, but also in how to safeguard yourself and
others from trouble and injury.
In addition, the many tips given in this manual will help keep your motorcycle in the best possible condition. If you have any
further questions, do not hesitate to contact your Yamaha dealer.
The Yamaha team wishes you many safe and pleasant rides. So, remember to put safety first!
U5SCE1E0.book Page 1 Monday, September 8, 2003 11:32 AM
Page 4 of 86

IMPORTANT MANUAL INFORMATION
EAU10150
Particularly important information is distinguished in this manual by the following notations:NOTE:�
This manual should be considered a permanent part of this motorcycle and should remain with it even if the motorcycle
is subsequently sold.
�
Yamaha continually seeks advancements in product design and quality. Therefore, while this manual contains the most
current product information available at the time of printing, there may be minor discrepancies between your motorcycleand this manual. If you have any questions concerning this manual, please consult your Yamaha dealer.WARNING
EWA10030
PLEASE READ THIS MANUAL CAREFULLY AND COMPLETELY BEFORE OPERATING THIS MOTORCYCLE.The Safety Alert Symbol means ATTENTION! BECOME ALERT! YOUR SAFETY IS
INVOLVED!
Failure to follow WARNING instructions could result in severe injury or death
to the
motorcycle operator, a bystander, or a person inspecting or repairing the motor-
cycle.
A CAUTION indicates special precautions that must be taken to avoid damage to
the motorcycle.
A NOTE provides key information to make procedures easier or clearer.
WARNING
CAUTION:
NOTE:
U5SCE1E0.book Page 1 Monday, September 8, 2003 11:32 AM
Page 5 of 86
IMPORTANT MANUAL INFORMATION
EAU10200
XVS650A
OWN ER’S MANUAL
©2003 by Yamaha Motor Co., Ltd.
1st edition, August 2003
All rights reserved.
Any reprinting or unauthorized use
without the written permission of
Yamaha Motor Co., Ltd.
is expressly prohibited.
Printed in Japan.
U5SCE1E0.book Page 2 Monday, September 8, 2003 11:32 AM
Page 6 of 86

TABLE OF CONTENTSSAFETY INFORMATION ..................1-1
DESCRIPTION ..................................2-1
Left view ..........................................2-1
Right view ........................................2-2
Controls and instruments.................2-3
INSTRUMENT AND CONTROL
FUNCTIONS.......................................3-1
Immobilizer system .........................3-1
Main switch/steering lock ................3-2
Indicator and warning lights ............3-3
Speedometer unit ...........................3-5
Anti-theft alarm (optional) ...............3-5
Handlebar switches ........................3-5
Clutch lever .....................................3-7
Shift pedal .......................................3-7
Brake lever .....................................3-7
Brake pedal ....................................3-8
Fuel tank cap ..................................3-8
Fuel .................................................3-9
Catalytic converter ........................3-10
Fuel cock ......................................3-10
Starter (choke) knob ......................3-11
Seats ............................................3-11
Helmet holder ...............................3-12
Storage compartment ...................3-13
Adjusting the shock absorber
assembly ...................................3-13
Luggage strap holders ..................3-14
Sidestand ......................................3-15Ignition circuit cut-off system ........ 3-15
PRE-OPERATION CHECKS............. 4-1
Pre-operation check list .................. 4-2
OPERATION AND IMPORTANT
RIDING POINTS................................. 5-1
Starting a cold engine .................... 5-1
Starting a warm engine .................. 5-2
Shifting ........................................... 5-2
Tips for reducing fuel
consumption ............................... 5-3
Engine break-in .............................. 5-4
Parking ........................................... 5-4
PERIODIC MAINTENANCE AND
MINOR REPAIR................................. 6-1
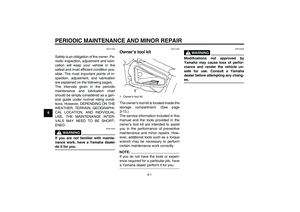
Owner’s tool kit ............................... 6-1
Periodic maintenance and
lubrication chart .......................... 6-2
Removing and installing panels ..... 6-5
Checking the spark plugs ............... 6-6
Engine oil and oil filter element ...... 6-7
Final gear oil ................................. 6-10
Cleaning the air filter element ...... 6-11
Adjusting the carburetors ............. 6-12
Adjusting the engine idling
speed ........................................ 6-12
Adjusting the throttle cable free
play ........................................... 6-13
Adjusting the valve clearance ...... 6-13Tires ............................................. 6-14
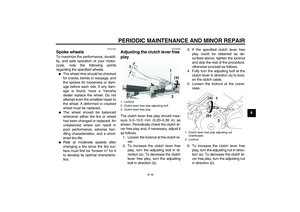
Spoke wheels .............................. 6-16
Adjusting the clutch lever free
play ........................................... 6-16
Adjusting the brake lever free
play ........................................... 6-17
Adjusting the brake pedal position
and free play ............................. 6-18
Adjusting the rear brake light
switch ....................................... 6-19
Checking the front brake pads
and rear brake shoes ............... 6-19
Checking the brake fluid level ...... 6-20
Changing the brake fluid .............. 6-21
Checking and lubricating the
cables ....................................... 6-21
Checking and lubricating the
throttle grip and cable ............... 6-21
Checking and lubricating the
brake and shift pedals .............. 6-22
Checking and lubricating the
brake and clutch levers ............ 6-22
Checking and lubricating the
sidestand .................................. 6-23
Checking the front fork ................. 6-23
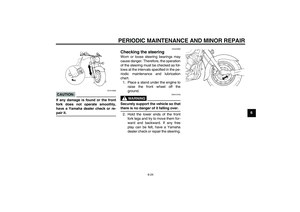
Checking the steering .................. 6-24
Checking the wheel bearings ....... 6-25
Battery ......................................... 6-25
Replacing the fuses ..................... 6-26
Replacing the headlight bulb ....... 6-27U5SCE1E0.book Page 1 Monday, September 8, 2003 11:32 AM
Page 7 of 86
TABLE OF CONTENTS
Replacing a turn signal light bulb
or the tail/brake light bulb .......... 6-29
Replacing the auxiliary light
bulb ........................................... 6-29
Supporting the motorcycle ............ 6-30
Front wheel ................................... 6-31
Rear wheel ................................... 6-32
Troubleshooting ............................ 6-34
Troubleshooting chart ................... 6-35
MOTORCYCLE CARE AND
STORAGE.......................................... 7-1
Care ................................................ 7-1
Storage ...........................................7-3
SPECIFICATIONS ............................. 8-1
CONSUMER INFORMATION............. 9-1
Identification numbers .................... 9-1
U5SCE1E0.book Page 2 Monday, September 8, 2003 11:32 AM
Page 8 of 86

1-1
1
SAFETY INFORMATION
EAU10250
MOTORCYCLES ARE SINGLE
TRACK VEHICLES. THEIR SAFE USE
AND OPERATION ARE DEPENDENT
UPON THE USE OF PROPER RIDING
TECHNIQUES AS WELL AS THE EX-
PERTISE OF THE OPERATOR. EV-
ERY OPERATOR SHOULD KNOW
THE FOLLOWING REQUIREMENTS
BEFORE RIDING THIS MOTOR-
CYCLE.
HE OR SHE SHOULD:�
OBTAIN THOROUGH INSTRUC-
TIONS FROM A COMPETENT
SOURCE ON ALL ASPECTS OF
MOTORCYCLE OPERATION.
�
OBSERVE THE WARNINGS AND
MAINTENANCE REQUIRE-
MENTS IN THE OWNER’S MAN-
UAL.
�
OBTAIN QUALIFIED TRAINING
IN SAFE AND PROPER RIDING
TECHNIQUES.
�
OBTAIN PROFESSIONAL TECH-
NICAL SERVICE AS INDICATED
BY THE OWNER’S MANUALAND/OR WHEN MADE NECES-
SARY BY MECHANICAL CONDI-
TIONS.
Safe riding
�
Always make pre-operation
checks. Careful checks may help
prevent an accident.
�
This motorcycle is designed to car-
ry the operator and a passenger.
�
The failure of motorists to detect
and recognize motorcycles in traf-
fic is the predominating cause of
automobile/motorcycle accidents.
Many accidents have been caused
by an automobile driver who did
not see the motorcycle. Making
yourself conspicuous appears to
be very effective in reducing the
chance of this type of accident.
Therefore:
Wear a brightly colored jacket.
Use extra caution when ap-
proaching and passing through
intersections, since intersec-
tions are the most likely places
for motorcycle accidents to oc-
cur.Ride where other motorists can
see you. Avoid riding in another
motorist’s blind spot.
�
Many motorcycle accidents in-
volve inexperienced operators. In
fact, many operators who have
been involved in accidents do not
even have a current motorcycle li-
cense.
Make sure that you are qualified
and that you only lend your
motorcycle to other qualified op-
erators.
Know your skills and limits.
Staying within your limits may
help you to avoid an accident.
We recommend that you prac-
tice riding your motorcycle
where there is no traffic until you
have become thoroughly famil-
iar with the motorcycle and all of
its controls.
�
Many motorcycle accidents have
been caused by error of the motor-
cycle operator. A typical error
made by the operator is veering
U5SCE1E0.book Page 1 Monday, September 8, 2003 11:32 AM


5SC-28199-E1
XVS650A
OWNER’S MANUAL")
 or documents: Type-designation:
5SL-00, 5VS-00, 5VX-00, 3HT-00, 5UX-00, 5UX-10,")


