2004 SUBARU IMPREZA WRX brake pads
[x] Cancel search: brake padsPage 161 of 491

3-24
Instruments and controls
as when the engine is jump started, the ABS warning
light may come on. This is due to the low battery volt-
age and does not indicate a malfunction. When the
battery becomes fully charged, the light will go out. !
Brake system warning light
"Driving with the brake system warning light
on is dangerous. This indicates your brake sys-
tem may not be working properly. If the light re-
mains on, have the brakes inspected by a
SUBARU dealer immediately." If at all in doubt about whether the brakes are
operating properly, do not drive the vehicle.
Have your vehicle towed to the nearest
SUBARU dealer for repair.
This light has the following two functions: ! Parking brake warning
The light comes on with the parking brake applied
while the ignition switch is in the “ON” position. It goes
out when the parking brake is fully released. !
Brake fluid level warning
This light comes on when the brake fluid level has
dropped to near the “MIN” level of the brake fluid res-
ervoir with the ignition switch in the “ON” position and
with the parking brake fully released.
If the brake system warning light should come on while
driving (with the parking brake fully released and with
the ignition switch positioned in “ON”), it could be an
indication of leaking of brake fluid or worn brake pads.
If this occurs, immediately stop the vehicle at the near-
est safe place and check the brake fluid level. If the flu-
id level is below the “MIN” mark in the reservoir, do not
drive the vehicle. Have the vehicle towed to the near-
est SUBARU dealer for repair. ! Electronic Brake Force Distribution (EBD) sys-
tem warning (for vehicles with ABS)
The brake system warning light also illuminates if a
malfunction occurs in the EBD system. In that event, it
comes on together with the ABS warning light.
The EBD system may be malfunctioning if the brake
system warning light and ABS warning light illuminate
simultaneously during driving.
Even if the EBD system fails, the conventional braking
system will still function. However, the rear wheels will
be more prone to locking when the brakes are applied
harder than usual and the vehicle’s motion may there-
(U.S.) (Canada)
Page 297 of 491

7-28
Starting and operating
Power steering
The power steering system operates only when the
engine is running.
If you lose power steering assist because the engine
stops or the system fails to function, you can steer butit will take much more effort.
NOTE
Right after the engine has been started and before
it has warmed up, you may hear a noise coming
from areas adjacent to the power steering pump
which is located at the right-front area of the en-
gine compartment. This noise is normal. It does
not indicate power steering system trouble.
Do not hold the steering wheel at the fully
locked position left or right for more than five
seconds. This may damage the power steering
pump.
Braking !
Braking tips
Never rest your foot on the brake pedal while
driving. This can cause dangerous overheating
of the brakes and needless wear on the brake
pads and linings.
! When the brakes get wet
When driving in rain or after washing the vehicle, the
brakes may get wet. As a result, brake stopping dis-
tance will be longer. To dry the brakes, drive the vehi-
cle at a safe speed while lightly depressing the brake
pedal to heat up the brakes. ! Use of engine braking
Remember to make use of engine braking in addition
to foot braking. When descending a grade, if only the
foot brake is used, the brakes may start working im-
properly because of brake fluid overheating, caused
by overheated brake pads. To help prevent this, shift
into a lower gear to get stronger engine braking.
Page 298 of 491

7-29
Starting and operating
– CONTINUED –
!Braking when a tire is punctured
Do not depress the brake pedal suddenly when a tire
is punctured. This could cause a loss of control of the
vehicle. Keep driving straight ahead while gradually
reducing speed. Then slowly pull off the road to a safe
place. ! Brake system
! Two separate circuits
Your vehicle has two separate circuit brake systems.
Each circuit works diagonally across the vehicle. If one
circuit of the brake system should fail, the other half of
the system still works. If one circuit fails, the brake
pedal will go down much closer to the floor than usual
and you will need to press it down much harder. And a
much longer distance will be needed to stop the vehi- cle. ! Brake booster
The brake booster uses engine manifold vacuum to
assist braking force. Do not turn off the engine while
driving because that will turn off the brake booster, re-
sulting in poor braking power.
The brakes will continue to work even when the brake
booster completely stops functioning. If this happens,
however, you will have to push the pedal much harder than normal and the braking distance will increase. !
Disc brake pad wear warning indica- tors
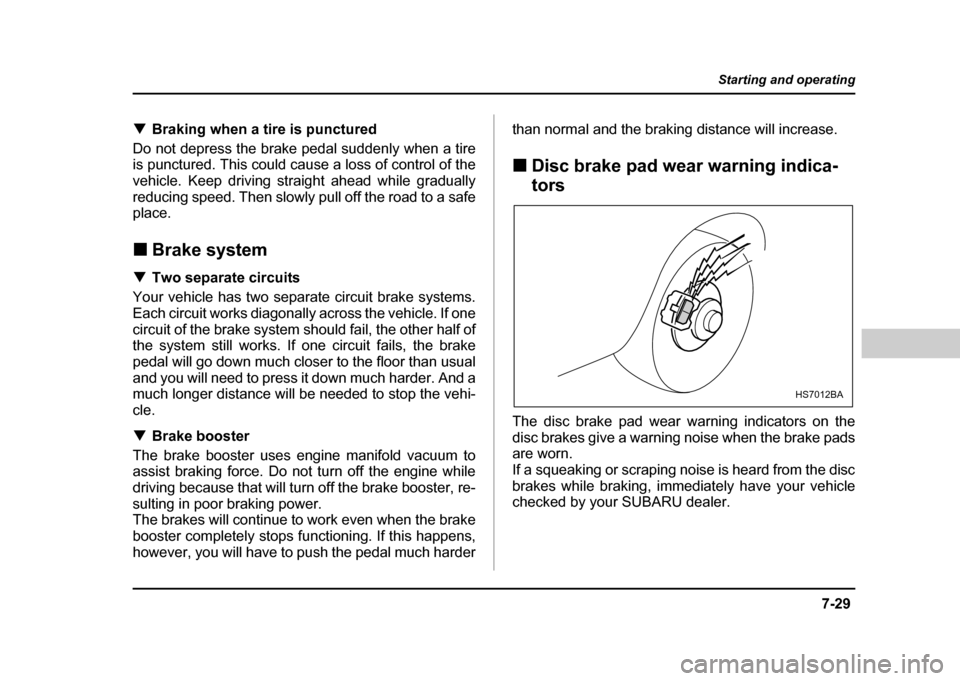
The disc brake pad wear warning indicators on the
disc brakes give a warning noise when the brake pads
are worn.
If a squeaking or scraping noise is heard from the disc
brakes while braking, immediately have your vehicle
checked by your SUBARU dealer.
HS7012BA
Page 313 of 491

8-2
Driving tips
Driving tipsNew vehicle break-in driving – the
first 1,000 miles (1,600 km)
The performance and long life of your vehicle are de-
pendent on how you handle and care for your vehicle
while it is new. Follow these instructions during the
first 1,000 miles (1,600 km): "
Do not race the engine. And do not allow engine
speed to exceed 4,000 rpm except in an emergency. " Do not drive at one constant engine or vehicle
speed for a long time, either fast or slow." Avoid starting suddenly and rapid acceleration, ex-
cept in an emergency. " Avoid hard braking, except in an emergency.
The same break-in procedures should be applied to
an overhauled engine, newly mounted engine or when
brake pads or brake linings are replaced with new
ones.
Fuel economy hints
The following suggestions will help to save your fuel. " Select the proper gear position for the speed and
road conditions. " Avoid sudden acceleration or deceleration. Always
accelerate gently until you reach the desired speed.
Then try to maintain that speed for as long as possible. " Do not pump the accelerator and avoid racing the
engine. " Avoid unnecessary engine idling.
" Keep the engine properly tuned.
" Keep the tires inflated to the correct pressure shown
on the tire placard, which is located under the door
latch on the driver’s side. Low pressure will increase
tire wear and fuel consumption. " Use the air conditioner only when necessary.
" Keep the front and rear wheels in proper alignment.
" Avoid carrying unnecessary luggage or cargo.
Page 321 of 491

8-10
Driving tips
shallow streams, first check the depth of the water and
the bottom of the stream bed for firmness and ensure
that the bed of the stream is flat. Drive slowly and com-
pletely through the stream. The water should be shal-
low enough that it does not reach the vehicle’s under-
carriage. Water entering the engine air intake or the
exhaust pipe or water splashing onto electrical parts
may damage your vehicle and may cause it to stall.
Never attempt to drive through rushing water; regard-
less of its depth, it can wash away the ground from un-
der your tires, resulting in possible loss of traction and
even vehicle rollover. "
Always check your brakes for effectiveness immedi-
ately after driving in sand, mud or water. Do this by
driving slowly and stepping on the brake pedal. Re-
peat that process several times to dry out the brake
discs and brake pads. " Do not drive or park over or near flammable materi-
als such as dry grass or fallen leaves, as they may
burn easily. The exhaust system is very hot while the
engine is running and right after the engine stops. This
could create a fire hazard." After driving through tall grass, mud, rocks, sand,
rivers, etc., check that there is no grass, bush, paper,
rags, stones, sand, etc. adhering to or trapped on the
underbody. Clear off any such matter from the under-
body. If the vehicle is used with these materials trapped or adhering to the underbody, a mechanical
breakdown or fire could occur. "
Secure all cargo carried inside the vehicle and make
certain that it is not piled higher than the seatbacks.
During sudden stops or jolts, unsecured cargo could
be thrown around in the vehicle and cause injury. Do
not pile heavy loads on the roof. Those loads raise the
vehicle’s center of gravity and make it more prone to
tip over." If you must rock the vehicle to free it from sand or
mud, depress the accelerator pedal slightly and move
the selector lever back and forth between “D” and “R”
repeatedly. Do not race the engine. For the best pos-
sible traction, avoid spinning the wheels when trying to
free the vehicle.
When the road surface is extremely slippery, you can
obtain better traction by starting the vehicle with the
transmission in 2nd than 1st (both for MT and AT). " Never equip your vehicle with tires larger than those
specified in this manual. " Frequent driving of an AWD vehicle under hard-driv-
ing conditions such as rough roads or off roads will ne-
cessitate more frequent replacement of engine oil,
brake fluid and transmission oil than that specified in
the maintenance schedule described in the “Warranty
and Maintenance Booklet”.
Remember that damage done to your Subaru while
Page 386 of 491

11 - 1
11
Maintenance and service
Maintenance schedule ................................. 11-3
Maintenance precautions ............................ 11-3 Before checking or servicing in the engine compartment .................................................. 11-4
When you do checking or servicing in the engine compartment while the engine is
running ............................................................ 11-5
Engine hood .................................................. 11-5
Engine compartment overview ................... 11-8 2.5 liter model .................................................... 11-8
2.0 liter (Turbo) model ...................................... 11-9
2.5 liter (Turbo) model ...................................... 11-10
Engine oil ...................................................... 11-11 Checking the oil level ....................................... 11-11
Changing the oil and oil filter .......................... 11-12
Recommended grade and viscosity ................ 11-16
Recommended grade and viscosity under severe driving conditions .............................. 11-18
Synthetic oil ....................................................... 11-18
Cooling system ............................................. 11-18 Cooling fan, hose and connections ................ 11-19
Engine coolant .................................................. 11-19
Air cleaner element ...................................... 11-23 Replacing the air cleaner element ................... 11-23
Spark plugs ................................................... 11-26 Recommended spark plugs ............................. 11-27
Drive belts ..................................................... 11-27
Manual transmission oil ............................... 11-28 Checking the oil level ....................................... 11-28
Recommended grade and viscosity ................ 11-30 Automatic transmission fluid ...................... 11-31
Checking the fluid level .................................... 11-31
Recommended fluid ......................................... 11-32
Front differential gear oil (AT vehicles) ...... 11-33 Checking the oil level ....................................... 11-33
Recommended grade and viscosity ............... 11-33
Rear differential gear oil ............................... 11-34 Checking the gear oil level .............................. 11-34
Recommended grade and viscosity ............... 11-35
Power steering fluid ...................................... 11-36 Checking the fluid level .................................... 11-36
Recommended fluid ......................................... 11-37
Brake fluid ..................................................... 11-37 Checking the fluid level .................................... 11-37
Recommended brake fluid ............................... 11-38
Clutch fluid (MT vehicles) ............................ 11-38 Checking the fluid level .................................... 11-38
Recommended clutch fluid .............................. 11-39
Brake booster ................................................ 11-40
Brake pedal .................................................... 11-40 Checking the brake pedal free play ................ 11-40
Checking the brake pedal reserve distance ... 11-41
Clutch pedal (MT vehicles) ........................... 11-41 Checking the clutch function .......................... 11-41
Checking the clutch pedal free play ............... 11-42
Replacement of brake pad and lining ......... 11-42 Breaking-in of new brake pads and linings .... 11-43
Parking brake stroke .................................... 11-44
Tires and wheels ........................................... 11-44
Page 427 of 491

11 - 4 2
Maintenance and service
!
Checking the clutch pedal free play
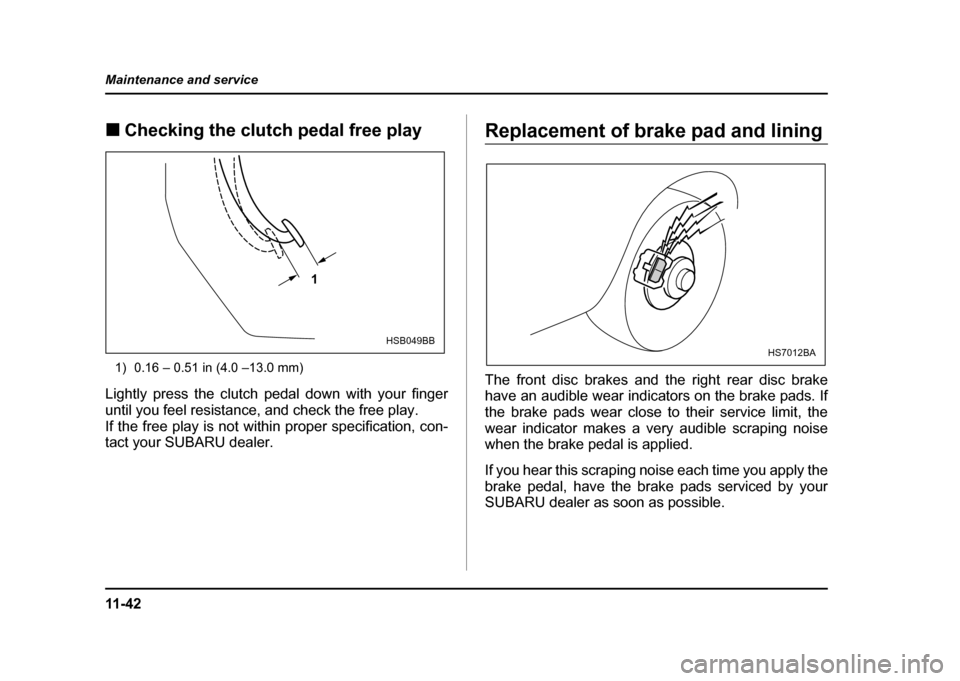
1) 0.16 – 0.51 in (4.0 –13.0 mm)
Lightly press the clutch pedal down with your finger
until you feel resistance, and check the free play.
If the free play is not within proper specification, con-
tact your SUBARU dealer.Replacement of brake pad and lining
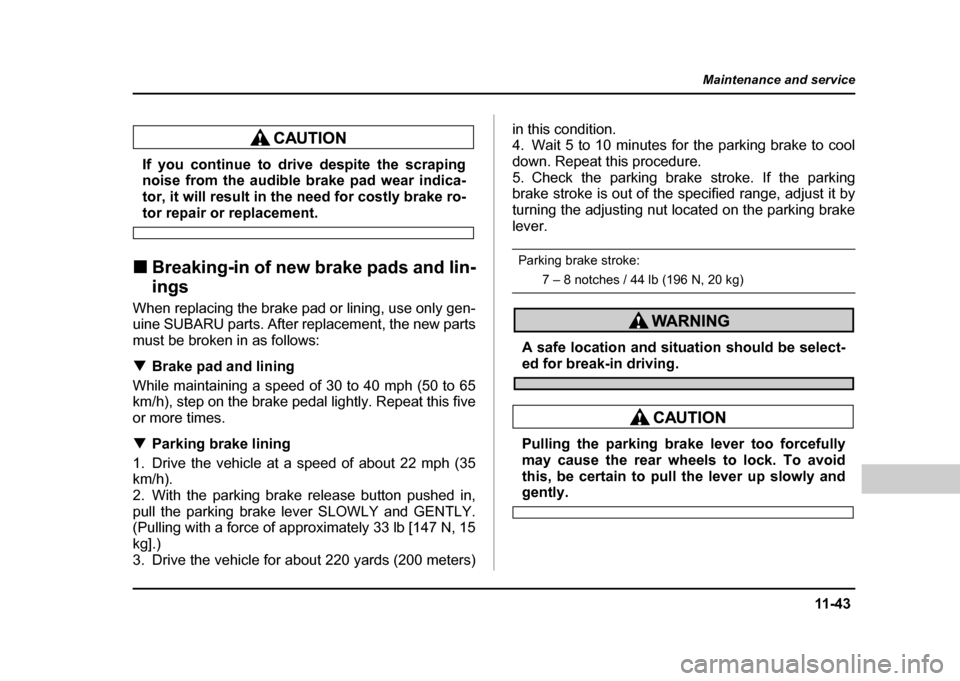
The front disc brakes and the right rear disc brake
have an audible wear indicators on the brake pads. If
the brake pads wear close to their service limit, the
wear indicator makes a very audible scraping noise
when the brake pedal is applied.
If you hear this scraping noise each time you apply the
brake pedal, have the brake pads serviced by your
SUBARU dealer as soon as possible.
1
HSB049BBHS7012BA
Page 428 of 491

11 -4 3
Maintenance and service
– CONTINUED –
If you continue to drive despite the scraping
noise from the audible brake pad wear indica-
tor, it will result in the need for costly brake ro-
tor repair or replacement.
! Breaking-in of new brake pads and lin- ings
When replacing the brake pad or lining, use only gen-
uine SUBARU parts. After replacement, the new parts
must be broken in as follows: ! Brake pad and lining
While maintaining a speed of 30 to 40 mph (50 to 65
km/h), step on the brake pedal lightly. Repeat this five
or more times. ! Parking brake lining
1. Drive the vehicle at a speed of about 22 mph (35 km/h).
2. With the parking brake release button pushed in,
pull the parking brake lever SLOWLY and GENTLY.
(Pulling with a force of approximately 33 lb [147 N, 15 kg].)
3. Drive the vehicle for about 220 yards (200 meters) in this condition.
4. Wait 5 to 10 minutes for the parking brake to cool
down. Repeat this procedure.
5. Check the parking brake stroke. If the parking
brake stroke is out of the specified range, adjust it by
turning the adjusting nut located on the parking brake
lever.
Parking brake stroke:
7 – 8 notches / 44 lb (196 N, 20 kg)
A safe location and situation should be select-ed for break-in driving.
Pulling the parking brake lever too forcefully
may cause the rear wheels to lock. To avoid
this, be certain to pull the lever up slowly and
gently.