2004 SUBARU IMPREZA WRX automatic transmission
[x] Cancel search: automatic transmissionPage 140 of 491
3-3
Instruments and controls
– CONTINUED –
Instruments and controlsIgnition switch
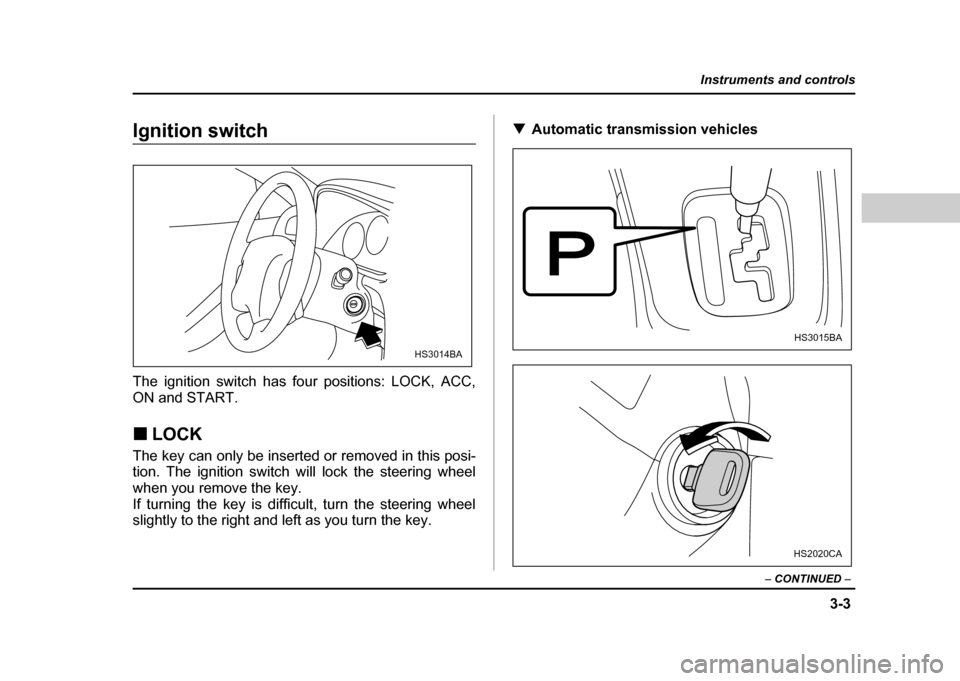
The ignition switch has four positions: LOCK, ACC,
ON and START. !LOCK
The key can only be inserted or removed in this posi-
tion. The ignition switch will lock the steering wheel
when you remove the key.
If turning the key is difficult, turn the steering wheel
slightly to the right and left as you turn the key. !
Automatic transmission vehicles
HS3014BA
HS3015BA
HS2020CA
Page 141 of 491
3-4
Instruments and controls
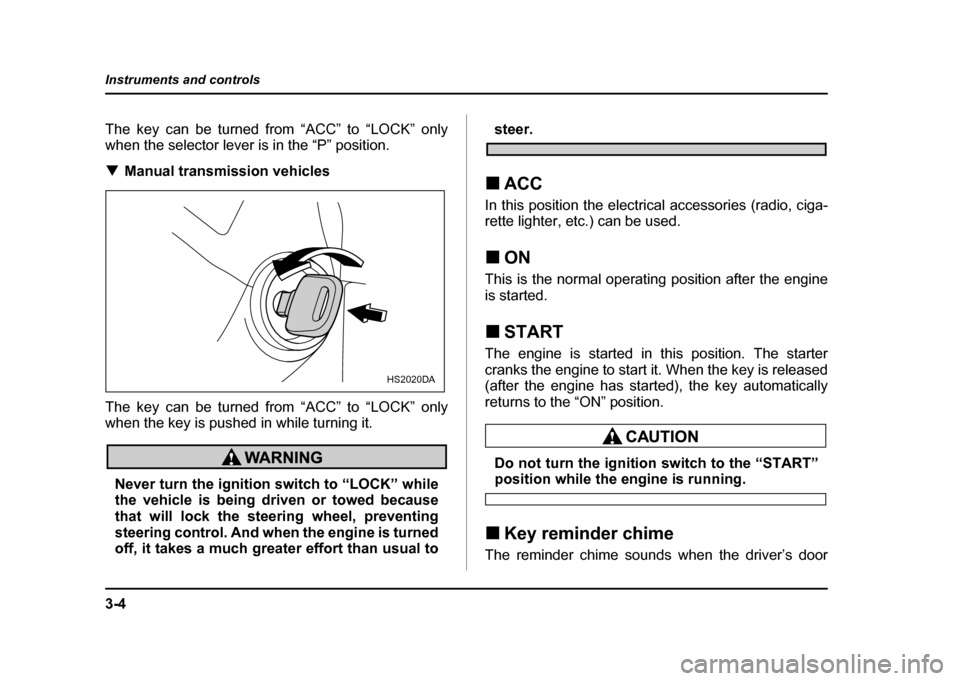
The key can be turned from “ACC” to “LOCK” only
when the selector lever is in the “P” position. !
Manual transmission vehicles
The key can be turned from “ACC” to “LOCK” only
when the key is pushed in while turning it.
Never turn the ignition switch to “LOCK” while
the vehicle is being driven or towed because
that will lock the steering wheel, preventing
steering control. And when the engine is turned
off, it takes a much greater effort than usual to
steer.
! ACC
In this position the electrical accessories (radio, ciga-
rette lighter, etc.) can be used. ! ON
This is the normal operating position after the engine
is started. ! START
The engine is started in this position. The starter
cranks the engine to start it. When the key is released
(after the engine has started), the key automatically
returns to the “ON” position.
Do not turn the ignition switch to the “START”position while the engine is running.
! Key reminder chime
The reminder chime sounds when the driver’s door
HS2020DA
Page 159 of 491
3-22
Instruments and controls
Do not operate the engine with the oil pressure
warning light on. This may cause serious en-
gine damage.
! AT OIL TEMPerature warning
light (for AT vehicles)
If this light comes on when the engine is running, it
may indicate that the automatic transmission fluid tem-
perature is too hot.
If the light comes on while driving, it is unnecessary to
stop the vehicle, but avoid driving up steep grades or
in stop and go traffic. ! Automatic transmission control system warn-
ing
If the light flashes after the engine starts, it may indi-
cate that the automatic transmission control system is
not working properly. Contact your nearest SUBARU
dealer for service immediately. !
Rear differential oil temperature
warning light (WRX-STi)
Reduce vehicle speed and park the vehicle in a
safe place as soon as possible if the R.DIFF
TEMP light comes on. Continued driving with
this light on can damage the rear differential
and other parts of the powertrain.
If this light comes on when the engine is running, it
may indicate that the rear differential oil temperature is
too hot.
At this time, the driver’s control center differential will
automatically cancel the current torque-distribution ra-
tio setting and adopts its minimum ratio.
If the light comes on while driving, reduce vehicle
speed and stop the vehicle at the nearest safe place.
Park the vehicle for several minutes. After the light
goes out, you can start driving.
If the light does not go out, contact the neares
SUBARU dealer for service.
NOTE " If the tire pressures are not correct and/or the
Page 168 of 491
3-31
Instruments and controls
– CONTINUED –
more than just a few seconds.
! Daytime running light system (except
U.S. spec. WRX-STi)
The low beam headlights will automatically come on at
reduced brightness when the engine has started, un-
der the following conditions: " The parking brake is fully released.
" The light switch is in the “OFF” or “ ” position.
" The automatic transmission selector lever is set at
other than the “P” position.
The tail lights, parking lights, and side marker
lights are not turned on by the daytime running
light system. The light switch must always be
turned to the “ ” position when it is dark
outside.
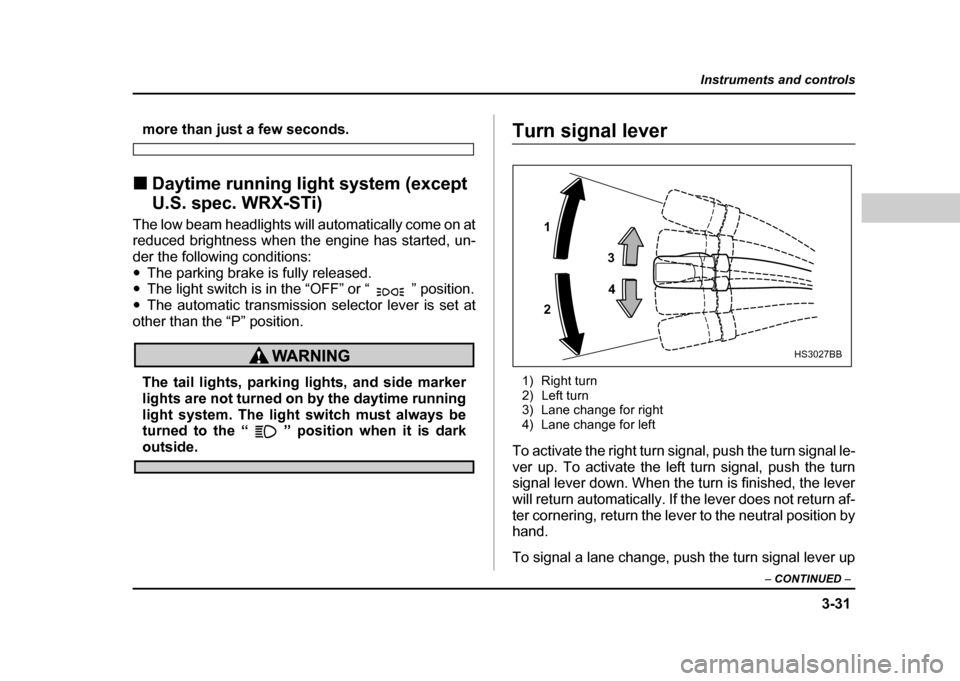
Turn signal lever
1) Right turn
2) Left turn
3) Lane change for right
4) Lane change for left
To activate the right turn signal, push the turn signal le-
ver up. To activate the left turn signal, push the turn
signal lever down. When the turn is finished, the lever
will return automatically. If the lever does not return af-
ter cornering, return the lever to the neutral position by
hand.
To signal a lane change, push the turn signal lever up
1 2 3
4
HS3027BB
Page 182 of 491
3-45
Instruments and controls
– CONTINUED –
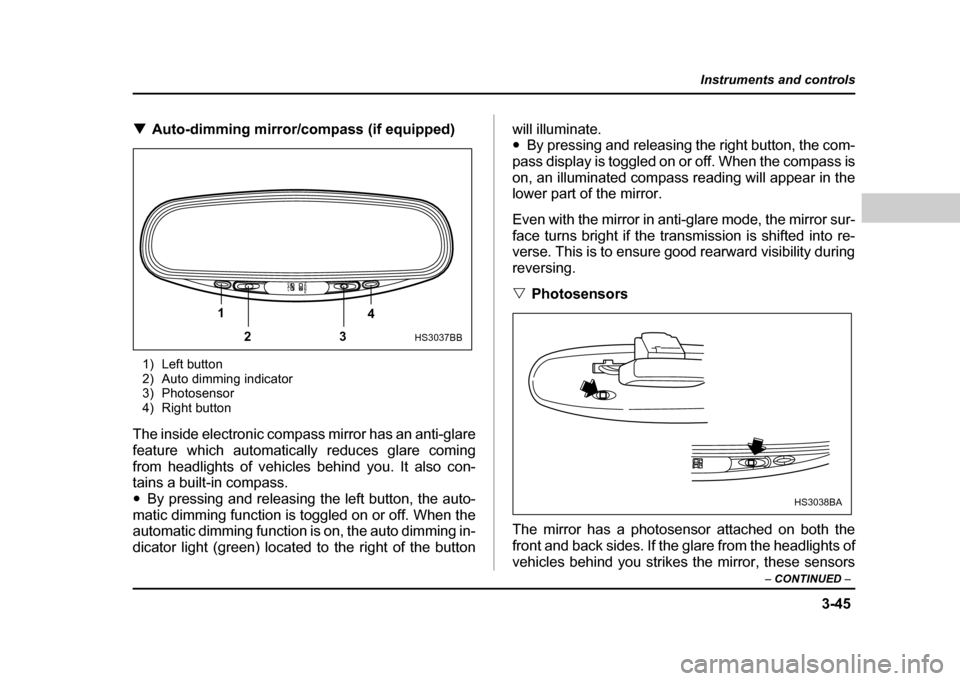
!Auto-dimming mirror/compass (if equipped)
1) Left button
2) Auto dimming indicator
3) Photosensor
4) Right button
The inside electronic compass mirror has an anti-glare
feature which automatically reduces glare coming
from headlights of vehicles behind you. It also con-
tains a built-in compass." By pressing and releasing the left button, the auto-
matic dimming function is toggled on or off. When the
automatic dimming function is on, the auto dimming in-
dicator light (green) located to the right of the button will illuminate. "
By pressing and releasing the right button, the com-
pass display is toggled on or off. When the compass is
on, an illuminated compass reading will appear in the
lower part of the mirror.
Even with the mirror in anti-glare mode, the mirror sur-
face turns bright if the transmission is shifted into re-
verse. This is to ensure good rearward visibility during reversing. " Photosensors
The mirror has a photosensor attached on both the
front and back sides. If the glare from the headlights of
vehicles behind you strikes the mirror, these sensors
1 23 4
HS3037BB
HS3038BA
Page 245 of 491
5-32
Audio
"
Do not attempt to insert two or more discs
into the slot at a time. Doing so can cause me-
chanical damage to the CD changer." Use only music CDs identified by
am ark .
" Do not use CDs listed below which could
cause damage to the CD player. "3-inch (8 cm) compact disc.
" Any disc with a peel-off or seal on it.
" Any disc with scratches and/or dust.
" Bent disc.
" Cleaning disc.
" CD accessory. (E.g., 3-inch (8 cm) disc
adapter)
" Do not insert or remove any disc when the
automatic transmission selector lever is in the
park position; the selector lever in that position
can interfere with disc insertion or removal,
causing scratches on the disc surface (for AT
vehicles).
! To insert a disc
1. Press one of the “Disc select” buttons (3) (num-
bered from 1 to 6) for which the disc indicator light (2) is “OFF”.
The Disc indicator lights are located directly above the
corresponding “Disc select” buttons.
2. The indicator will begin blinking. The blinking will last for 15 seconds.
During this period, insert a desired disc, and the disc
will begin to play. (If any disc is not inserted during this
period, the “Disc slot” (1) door will close. Repeat step
1.)
Be sure to hold a disc with the label side (the side
where titles are printed) up.
3. To insert another disc, repeat step 1 and 2 choos-
ing a different disc select button. !
To insert six discs at a time
1. Press and hold the “Disc select” button number 1
until all disc indicators begin blinking (about 1.5 sec-
onds).
2. The indicators will blink for 15 seconds. During this
period, insert desired six discs.
3. When all discs are loaded, the first disc will begin to
play. (If no disc is inserted within this 15 seconds, the
entire disc load sequence will be canceled.) ! To remove a disc
1. Press the desired one of the “Disc select” buttons
(3) (numbered from 1 to 6) for which the disc indicator
light is on.
Page 270 of 491

7-1
7
Starting and operating
F uel .. ... ... ... .. ... ... ... ... .. ... ... ... ... ... .. ... ... ... ... .. ... ... 7-2
F uel re quire ments ..................... ..................... ... 7-2
Fuel filler lid and cap ........................................ 7-4
State emission testing (U.S. only) ............... 7-7
Preparing to drive ......................................... 7-9
Starting the engine ....................................... 7-9 Manual transmission vehicle ........................... 7-9
Automatic transmission vehicle ...................... 7-10
Starting the engine during cold weather below −4 °F ( −20 °C) ......................................... 7-10
Starting a flooded engine ................................. 7-11
Stopping the engine ..................................... 7-11
Manual transmission – 6 speed (WRX-STi) 7-12 Selecting reverse gear ...................................... 7-12
Shifting speeds ................................................. 7-13
Driving tips ........................................................ 7-14
Manual transmission – 5 speed (except WRX-STi) ...................................... 7-15Shifting speeds ................................................. 7-15
Driving tips ........................................................ 7-17
Driver’s Control Center Differential (DCCD) (WRX-STi) ..................................... 7-18Auto mode ......................................................... 7-18
Manual mode ..................................................... 7-19
Temporary release ............................................ 7-21
Automatic transmission ............................... 7-21 Selector lever for automatic transmission ..... 7-22
Shift lock release .............................................. 7-26
Limited slip differential (LSD) (if equipped) 7-27 Power steering .............................................. 7-28
Braking ........................................................... 7-28
Braking tips ....................................................... 7-28
Brake system .................................................... 7-29
Disc brake pad wear warning indicators ........ 7-29
ABS (Anti-lock Brake System) ..................... 7-30 ABS system self-check .................................... 7-30
ABS warning light ............................................. 7-31
Electronic Brake Force Distribution (EBD) system ........................................................ 7-32Steps to take if EBD system fails .................... 7-33
Parking your vehicle ..................................... 7-34 Parking brake .................................................... 7-34
Parking tips ....................................................... 7-35
Cruise control ................................................ 7-37 To set cruise control ........................................ 7-37
To temporarily cancel the cruise control ....... 7-39
To turn off the cruise control ........................... 7-40
To change the cruising speed ......................... 7-40
Page 279 of 491
7-10
Starting and operating
If the engine does not start within ten seconds, wait a
while and then turn the ignition switch to the “START”
position again while depressing the accelerator pedal
half way down.
6. Confirm that all warning and indicator lights have
gone off after the engine has started. The fuel injection
system automatically lowers the idle speed as the en-
gine warms up. !
Automatic transmission vehicle
1. Apply the parking brake.
2. Turn off unnecessary lights and accessories.
3. Shift the selector lever to the “P” or “N” position
(preferably “P” position).
The starter motor will only operate when the select le-
ver is at the “P” or “N” position.
4. Turn the ignition switch to the “ON” position and
check the operation of the warning and indicator lights.
Refer to the “Warning and indicator lights” section
(chapter 3).
5. Turn the ignition switch to the “START” position
without depressing the accelerator pedal. Release
the key immediately after the engine has started.
If the engine does not start within ten seconds, wait a
while and then turn the ignition switch to the “START”
position again while depressing the accelerator pedal half way down.
6. Confirm that all warning and indicator lights have
gone out after the engine has started. The fuel injec-
tion system automatically lowers the idle speed as the
engine warms up.
While the engine is warming up, make sure that the
selector lever is at the “P” or “N” position and that the
parking brake is applied.
If you restart the engine while the vehicle is
moving, shift the selector lever into the “N” po-
sition. Do not attempt to place the selector lever
of a moving vehicle into the “P” position.
! Starting the engine during cold weath- er below −4 °F ( −20 °C)
If the engine is difficult to start using the normal meth-
od (without depressing the accelerator pedal), turn the
ignition switch to the “START” position while slightly
depressing the accelerator pedal.