Page 2454 of 2870
4AT-140
AUTOMATIC TRANSMISSION
AT Main Case
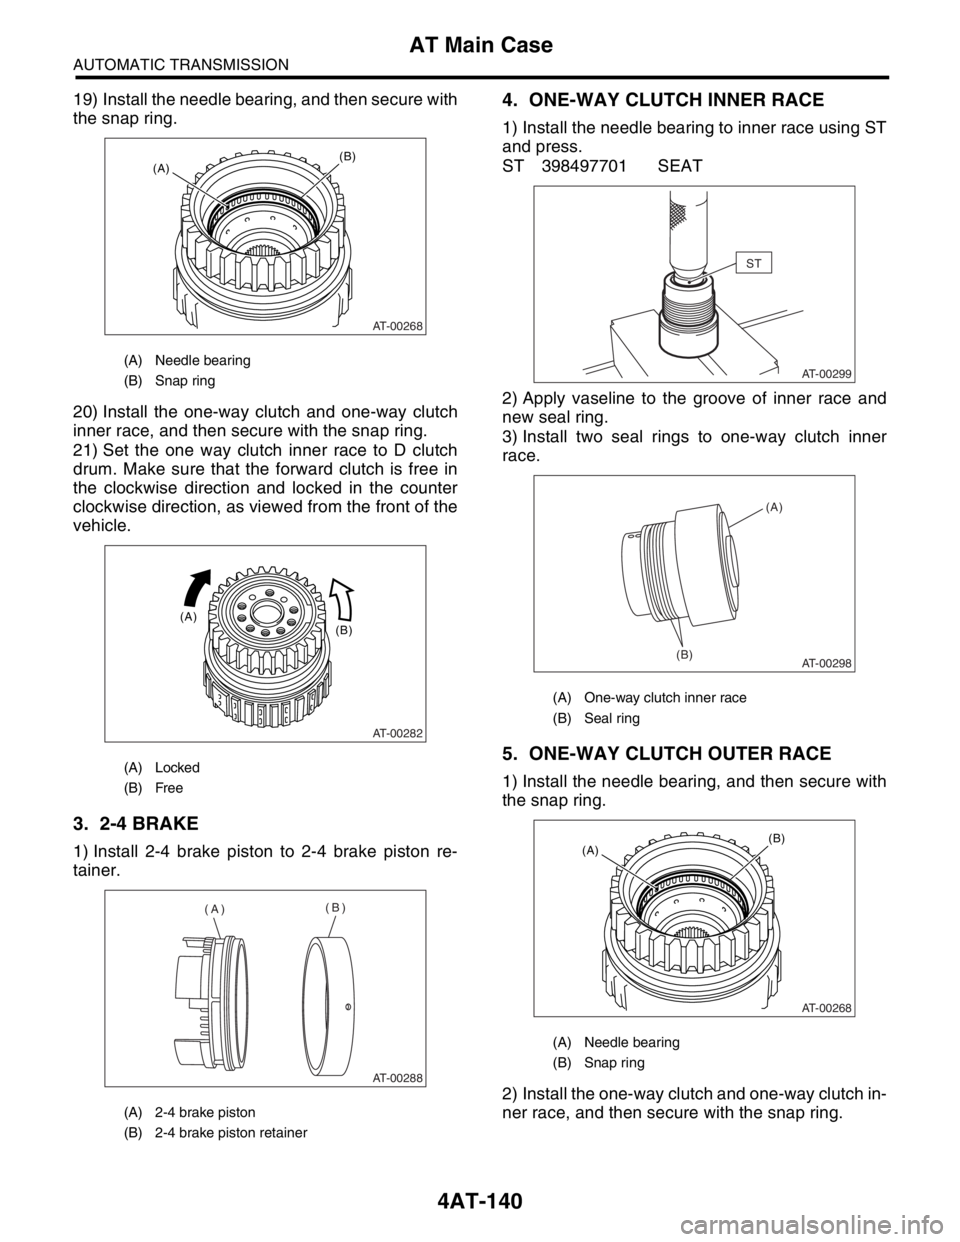
19) Install the needle bearing, and then secure with
the snap ring.
20) Install the one-way clutch and one-way clutch
inner race, and then secure with the snap ring.
21) Set the one way clutch inner race to D clutch
drum. Make sure that the forward clutch is free in
the clockwise direction and locked in the counter
clockwise direction, as viewed from the front of the
vehicle.
3. 2-4 BRAKE
1) Install 2-4 brake piston to 2-4 brake piston re-
tainer.
4. ONE-WAY CLUTCH INNER RACE
1) Install the needle bearing to inner race using ST
and press.
ST 398497701 SEAT
2) Apply vaseline to the groove of inner race and
new seal ring.
3) Install two seal rings to one-way clutch inner
race.
5. ONE-WAY CLUTCH OUTER RACE
1) Install the needle bearing, and then secure with
the snap ring.
2) Install the one-way clutch and one-way clutch in-
ner race, and then secure with the snap ring.
(A) Needle bearing
(B) Snap ring
(A) Locked
(B) Free
(A) 2-4 brake piston
(B) 2-4 brake piston retainer
AT-00268
(B)(A)
AT-00282
(B) (A)
AT-00288
(A)(B)
(A) One-way clutch inner race
(B) Seal ring
(A) Needle bearing
(B) Snap ring
ST
AT-00299
AT-00298(B)(A)
AT-00268
(B)(A)
Page 2455 of 2870
4AT-141
AUTOMATIC TRANSMISSION
AT Main Case
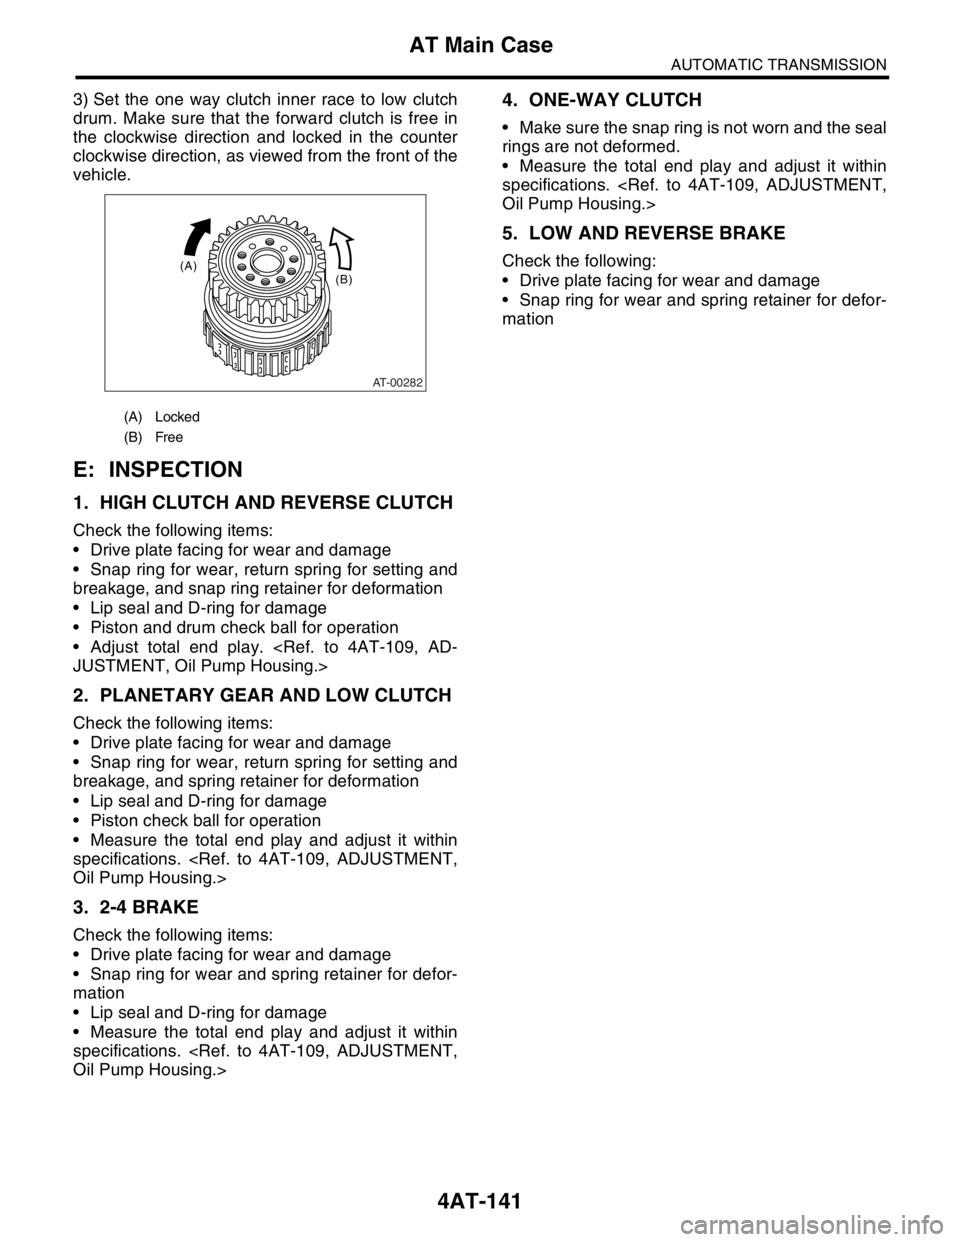
3) Set the one way clutch inner race to low clutch
drum. Make sure that the forward clutch is free in
the clockwise direction and locked in the counter
clockwise direction, as viewed from the front of the
vehicle.
E: INSPECTION
1. HIGH CLUTCH AND REVERSE CLUTCH
Check the following items:
Drive plate facing for wear and damage
Snap ring for wear, return spring for setting and
breakage, and snap ring retainer for deformation
Lip seal and D-ring for damage
Piston and drum check ball for operation
Adjust total end play.
JUSTMENT, Oil Pump Housing.>
2. PLANETARY GEAR AND LOW CLUTCH
Check the following items:
Drive plate facing for wear and damage
Snap ring for wear, return spring for setting and
breakage, and spring retainer for deformation
Lip seal and D-ring for damage
Piston check ball for operation
Measure the total end play and adjust it within
specifications.
Oil Pump Housing.>
3. 2-4 BRAKE
Check the following items:
Drive plate facing for wear and damage
Snap ring for wear and spring retainer for defor-
mation
Lip seal and D-ring for damage
Measure the total end play and adjust it within
specifications.
Oil Pump Housing.>
4. ONE-WAY CLUTCH
Make sure the snap ring is not worn and the seal
rings are not deformed.
Measure the total end play and adjust it within
specifications.
Oil Pump Housing.>
5. LOW AND REVERSE BRAKE
Check the following:
Drive plate facing for wear and damage
Snap ring for wear and spring retainer for defor-
mation
(A) Locked
(B) Free
AT-00282
(B) (A)
Page 2456 of 2870
4AT-142
AUTOMATIC TRANSMISSION
Transmission Control Device
39.Transmission Control Device
A: REMOVAL
1) Remove the transmission assembly from vehi-
cle.
mission Assembly.>
2) Pull out the torque converter clutch assembly.
Clutch Assembly.>
3) Remove the input shaft.
4) Lift-up the lever on rear side of transmission har-
ness connector, and then disconnect it from the
stay.
5) Disconnect the air breather hose.
87, REMOVAL, Air Breather Hose.>
6) Disconnect the inhibitor switch connector from
the stay.
7) Wrap vinyl tape around the nipple attached to
the air breather hose.
8) Remove the pitching stopper bracket.
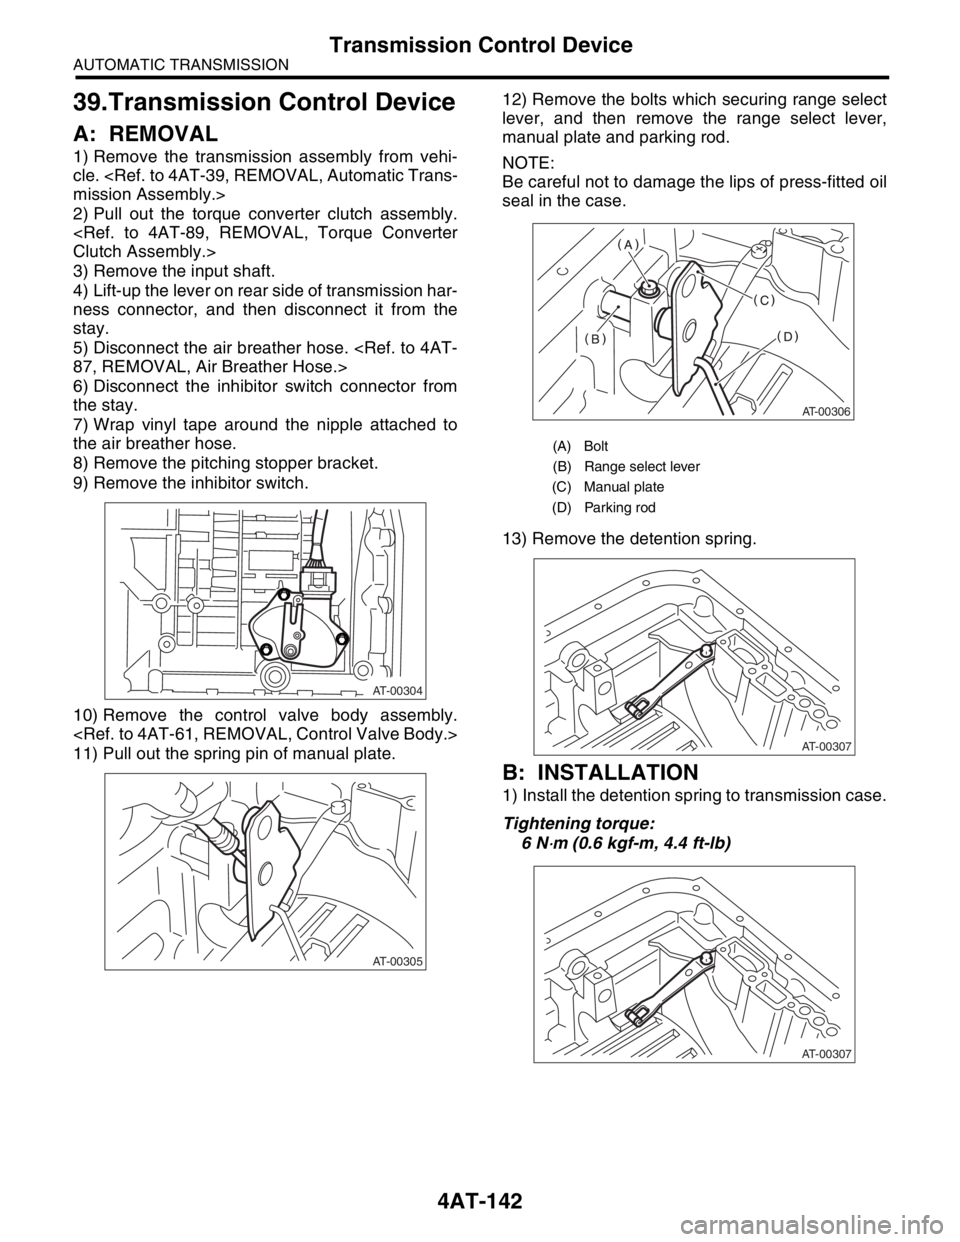
9) Remove the inhibitor switch.
10) Remove the control valve body assembly.
11) Pull out the spring pin of manual plate.12) Remove the bolts which securing range select
lever, and then remove the range select lever,
manual plate and parking rod.
NOTE:
Be careful not to damage the lips of press-fitted oil
seal in the case.
13) Remove the detention spring.
B: INSTALLATION
1) Install the detention spring to transmission case.
Tightening torque:
6 N
⋅m (0.6 kgf-m, 4.4 ft-lb)
AT-00304
AT-00305
(A) Bolt
(B) Range select lever
(C) Manual plate
(D) Parking rod
AT-00306
AT-00307
AT-00307
Page 2457 of 2870
4AT-143
AUTOMATIC TRANSMISSION
Transmission Control Device
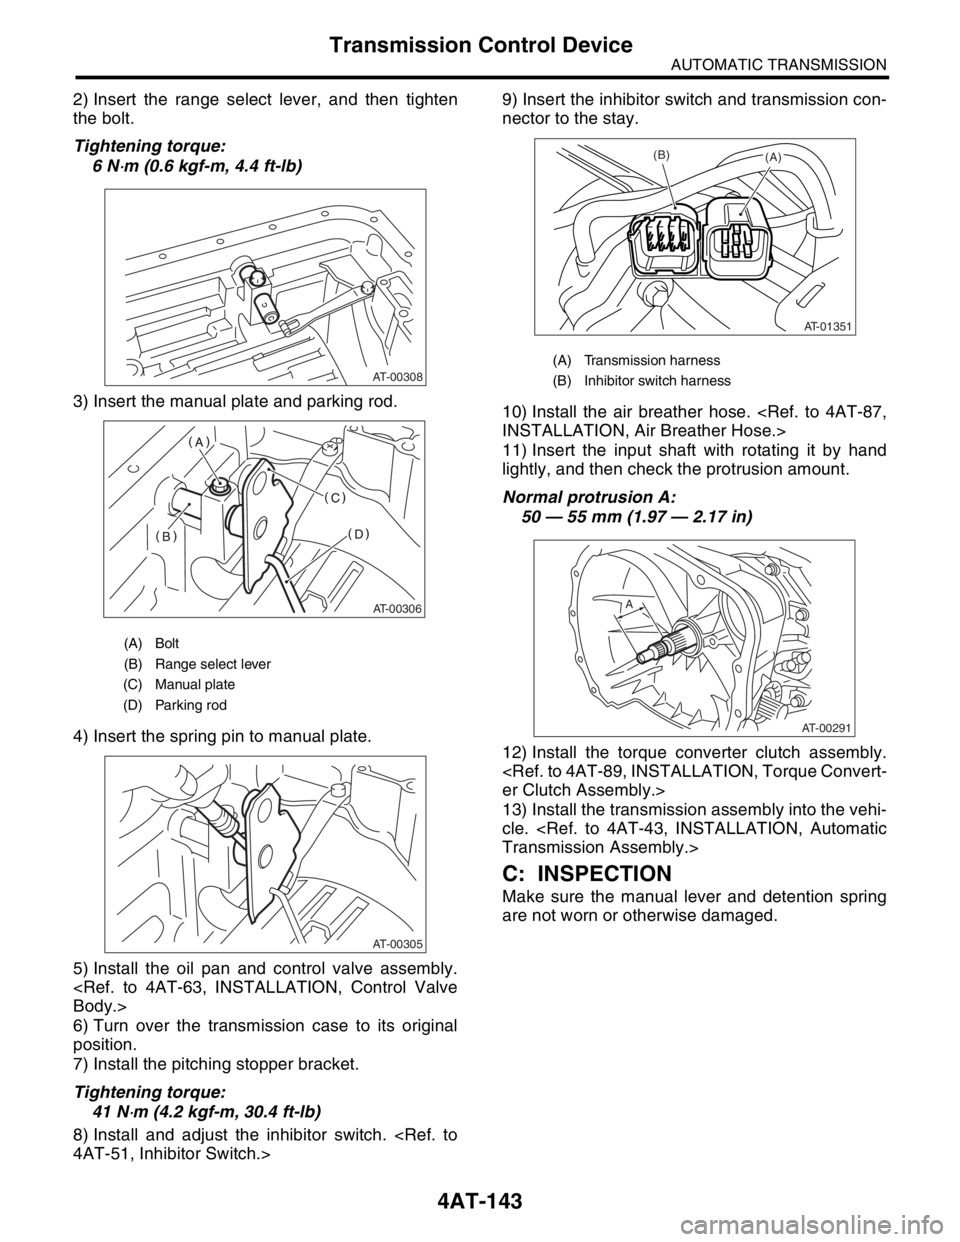
2) Insert the range select lever, and then tighten
the bolt.
Tightening torque:
6 N
⋅m (0.6 kgf-m, 4.4 ft-lb)
3) Insert the manual plate and parking rod.
4) Insert the spring pin to manual plate.
5) Install the oil pan and control valve assembly.
Body.>
6) Turn over the transmission case to its original
position.
7) Install the pitching stopper bracket.
Tightening torque:
41 N
⋅m (4.2 kgf-m, 30.4 ft-lb)
8) Install and adjust the inhibitor switch.
4AT-51, Inhibitor Switch.>9) Insert the inhibitor switch and transmission con-
nector to the stay.
10) Install the air breather hose.
INSTALLATION, Air Breather Hose.>
11) Insert the input shaft with rotating it by hand
lightly, and then check the protrusion amount.
Normal protrusion A:
50 — 55 mm (1.97 — 2.17 in)
12) Install the torque converter clutch assembly.
er Clutch Assembly.>
13) Install the transmission assembly into the vehi-
cle.
Transmission Assembly.>
C: INSPECTION
Make sure the manual lever and detention spring
are not worn or otherwise damaged.
(A) Bolt
(B) Range select lever
(C) Manual plate
(D) Parking rod
AT-00308
AT-00306
AT-00305
(A) Transmission harness
(B) Inhibitor switch harness
AT-01351
(B)(A)
AT-00291
A
Page 2458 of 2870
4AT-144
AUTOMATIC TRANSMISSION
Transmission Control Device
Page 2459 of 2870
FUJI HEAVY INDUSTRIES LTD. G8080GE5
2004 FORESTER SERVICE MANUAL QUICK REFERENCE INDEX
TRANSMISSION SECTION
This service manual has been prepared
to provide SUBARU service personnel
with the necessary information and data
for the correct maintenance and repair
of SUBARU vehicles.
This manual includes the procedures
for maintenance, disassembling, reas-
sembling, inspection and adjustment of
components and diagnostics for guid-
ance of experienced mechanics.
Please peruse and utilize this manual
fully to ensure complete repair work for
satisfying our customers by keeping
their vehicle in optimum condition.
When replacement of parts during
repair work is needed, be sure to use
SUBARU genuine parts.
All information, illustration and specifi-
cations contained in this manual are
based on the latest product information
available at the time of publication
approval.CONTROL SYSTEM CS
AUTOMATIC TRANSMISSION 4AT
AUTOMATIC TRANSMISSION
(DIAGNOSTIC)4AT(H4SO)
AUTOMATIC TRANSMISSION
(DIAGNOSTIC)4AT(H4DOTC)
AUTOMATIC TRANSMISSION
(DIAGNOSTIC)4AT(H4DOTC 2.5)
MANUAL TRANSMISSION AND
DIFFERENTIAL5MT
CLUTCH SYSTEM CL
Page 2460 of 2870

AUTOMATIC TRANSMISSION
(DIAGNOSTIC)
4AT(H4SO)
Page
1. Basic Diagnostic Procedure ........................................................................2
2. Check List for Interview ...............................................................................4
3. General Description ....................................................................................5
4. Electrical Components Location..................................................................8
5. Transmission Control Module (TCM) I/O Signal .......................................12
6. Subaru Select Monitor...............................................................................17
7. Read Diagnostic Trouble Code (DTC) ......................................................20
8. Inspection Mode ........................................................................................22
9. Clear Memory Mode..................................................................................23
10. Power Indicator Light Display....................................................................24
11. Diagnostic Procedure for Subaru Select Monitor Communication ............32
12. List of Diagnostic Trouble Code (DTC) .....................................................35
13. Diagnostic Procedure with Diagnostic Trouble Code (DTC) .....................36
14. Diagnostic Procedure without Diagnostic Trouble Code (DTC) ................84
15. Symptom Related Diagnostic ..................................................................110
Page 2461 of 2870

4AT(H4SO)-2
AUTOMATIC TRANSMISSION (DIAGNOSTIC)
Basic Diagnostic Procedure
1. Basic Diagnostic Procedure
A: PROCEDURE
Step Check Yes No
1 CHECK PRE-INSPECTION.
1) Ask the customer when and how trouble
occurred using interview checklist.
4AT(H4SO)-4, Check List for Interview.>
2) Before performing the diagnosis, inspect
following items which might influence the AT
problems.
General inspection
INSPECTION, General Description.>
Disconnection of harness connector
Visually check the damage of harness
Oil leak
Stall speed test
Line pressure test
Pressure Test.>
Transfer clutch pressure test
38, Transfer Clutch Pressure Test.>
Time lag test
Te s t . >
Road test
Inhibitor switch
Switch.>Is the unit that might influence
AT problem normal?Go to step 2.Repair or replace
each item.
2 CHECK POWER INDICATOR LIGHT.
Turn the ignition switch to ON.Does the POWER indicator
light illuminate?Go to step 4.Go to step 3.
3 CHECK POWER INDICATOR LIGHT.
1) Turn the ignition switch to OFF.
2) Repair the POWER indicator light circuit or
power supply and ground line circuit.
Indicator Light Display.>
3) Turn the ignition switch to ON.Is the POWER indicator light
illuminate?Go to step 4.Go to step 5.
4 CHECK INDICATION OF DTC.
Calling up the DTC.
Without Subaru Select Monitor
SELECT MONITOR, OPERATION, Read
Diagnostic Trouble Code (DTC).>
With Subaru Select Monitor
SELECT MONITOR, OPERATION, Read
Diagnostic Trouble Code (DTC).>
NOTE:
If the communication function of select monitor
cannot be executed normally, check the communi-
cation circuit.
NICATION FOR INITIALIZING IMPOSSIBLE,
Diagnostic Procedure for Subaru Select Monitor
Communication.>Is the DTC displayed? Go to step 6.
NOTE:
Record all DTC.Go to step 5.