Page 329 of 2870
FUJI HEAVY INDUSTRIES LTD. G8080GE7
2004 FORESTER SERVICE MANUAL QUICK REFERENCE INDEX
BODY SECTION
This service manual has been prepared
to provide SUBARU service personnel
with the necessary information and data
for the correct maintenance and repair
of SUBARU vehicles.
This manual includes the procedures
for maintenance, disassembling, reas-
sembling, inspection and adjustment of
components and diagnostics for guid-
ance of experienced mechanics.
Please peruse and utilize this manual
fully to ensure complete repair work for
satisfying our customers by keeping
their vehicle in optimum condition.
When replacement of parts during
repair work is needed, be sure to use
SUBARU genuine parts.
All information, illustration and specifi-
cations contained in this manual are
based on the latest product information
available at the time of publication
approval.HVAC SYSTEM
(HEATER, VENTILATOR AND A/C)AC
HVAC SYSTEM (AUTO A/C)
(DIAGNOSTIC)AC
AIRBAG SYSTEM AB
AIRBAG SYSTEM (DIAGNOSTIC) AB
SEAT BELT SYSTEM SB
LIGHTING SYSTEM LI
WIPER AND WASHER SYSTEM WW
ENTERTAINMENT ET
COMMUNICATION SYSTEM COM
GLASS/WINDOW/MIRROR GW
BODY STRUCTURE BS
INSTRUMENTATION/DRIVER INFO IDI
SEAT SE
SECURITY AND LOCK SL
SUNROOF/T-TOP/CONVERTIBLE TOP
(SUNROOF)SR
EXTERIOR/INTERIOR TRIM EI
EXTERIOR BODY PANEL EB
Page 331 of 2870

GLASS/WINDOW/MIRROR
GW
Page
1. General Description ....................................................................................2
2. Power Window System ...............................................................................6
3. Power Window Control Switch ....................................................................7
4. Remote Control Mirror System..................................................................10
5. Scalp Cap..................................................................................................11
6. Outer Mirror Assembly ..............................................................................12
7. Outer Mirror ...............................................................................................14
8. Remote Control Mirror Switch ...................................................................15
9. Front Door Glass .......................................................................................17
10. Front Regulator and Motor Assembly .......................................................21
11. Rear Door Glass .......................................................................................22
12. Rear Regulator and Motor Assembly ........................................................24
13. Windshield Glass ......................................................................................25
14. Inner Rearview Mirror................................................................................28
15. Rear Gate Glass .......................................................................................29
16. Rear Window Defogger System ................................................................30
17. Rear Window Defogger .............................................................................31
18. Rear Quarter Glass ...................................................................................32
19. Roof Window Glass...................................................................................34
Page 349 of 2870
GW-19
GLASS/WINDOW/MIRROR
Front Door Glass
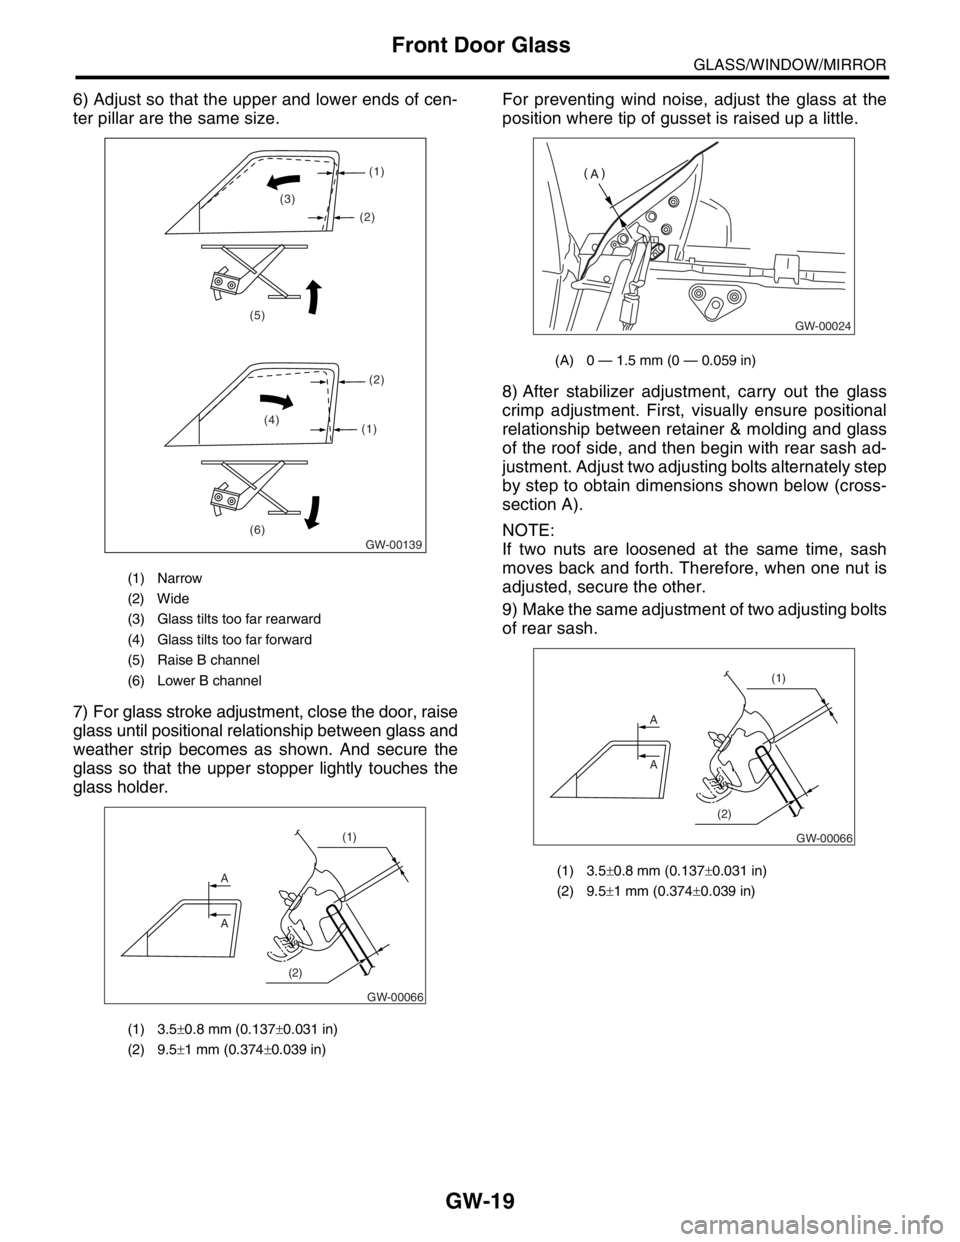
6) Adjust so that the upper and lower ends of cen-
ter pillar are the same size.
7) For glass stroke adjustment, close the door, raise
glass until positional relationship between glass and
weather strip becomes as shown. And secure the
glass so that the upper stopper lightly touches the
glass holder.For preventing wind noise, adjust the glass at the
position where tip of gusset is raised up a little.
8) After stabilizer adjustment, carry out the glass
crimp adjustment. First, visually ensure positional
relationship between retainer & molding and glass
of the roof side, and then begin with rear sash ad-
justment. Adjust two adjusting bolts alternately step
by step to obtain dimensions shown below (cross-
section A).
NOTE:
If two nuts are loosened at the same time, sash
moves back and forth. Therefore, when one nut is
adjusted, secure the other.
9) Make the same adjustment of two adjusting bolts
of rear sash.
(1) Narrow
(2) Wide
(3) Glass tilts too far rearward
(4) Glass tilts too far forward
(5) Raise B channel
(6) Lower B channel
(1) 3.5±0.8 mm (0.137±0.031 in)
(2) 9.5±1 mm (0.374±0.039 in)
GW-00139 (6) (5)
(4)
(1)(2) (1)
(2) (3)
A
A
(1)
(2)
GW-00066
(A) 0 — 1.5 mm (0 — 0.059 in)
(1) 3.5±0.8 mm (0.137±0.031 in)
(2) 9.5±1 mm (0.374±0.039 in)
GW-00024
A
A
(1)
(2)
GW-00066
Page 355 of 2870
GW-25
GLASS/WINDOW/MIRROR
Windshield Glass
13.Windshield Glass
A: REMOVAL
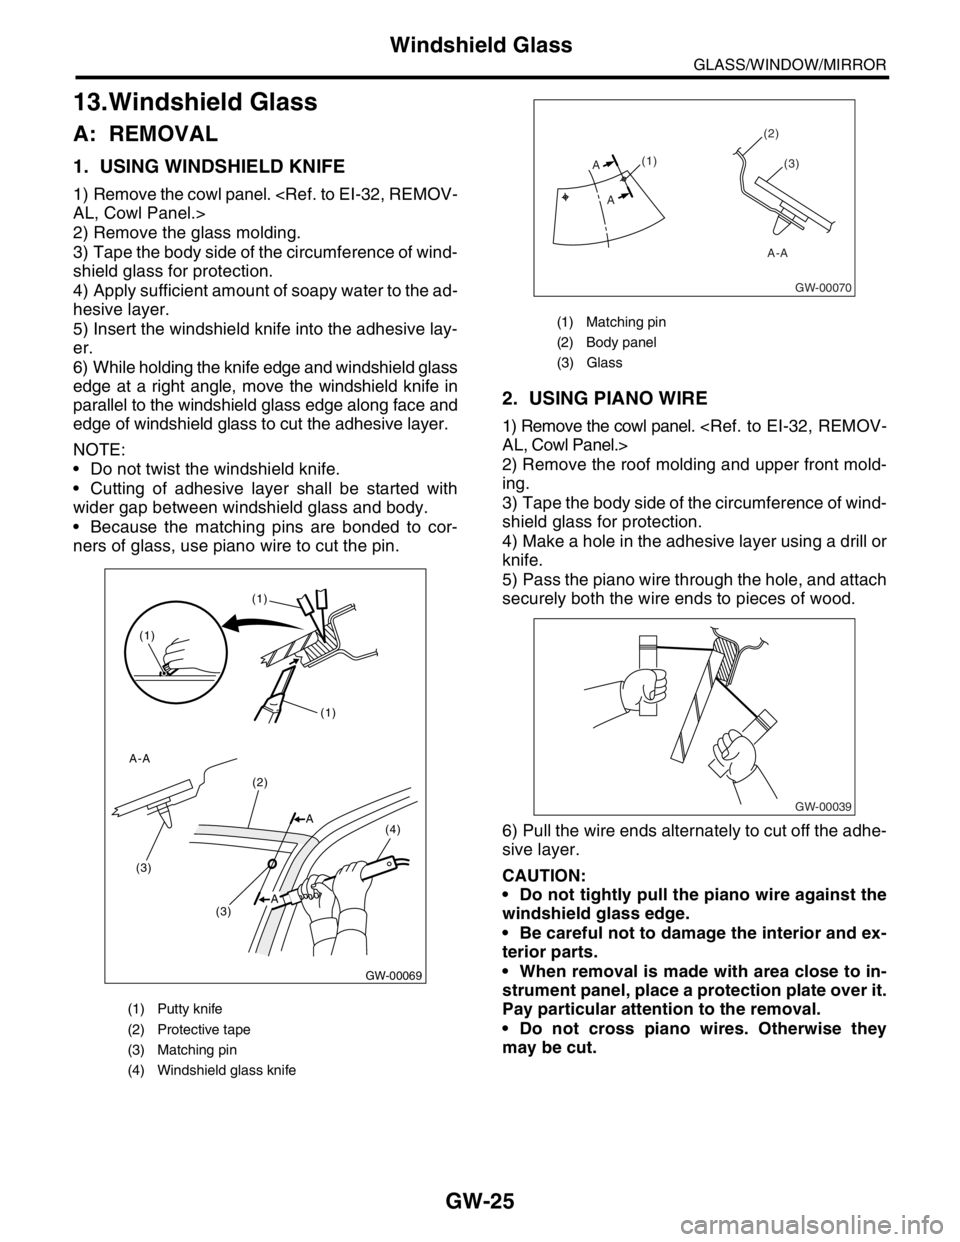
1. USING WINDSHIELD KNIFE
1) Remove the cowl panel.
AL, Cowl Panel.>
2) Remove the glass molding.
3) Tape the body side of the circumference of wind-
shield glass for protection.
4) Apply sufficient amount of soapy water to the ad-
hesive layer.
5) Insert the windshield knife into the adhesive lay-
er.
6) While holding the knife edge and windshield glass
edge at a right angle, move the windshield knife in
parallel to the windshield glass edge along face and
edge of windshield glass to cut the adhesive layer.
NOTE:
Do not twist the windshield knife.
Cutting of adhesive layer shall be started with
wider gap between windshield glass and body.
Because the matching pins are bonded to cor-
ners of glass, use piano wire to cut the pin.
2. USING PIANO WIRE
1) Remove the cowl panel.
AL, Cowl Panel.>
2) Remove the roof molding and upper front mold-
ing.
3) Tape the body side of the circumference of wind-
shield glass for protection.
4) Make a hole in the adhesive layer using a drill or
knife.
5) Pass the piano wire through the hole, and attach
securely both the wire ends to pieces of wood.
6) Pull the wire ends alternately to cut off the adhe-
sive layer.
CAUTION:
Do not tightly pull the piano wire against the
windshield glass edge.
Be careful not to damage the interior and ex-
terior parts.
When removal is made with area close to in-
strument panel, place a protection plate over it.
Pay particular attention to the removal.
Do not cross piano wires. Otherwise they
may be cut.
(1) Putty knife
(2) Protective tape
(3) Matching pin
(4) Windshield glass knife
GW-00069 (1) (1)
(1)
(3)
(3)(2)
(4) A A-A
A
(1) Matching pin
(2) Body panel
(3) Glass
(1)(2)
(3)
A A
GW-00070
A-A
GW-00039
Page 364 of 2870
GW-34
GLASS/WINDOW/MIRROR
Roof Window Glass
19.Roof Window Glass
A: REMOVAL
B: INSTALLATION
C: ADJUSTMENT
Page 365 of 2870
FUJI HEAVY INDUSTRIES LTD. G8080GE7
2004 FORESTER SERVICE MANUAL QUICK REFERENCE INDEX
BODY SECTION
This service manual has been prepared
to provide SUBARU service personnel
with the necessary information and data
for the correct maintenance and repair
of SUBARU vehicles.
This manual includes the procedures
for maintenance, disassembling, reas-
sembling, inspection and adjustment of
components and diagnostics for guid-
ance of experienced mechanics.
Please peruse and utilize this manual
fully to ensure complete repair work for
satisfying our customers by keeping
their vehicle in optimum condition.
When replacement of parts during
repair work is needed, be sure to use
SUBARU genuine parts.
All information, illustration and specifi-
cations contained in this manual are
based on the latest product information
available at the time of publication
approval.HVAC SYSTEM
(HEATER, VENTILATOR AND A/C)AC
HVAC SYSTEM (AUTO A/C)
(DIAGNOSTIC)AC
AIRBAG SYSTEM AB
AIRBAG SYSTEM (DIAGNOSTIC) AB
SEAT BELT SYSTEM SB
LIGHTING SYSTEM LI
WIPER AND WASHER SYSTEM WW
ENTERTAINMENT ET
COMMUNICATION SYSTEM COM
GLASS/WINDOW/MIRROR GW
BODY STRUCTURE BS
INSTRUMENTATION/DRIVER INFO IDI
SEAT SE
SECURITY AND LOCK SL
SUNROOF/T-TOP/CONVERTIBLE TOP
(SUNROOF)SR
EXTERIOR/INTERIOR TRIM EI
EXTERIOR BODY PANEL EB
Page 383 of 2870
FUJI HEAVY INDUSTRIES LTD. G8080GE7
2004 FORESTER SERVICE MANUAL QUICK REFERENCE INDEX
BODY SECTION
This service manual has been prepared
to provide SUBARU service personnel
with the necessary information and data
for the correct maintenance and repair
of SUBARU vehicles.
This manual includes the procedures
for maintenance, disassembling, reas-
sembling, inspection and adjustment of
components and diagnostics for guid-
ance of experienced mechanics.
Please peruse and utilize this manual
fully to ensure complete repair work for
satisfying our customers by keeping
their vehicle in optimum condition.
When replacement of parts during
repair work is needed, be sure to use
SUBARU genuine parts.
All information, illustration and specifi-
cations contained in this manual are
based on the latest product information
available at the time of publication
approval.HVAC SYSTEM
(HEATER, VENTILATOR AND A/C)AC
HVAC SYSTEM (AUTO A/C)
(DIAGNOSTIC)AC
AIRBAG SYSTEM AB
AIRBAG SYSTEM (DIAGNOSTIC) AB
SEAT BELT SYSTEM SB
LIGHTING SYSTEM LI
WIPER AND WASHER SYSTEM WW
ENTERTAINMENT ET
COMMUNICATION SYSTEM COM
GLASS/WINDOW/MIRROR GW
BODY STRUCTURE BS
INSTRUMENTATION/DRIVER INFO IDI
SEAT SE
SECURITY AND LOCK SL
SUNROOF/T-TOP/CONVERTIBLE TOP
(SUNROOF)SR
EXTERIOR/INTERIOR TRIM EI
EXTERIOR BODY PANEL EB
Page 403 of 2870
FUJI HEAVY INDUSTRIES LTD. G8080GE7
2004 FORESTER SERVICE MANUAL QUICK REFERENCE INDEX
BODY SECTION
This service manual has been prepared
to provide SUBARU service personnel
with the necessary information and data
for the correct maintenance and repair
of SUBARU vehicles.
This manual includes the procedures
for maintenance, disassembling, reas-
sembling, inspection and adjustment of
components and diagnostics for guid-
ance of experienced mechanics.
Please peruse and utilize this manual
fully to ensure complete repair work for
satisfying our customers by keeping
their vehicle in optimum condition.
When replacement of parts during
repair work is needed, be sure to use
SUBARU genuine parts.
All information, illustration and specifi-
cations contained in this manual are
based on the latest product information
available at the time of publication
approval.HVAC SYSTEM
(HEATER, VENTILATOR AND A/C)AC
HVAC SYSTEM (AUTO A/C)
(DIAGNOSTIC)AC
AIRBAG SYSTEM AB
AIRBAG SYSTEM (DIAGNOSTIC) AB
SEAT BELT SYSTEM SB
LIGHTING SYSTEM LI
WIPER AND WASHER SYSTEM WW
ENTERTAINMENT ET
COMMUNICATION SYSTEM COM
GLASS/WINDOW/MIRROR GW
BODY STRUCTURE BS
INSTRUMENTATION/DRIVER INFO IDI
SEAT SE
SECURITY AND LOCK SL
SUNROOF/T-TOP/CONVERTIBLE TOP
(SUNROOF)SR
EXTERIOR/INTERIOR TRIM EI
EXTERIOR BODY PANEL EB