2004 SUBARU FORESTER key
[x] Cancel search: keyPage 2787 of 2870

5MT-74
MANUAL TRANSMISSION AND DIFFERENTIAL
Main Shaft Assembly For Single-Range
3) Install the 4th needle bearing race onto trans-
mission main shaft using ST1, ST2 and a press.
CAUTION:
Do not apply load in excess of 10 kN (1 ton, 1.1
US ton, 1.0 Imp ton).
ST1 899714110 REMOVER
ST2 499877000 RACE 4-5 INSTALLER
4) Install the baulk ring, needle bearing, 4th drive
gear and 4th gear thrust washer to transmission
main shaft.
NOTE:
Align the baulk ring and gear & hub assembly
with key convex part.
Pay attention to the orientation of thrust washer.5) Drive the ball bearing onto the rear section of
transmission main shaft using ST1, ST2 and a
press.
CAUTION:
Do not apply load in excess of 10 kN (1 ton, 1.1
US ton, 1.0 Imp ton).
ST1 899714110 REMOVER
ST2 499877000 RACE 4-5 INSTALLER
6) Using the ST1 and ST2, install the 5th gear
thrust washer and 5th needle bearing race onto the
rear section of transmission main shaft.
CAUTION:
Do not apply load in excess of 10 kN (1 ton, 1.1
US ton, 1.0 Imp ton).
NOTE:
Pay attention to the orientation of thrust washer.
ST1 899714110 REMOVER
ST2 499877000 RACE 4-5 INSTALLER
7) Install the bearing onto synchro cone.
8) Install the baulk ring, synchro cone and new ball
bearing. onto 5th-Rev sleeve and hub assembly
using ST and a press.
CAUTION:
Do not apply load in excess of 10 kN (1 ton, 1.1
US ton, 1.0 Imp ton).
(A) 4th needle bearing race
(A) Groove
(B) Face this surface to 4th gear side
MT-00192 (A)
ST1
ST2
MT-00193 (A)
(B)
(A) Face this surface to 5th gear side.
MT-00194
ST1
ST2
MT-00195
(A)
Page 2789 of 2870
5MT-76
MANUAL TRANSMISSION AND DIFFERENTIAL
Main Shaft Assembly For Single-Range
E: INSPECTION
Disassembled parts should be washed clean first
and then inspected carefully.
1) Bearings
Replace the bearings in the following cases:
Bearings whose balls, outer races and inner rac-
es are broken or rusty.
Worn bearings
Bearings that fail to turn smoothly or make noise
when turned after gear oil lubrication.
Bearings having other defects
2) Bushing (each gear)
Replace the bushing in the following cases:
When the sliding surface is damaged or abnor-
mally worn.
When the inner wall is abnormally worn.
3) Gears
Replace the gears with new ones if their tooth
surfaces are broken, damaged, or excessively
worn.
Correct or replace if the cone that contacts the
baulk ring is rough or damaged.
Correct or replace if the inner surface or end face
is damaged.
4) Baulk ring
Replace the ring in the following cases:
When the inner surface and end face are dam-
aged.
When the ring inner surface is abnormally or par-
tially worn down.
When the contact surface of the synchronizer
ring insert is scored or abnormally worn down.
5) Shifting insert key
Replace the insert if deformed, excessively worn,
or defective in any way.
6) Oil seal
Replace the oil seal if the lip is deformed, hard-
ened, damaged, worn, or defective in any way.
7) O-ring
Replace the O-ring if the sealing face is deformed,
hardened, damaged, worn, or defective in any way.
8) Gearshift mechanism
Repair or replace the gearshift mechanism if ex-
cessively worn, bent, or defective in any way.
F: ADJUSTMENT
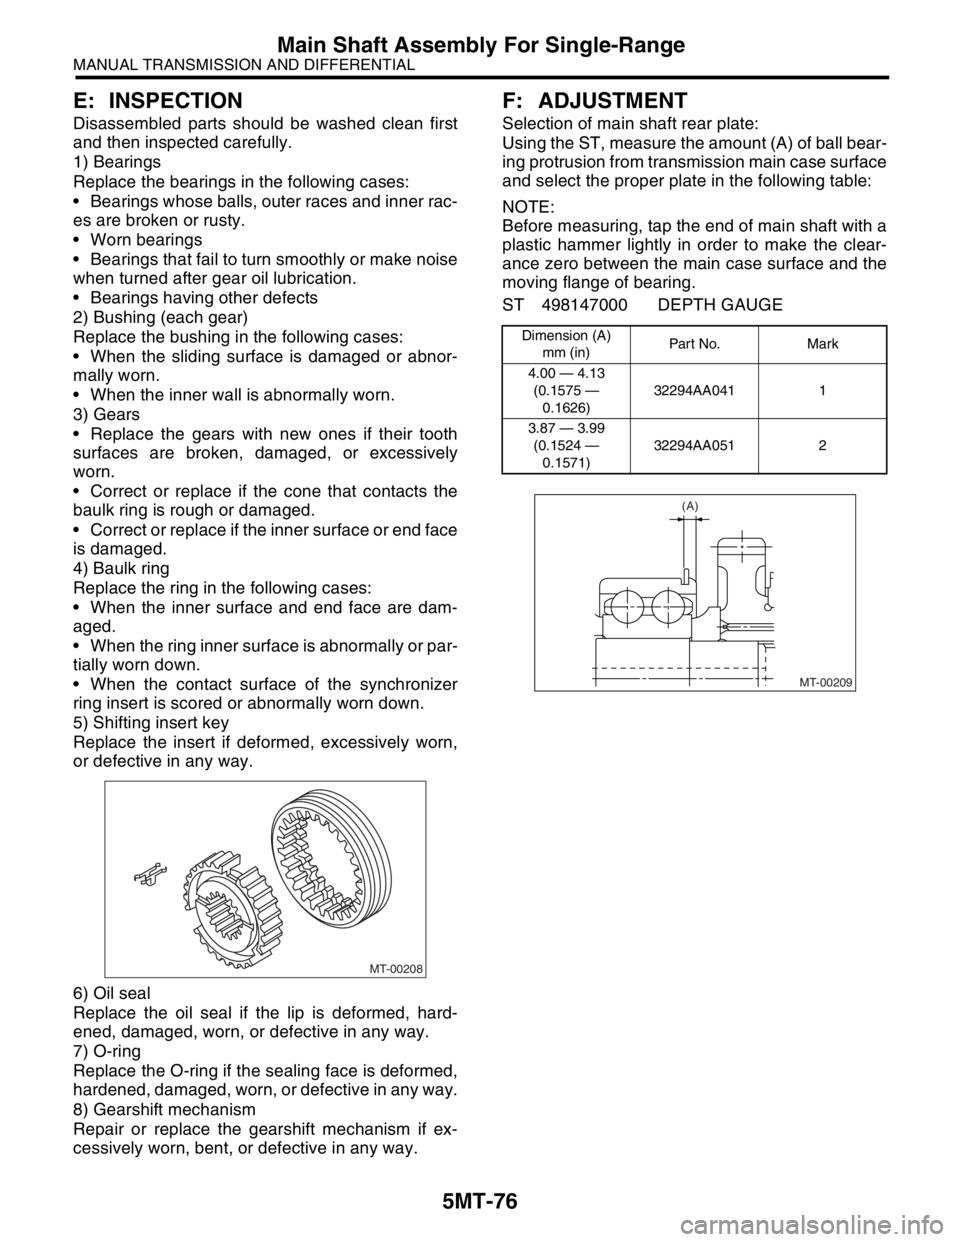
Selection of main shaft rear plate:
Using the ST, measure the amount (A) of ball bear-
ing protrusion from transmission main case surface
and select the proper plate in the following table:
NOTE:
Before measuring, tap the end of main shaft with a
plastic hammer lightly in order to make the clear-
ance zero between the main case surface and the
moving flange of bearing.
ST 498147000 DEPTH GAUGE
MT-00208
Dimension (A)
mm (in)Par t No. Mar k
4.00 — 4.13
(0.1575 —
0.1626)32294AA041 1
3.87 — 3.99
(0.1524 —
0.1571)32294AA051 2
MT-00209
(A)
Page 2792 of 2870
5MT-79
MANUAL TRANSMISSION AND DIFFERENTIAL
Main Shaft Assembly For Dual-Range
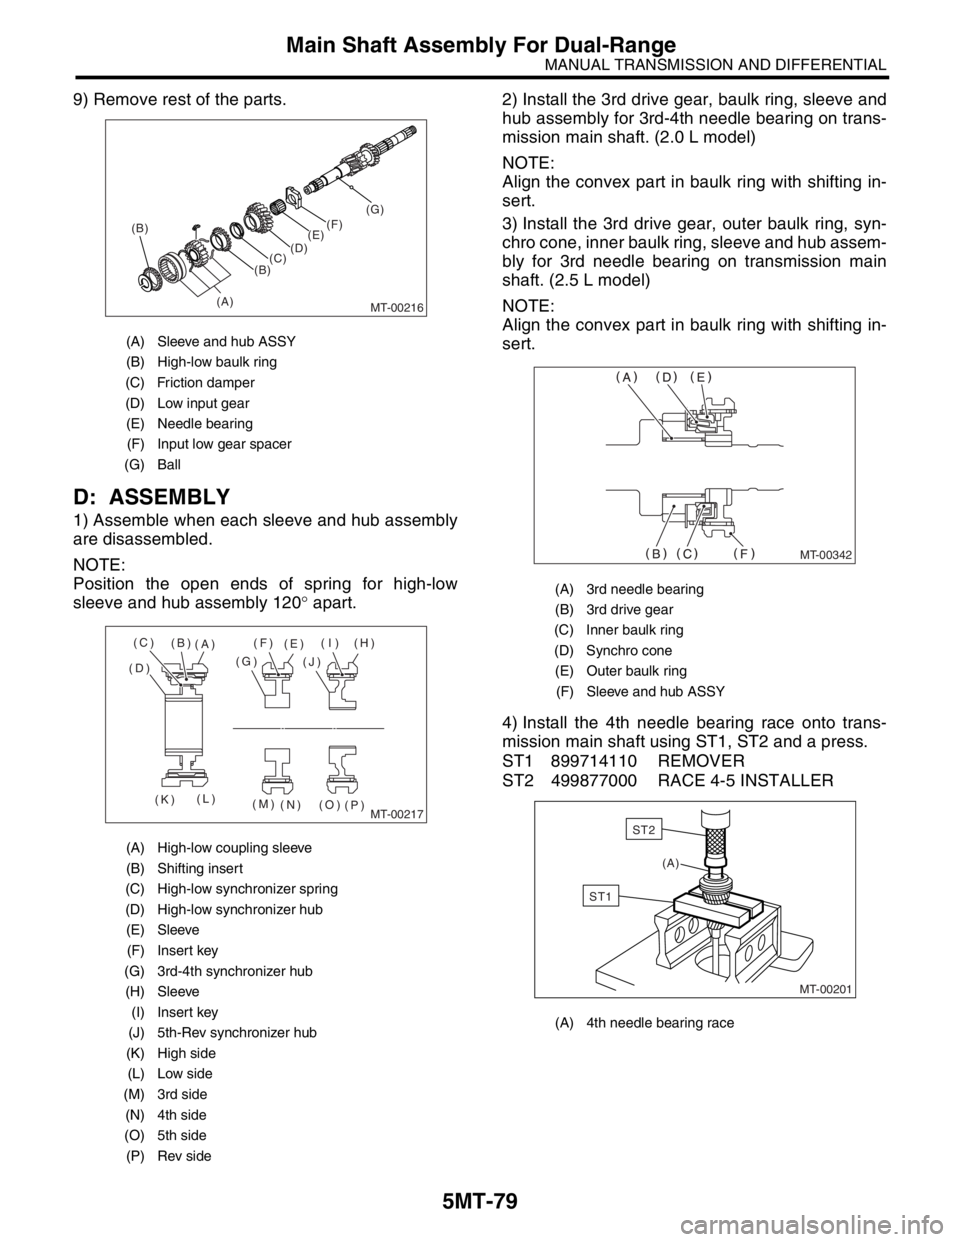
9) Remove rest of the parts.
D: ASSEMBLY
1) Assemble when each sleeve and hub assembly
are disassembled.
NOTE:
Position the open ends of spring for high-low
sleeve and hub assembly 120° apart.2) Install the 3rd drive gear, baulk ring, sleeve and
hub assembly for 3rd-4th needle bearing on trans-
mission main shaft. (2.0 L model)
NOTE:
Align the convex part in baulk ring with shifting in-
sert.
3) Install the 3rd drive gear, outer baulk ring, syn-
chro cone, inner baulk ring, sleeve and hub assem-
bly for 3rd needle bearing on transmission main
shaft. (2.5 L model)
NOTE:
Align the convex part in baulk ring with shifting in-
sert.
4) Install the 4th needle bearing race onto trans-
mission main shaft using ST1, ST2 and a press.
ST1 899714110 REMOVER
ST2 499877000 RACE 4-5 INSTALLER
(A) Sleeve and hub ASSY
(B) High-low baulk ring
(C) Friction damper
(D) Low input gear
(E) Needle bearing
(F) Input low gear spacer
(G) Ball
(A) High-low coupling sleeve
(B) Shifting insert
(C) High-low synchronizer spring
(D) High-low synchronizer hub
(E) Sleeve
(F) Insert key
(G) 3rd-4th synchronizer hub
(H) Sleeve
(I) Insert key
(J) 5th-Rev synchronizer hub
(K) High side
(L) Low side
(M) 3rd side
(N) 4th side
(O) 5th side
(P) Rev side
MT-00216
(B)
(A)(E)(F)(G)
(D)
(C)
(B)
MT-00217
(B)
(A)
(D)(G)(F)
(E)(I) (H)
(J)
(K)(L)
(M)
(N) (O)
(P) (C)
(A) 3rd needle bearing
(B) 3rd drive gear
(C) Inner baulk ring
(D) Synchro cone
(E) Outer baulk ring
(F) Sleeve and hub ASSY
(A) 4th needle bearing race
MT-00342
MT-00201
(A)
ST1
ST2
Page 2795 of 2870
5MT-82
MANUAL TRANSMISSION AND DIFFERENTIAL
Main Shaft Assembly For Dual-Range
E: INSPECTION
Disassembled parts should be washed clean first
and then inspected carefully.
1) Bearings
Replace the bearings in the following cases:
Bearings whose balls, outer races and inner rac-
es are broken or rusty.
Worn bearings
Bearings that fail to turn smoothly or make noise
when turned after gear oil lubrication.
Bearings having other defects
2) Bushing (each gear)
Replace the bushing in the following cases:
When the sliding surface is damaged or abnor-
mally worn.
When the inner wall is abnormally worn.
3) Gears
Replace the gears with new ones if their tooth
surfaces are broken, damaged, or excessively
worn.
Correct or replace if the cone that contacts the
baulk ring is rough or damaged.
Correct or replace if the inner surface or end face
is damaged.
4) Baulk ring
Replace the ring in the following cases:
When the inner surface and end face are dam-
aged.
When the ring inner surface is abnormally or par-
tially worn down.
When the contact surface of the synchronizer
ring insert is scored or abnormally worn down.
5) Shifting insert key
Replace the insert if deformed, excessively worn,
or defective in any way.
6) Oil seal
Replace the oil seal if the lip is deformed, hard-
ened, damaged, worn, or defective in any way.
7) O-ring
Replace the O-ring if the sealing face is deformed,
hardened, damaged, worn, or defective in any way.
8) Gearshift mechanism
Repair or replace the gearshift mechanism if ex-
cessively worn, bent, or defective in any way.
F: ADJUSTMENT
Choose the main shaft rear plate.
Range.>
Page 2799 of 2870
5MT-86
MANUAL TRANSMISSION AND DIFFERENTIAL
Input Shaft Assembly
3) Gears
Replace the gears with new ones if their tooth
surfaces are broken, damaged, or excessively
worn.
Correct or replace if the cone that contacts the
baulk ring is rough or damaged.
Correct or replace if the inner surface or end face
is damaged.
4) Baulk ring
Replace the ring in the following cases:
When the inner surface and end face are dam-
aged.
When the ring inner surface is excessively or
partially worn down.
When the contact surface of the synchronizer
ring insert is scored or abnormally worn down.
5) Shifting insert key
Replace the insert if deformed, excessively worn,
or defective in any way.
6) Oil seal
Replace the oil seal if the lip is deformed, hard-
ened, damaged, worn, or defective in any way.
7) O-ring
Replace the O-ring if the sealing face is deformed,
hardened, damaged, worn, or defective in any way.
8) Gearshift mechanism
Repair or replace the gearshift mechanism if ex-
cessively worn, bent, or defective in any way.
9) Measure the clearance between snap ring and
ball bearing using thickness gauge.
Clearance:
0 — 0.12 mm (0 — 0.0047 in)
If the measurement is not within specification, se-
lect a suitable snap ring.F: ADJUSTMENT
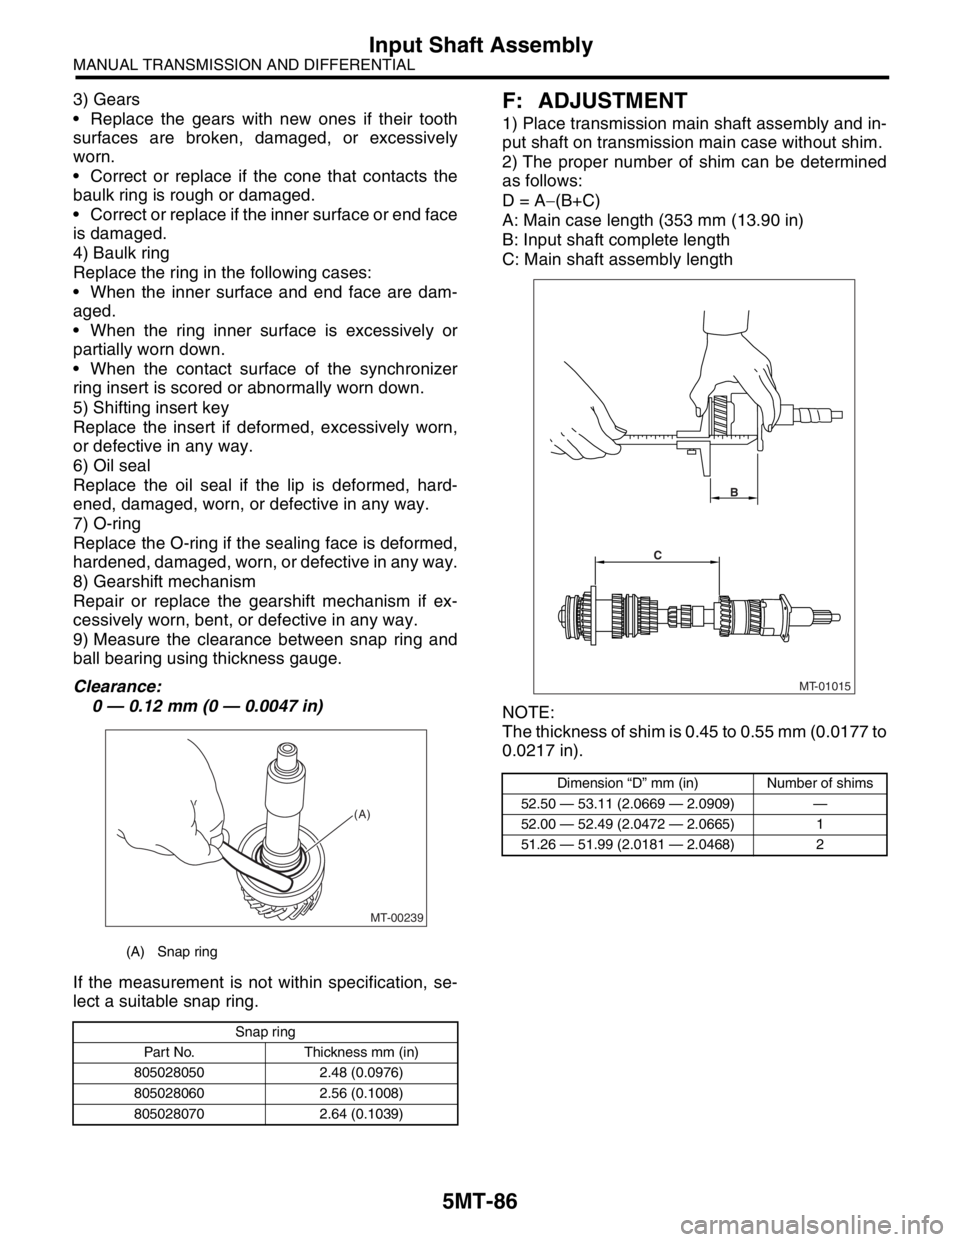
1) Place transmission main shaft assembly and in-
put shaft on transmission main case without shim.
2) The proper number of shim can be determined
as follows:
D = A−(B+C)
A: Main case length (353 mm (13.90 in)
B: Input shaft complete length
C: Main shaft assembly length
NOTE:
The thickness of shim is 0.45 to 0.55 mm (0.0177 to
0.0217 in).
(A) Snap ring
Snap ring
Part No. Thickness mm (in)
805028050 2.48 (0.0976)
805028060 2.56 (0.1008)
805028070 2.64 (0.1039)
MT-00239
(A)
Dimension “D” mm (in) Number of shims
52.50 — 53.11 (2.0669 — 2.0909) —
52.00 — 52.49 (2.0472 — 2.0665) 1
51.26 — 51.99 (2.0181 — 2.0468) 2
MT-01015
CB
Page 2802 of 2870
5MT-89
MANUAL TRANSMISSION AND DIFFERENTIAL
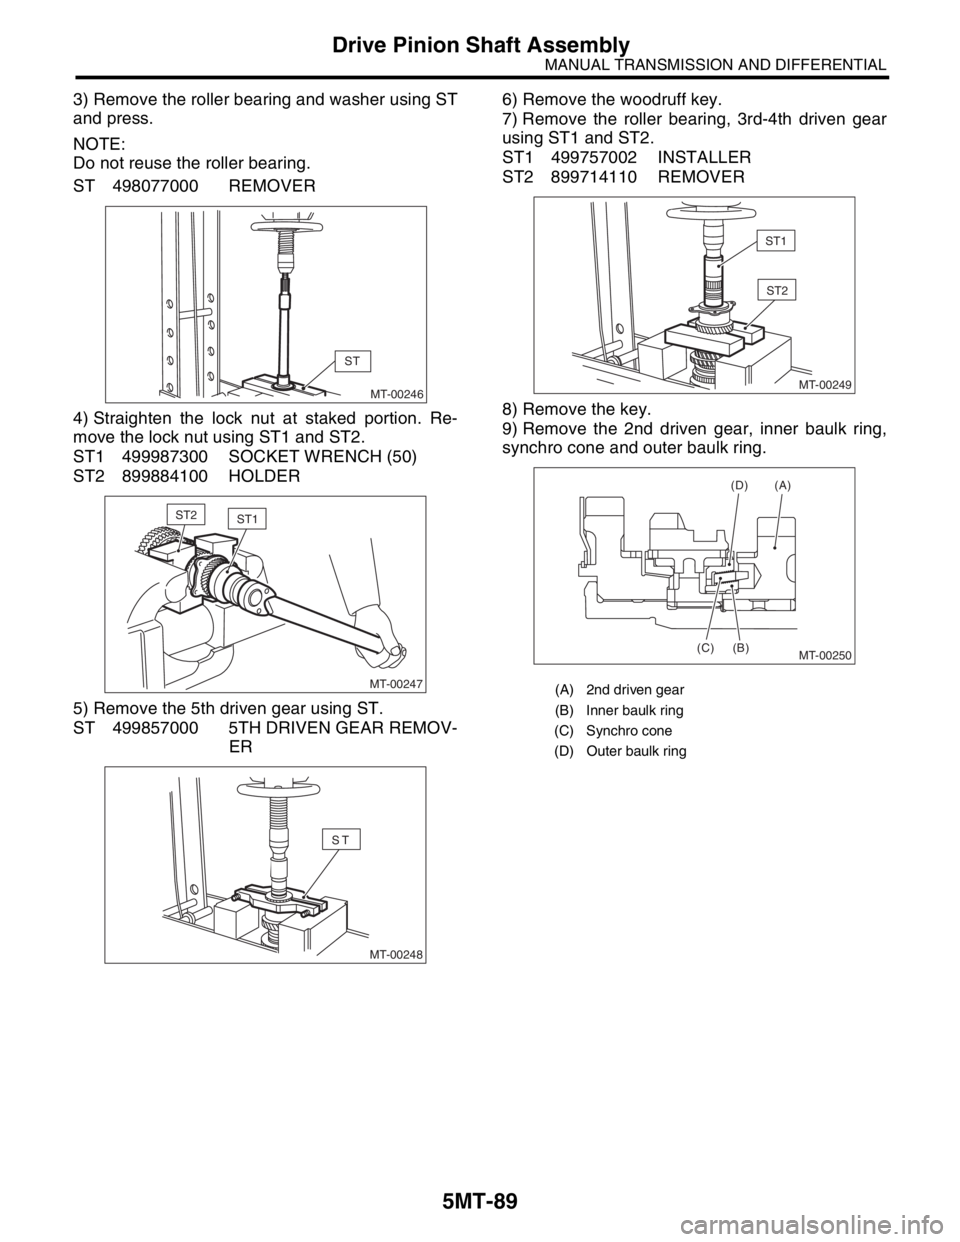
Drive Pinion Shaft Assembly
3) Remove the roller bearing and washer using ST
and press.
NOTE:
Do not reuse the roller bearing.
ST 498077000 REMOVER
4) Straighten the lock nut at staked portion. Re-
move the lock nut using ST1 and ST2.
ST1 499987300 SOCKET WRENCH (50)
ST2 899884100 HOLDER
5) Remove the 5th driven gear using ST.
ST 499857000 5TH DRIVEN GEAR REMOV-
ER6) Remove the woodruff key.
7) Remove the roller bearing, 3rd-4th driven gear
using ST1 and ST2.
ST1 499757002 INSTALLER
ST2 899714110 REMOVER
8) Remove the key.
9) Remove the 2nd driven gear, inner baulk ring,
synchro cone and outer baulk ring.
MT-00246
ST
MT-00247
ST1ST2
MT-00248
ST
(A) 2nd driven gear
(B) Inner baulk ring
(C) Synchro cone
(D) Outer baulk ring
MT-00249
ST1
ST2
MT-00250
(A)
(B) (C)(D)
Page 2803 of 2870
5MT-90
MANUAL TRANSMISSION AND DIFFERENTIAL
Drive Pinion Shaft Assembly
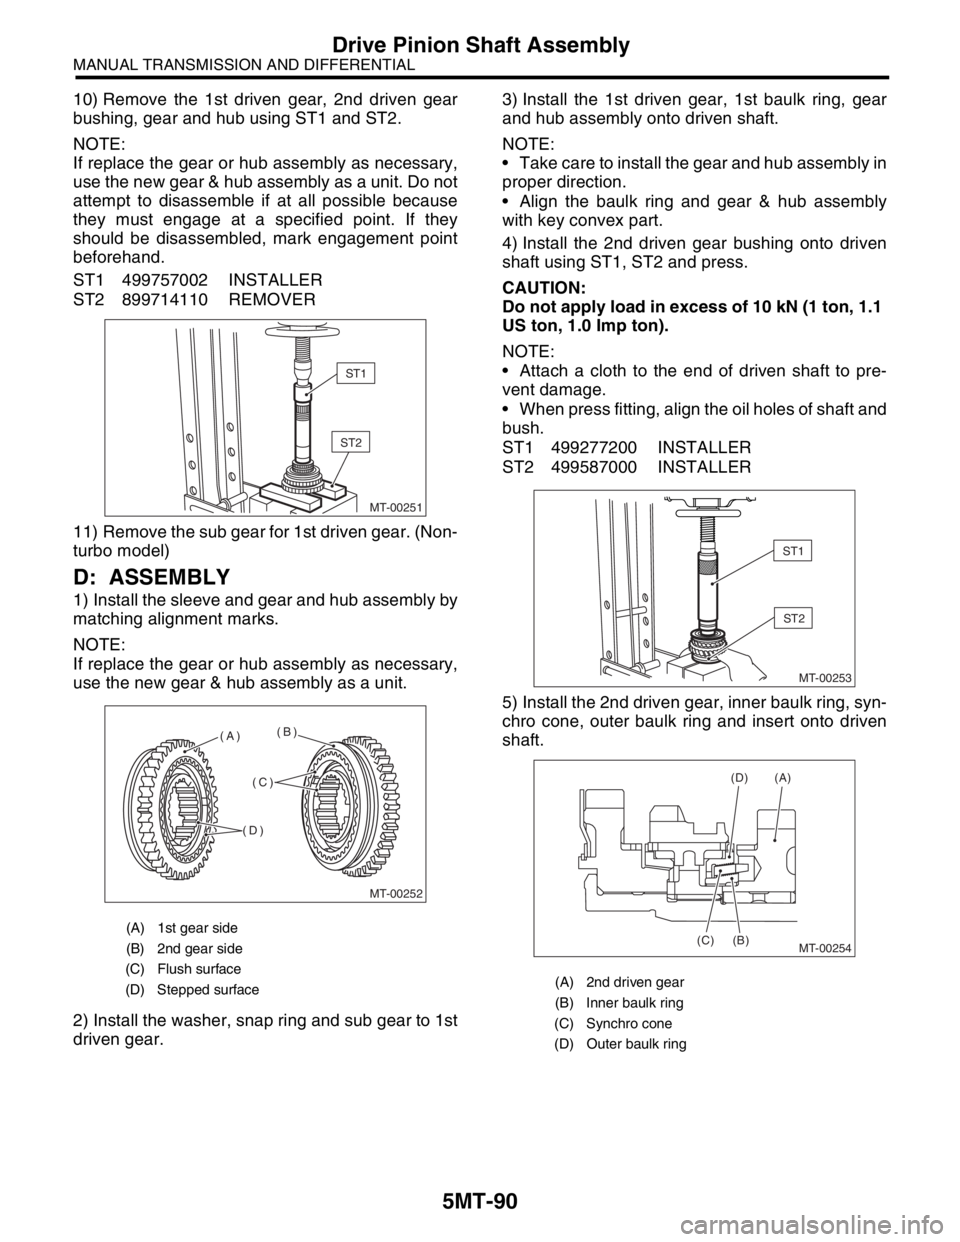
10) Remove the 1st driven gear, 2nd driven gear
bushing, gear and hub using ST1 and ST2.
NOTE:
If replace the gear or hub assembly as necessary,
use the new gear & hub assembly as a unit. Do not
attempt to disassemble if at all possible because
they must engage at a specified point. If they
should be disassembled, mark engagement point
beforehand.
ST1 499757002 INSTALLER
ST2 899714110 REMOVER
11) Remove the sub gear for 1st driven gear. (Non-
turbo model)
D: ASSEMBLY
1) Install the sleeve and gear and hub assembly by
matching alignment marks.
NOTE:
If replace the gear or hub assembly as necessary,
use the new gear & hub assembly as a unit.
2) Install the washer, snap ring and sub gear to 1st
driven gear.3) Install the 1st driven gear, 1st baulk ring, gear
and hub assembly onto driven shaft.
NOTE:
Take care to install the gear and hub assembly in
proper direction.
Align the baulk ring and gear & hub assembly
with key convex part.
4) Install the 2nd driven gear bushing onto driven
shaft using ST1, ST2 and press.
CAUTION:
Do not apply load in excess of 10 kN (1 ton, 1.1
US ton, 1.0 Imp ton).
NOTE:
Attach a cloth to the end of driven shaft to pre-
vent damage.
When press fitting, align the oil holes of shaft and
bush.
ST1 499277200 INSTALLER
ST2 499587000 INSTALLER
5) Install the 2nd driven gear, inner baulk ring, syn-
chro cone, outer baulk ring and insert onto driven
shaft.
(A) 1st gear side
(B) 2nd gear side
(C) Flush surface
(D) Stepped surface
MT-00251
ST1
ST2
MT-00252
(B)
(A)
(C)
(D)
(A) 2nd driven gear
(B) Inner baulk ring
(C) Synchro cone
(D) Outer baulk ring
MT-00253
ST1
ST2
MT-00254
(A)
(B) (C)(D)
Page 2804 of 2870
5MT-91
MANUAL TRANSMISSION AND DIFFERENTIAL
Drive Pinion Shaft Assembly
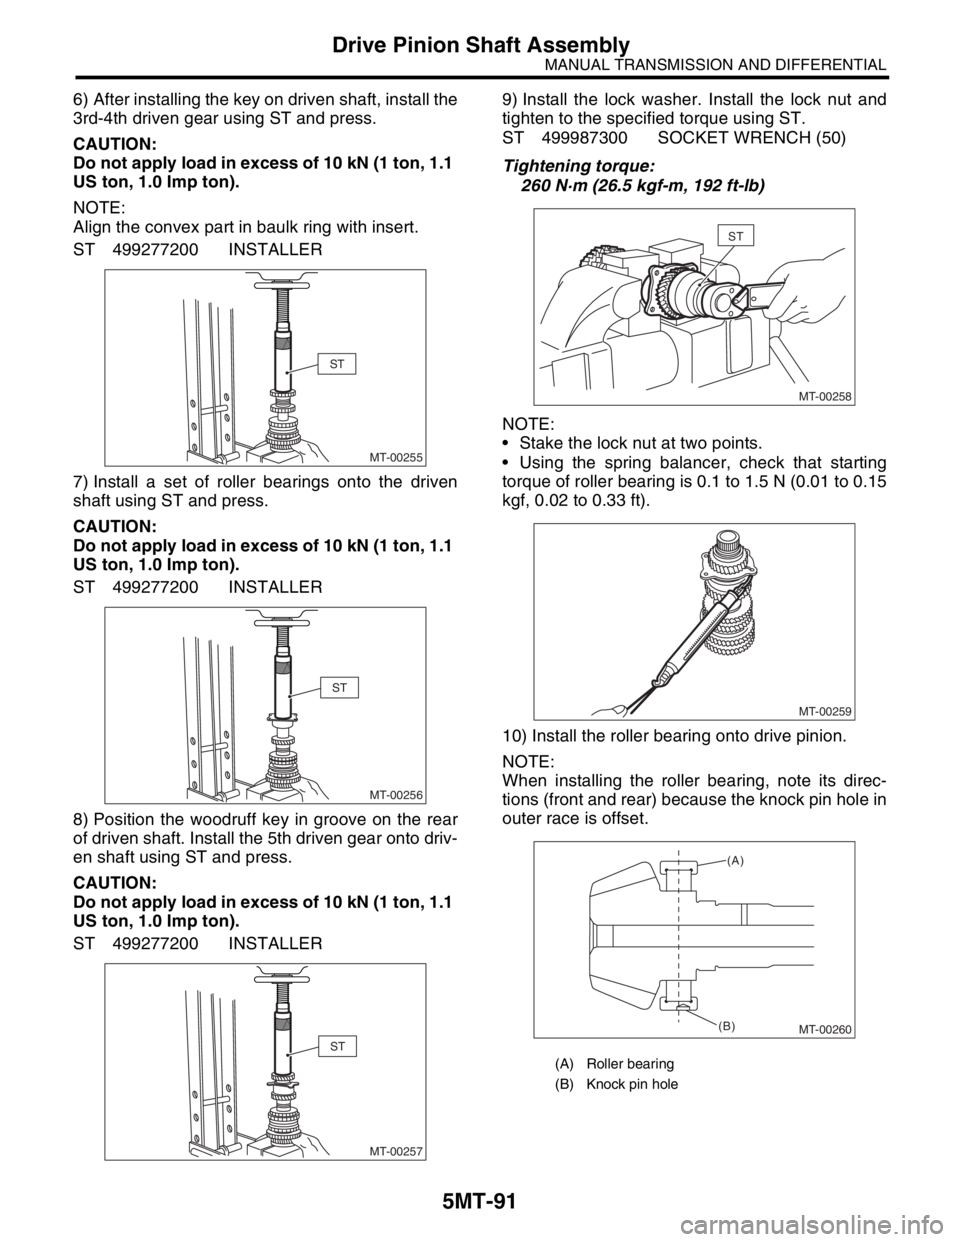
6) After installing the key on driven shaft, install the
3rd-4th driven gear using ST and press.
CAUTION:
Do not apply load in excess of 10 kN (1 ton, 1.1
US ton, 1.0 Imp ton).
NOTE:
Align the convex part in baulk ring with insert.
ST 499277200 INSTALLER
7) Install a set of roller bearings onto the driven
shaft using ST and press.
CAUTION:
Do not apply load in excess of 10 kN (1 ton, 1.1
US ton, 1.0 Imp ton).
ST 499277200 INSTALLER
8) Position the woodruff key in groove on the rear
of driven shaft. Install the 5th driven gear onto driv-
en shaft using ST and press.
CAUTION:
Do not apply load in excess of 10 kN (1 ton, 1.1
US ton, 1.0 Imp ton).
ST 499277200 INSTALLER9) Install the lock washer. Install the lock nut and
tighten to the specified torque using ST.
ST 499987300 SOCKET WRENCH (50)
Tightening torque:
260 N·m (26.5 kgf-m, 192 ft-lb)
NOTE:
Stake the lock nut at two points.
Using the spring balancer, check that starting
torque of roller bearing is 0.1 to 1.5 N (0.01 to 0.15
kgf, 0.02 to 0.33 ft).
10) Install the roller bearing onto drive pinion.
NOTE:
When installing the roller bearing, note its direc-
tions (front and rear) because the knock pin hole in
outer race is offset.
MT-00255
ST
MT-00256
ST
MT-00257
ST
(A) Roller bearing
(B) Knock pin hole
MT-00258
ST
MT-00259
MT-00260
(A)
(B)