2004 SUBARU FORESTER check engine light
[x] Cancel search: check engine lightPage 2062 of 2870

EN(H4DOTC 2.5)-38
ENGINE (DIAGNOSTIC)
Inspection Mode
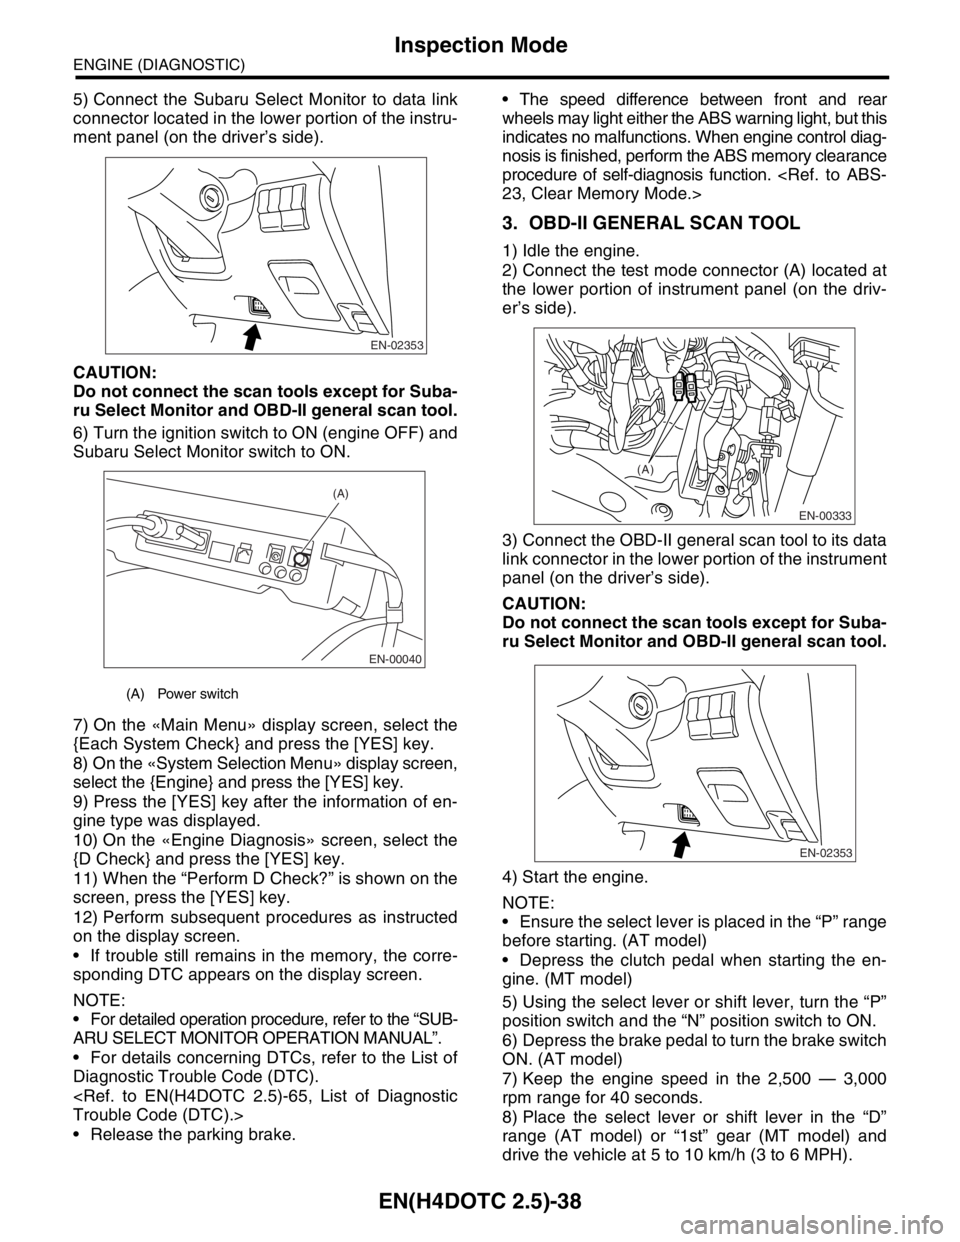
5) Connect the Subaru Select Monitor to data link
connector located in the lower portion of the instru-
ment panel (on the driver’s side).
CAUTION:
Do not connect the scan tools except for Suba-
ru Select Monitor and OBD-II general scan tool.
6) Turn the ignition switch to ON (engine OFF) and
Subaru Select Monitor switch to ON.
7) On the «Main Menu» display screen, select the
{Each System Check} and press the [YES] key.
8) On the «System Selection Menu» display screen,
select the {Engine} and press the [YES] key.
9) Press the [YES] key after the information of en-
gine type was displayed.
10) On the «Engine Diagnosis» screen, select the
{D Check} and press the [YES] key.
11) When the “Perform D Check?” is shown on the
screen, press the [YES] key.
12) Perform subsequent procedures as instructed
on the display screen.
If trouble still remains in the memory, the corre-
sponding DTC appears on the display screen.
NOTE:
For detailed operation procedure, refer to the “SUB-
ARU SELECT MONITOR OPERATION MANUAL”.
For details concerning DTCs, refer to the List of
Diagnostic Trouble Code (DTC).
Release the parking brake. The speed difference between front and rear
wheels may light either the ABS warning light, but this
indicates no malfunctions. When engine control diag-
nosis is finished, perform the ABS memory clearance
procedure of self-diagnosis function.
3. OBD-II GENERAL SCAN TOOL
1) Idle the engine.
2) Connect the test mode connector (A) located at
the lower portion of instrument panel (on the driv-
er’s side).
3) Connect the OBD-II general scan tool to its data
link connector in the lower portion of the instrument
panel (on the driver’s side).
CAUTION:
Do not connect the scan tools except for Suba-
ru Select Monitor and OBD-II general scan tool.
4) Start the engine.
NOTE:
Ensure the select lever is placed in the “P” range
before starting. (AT model)
Depress the clutch pedal when starting the en-
gine. (MT model)
5) Using the select lever or shift lever, turn the “P”
position switch and the “N” position switch to ON.
6) Depress the brake pedal to turn the brake switch
ON. (AT model)
7) Keep the engine speed in the 2,500 — 3,000
rpm range for 40 seconds.
8) Place the select lever or shift lever in the “D”
range (AT model) or “1st” gear (MT model) and
drive the vehicle at 5 to 10 km/h (3 to 6 MPH).
(A) Power switch
EN-02353
EN-00040
(A)
EN-00333
(A)
EN-02353
Page 2063 of 2870

EN(H4DOTC 2.5)-39
ENGINE (DIAGNOSTIC)
Inspection Mode
NOTE:
On AWD vehicles, release the parking brake.
The speed difference between front and rear
wheels may light either the ABS warning light, but
this indicates no malfunctions. When engine con-
trol diagnosis is finished, perform the ABS memory
clearance procedure of self-diagnosis function.
9) Using the OBD-II general scan tool, check
DTC(s) and record the result(s).
NOTE:
For detailed operation procedures, refer to the
OBD-II General Scan Tool Operation Manual.
For details concerning DTCs, refer to the List of
Diagnostic Trouble Code (DTC).
Page 2069 of 2870

EN(H4DOTC 2.5)-45
ENGINE (DIAGNOSTIC)
Malfunction Indicator Light
15.Malfunction Indicator Light
A: PROCEDURE
B: ACTIVATION OF MALFUNCTION
INDICATOR LIGHT
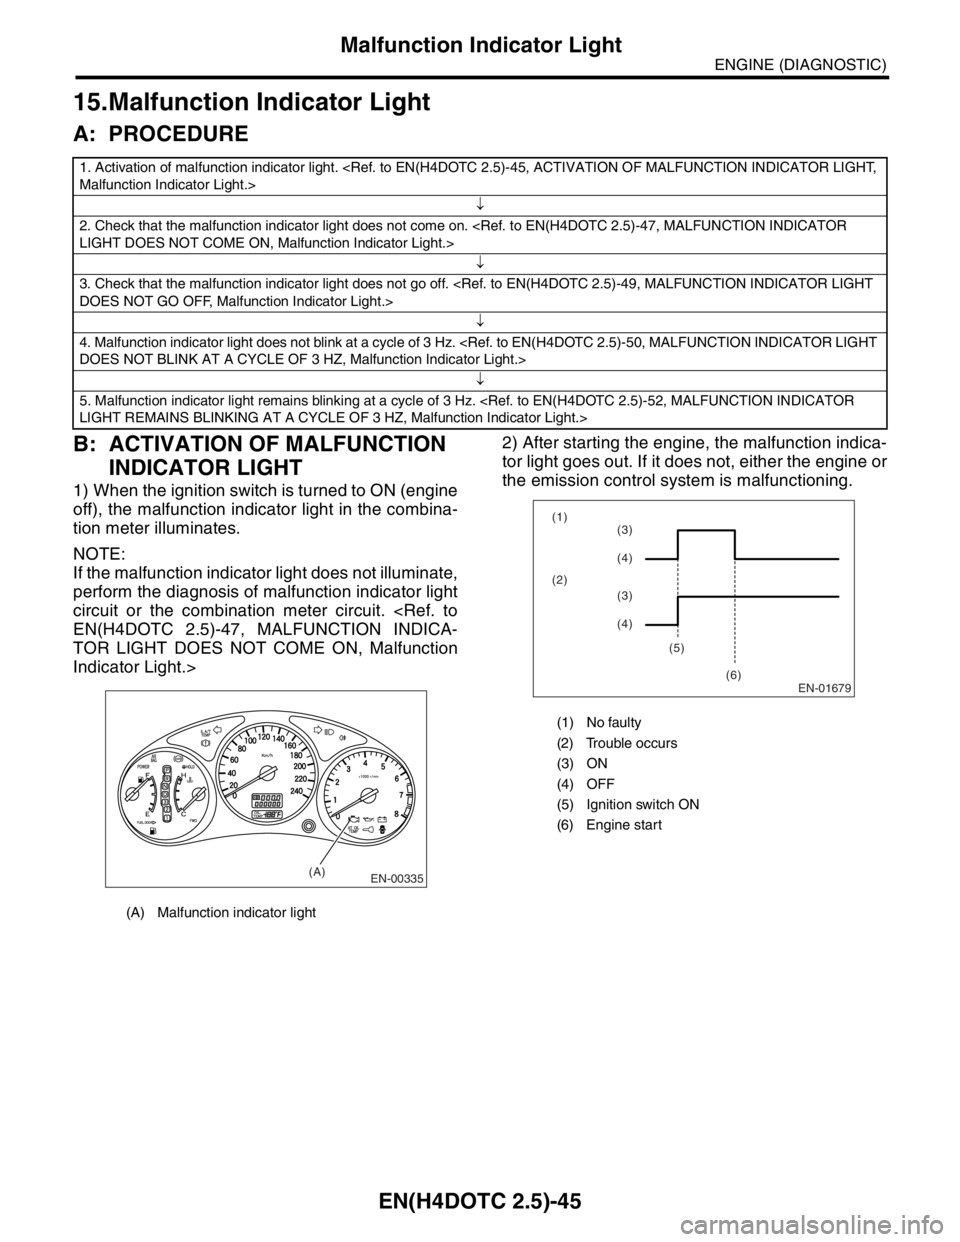
1) When the ignition switch is turned to ON (engine
off), the malfunction indicator light in the combina-
tion meter illuminates.
NOTE:
If the malfunction indicator light does not illuminate,
perform the diagnosis of malfunction indicator light
circuit or the combination meter circuit.
TOR LIGHT DOES NOT COME ON, Malfunction
Indicator Light.>2) After starting the engine, the malfunction indica-
tor light goes out. If it does not, either the engine or
the emission control system is malfunctioning.
1. Activation of malfunction indicator light.
↓
2. Check that the malfunction indicator light does not come on.
↓
3. Check that the malfunction indicator light does not go off.
↓
4. Malfunction indicator light does not blink at a cycle of 3 Hz.
↓
5. Malfunction indicator light remains blinking at a cycle of 3 Hz.
(A) Malfunction indicator light
EN-00335(A)
(1) No faulty
(2) Trouble occurs
(3) ON
(4) OFF
(5) Ignition switch ON
(6) Engine start
EN-01679
(1)
(2)
(5)
(6)(3)
(4)
(3)
(4)
Page 2072 of 2870

EN(H4DOTC 2.5)-48
ENGINE (DIAGNOSTIC)
Malfunction Indicator Light
Step Check Yes No
1 CHECK OUTPUT SIGNAL FROM ECM.
1) Turn the ignition switch to ON.
2) Measure the voltage between ECM con-
nector and chassis ground.
Connector & terminal
(B134) No. 17 (+) — Chassis ground (
−):Is the voltage less than 1 V? Go to step 4.Go to step 2.
2 CHECK POOR CONTACT.Does the malfunction indicator
light come on when shaking or
pulling the ECM connector and
harness?Repair the poor
contact in ECM
connector.Go to step 3.
3 CHECK ECM CONNECTOR.Is the ECM connector correctly
connected?Replace the ECM.
41, Engine Con-
trol Module
(ECM).>Repair the con-
nection of ECM
connector.
4 CHECK HARNESS BETWEEN COMBINA-
TION METER AND ECM CONNECTOR.
1) Turn the ignition switch to OFF.
2) Remove the combination meter.
3) Disconnect the connector from ECM and
combination meter.
4) Measure the resistance of harness between
ECM and combination meter connector.
Connector & terminal
(B134) No. 17 — (i12) No. 1:Is the resistance less than 1
Ω?Go to step 5.Repair the harness
and connector.
NOTE:
In this case repair
the following:
Open circuit in
harness between
ECM and combi-
nation meter con-
nector
Poor contact in
coupling connector
5 CHECK POOR CONTACT.
Check poor contact in combination meter con-
nector.Is there poor contact in combi-
nation meter connector?Repair poor con-
tact in combination
meter connector.Go to step 6.
6 CHECK HARNESS BETWEEN COMBINA-
TION METER AND IGNITION SWITCH CON-
NECTOR.
1) Turn the ignition switch to ON.
2) Measure the voltage between combination
meter connector and chassis ground.
Connector & terminal
(i10) No. 9 (+) — Chassis ground (
−):Is the voltage more than 10 V? Replace the board
of combination
meter.
Meter Assembly.>Check the follow-
ing and repair if
necessary.
N
OTE:
Blown out of
fuse (No. 14)
Open or short
circuit in harness
between fuse (No.
14) and battery
terminal
Poor contact in
ignition switch con-
nector
Page 2073 of 2870

EN(H4DOTC 2.5)-49
ENGINE (DIAGNOSTIC)
Malfunction Indicator Light
D: MALFUNCTION INDICATOR LIGHT DOES NOT GO OFF
DIAGNOSIS:
The malfunction indicator light circuit is shorted.
TROUBLE SYMPTOM:
Although malfunction indicator light comes on when the engine runs, DTC is not shown on the Subaru Select
Monitor or OBD-II general scan tool display.
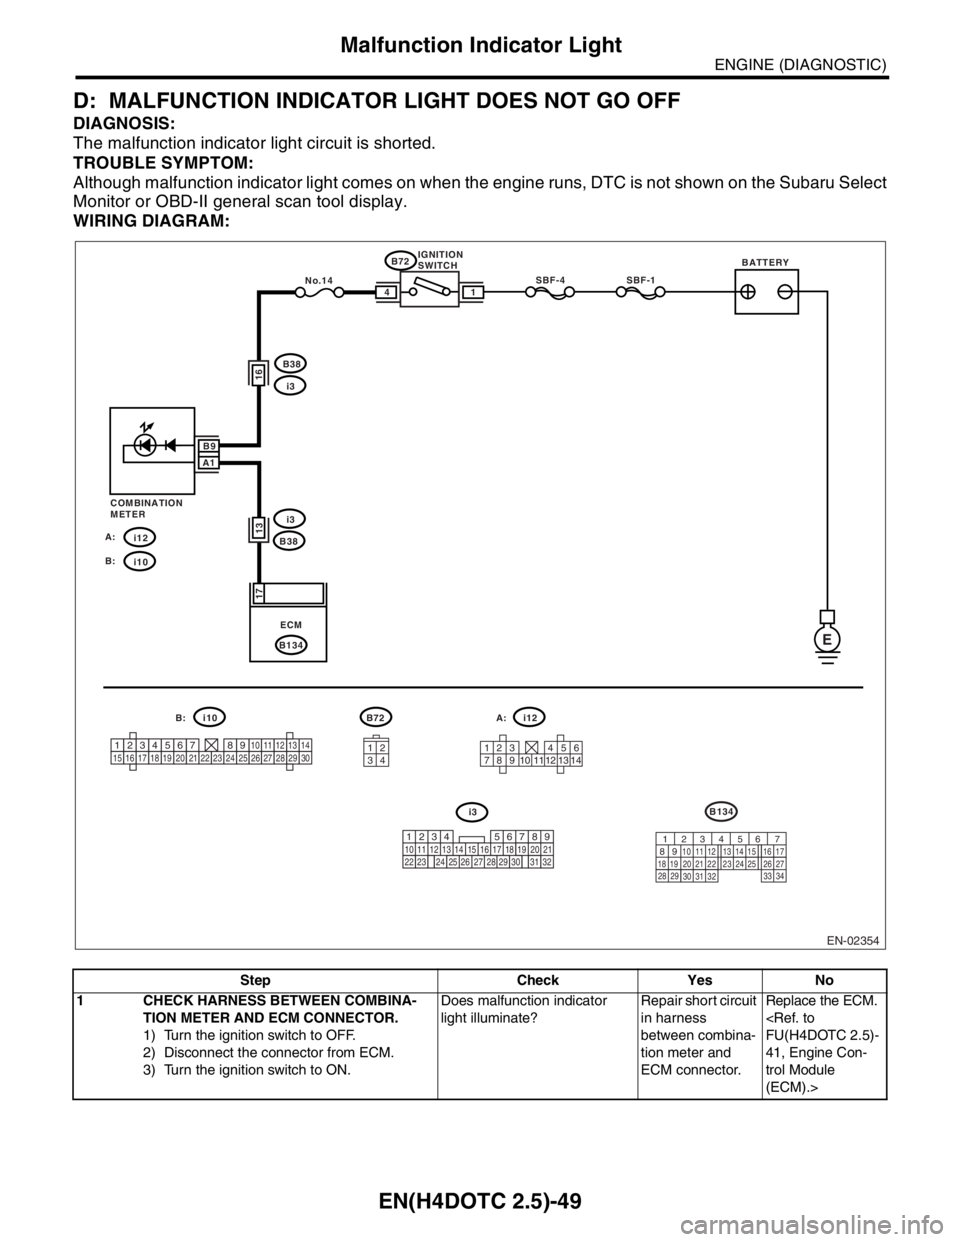
WIRING DIAGRAM:
Step Check Yes No
1 CHECK HARNESS BETWEEN COMBINA-
TION METER AND ECM CONNECTOR.
1) Turn the ignition switch to OFF.
2) Disconnect the connector from ECM.
3) Turn the ignition switch to ON.Does malfunction indicator
light illuminate?Repair short circuit
in harness
between combina-
tion meter and
ECM connector.Replace the ECM.
41, Engine Con-
trol Module
(ECM).>
EN-02354
SBF-4 SBF-1
No.14B72
B38
B134ECMi3
E
1 4
17
i12 A:
i10 B:B9
A1
B72 i12 i10
i3
3412
123 456
789 121310 11 14
13
i3 B38
A: B: COMBINATION
METERIGNITION
SWITCHBATTERY
B134
56 7
82 1
94 3
10
24 22 23 25 11 12 13 14 15
26 27
2816 17
18 19 20 21
33 34 29
32 30 31
16
219
32
1234 5610 11 12 13 14 15716
23 3019 20
22 26 27 28 29817
24 3118
25
123456789101112131415161718192021222324252627282930
Page 2075 of 2870

EN(H4DOTC 2.5)-51
ENGINE (DIAGNOSTIC)
Malfunction Indicator Light
Step Check Yes No
1 CHECK STATUS OF MALFUNCTION INDI-
CATOR LIGHT.
1) Turn the ignition switch to OFF.
2) Disconnect the test mode connectors.
3) Turn the ignition switch to ON. (engine OFF)Does malfunction indicator
light illuminate?Go to step 2.Repair the malfunc-
tion indictor light cir-
cuit.
47, MALFUNC-
TION INDICA-
TOR LIGHT
DOES NOT
COME ON, Mal-
function Indicator
Light.>
2 CHECK HARNESS BETWEEN COMBINA-
TION METER AND ECM CONNECTOR.
1) Turn the ignition switch to OFF.
2) Disconnect the connector from ECM.
3) Turn the ignition switch to ON.Does malfunction indicator
light illuminate?Repair ground
short circuit in har-
ness between com-
bination meter and
ECM connector.Go to step 3.
3 CHECK HARNESS BETWEEN TEST MODE
CONNECTOR AND CHASSIS GROUND.
1) Turn the ignition switch to OFF.
2) Disconnect the connector from ECM.
3) Measure the resistance of harness
between test mode connector and chassis
ground.
Connector & terminal
(B76) No. 1 — Chassis ground:Is the resistance less than 1
Ω?Go to step 4.Repair the harness
and connector.
N
OTE:
In this case repair
the following:
Open circuit in
harness between
test mode connec-
tor and chassis
ground
4 CHECK POOR CONTACT.
Check poor contact in ECM connector.Is there poor contact in ECM
connector?Repair the poor
contact in ECM
connector.Go to step 5.
5 CHECK HARNESS BETWEEN ECM AND
TEST MODE CONNECTOR.
1) Connect the test mode connector.
2) Measure the resistance of harness
between ECM and chassis ground.
Connector & terminal
(B137) No. 15 — Chassis ground:Is the resistance less than 1
Ω?Go to step 6.Repair open circuit
in harness between
ECM and test
mode connector.
6 CHECK POOR CONTACT.
Check poor contact in ECM connector.Is there poor contact in ECM
connector?Repair the poor
contact in ECM
connector.Replace the ECM.
41, Engine Con-
trol Module
(ECM).>
Page 2077 of 2870

EN(H4DOTC 2.5)-53
ENGINE (DIAGNOSTIC)
Malfunction Indicator Light
Step Check Yes No
1 CHECK TEST MODE CONNECTOR.
1) Disconnect the test mode connectors
2) Turn the ignition switch to ON.Does the malfunction indicator
light blink?Go to step 2.System is in good
order.
N
OTE:
Malfunction indica-
tor light blinks at a
cycle of 3 Hz when
test mode connec-
tor is connected.
2 CHECK HARNESS BETWEEN ECM CON-
NECTOR AND ENGINE GROUND TERMI-
NAL.
1) Turn the ignition switch to OFF.
2) Disconnect the connector from ECM.
3) Measure the resistance of harness
between ECM connector and chassis ground.
Connector & terminal
(B137) No. 15 — Chassis ground:Is the resistance less than 5
Ω?Repair the short
circuit in harness
between ECM and
test mode connec-
tor.Replace the ECM.
41, Engine Con-
trol Module
(ECM).>
Page 2105 of 2870

EN(H4DOTC 2.5)-81
ENGINE (DIAGNOSTIC)
Diagnostic Procedure with Diagnostic Trouble Code (DTC)
Step Check Yes No
1 CONNECT SUBARU SELECT MONITOR OR
THE OBD-II GENERAL SCAN TOOL, AND
READ DATA.
1) Turn the ignition switch to OFF.
2) Connect the Subaru Select Monitor or the
OBD-II general scan tool to data link connector.
3) Turn the ignition switch to ON and the Sub-
aru Select Monitor or OBD-II general scan tool
switch to ON.
4) Start the engine.
5) Connect the Subaru Select Monitor or OBD-II
general scan tool, and read the mass air flow
sensor voltage.
N
OTE:
Subaru Select Monitor
For detailed operation procedure, refer to “READ
CURRENT DATA SHOWN ON DISPLAY FOR
ENGINE”.
OBD-II general scan tool
For detailed operation procedures, refer to the
OBD-II General Scan Tool Operation Manual.Is the voltage 0.2 — 4.7 V? Even if the mal-
function indicator
light illuminates,
the circuit has
returned to a nor-
mal condition at
this time. A tempo-
rary poor contact
of the connector or
harness may be
the cause. Repair
harness or con-
nector in the mass
air flow sensor.
N
OTE:
In this case repair
the following:
Open or ground
short circuit in har-
ness between
mass air flow sen-
sor and ECM con-
nector
Poor contact in
mass air flow sen-
sor or ECM con-
nectorGo to step 2.
2 CHECK INPUT SIGNAL FROM ECM.
Measure the voltage between ECM connector
and chassis ground while engine is idling.
Connector & terminal
(B136) No. 23 (+) — Chassis ground (
−):Is the voltage more than 0.2 V? Go to step 4.Go to step 3.
3 CHECK INPUT SIGNAL FOR ECM (WITH
SUBARU SELECT MONITOR).
Measure the voltage between ECM connector
and chassis ground while engine is idling.Does the voltage change by
shaking the harness and con-
nector of ECM while monitor-
ing the value with Subaru
Select Monitor?Repair the poor
contact in ECM
connector.Contact the SUB-
ARU dealer.
N
OTE:
Inspection by DTM
is required, because
probable cause is
deterioration of mul-
tiple parts.
4 CHECK POWER SUPPLY TO MASS AIR
FLOW SENSOR.
1) Turn the ignition switch to OFF.
2) Disconnect the connector from mass air
flow sensor.
3) Turn the ignition switch to ON.
4) Measure voltage between mass air flow
sensor connector and chassis ground.
Connector & terminal
(B3) No. 1 (+) — Chassis ground (
−):Is the voltage more than 5 V? Go to step 5.Repair open circuit
between mass air
flow sensor and
main relay
5 CHECK HARNESS BETWEEN ECM AND
MASS AIR FLOW SENSOR CONNECTOR.
1) Turn the ignition switch to OFF.
2) Disconnect the connector from ECM.
3) Measure the resistance of harness between
ECM and mass air flow sensor connector.
Connector & terminal
(B136) No. 23 — (B3) No. 3:
(B136) No. 31 — (B3) No. 2:
(B136) No. 35 — (B3) No. 5:Is the resistance less than 1 Ω? Go to step 6.Repair open circuit
between ECM and
mass air flow sen-
sor connector.