2004 PORSCHE CAYENNE center console
[x] Cancel search: center consolePage 7 of 379

Table of Contents
7 Table of Contents
Overview Illustrations......................... 10Driver’s cockpit ............................................ 11
Steering wheel and instrument cluster ............ 12
Center console, front .................................... 13Opening and Locking ......................... 14Never invite car theft! .................................... 15
Keys ............................................................ 16
Central Locking System................................ 17
Brief overview – Opening and locking from
outside ........................................................ 18
Unlocking and locking from outside ................ 19
Opening and locking from inside .................... 28
Opening and closing the engine
compartment lid ........................................... 29
Malfunctions when opening and closing .......... 31Seats, Mirrors and Steering Wheel ..... 33Seat and Headrest ........................................ 34
Front seat with memory................................. 37
Easy Entry Function ..................................... 39
Fire Extinguisher ........................................... 40
Heated Seats – Front and Rear ...................... 40
Safety Belts.................................................. 42
Airbag Systems ............................................ 45
Child Restraint Systems ................................ 49
LATCH Child Seat System.............................. 53
Child Restraint Anchorages ............................ 54
Door Mirrors................................................. 55
Interior Mirror ............................................... 57Automatic Anti-Dazzle Mirror .......................... 57
Steering Wheel ............................................. 58
Multi-Functional Steering Wheel ...................... 60
Sun Visors .................................................... 62
Make-up mirror ............................................. 62
Sun Blinds, Rear Side Windows ...................... 62
Air Conditioning, Parking Heater and
Heated Rear Window ......................... 63Opening the Cover Flap of the
Air-Conditioning Control Panel ....................... 64
Overview of Air-Conditioning Systems ............. 64
Valid for Every Air-Conditioning System ........... 65
Brief Overview – Manual Air-Conditioning ...... 66
Manual Air-Conditioning.................................. 67
Brief Overview – Automatically Controlled
2-Zone Air-Conditioning System ...................... 69
Automatically Controlled
2-Zone Air-Conditioning .................................. 70
Brief Overview – Automatically Controlled
4-Zone Air-Conditioning System,
Front Control Panel ....................................... 73
Brief Overview – Automatically Controlled
4-Zone Air-Conditioning System,
Rear Control Panel ........................................ 74
Automatically Controlled
4-Zone Air-Conditioning .................................. 75
Vents ........................................................... 79
Heated Rear Window ..................................... 80
Parking Heater.............................................. 81
Windows and Sliding Roofs ................ 86Power windows ............................................. 87
Brief overview - sliding/lifting roof ................ 91
Sliding/Lifting Roof........................................ 92
Brief overview – Panorama roof system ....... 96
Panorama roof system.................................. 97Lights, Turn Signals and Windshield
Wipers ............................................ 103Light Switch ............................................... 104
Instrument Illumination................................. 105
Automatic Headlight Beam Adjustment.......... 106
Turn signal/High Beam/
Headlight Flasher Stalk ................................ 106
Emergency flasher ...................................... 107
Interior Lighting........................................... 107
Comfort Lighting ......................................... 109
Coming Home Function
(Auto Shut Off Delay)................................... 109
Door-Surrounding Lighting ........................... 109
Brief overview – Windshield wipers ............. 110
Windshield Wiper/Washer Stalk .................... 111
10_Cayenne_21_KW17.book Seite 7 Donnerstag, 9. April 2009 3:33 15
Page 10 of 379

10
Overview Illustrations
Overview IllustrationsDriver’s cockpit ............................................ 11
Steering wheel and instrument cluster ............ 12
Center console, front .................................... 13
10_Cayenne_21_KW17.book Seite 10 Donnerstag, 9. April 2009 3:33 15
Page 13 of 379

Overview Illustrations
13
Center console, front1. Porsche Communication Management (PCM)
See separate operating instructions.
2. Air conditioner
See Page 64.
3. Ashtray/cigarette lighter
See Page 226.
4. Cupholder
See Page 226.
5. Reduction (Low Range), differential locks
See Page 177.
6. Sport mode
See Page 179.
7. Porsche Active Suspension Management
(PASM) running-gear setup
See Page 193.
8. Height adjustment, air suspension
See Page 190.
9. Armrest, storage trays
See Page 224.
10.ParkAssistent warning indicator
See Page 239.
11.Vents
See Page 79.
12.Glove compartment
See Page 223.
10_Cayenne_21_KW17.book Seite 13 Donnerstag, 9. April 2009 3:33 15
Page 76 of 379

76
Air Conditioning, Parking Heater and Heated Rear Window You can switch to automatic mode for the front
and rear air-conditioned areas, independently of
one another.
fPress AUTO button C on the front or rear
control panel.
The indicator light in button C of the front con-
trol panel and the AUTO indication in the rear
display panel are lit.
Air quantity and distribution are automatically
controlled and variations are compensated.Note on operation
If necessary, the automatic system can be
manually influenced.
This manual setting is retained until the appropri-
ate function button is pressed again or the AUTO
button C is pressed.Automatic mode
Control panel, rear
C- AUTO button (automatic mode)
F- Air-conditioning/seat heating display
G- Air-quantity button, left
H- Temperature button, left; seat heating, left
I- Air to vent, left door post
J- Air to footwell, left
K- Air to left central vent (center console)
O-Seat heating off/on
P- Air to vent, right door post
Q- Air to footwell, right
R- Air to right central vent (center console)
S- Temperature button, right; seat heating, right
T- Air-quantity button, rightSensorsTo avoid affecting the performance of the air-con-
ditioning system:
fDo not cover the sun sensor on the dashboard
and the temperature sensor F in the front con-
trol panel of the air-conditioning system.
10_Cayenne_21_KW17.book Seite 76 Donnerstag, 9. April 2009 3:33 15
Page 94 of 379

94
Windows and Sliding Roofs
Emergency operation of sliding/lifting
roofIf the sliding/lifting roof is defective, this can be
closed or opened manually.
Warning!
Risk of serious personal injury and damage
to the sliding/lifting roof during emergency
operation.
fEnsure that no one can be injured when the
sliding/lifting roof is operated.
fDuring and after emergency operation, the
sliding/lifting roof may no longer be operated with the rocker switch.
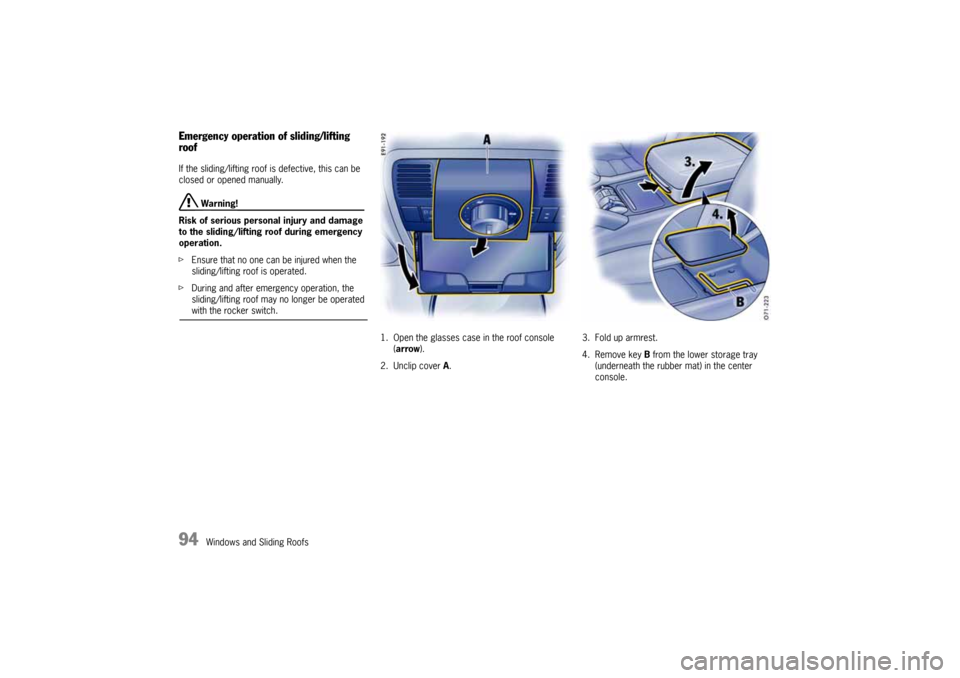
1. Open the glasses case in the roof console
(arrow).
2. Unclip cover A.3. Fold up armrest.
4. Remove key B from the lower storage tray
(underneath the rubber mat) in the center
console.
10_Cayenne_21_KW17.book Seite 94 Donnerstag, 9. April 2009 3:33 15
Page 101 of 379

Windows and Sliding Roofs
101
Roller blind cleaning position1. Close Panorama roof system and roller blind
completely.
2. Turn knob to position C. The Panorama roof
system opens completely.
3. When the Panorama roof system has reached
the final position, hold the rocker switch G to
the front for longer than 3 seconds, until the
roller blind is completely closed.
4. Remove dirt (e.g., leaves).
5. Keep the rocker switch F pressed to the rear,
until the roller blind is completely closed.
6. Close sliding roof element.
Caution!
Risk of damage if the Panorama roof system
and roller blind are in the roller blind
cleaning position while driving.
fClose the Panorama roof system completely one time before driving off.
Emergency operation of the Panorama
roof systemUse emergency operation only under exceptional
circumstances if the electric emergency closing
function cannot be implemented and the end
position cannot be stored.
fBefore using emergency operation, please
check whether the fuse is defective. After the
fuse has been changed, the limit positions of
the Panorama roof system will have to be
stored again.
Danger!
Danger of injury and risk of damage when
closing the roof.
fEnsure that no one is in the way of the roof ele-
ments as they are being opened or closed.
fDo not operate the Panorama roof system with
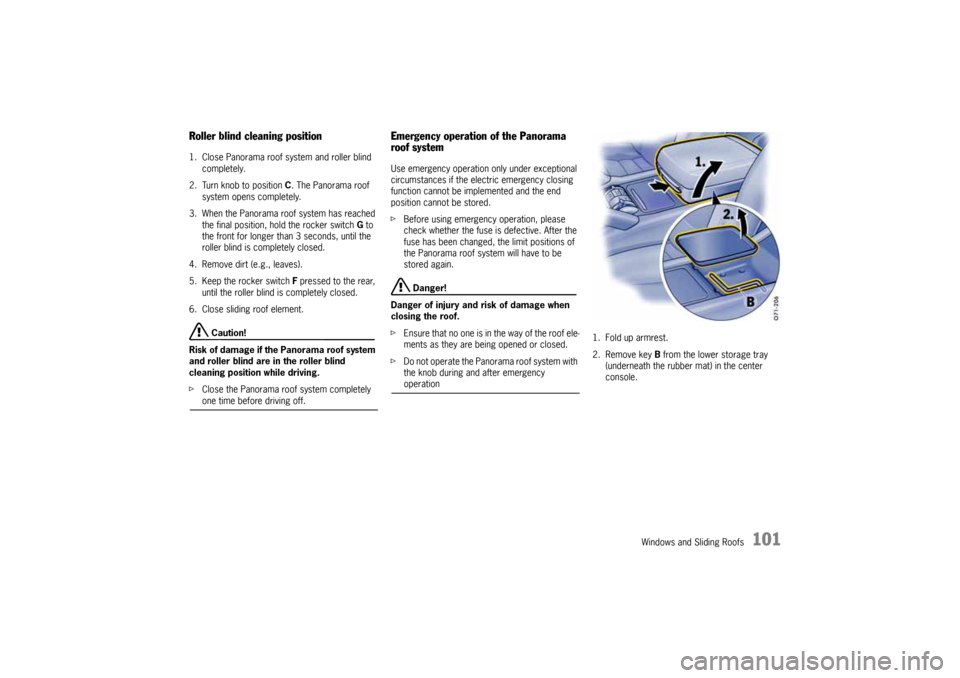
the knob during and after emergency operation1. Fold up armrest.
2. Remove key B from the lower storage tray
(underneath the rubber mat) in the center
console.
10_Cayenne_21_KW17.book Seite 101 Donnerstag, 9. April 2009 3:33 15
Page 131 of 379

Multi-Purpose Display and Instruments
131
Note on operation
fFor information on the operating principle of
the multi-purpose display:
Please see the chapter “OPERATING
PRINCIPLE” on Page 124.
Displaying status of level controlThe ground clearance of vehicles equipped with
level control is shown in the LEVEL menu.
Note on operation
The level control is adjusted by means of the
rocker switch behind the gearshift lever in the
center console.
For information on level control and height
adjustment:
Please see the chapter “AIR SUSPENSION WITH
LEVEL CONTROL AND HEIGHT ADJUSTMENT” on
Page 190.
Displaying status of locks/reduc-
tionThe selected driving programs for Low Range/
High Range as well as the engaged locks can be
displayed.
Note on operation
The driving programs are set by means of the
rocker switch behind the gearshift lever in the
center console.
fFor information on the programs for Off Road
and On Road driving and engaging locks/
reduction:
Please see the chapter “DRIVING PROGRAMS
FOR ON-ROAD AND OFF-ROAD DRIVING” on
Page 177.
1.MAIN MENU
>VEHICLE INFO
Select and confirm.
2.Select WARNINGS.
3.Confirm selection.
NO WARNING is displayed if the vehicle is in
perfect condition. Any warning messages
which are present are displayed.
4.Press repeatedly to display the warnings one
after the other.
5.Confirm selection.
VEHICLE INFO menu is displayed.
1.MAIN MENU
>VEHICLE INFO
Select and confirm.
2.Select LEVEL.
3.Confirm selection.
The current level settings are displayed.
4.Confirm selection.
VEHICLE INFO menu is displayed.
1.MAIN MENU
>VEHICLE INFO
Select and confirm.
2.Select LOCKS/REDUCT.
3.Confirm selection.
The current settings for
- Longitudinal lock on/off
- Reduction on/off
- Transverse axle differential lock on/off are
displayed.
4.Confirm selection.
VEHICLE INFO menu is displayed.
10_Cayenne_21_KW17.book Seite 131 Donnerstag, 9. April 2009 3:33 15
Page 175 of 379

Driving and Driving Safety
175
ParkingfGo easy on the accelerator.
fWhen parking or maneuvring in a small space,
control the speed by careful use of the foot-
brake.Driving in winterIn wintry road conditions it is advisable to take
steep inclines in manual mode M. This prevents
the occurrence of gear changes that could cause
wheelspin.
Limp-home modeIf there is a fault in the transmission:
–An X appears instead of the current gear
indicator on the multi-purpose display of the
instrument panel.
The transmission no longer shifts.
fTo remedy the fault, immediately consult an
authorized Porsche dealer.
Warning!
Reverse gear lock monitoring is disabled in
the emergency running program.
Damage to the vehicle may result as well as
loss of control, if the vehicle is moving for-
ward fast enough to cause rear wheel lockup.
fDo not shift into R while the vehicle is moving forward.
Tip on driving
3rd or 5th gear in selector position D and reverse
gear R are now available and will allow you to
reach the nearest authorized Porsche dealer.
fPlease go to your authorized Porsche dealer
as soon as possible.
Selector lever emergency releaseIn the event of an electrical fault, the selector lever
lock in position P can be manually released (for
towing the vehicle, for example).
1. Fold up armrest.
2. Remove key B from the lower storage tray
(underneath the rubber mat) in the center
console.
10_Cayenne_21_KW17.book Seite 175 Donnerstag, 9. April 2009 3:33 15