Page 161 of 195

Emergency StartingwithJumper
Cables
If the battery isdischarged, e.g.inwinter orafter
the car has been parked foralong time, thebat-
tery ofanother carcan beused forstarting with
the help ofjumper cables.
Make surethevoltage ofboth batteries isthe
same.
The capacity (Ampere hours,Ah)ofthe booster
battery mustnotbesubstantially lessthan thatof
the discharged battery.
The discharged batterymustbecorrectly con-
nected tothe vehicle's electrical system.
I>
Please observe thechapter "BATTERY" on
Page 155.
I>
Please observe thechapter "EMERGENCY UN-
LOCKING OFTHE LUGGAGE COMPARTMENT
LID AND ENGINE COMPARTMENT LID"on
Page 154.
Note
I>
Donot trytostart thecarbypushing ortow-
ing. Damage tothe catalytic converters and
other components ofthe car may result.
160
PracticalTips,Emergency Service
A
Warning!
Risk ofdamage andserious personal injury
due toshort circuit.
I>
Use only jumper cablesofadequate diameter
cross-section andfitted withcompletely insu-
lated alligator clips.
I>
Follow allwarnings andinstructions ofthe
jumper cablemanufacturer.
I>
When connecting jumpercables, makesure
that they cannot getcaught inany moving
parts inthe engine compartment.
The jumper cablesmustbelong enough so
that neither vehicles norcables touchanother.
I>
The vehicles mustnotbeincontact, otherwise
current mightflowassoon asthe positive ter-
minals areconnected.
I>
The cable clamps mustnotbeallowed tocon-
tact each other whenoneendofthe jumper ca-
bles areconnected toabattery.
I>
Ensure thattools orconductive jewellery
(rings, chains, watchstraps) donot come into
contact withliveparts ofthe vehicle.
I>
Improper hook-upofjumper cablescanruin
the alternator.
Danger
ofcaustic burns.
I>
Donot lean over thebattery.
Danger ofgas explosion.
I>
Improper useofbooster batterytostart a
vehicle maycause anexplosion, resultingin
severe personal injuries.
I>
Keep sources ofignition awayfromthebat-
tery, e.g.open flame, burning cigarettes or
sparking duetocable contact orwelding work.
I>
Adischarged batterycanfreeze evenat
WFj-lOoC.
Before connecting Jumpercables, afrozen bat-
tery must bethawed out.
Page 162 of 195

+
=Positive terminal
for
jump starting
- =Grounding point
for
jump starting
Connect jumpercablesinthe following
sequence:
1. Check electrolyte levelofeach cell.Ifneces-
sary, fillwith distilled watertojust above
plates.
2. Onavehicle withadischarged battery:turnoff
all consumers andaccessories, movethegear
shift lever intotheneutral position andsetthe
parking brake.
3. Open thecap ofthe positive terminal forjump
starting
(+).
4.
Attach the
positive cable
firsttothe positive
terminal forjump starting (+),
then tothe positive terminal ofthe booster bat-
tery.
5. Connect the
negative cable
firsttothe nega-
tive terminal ofthe booster battery,thentothe
grounding pointforjump starting (-).
6. Run theengine ofthe booster caratahigher
speed.
7. Start theengine.
An attempted startusing jumper cablesshould
not last more than15seconds. Thenallowa
waiting periodofatleast oneminute.
8. With theengine running, disconnect bothjump-
er cables inreverse order.
Close thelidofthe jump startbox.
PracticalTips,Emergency Service
Page 163 of 195

Lights, Replacing Bulbs
A
Warning!
Risk ofshort circuit.
c>
Always switchoffthe relevant consumer when
changing bulbs.
Risk ofinjury. Theheadlights areunder high
voltage wheninstalled.
c>
Becareful duringallwork inthe area ofthe
headlights.
Risk ofdamage. Bulbsofahigher wattage
can damage thelamp housing.
c>
Only thebulbs shown inthe chart maybeused.
c>
New bulbs mustbeclean andfree from
grease.
Therefore, nevertouch bulbswith
your barehands.
Use acloth orsoft paper whilereplacing bulbs.
c>
For reasons oftraffic safety, werecommend
that youalways carryspare bulbssothat you
can have acorrectly illuminated caratall
times. In certain countries, thecarrying ofspare
bulbs ismandatory.
Practical Tips,Emergency Service
A
Caution!
Risk ofdamage toheadlights duetoexces-
sive temperatures andabrasion.
c>
Attach nocoverings (e.g.films, "stone
guards") inthe area ofthe headlights.
c>
Use soapy wateronlytoclean lightlenses and
plastic headlight lenses.
In no case maychemical cleanersorother vol-
atile cleaning fluidsbeused.
c>
Toprevent scratches, donot rubwith adry or
merely moistcloth,tissue orinsect sponges.
Page 164 of 195
BulbChart
Type.
rating
Low beam
H7,55W
Bi-Xenon lowbeam
Philips,D2S35W
High beam
H9,65W
Additional highbeam
(with Bi-Xenon headlights)
Hll,55W
Fog lights
H3,55W
Rear foglight,
Reversing light
P21 W
Taillight, brakelight
P21 /5 W
Raised brakelight
W3W
Turn signal light
PY21W
Parking lightfront
H6W
Side marker light
WY5W
Door guardjkerb light
W5W
License platelight
C5W
Luggage compartmenVengine
compartment light,interior light
K10 W
Reading light
6W Xenon
PracticalTips,Emergency Service
Page 165 of 195
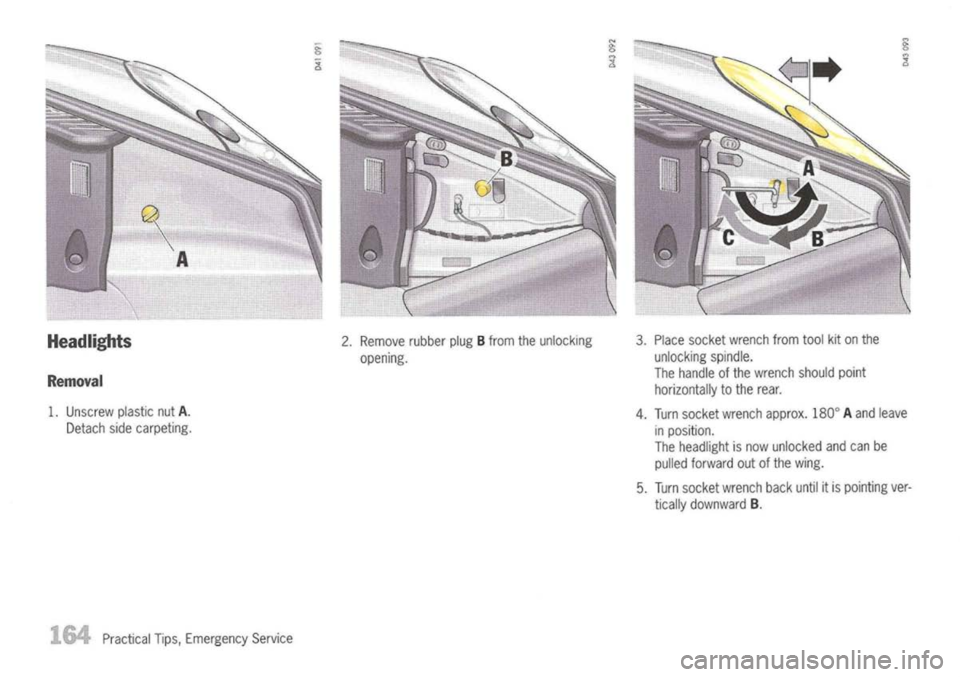
Headlights
Removal
1. Unscrew plasticnut
A.
Detach sidecarpeting.
Practical Tips,Emergency Service 2.
Remove rubberplugBfrom theunlocking
opening. 3.
Place socket wrench fromtoolkitonthe
unlocking spindle.
The handle ofthe wrench shouldpoint
horizontally tothe rear.
4. Turn socket wrench approx. 180
0
Aand leave
in position.
The headlight isnow unlocked andcanbe
pulled forward outofthe wing.
5. Turn socket wrench backuntilitis pointing ver-
tically downward
B.
Page 166 of 195
Installing
1. Insert headlight intoguide railsandpush fully
into thewing.
2. Push headlight tothe rear andatthe same
time turnthesocket wrench untilitpoints hor-
izontally tothe rear
C.
The headlight lockingdevicemustperceptibly
and audibly engage.
3. Check headlight forafirm seating, e.g.bypull-
ing itin the area ofthe fog light.
4. Insert rubber plugintotheunlocking opening
and secure thecarpeting.
Check thefunction ofall lights.
I>I>I>
PracticalTips,Emergency Service
Page 167 of 195
Lowbeam, highbeam andadditional
high beam
Opening thelidofthe headlight housing
1. Unscrew thetwo screws
A.
2. Press bothrelease tabsBand remove lid.
Practical Tips,Emergency Service
Changing
bulbforlow beam
1. Turn plugcounter-clockwise (bayonetlock)and
pull itoff.
2. Replace defective bulb.
When doing so,ensure bulbisseated properly.
3. Reassemble inreverse order.
Changing
bulbforlow beam andhigh beam
(Bi-Xenon headlight)
1. Turn plugcounter-clockwise (bayonetlock)and
pull itoff.
Page 168 of 195
2.Turn clamping ringcounter-clockwise (bayonet
lock) andpullitoff.
3. Replace defective bulb.
When doing so,ensure bulbisseated properly.
4. Reassemble inreverse order.
Note
In order toprevent impairment ofthe headlight
beam adjustment function,thecable Cof the plug
must always pointtothe outside ofthe vehicle.
Changing
bulbforhigh beam or
additional highbeam (Bi-Xenon headlight)
1. Turn bulbholder.
Turn itcounter-clockwise onthe leftheadlight
and clockwise onthe right headlight.
Take bulbholder outofthe headlight housing.
2. Pull both plugrelease tabsapart.
Pull plug outofthe bulb holder.
3. Replace thedefective bulbwith bulb holder.
4. Reassemble inreverse order.
Closing
lidofheadlight housing
1. Insert retaining lugsoflid into thebottom of
the headlight housingandclose liduntil itper-
ceptibly engages.
2. Screw inboth screws.
[>[>[>
Practical Tips,Emergency Service
.1.67