Page 2 of 128

22-12-2003
3YOUR PARTNER AT A GLANCE
1 -Speaker (tweeter).
2 - Windscreen demisting vents.
3 - Controls:- Electric windows.
- Demisting of rear door
windows or tailgate.
- Air conditioning.
- ASR/ESP.
4 - Central locking button.
5 - Multifunction display or clock.
6 - Hazard lights button.
7 - Central adjustable heating/ventilation vents.
8 - Lights and direction indica-tors stalk.
9 - Cruise control.
10 - Instrument panel.
11 - Driver's air bag.Horn. 12 -
Windscreen wash-wipe stalk.
13 - Audio equipment steeringwheel control.
14 - Steering lock and ignition.
15 - Fuse box.
16 - Passenger air bag disar-ming control*.
17 - Steering wheel adjustmentcontrol.
18 - Passenger's electric mirrorcontrol.
19 - Headlamp height adjustment.
20 - Heated seats control.
21 - Handbrake.
22 - 12 V accessories socket.
23 - Removable ashtray.
24 - Lighter.
25 - Storage.
26 - Gear lever. 27 -
Heating/air conditioningcontrols.
28 - Audio RB3 or RD3.
29 - Lower glove box.
30 - Upper glove box or passenger air bag.
31 - Bonnet release.
32 - Side adjustableheating/ventilation vents.
33 - Side window demistingvents.
* According to country.
Page 5 of 128
6YOUR PARTNER AT A GLANCE
FRONT SEATS Driver and passenger seats 1- Head restraint height adjust-
ment.
Never travel with the head restraints removed.
2 - Seat back angle adjustment.
3 - Forwards-backwards adjust-
ment.
4 - Storage drawer (passenger).
5 - Access to rear seats.
54
22-12-2003
Page 8 of 128

9YOUR PARTNER AT A GLANCE
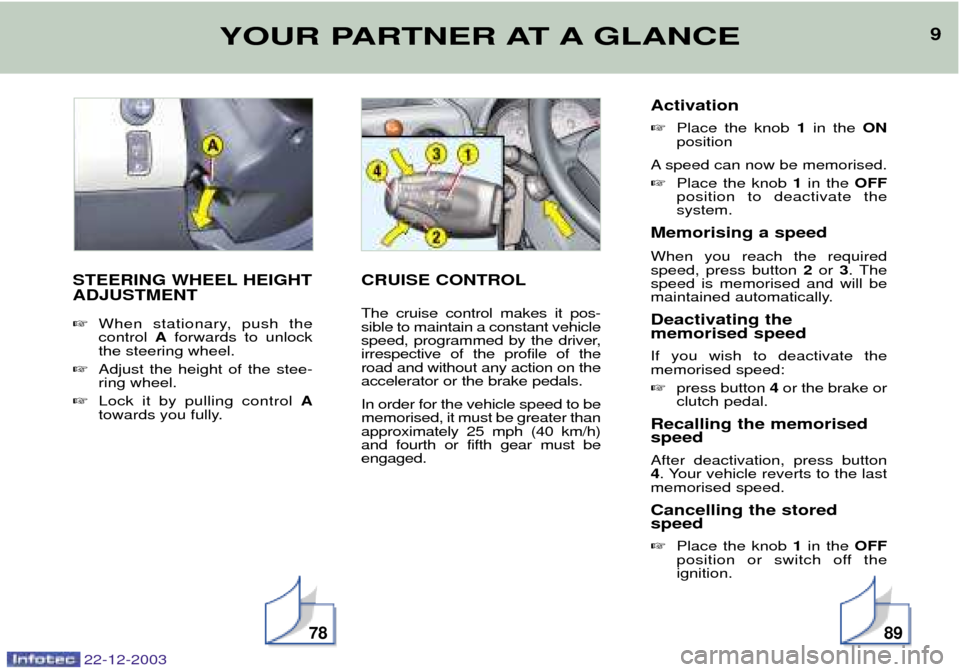
STEERING WHEEL HEIGHT ADJUSTMENT �When stationary, push the control Aforwards to unlock
the steering wheel.
� Adjust the height of the stee-ring wheel.
� Lock it by pulling control A
towards you fully.CRUISE CONTROL The cruise control makes it pos- sible to maintain a constant vehicle
speed, programmed by the driver,irrespective of the profile of theroad and without any action on theaccelerator or the brake pedals. In order for the vehicle speed to be memorised, it must be greater thanapproximately 25 mph (40 km/h)and fourth or fifth gear must beengaged.
Activation � Place the knob 1in the ON
position
A speed can now be memorised. � Place the knob 1in the OFF
position to deactivate the system.
Memorising a speed When you reach the required speed, press button 2or 3. The
speed is memorised and will be
maintained automatically. Deactivating the memorised speed If you wish to deactivate the memorised speed: � press button 4or the brake or
clutch pedal.
Recalling the memorised speed After deactivation, press button 4 . Your vehicle reverts to the last
memorised speed. Cancelling the stored speed � Place the knob 1in the OFF
position or switch off the ignition.
7889
22-12-2003
Page 54 of 128
22-12-2003
YOUR PARTNER IN DETAIL
54
FRONT SEATS
1- Head restraint height
adjustment
To raise or lower the restraint, slide it.
To remove the head restraint, place it in the top position, press the tabsand pull it upwards.
To put it back in position, locate the stems of the restraint in the holes,taking care to keep them in line withthe seat back.
2- Seat back angle adjustment A. Turn the knob.
B. Pull the lever (version with one
sliding side door only).
3- Forwards-backwards adjustment
Lift the control and slide the seat forwards or backwards.
The adjustment is correct when the upper edge of the headrestraint is level with the top ofthe head.
Page 60 of 128

22-12-2003
YOUR PARTNER IN DETAIL
60
Never leave one or more children alone and unsu-pervised in a vehicle. Never leave a child or an
animal in a vehicle which is expo- sed to the sun and has the win-dows closed.
To protect your young children from the sun, fit blinds on the rearwindows. Never leave the keys within reach of children inside the vehicle. Observe strictly the recommenda- tions for assembling and securingthe child seat as shown in thechild seat instructions.
To prevent the doors from opening
accidentally, use the child lock*. Also, do not open the rear win- dows more than a third*.
* According to model.
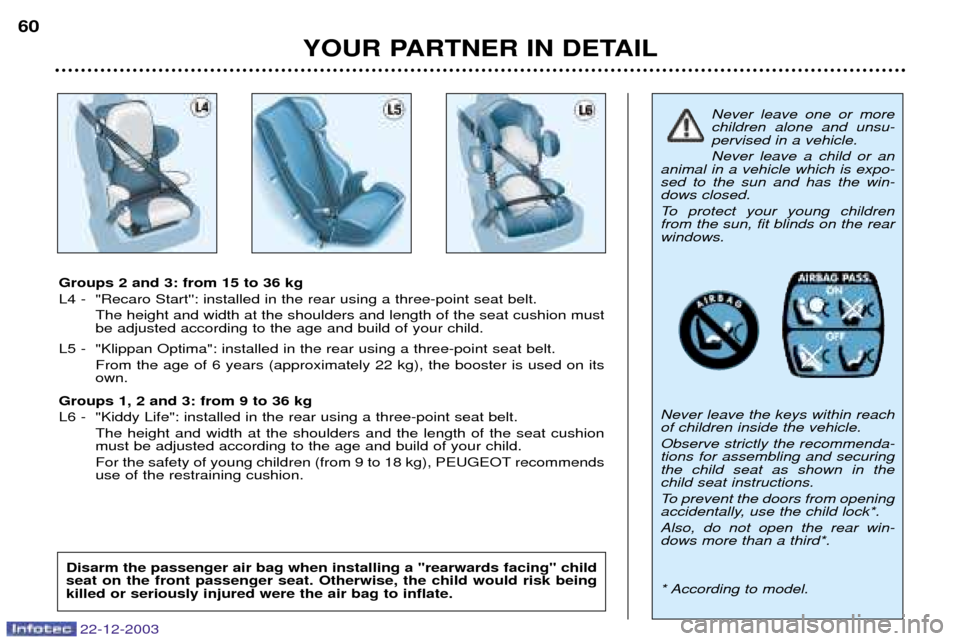
Groups 2 and 3: from 15 to 36 kg
L4 - "Recaro Start'': installed in the rear using a three-point seat belt.
The height and width at the shoulders and length of the seat cushion must be adjusted according to the age and build of your child.
L5 - "Klippan Optima": installed in the rear using a three-point seat belt. From the age of 6 years (approximately 22 kg), the booster is used on itsown.
Groups 1, 2 and 3: from 9 to 36 kg
L6 - "Kiddy Life": installed in the rear using a three-point seat belt. The height and width at the shoulders and the length of the seat cushion must be adjusted according to the age and build of your child.
For the safety of young children (from 9 to 18 kg), PEUGEOT recommends use of the restraining cushion.
Disarm the passenger air bag when installing a "rearwards facing" child seat on the front passenger seat. Otherwise, the child would risk beingkilled or seriously injured were the air bag to inflate.
Page 62 of 128

22-12-2003
YOUR PARTNER IN DETAIL
62
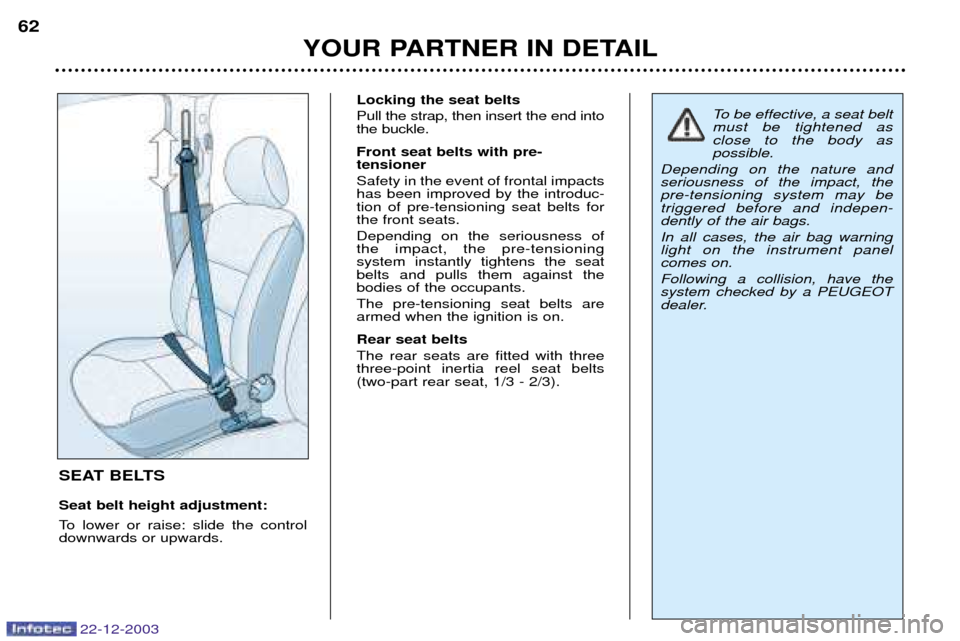
SEAT BELTS Seat belt height adjustment:
To lower or raise: slide the control downwards or upwards. Locking the seat belts Pull the strap, then insert the end into the buckle. Front seat belts with pre- tensioner Safety in the event of frontal impacts has been improved by the introduc-tion of pre-tensioning seat belts forthe front seats. Depending on the seriousness of the impact, the pre-tensioning system instantly tightens the seatbelts and pulls them against thebodies of the occupants. The pre-tensioning seat belts are armed when the ignition is on. Rear seat belts The rear seats are fitted with three three-point inertia reel seat belts(two-part rear seat, 1/3 - 2/3).
To be effective, a seat belt must be tightened asclose to the body as possible.
Depending on the nature andseriousness of the impact, thepre-tensioning system may betriggered before and indepen-dently of the air bags. In all cases, the air bag warning light on the instrument panelcomes on. Following a collision, have the system checked by a PEUGEOT
dealer.
Page 75 of 128

22-12-2003
YOUR PARTNER IN DETAIL
70
REAR ROOF FLAP
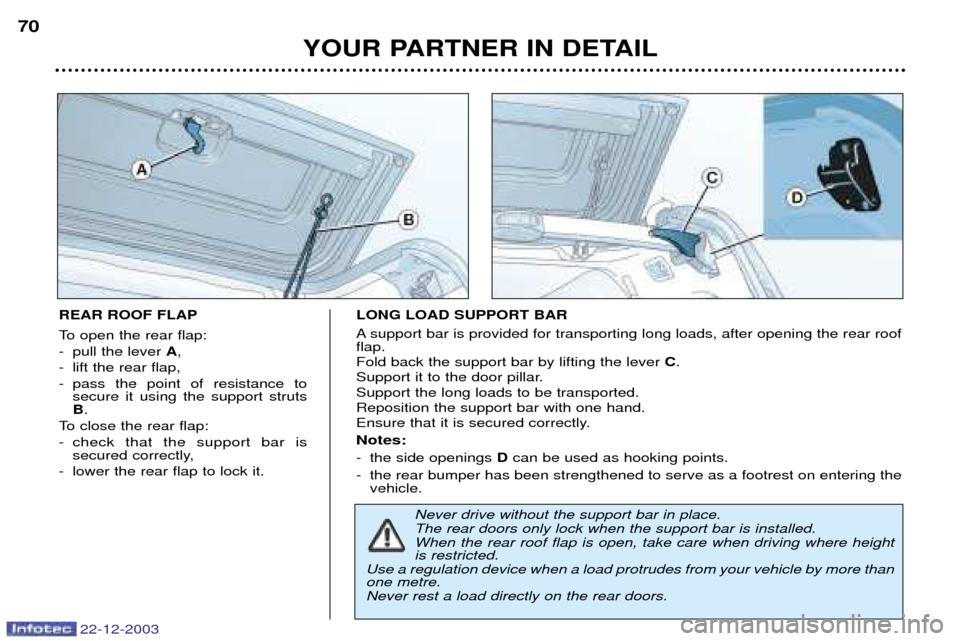
To open the rear flap:
- pull the lever
A,
- lift the rear flap,
- pass the point of resistance to secure it using the support struts B.
To close the rear flap:
- check that the support bar is secured correctly,
- lower the rear flap to lock it. LONG LOAD SUPPORT BAR
A support bar is provided for transporting long loads, after opening the rear roof flap. Fold back the support bar by lifting the lever C.
Support it to the door pillar.Support the long loads to be transported.Reposition the support bar with one hand.
Ensure that it is secured correctly.
Notes:
- the side openings Dcan be used as hooking points.
- the rear bumper has been strengthened to serve as a footrest on entering the vehicle.
Never drive without the support bar in place. The rear doors only lock when the support bar is installed.When the rear roof flap is open, take care when driving where height is restricted.
Use a regulation device when a load protrudes from your vehicle by more thanone metre. Never rest a load directly on the rear doors.
Page 83 of 128
22-12-2003
HORNPress one of the spokes or the centre of the steeringwheel.
YOUR PARTNER IN DETAIL
78
STEERING WHEEL HEIGHT ADJUSTMENT
When stationary, push the handle fowards to unlock the steeringwheel. Adjust it to the desired height.Pull the handle towards you fully to lock the steering wheel.HAZARD WARNING LIGHTS Press the button, the direction indicators flash. They can operate with the ignition
off.