Page 13 of 128
14YOUR PARTNER AT A GLANCE
OPENING THE BONNET Inside the vehicle:Pull the
control on the left-hand side, under the fascia panel. Outside the vehicle: Lift
the control, raise the bonnet and secure thestrut to keep the bonnetopen.
FILLING WITH FUEL This operation must be carried out with
the engine switched off.
� Insert the key then turn it to the left.
� Remove the cap.
An indication shows which type of fuel to use.
When you fill your tank, do not continue after the third cut-off of the pump. This could cause a malfunction. The capacity of the tank is approximately 55 litres for petrol engines and 60 litres for Diesel engines. Note: the right-hand sliding side door cannot be opened while the fuel tank
cap is removed.
Low fuel level warning light From the time this light comes on, you have enough fuel left to cover approximately 30 miles (50 km) .
7271
22-12-2003
Page 58 of 128
22-12-2003
YOUR PARTNER IN DETAIL
58
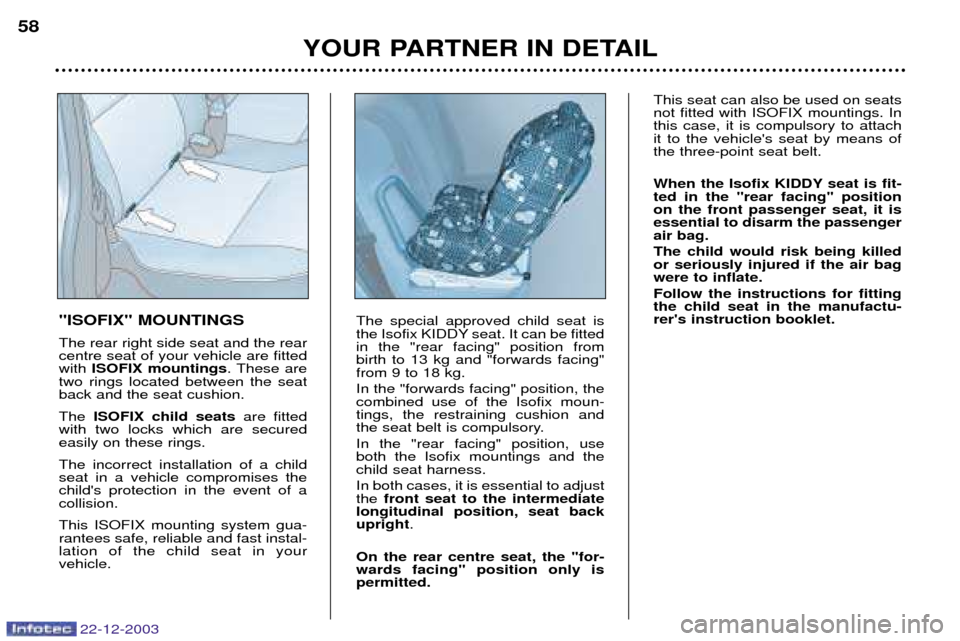
"ISOFIX" MOUNTINGS The rear right side seat and the rear centre seat of your vehicle are fittedwith ISOFIX mountings . These are
two rings located between the seatback and the seat cushion. The ISOFIX child seats are fitted
with two locks which are secured easily on these rings. The incorrect installation of a child seat in a vehicle compromises thechild's protection in the event of acollision. This ISOFIX mounting system gua- rantees safe, reliable and fast instal-lation of the child seat in yourvehicle. The special approved child seat is
the Isofix KIDDY seat. It can be fittedin the "rear facing" position frombirth to 13 kg and "forwards facing"from 9 to 18 kg. In the "forwards facing" position, the combined use of the Isofix moun-tings, the restraining cushion and
the seat belt is compulsory. In the "rear facing" position, use both the Isofix mountings and thechild seat harness. In both cases, it is essential to adjust the
front seat to the intermediate
longitudinal position, seat backupright .
On the rear centre seat, the "for-wards facing" position only ispermitted. This seat can also be used on seatsnot fitted with ISOFIX mountings. Inthis case, it is compulsory to attachit to the vehicle's seat by means ofthe three-point seat belt.
When the Isofix KIDDY seat is fit- ted in the "rear facing" positionon the front passenger seat, it isessential to disarm the passengerair bag. The child would risk being killed or seriously injured if the air bagwere to inflate. Follow the instructions for fitting the child seat in the manufactu-rer's instruction booklet.
Page 59 of 128
22-12-2003
YOUR PARTNER IN DETAIL59
CHILD SEATS RECOMMENDED BY PEUGEOT
In addition to the ISOFIX child seats, PEUGEOT offers a complete range of child seats which are secured using the seat
belt :
Group 0+: from birth to 13 kg
L1 - "Britax Babysure": installed in the rear-facing position in the front and in the rear using a three-point seat belt. In the front, it is compulsory to disarm the passenger air bag and the vehicle's seat must be adjusted to the intermediate longitudinal position.
Group 1: from 9 to 18 kg
L2 - "Ršmer Prince": installed in the rear using a two or three-point seat belt. For the safety of your child, it is imperative that the restraining cushion is used.
Group 2: from 15 to 25 kg
L3 - "Ršmer Vario'': installed in the rear using a two or three-point seat belt.
Page 60 of 128
22-12-2003
YOUR PARTNER IN DETAIL
60
Never leave one or more children alone and unsu-pervised in a vehicle. Never leave a child or an
animal in a vehicle which is expo- sed to the sun and has the win-dows closed.
To protect your young children from the sun, fit blinds on the rearwindows. Never leave the keys within reach of children inside the vehicle. Observe strictly the recommenda- tions for assembling and securingthe child seat as shown in thechild seat instructions.
To prevent the doors from opening
accidentally, use the child lock*. Also, do not open the rear win- dows more than a third*.
* According to model.
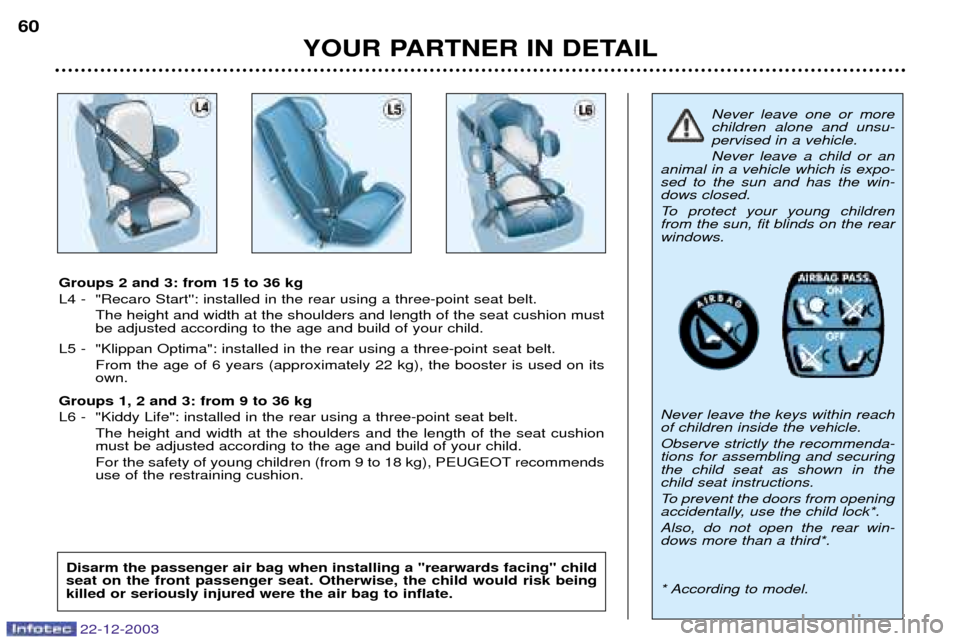
Groups 2 and 3: from 15 to 36 kg
L4 - "Recaro Start'': installed in the rear using a three-point seat belt.
The height and width at the shoulders and length of the seat cushion must be adjusted according to the age and build of your child.
L5 - "Klippan Optima": installed in the rear using a three-point seat belt. From the age of 6 years (approximately 22 kg), the booster is used on itsown.
Groups 1, 2 and 3: from 9 to 36 kg
L6 - "Kiddy Life": installed in the rear using a three-point seat belt. The height and width at the shoulders and the length of the seat cushion must be adjusted according to the age and build of your child.
For the safety of young children (from 9 to 18 kg), PEUGEOT recommends use of the restraining cushion.
Disarm the passenger air bag when installing a "rearwards facing" child seat on the front passenger seat. Otherwise, the child would risk beingkilled or seriously injured were the air bag to inflate.
Page 61 of 128
22-12-2003
YOUR PARTNER IN DETAIL61
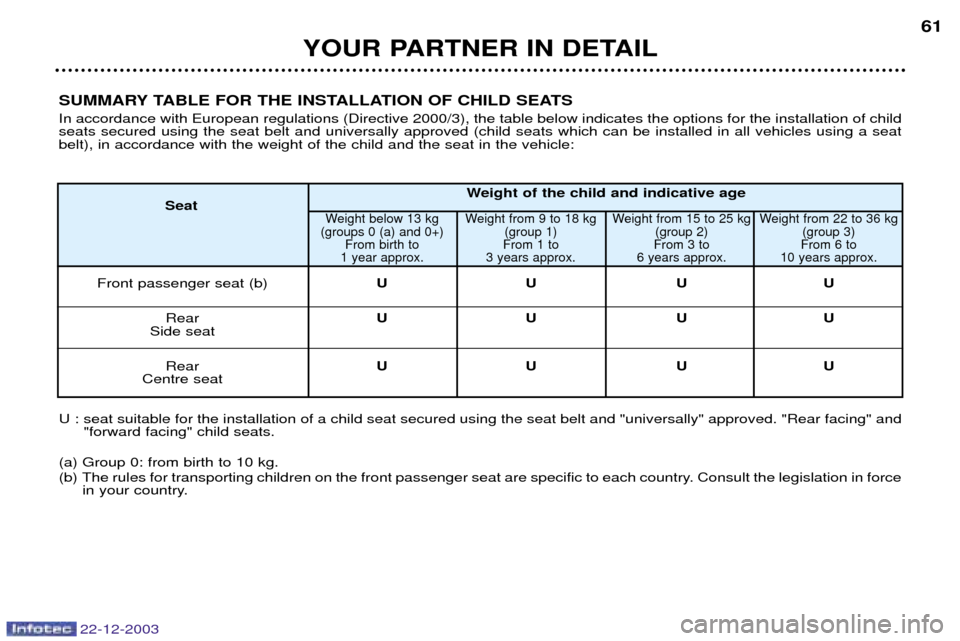
U : seat suitable for the installation of a child seat secured using the seat belt and "universally" approved. "Rear facing" an d
"forward facing" child seats.
(a) Group 0: from birth to 10 kg.
(b) The rules for transporting children on the front passenger seat are specific to each country. Consult the legislation in fo rce
in your country.
SUMMARY TABLE FOR THE INSTALLATION OF CHILD SEATS In accordance with European regulations (Directive 2000/3), the table below indicates the options for the installation of child seats secured using the seat belt and universally approved (child seats which can be installed in all vehicles using a seatbelt), in accordance with the weight of the child and the seat in the vehicle:
Weight of the child and indicative age
Seat
Weight below 13 kg Weight from 9 to 18 kg Weight from 15 to 25 kg Weight from 22 to 36 kg
(groups 0 (a) and 0+) (group 1) (group 2) (group 3) From birth to From 1 to From 3 to From 6 to
1 year approx. 3 years approx. 6 years approx. 10 years approx.
Front passenger seat (b) UU UU
Rear UU UU
Side seat
Rear UU UU
Centre seat
Page 75 of 128
22-12-2003
YOUR PARTNER IN DETAIL
70
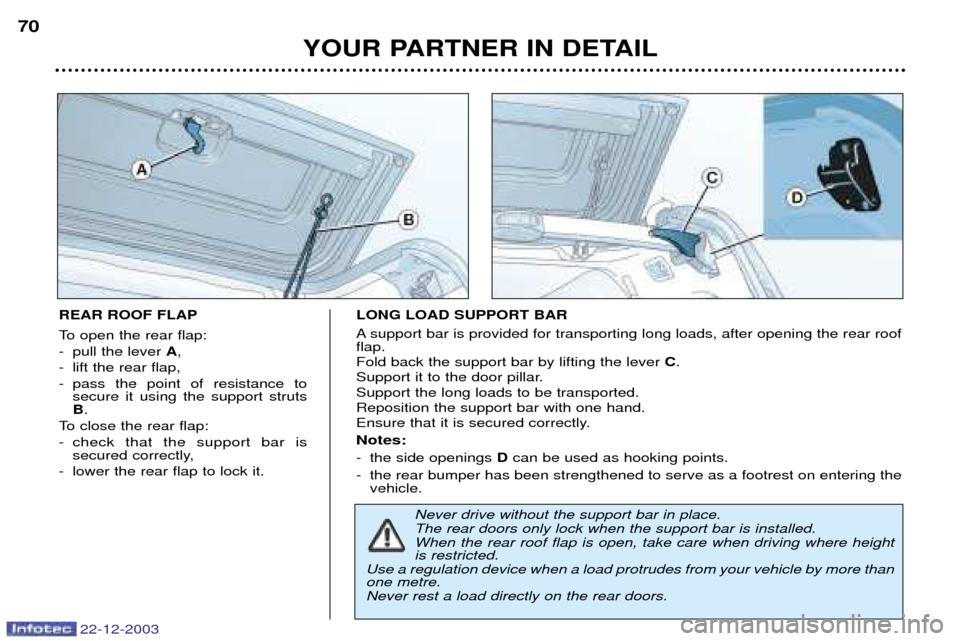
REAR ROOF FLAP
To open the rear flap:
- pull the lever
A,
- lift the rear flap,
- pass the point of resistance to secure it using the support struts B.
To close the rear flap:
- check that the support bar is secured correctly,
- lower the rear flap to lock it. LONG LOAD SUPPORT BAR
A support bar is provided for transporting long loads, after opening the rear roof flap. Fold back the support bar by lifting the lever C.
Support it to the door pillar.Support the long loads to be transported.Reposition the support bar with one hand.
Ensure that it is secured correctly.
Notes:
- the side openings Dcan be used as hooking points.
- the rear bumper has been strengthened to serve as a footrest on entering the vehicle.
Never drive without the support bar in place. The rear doors only lock when the support bar is installed.When the rear roof flap is open, take care when driving where height is restricted.
Use a regulation device when a load protrudes from your vehicle by more thanone metre. Never rest a load directly on the rear doors.
Page 76 of 128
22-12-2003
YOUR PARTNER IN DETAIL71
OPENING THE BONNET Inside the vehicle: pull the handle
on the left-hand side, under the fascia. Outside the vehicle: lift the catch
and raise the bonnet.
BONNET STRUT Secure the strut to hold the bonnet open. Before closing the bonnet, replace the strut in its housing.
To close Lower the bonnet and release it at the end of its travel. Check that thebonnet is locked.
Page 87 of 128
YOUR PARTNER IN DETAIL83
REAR LAYOUT
1. Trays between the front and rear seats
2. Load-space cover To remove it:
- remove the guides from the pillar rails,
- return the cover into its roller,
- compress it and remove it from its support.
To install it:
- position one end of the cover roller on its support,
- compress the opposite end of the roller and position it,
- release it to allow it to engage,
- unroll the cover as far as the boot pillars,
- insert the guides in the rails in the pillars,
3. Stowing rings
4. High load retaining net The high load retaining net can be fitted behind the front or rear seats. Open the covers Aof the corresponding upper fastenings.
Fit the ends of the metal bar in these fastenings.Secure the two net strap hooks behind the front seats, with the rear seat folded, or in the stowing rings Bon the floor.
The rings are located directly below the corresponding upper fastenings.Pull the two straps Ctaut.
5. Side door storage compartments
6. Seat back storage pockets
7. Storage net
22-12-2003