2004 NISSAN QUEST heater
[x] Cancel search: heaterPage 202 of 320

DISPLAY:
If the DISPLAY control is pushed for less than 2
seconds, the display menu will appear on the
screen.
cThe display menu will remain on the screen
for 10 seconds if no subsequent control
activations occur.
cUse NAVIGATION KEYS to navigate within
the display menu, and use ENTER to select
the item.
cHolding the DISPLAY control on the face-
plate for longer than approximately 2 sec-
onds while in the display menu will reset the
display characteristics to their nominal val-
ues. (Faceplate feature only)
If the DISPLAY control button on the faceplate is
pushed for more than 2 seconds, the media
track/time information will be displayed along the
bottom of the display. Pushing the DISPLAY con-
trol for more than 2 seconds will remove the
media track/time information from the display.
(Faceplate feature only)
NAVIGATION KEYS:
If media is in PLAY mode, activation of the NAVI-
GATION KEYS (Up, Down, Left, and Right) will
perform the following functions: next
chapter/track, previous chapter/track, fast re-verse and fast forward, and the display will
show,,andrespec-
tively in the upper left corner of the display for 4
seconds. (Faceplate feature only)
If media is in PAUSE mode, activation of the
NAVIGATION KEYS (Up, Down and Right) will
perform the following functions: next
chapter/track, previous chapter/track and slow
forward, and the display will show
,and a forward arrow symbol respectively in the
upper left corner of the display for 4 seconds.
(Faceplate feature only)
If media is in activated MENU mode, the NAVI-
GATION KEYS will be used to navigate Up,
Down, Left, and Right within the menu.
If display control menu is on, the NAVIGATION
KEYS will be used to navigate Up, Down, Left,
and Right within the menu.
ENTER:
In MENU mode, push the ENTER button to select
MENU items.
In the display menu, push the ENTER button to
select items for modification, as per the on-
screen instructions.
MENU:
If the media is in PLAY mode and the MENU
button is pressed, the DVD menu will appear onthe screen. Use Navigation Keys to navigate
within the menu, and use ENTER to select the
item.
Push the MENU button again to return to PLAY
mode.
TITLE (Remote control only):
Push TITLE button to return the DVD media to the
“title” of the DVD.
Push TITLE button again to return to the previous
stop point and play.
BACK (Remote control only):
Push the BACK button to exit the current active
menu and return to the previous menu.
SUBTITLE (Remote control only):
Push the SUBTITLE button to call up subtitle
selection menu.
Repeatedly press the SUBTITLE button to cycle
through each available subtitle.
AUDIO (Remote control only):
Push the AUDIO button to call up audio menu.
Repeatedly press the AUDIO button to cycle
through each available audio track.
4-50Display screen, heater, air conditioner and audio systems
ZREVIEW COPY:Ð2004 Quest(van)
Owners Manual(owners)ÐUSA English(nna)
10/08/03Ðtbrooks
X
Page 203 of 320
ANGLE (Remote control only):
Push the ANGLE button to call up camera angle
menu.
Repeatedly press the ANGLE button to cycle
through each available angle.
CLEAR (Remote control only):
Push the CLEAR button to clear all numeric in-
puts, if actuated prior to expiration of the
3-second timer.
NUMERIC KEYPAD (0–9 &¸10) (Remote
control only):
Push the NUMERIC KEYPAD to directly access
disc chapters, titles or tracks by inputting their
numeric value.
The “¸10” button input numbers greater than or
equal to 10, allowing up three digits to be input
for selecting chapter/title/track number.
The subsequent actuation of numeric buttons will
continuously shift the previously input number to
the “left”.
The chapter/title/track number will be automati-
cally selected (if valid, based on media content) if
3 seconds expire without any keypad inputs.The operator can cancel the input
chapter/title/track number by actuating the
CLEAR control prior to the expiration of the
3-second timer.
These functions can be used only for the DVD
discs which correspond to them.
Auxiliary input jacks
The auxiliary input jacks are located on the control
panel. Compatible devices such as video games
camcorders and portable video players can be
connected to the auxiliary jacks.
The auxiliary jacks are color coded for identifica-
tion purposes.
cYellow - video input
cWhite - left channel audio input
cRed - right channel audio input
CARE AND MAINTENANCE
Use a lightly dampened, lint free cloth to clean the
surfaces of your DVD Entertainment System.
(DVD player face, screen, remote control, etc.)
CAUTION
cDo not use any solvents or cleaning
solutions when cleaning the video
system.cDo not use excessive force on the moni-
tor screen.
cAvoid touching or scratching the moni-
tor screen as it may become dirty or
damaged.
cDo not attempt to use the system in
extreme temperature conditions [below
-4°F (-20°C) or above 158°F (70°C)].
cDo not attempt to operate the system in
extreme humidity conditions (less than
10% or more than 75%) .
Display screen, heater, air conditioner and audio systems4-51
ZREVIEW COPY:Ð2004 Quest(van)
Owners Manual(owners)ÐUSA English(nna)
10/08/03Ðtbrooks
X
Page 204 of 320
HOW TO HANDLE THE DVD
CAUTION
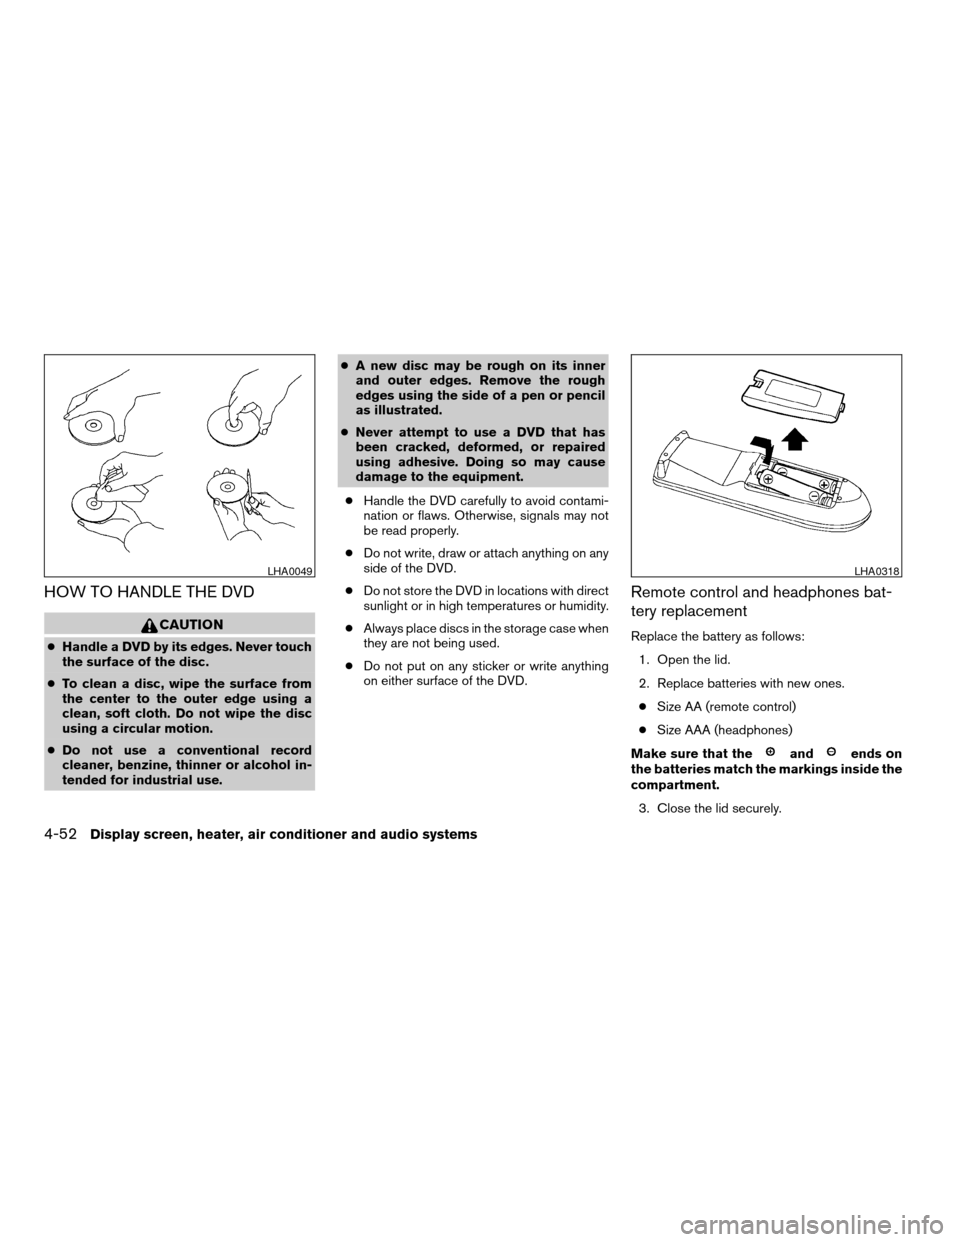
cHandle a DVD by its edges. Never touch
the surface of the disc.
cTo clean a disc, wipe the surface from
the center to the outer edge using a
clean, soft cloth. Do not wipe the disc
using a circular motion.
cDo not use a conventional record
cleaner, benzine, thinner or alcohol in-
tended for industrial use.cA new disc may be rough on its inner
and outer edges. Remove the rough
edges using the side of a pen or pencil
as illustrated.
cNever attempt to use a DVD that has
been cracked, deformed, or repaired
using adhesive. Doing so may cause
damage to the equipment.
cHandle the DVD carefully to avoid contami-
nation or flaws. Otherwise, signals may not
be read properly.
cDo not write, draw or attach anything on any
side of the DVD.
cDo not store the DVD in locations with direct
sunlight or in high temperatures or humidity.
cAlways place discs in the storage case when
they are not being used.
cDo not put on any sticker or write anything
on either surface of the DVD.
Remote control and headphones bat-
tery replacement
Replace the battery as follows:
1. Open the lid.
2. Replace batteries with new ones.
cSize AA (remote control)
cSize AAA (headphones)
Make sure that the
andends on
the batteries match the markings inside the
compartment.
3. Close the lid securely.
LHA0049LHA0318
4-52Display screen, heater, air conditioner and audio systems
ZREVIEW COPY:Ð2004 Quest(van)
Owners Manual(owners)ÐUSA English(nna)
10/08/03Ðtbrooks
X
Page 205 of 320
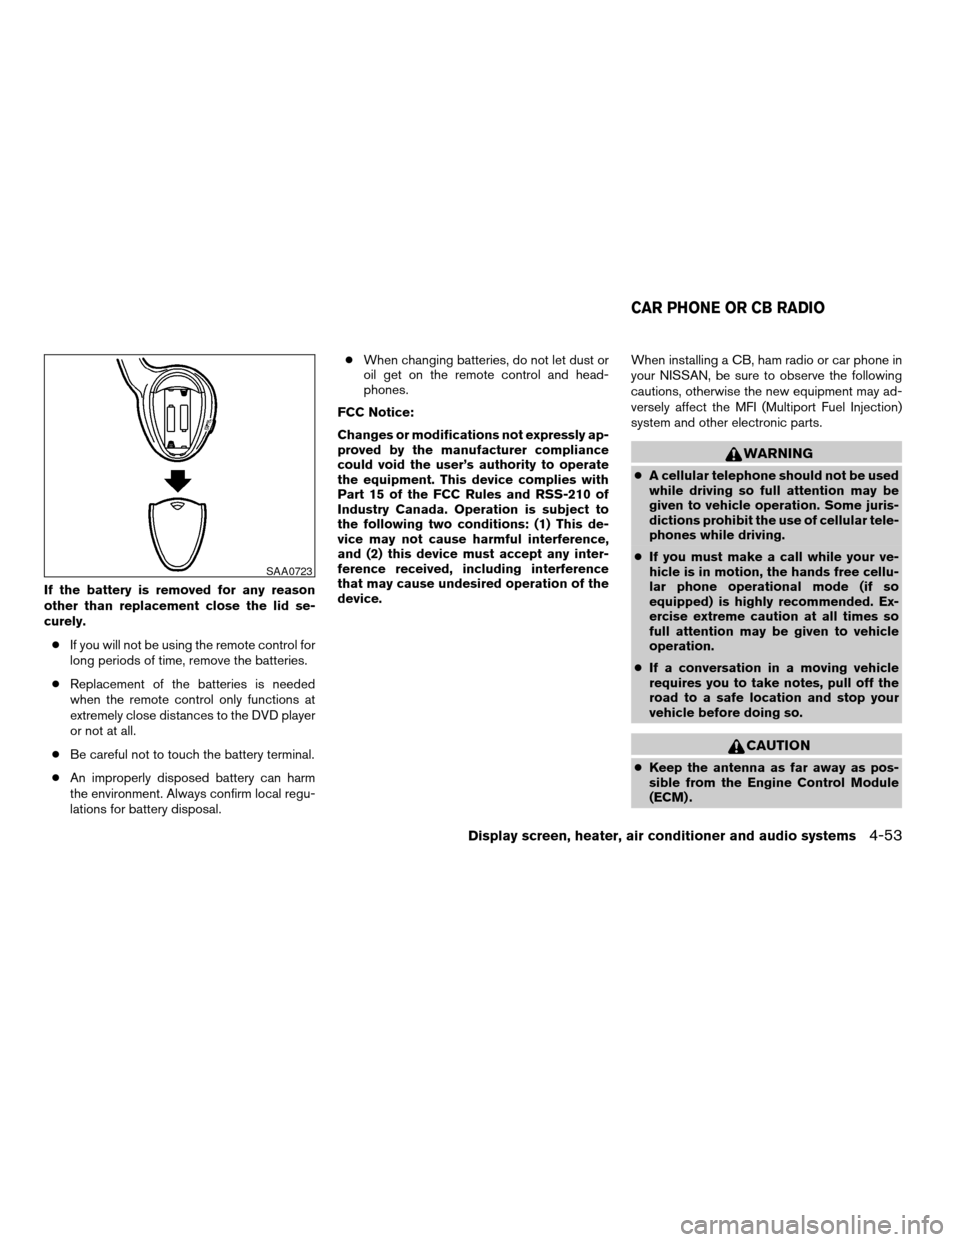
If the battery is removed for any reason
other than replacement close the lid se-
curely.
cIf you will not be using the remote control for
long periods of time, remove the batteries.
cReplacement of the batteries is needed
when the remote control only functions at
extremely close distances to the DVD player
or not at all.
cBe careful not to touch the battery terminal.
cAn improperly disposed battery can harm
the environment. Always confirm local regu-
lations for battery disposal.cWhen changing batteries, do not let dust or
oil get on the remote control and head-
phones.
FCC Notice:
Changes or modifications not expressly ap-
proved by the manufacturer compliance
could void the user’s authority to operate
the equipment. This device complies with
Part 15 of the FCC Rules and RSS-210 of
Industry Canada. Operation is subject to
the following two conditions: (1) This de-
vice may not cause harmful interference,
and (2) this device must accept any inter-
ference received, including interference
that may cause undesired operation of the
device.When installing a CB, ham radio or car phone in
your NISSAN, be sure to observe the following
cautions, otherwise the new equipment may ad-
versely affect the MFI (Multiport Fuel Injection)
system and other electronic parts.
WARNING
cA cellular telephone should not be used
while driving so full attention may be
given to vehicle operation. Some juris-
dictions prohibit the use of cellular tele-
phones while driving.
cIf you must make a call while your ve-
hicle is in motion, the hands free cellu-
lar phone operational mode (if so
equipped) is highly recommended. Ex-
ercise extreme caution at all times so
full attention may be given to vehicle
operation.
cIf a conversation in a moving vehicle
requires you to take notes, pull off the
road to a safe location and stop your
vehicle before doing so.
CAUTION
cKeep the antenna as far away as pos-
sible from the Engine Control Module
(ECM) .
SAA0723
CAR PHONE OR CB RADIO
Display screen, heater, air conditioner and audio systems4-53
ZREVIEW COPY:Ð2004 Quest(van)
Owners Manual(owners)ÐUSA English(nna)
10/08/03Ðtbrooks
X
Page 206 of 320
cKeep the antenna wire more than 8 in
(20 cm) away from the Multiport Fuel
Injection harness. Do not route the an-
tenna wire next to any harness.
cAdjust the antenna standing-wave ratio
as recommended by the manufacturer.
cConnect the ground wire from the CB
radio chassis to the body.
cFor details, consult a NISSAN dealer.
4-54Display screen, heater, air conditioner and audio systems
ZREVIEW COPY:Ð2004 Quest(van)
Owners Manual(owners)ÐUSA English(nna)
10/08/03Ðtbrooks
X
Page 209 of 320
cDo not stop or park the vehicle over
flammable materials such as dry grass,
waste paper or rags. They may ignite
and cause a fire.
CAUTION
cDo not use leaded gasoline. Deposits
from leaded gasoline will seriously re-
duce the three-way catalyst’s ability to
help reduce exhaust pollutants.
cKeep your engine tuned up. Malfunc-
tions in the ignition, fuel injection, or
electrical systems can cause overrich
fuel flow into the three-way catalyst,
causing it to overheat. Do not keep driv-
ing if the engine misfires, or if notice-
able loss of performance or other un-
usual operating conditions are
detected. Have the vehicle inspected
promptly by a NISSAN dealer.
cAvoid driving with an extremely low fuel
level. Running out of fuel could cause
the engine to misfire, damaging the
three-way catalyst.
cDo not race the engine while warming it
up.
cDo not push or tow your vehicle to start
the engine.
LOW TIRE PRESSURE WARNING
SYSTEM
This vehicle is equipped with the low tire pres-
sure warning system, which displays pressure of
all tires (except the spare tire) on the display
screen by sending a signal from a sensor that is
installed in each wheel.
The low tire pressure warning system will activate
only when the vehicle is driven at speeds above
20 MPH (32 km/h) . Also, this system may not
detect a sudden drop in tire pressure (for ex-
ample a flat tire while driving) .
Tire pressure rises and falls depending on the
heat caused by the vehicle’s operation and the
outside temperature. Low outside temperature
can lower the temperature of the air inside the tire
which can cause a lower tire inflation pressure.
This may cause the low tire pressure warning
light to illuminate.
If the warning light illuminates in low ambient
temperature as described above, check the tire
pressure for all four tires. Adjust the tire pressure
to the recommended COLD tire pressure shown
on the Tire and Loading Information label to turn
the low tire pressure warning light OFF.
Frequently check the tire pressure information
display on the display screen and adjust pressure
of each tire properly. (The order of the tire pres-sure figures displayed on the screen does not
correspond with the actual order of the tire posi-
tion.) See “Tire pressure information” in the “Dis-
play screen, heater, air conditioner and audio
systems” section for tire pressure monitor.
Low tire pressure warning
If the vehicle is being driven with very low tire
pressure (lower than 28 psi, 193 kPa) , the low
tire pressure warning light comes on and the
chime sounds for about 10 seconds.
For additional information regarding the above
warning, see “Warning/indicator lights and au-
dible reminders” in the “Instruments and con-
trols” section.
Starting and driving5-3
ZREVIEW COPY:Ð2004 Quest(van)
Owners Manual(owners)ÐUSA English(nna)
10/08/03Ðtbrooks
X
Page 230 of 320
LOW TIRE PRESSURE WARNING
SYSTEM
This vehicle is equipped with the low tire pres-
sure warning system, which displays the pres-
sure of each tire independently (except the spare
tire) on the display screen by sending a signal
from a sensor that is installed in each wheel. If the
vehicle is being driven with low tire pressure
(lower than 28 psi, 193 kPa) , the low tire pres-
sure warning system will activate and warn you of
it by the low tire pressure warning light. This
system will activate only when the vehicle is
driven at speeds above 20 MPH (32 km/h) . For
more details, please refer to “Warning/indicator
lights and audible reminders” in the “Instruments
and controls” section, “Tire pressure information”
in the “Display screen, heater, air conditioner and
audio systems” section and “Low tire pressure
warning system” in the “Starting and driving”
section.
WARNING
cIf the low tire pressure warning light
flashes while driving, avoid sudden
steering maneuvers or abrupt braking,
reduce vehicle speed, pull off the road
to a safe location and stop the vehicle
as soon as possible. Serious vehicle
damage could occur and may lead to an
accident and could result in serious
personal injury. Check the tire pressure
for all four tires. Adjust the tire pressure
to the recommended COLD tire pres-
sure shown on the Tire and Loading
Information label to turn the low tire
pressure warning light OFF. If you have
a flat tire, replace it with a spare tire as
soon as possible.
cWhen a spare tire is mounted or a wheel
is replaced, tire pressure will not be
indicated and the low tire pressure
warning system will not function. Con-
tact your NISSAN dealer as soon as
possible for tire replacement and/or
system resetting.
cDo not inject any tire liquid or aerosol
tire sealant into the tires, as this may
cause a malfunction of the tire pressure
sensors.
CHANGING A FLAT TIRE
If you have a flat tire, follow the instructions be-
low.
Stopping the vehicle
1. Safely move the vehicle off the road and
away from traffic.
2. Turn on the hazard warning flashers.
3. Park on a level surface and apply the parking
brake. Shift the transmission into P (Park) .
4. Turn off the engine.
5. Raise the hood to warn other traffic and to
signal professional road assistance person-
nel that you need assistance.
6. Have all passengers get out of the vehicle
and stand in a safe place, away from traffic
and clear of the vehicle.
WARNING
cMake sure the parking brake is securely
applied and the automatic transmission
is shifted into P (Park) .
cNever change tires when the vehicle is
on a slope, ice or slippery areas. This is
hazardous.
FLAT TIRE
6-2In case of emergency
ZREVIEW COPY:Ð2004 Quest(van)
Owners Manual(owners)ÐUSA English(nna)
10/08/03Ðtbrooks
X
Page 236 of 320
WARNING
Always follow the instructions below.
Failure to do so could result in damage to
the charging system and cause personal
injury.
1. If the booster battery is in another vehicle,
position the two vehicles to bring their bat-
teries near each other.
Do not allow the two vehicles to touch.
2. Apply the parking brake. Shift the transmis-
sion into P (Park) . Switch off all unnecessary
electrical systems (lights, heater, air condi-
tioner, etc.) .3. Remove vent caps on the battery (if so
equipped) . Cover the battery with an old
cloth to reduce explosion hazard.
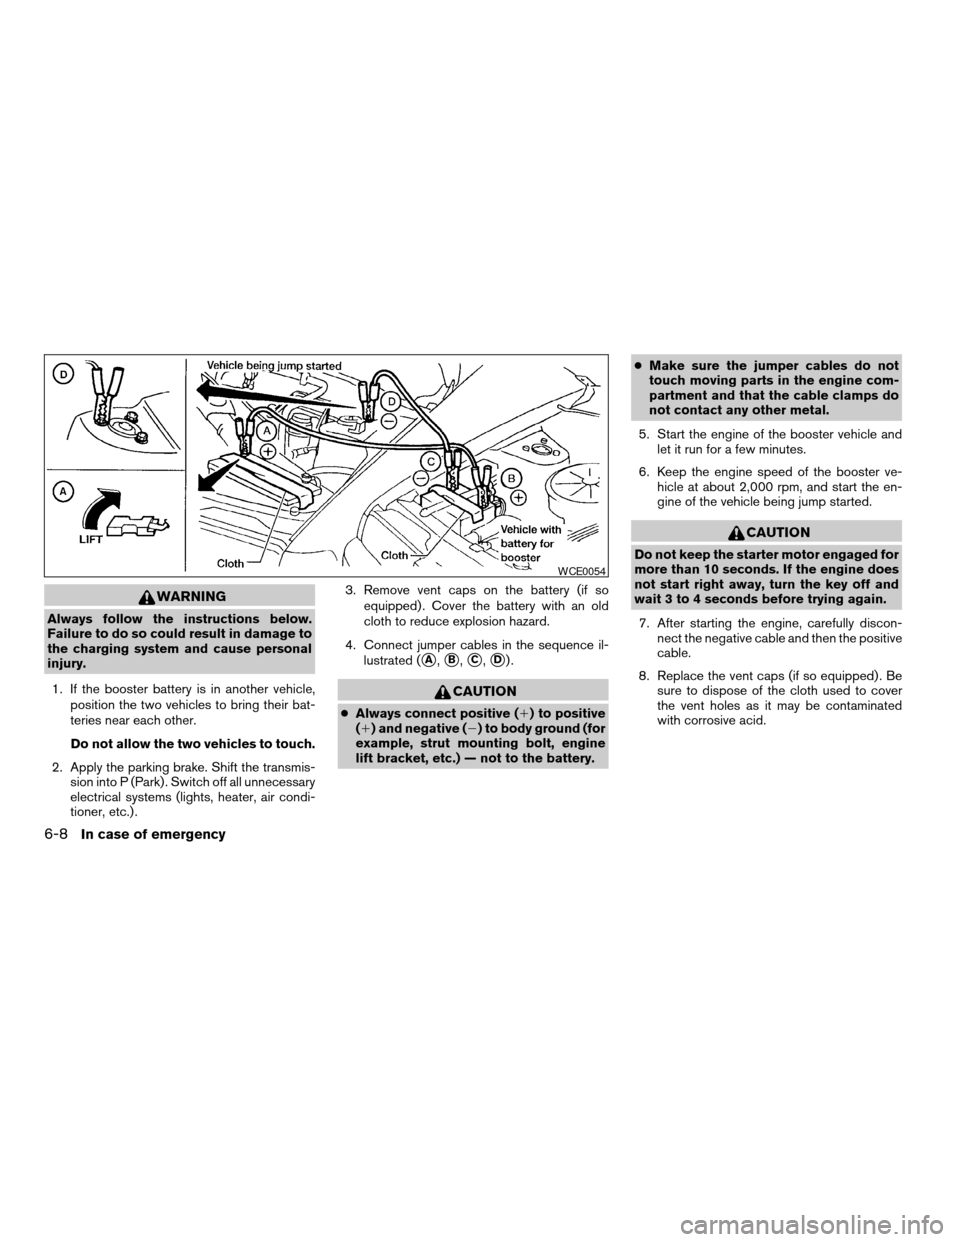
4. Connect jumper cables in the sequence il-
lustrated (
sA,sB,sC,sD).
CAUTION
cAlways connect positive (1) to positive
(1) and negative (2) to body ground (for
example, strut mounting bolt, engine
lift bracket, etc.) — not to the battery.cMake sure the jumper cables do not
touch moving parts in the engine com-
partment and that the cable clamps do
not contact any other metal.
5. Start the engine of the booster vehicle and
let it run for a few minutes.
6. Keep the engine speed of the booster ve-
hicle at about 2,000 rpm, and start the en-
gine of the vehicle being jump started.
CAUTION
Do not keep the starter motor engaged for
more than 10 seconds. If the engine does
not start right away, turn the key off and
wait 3 to 4 seconds before trying again.
7. After starting the engine, carefully discon-
nect the negative cable and then the positive
cable.
8. Replace the vent caps (if so equipped) . Be
sure to dispose of the cloth used to cover
the vent holes as it may be contaminated
with corrosive acid.
WCE0054
6-8In case of emergency
ZREVIEW COPY:Ð2004 Quest(van)
Owners Manual(owners)ÐUSA English(nna)
10/08/03Ðtbrooks
X