Page 75 of 262

The front seats are warmed by built-in heaters.
The switches located on the center console can
be operated independently of each other.
1. Start the engine.
2. Select heat range.
�For low heat, press the
(Low) side
of the switch.
�For high heat, press the(High) side
of the switch.
�For no heat, the switch has a center OFF
position between low and high.
The indicator light in the switch will illuminatewhen low or high is selected.
The heater is controlled by a thermostat,
automatically turning the heater on and off.
The indicator light will remain on as long as
the switch is on.
3. When the vehicle’s interior is warmed, or
before you leave the vehicle, be sure to turn
the switch to the OFF position (center).
An optional ventilated net seat has this built-in
heater only in the seat cushion part, not in the
seatback.
CAUTION
�The battery could run down if the
seat heater is operated while the en-
gine is not running.
�Do not use the seat heater for ex-
tended periods or when no one is
using the seat.
�Do not put anything on the seat
which insulates heat, such as a blan-
ket, cushion, seat cover, etc. Other-
wise, the seat may become
overheated.�Do not place anything hard or heavy
on the seat or pierce it with a pin or
similar object. This may result in
damage to the heater.
�Any liquid spilled on the heated seat
should be removed immediately with
a dry cloth.
�When cleaning the seat, never use
gasoline, thinner, or any similar ma-
terials.
�If any abnormalities are found or the
heated seat does not operate, turn
the switch off and have the system
checked by your NISSAN dealer.
SIC2321
HEATED SEATS (if so equipped)2-26
Instruments and controls
�
04.5.17/Z33-D/V5.0
�
Page 76 of 262
 system ON for most
driving conditions.
When the vehicle is stuck in mud or snow, the
VDC system reduces the engine output to re-
duc")
The vehicle should be driven with the Vehicle
Dynamic Control (VDC) system ON for most
driving conditions.
When the vehicle is stuck in mud or snow, the
VDC system reduces the engine output to re-
duce wheel spin. The engine speed will be
reduced even if the accelerator is depressed to
the floor. If maximum engine power is needed to
free a stuck vehicle, turn the VDC system off.
To cancel the Vehicle Dynamic Control (VDC)
system, push the VDC OFF switch (located on
the lower side of the instrument panel) to turn off
the system. The
indicator light will come
on.Push the VDC OFF switch again or restart the
engine to turn ON the system. See “Vehicle
dynamic control (VDC) system” in the “5. Start-
ing and driving” section.
The vehicle should be driven with the Traction
Control System (TCS) ON for most driving
conditions.
To cancel the Traction Control System (TCS),
push the TCS OFF switch (located on the lower
side of the instrument panel). The
indicator
light will come on. Push it again or restart the
engine to turn the system back on.
See “Traction control system (TCS)” in the “5.
Starting and driving” section.
SIC1881
SIC1967
VEHICLE DYNAMIC CONTROL
(VDC) OFF SWITCH (if so
equipped)TRACTIONCONTROL SYSTEM
(TCS) OFF SWITCH (if so
equipped)
Instruments and controls
2-27
�
04.5.17/Z33-D/V5.0
�
Page 78 of 262
 for both the front and
rear power outlets. Do not use
double adapters or more than one
accessory with a single power outlet.
�Use this power outlet with the engine
running. (If the engine i")
120W (10A) for both the front and
rear power outlets. Do not use
double adapters or more than one
accessory with a single power outlet.
�Use this power outlet with the engine
running. (If the engine is stopped,
this could result in a discharged bat-
tery.)
�Avoid using when the air conditioner,
headlights or rear window defroster
is on.�Before inserting or disconnecting a
plug, be sure to turn off the power
switch of electrical accessory being
used or the ACC power of the vehicle.
�Push the plug in as far as it will go. If
good contact is not made, the plug
may overheat or the internal tem-
perature fuse may blow.
�Do not allow water to contact the
socket. When not in use, be sure to
close the lid.
INSTRUMENT POCKET (except for
navigation system equipped models)�aTo open the lid, push the button.
�bTo close, pull the lid down.
WARNING
�The instrument pocket should not be
used while driving so full attention
may be given to vehicle operation.
SIC1968
Rear
SIC2259
STORAGE
Instruments and controls
2-29
�
04.5.17/Z33-D/V5.0
�
Page 87 of 262

�The key is removed from the ignition switch
while all doors are closed.
The interior light will turn off while the 30 second
timer is activated, when:
�The driver’s door is locked either with the
keyfob, a key or the power door lock switch.
�The ignition switch is turned ON.MAPTo turn on the light, push the plastic surface
�C
of the light. Push it again to turn off the light.
When the map light stays on, it will auto-
matically turn off 30 minutes after theignition switch has been turned to the OFF
position. To turn on the light again, turn the
ignition switch to the ONposition.
The map and vanity mirror lights will automati-
cally turn off 30 minutes after the latest operation
of the following with the ignition switch in the
ACC or OFF position:
�Opening or closing any door
�Locking or unlocking with the keyfob, a key or
the power door lock switch
�Inserting or removing a key from the ignition
switch
These lights will turn on again when any of the
above operations is performed after the lights
have turned off automatically. (The lights will turn
off 30 minutes after the latest operation of the
above as well.)
CAUTION
�Turn off the lights when you leave the
vehicle.
�Do not use the lights for extended
periods of time with the engine
stopped. This could result in a dis-
charged battery.The light on the vanity mirror will turn on when
the cover on the vanity mirror is opened.
When the vanity mirror light stays on, it will
automatically turn off 30 minutes after the
ignition switch has been turned to the OFF
position. To turn on the light again, turn the
ignition switch to the ONposition.
SIC2238
Roadster models
SIC1859
VANITY MIRROR LIGHT (if so
equipped)
2-38
Instruments and controls
�
04.5.17/Z33-D/V5.0
�
Page 89 of 262

WARNING
�Do not use the HomeLink
Universal
Transceiver with any garage door
opener that lacks safety stop and
reverse features as required by fed-
eral safety standards. (These stan-
dards became effective for opener
models manufactured after April 1,
1982). A garage door opener which
cannot detect an object in the path of
a closing garage door and then auto-
matically stop and reverse, does not
meet current federal safety stan-
dards. Using a garage door opener
without these features increases the
risk of serious injury or death.
�During programming, your garage
door or gate may open or close.
Make sure that people and objects
are clear of the garage door or gate
that you are programming.
�Your vehicle’s engine should be
turned off while programming the
HomeLink
Universal Transceiver.
PROGRAMMING HomeLinkTo program your HomeLink
Transceiver to op-
erate a garage door, gate, or entry door opener,
home or office lighting, you need to be at the
same location as the device. Note: Garage door
openers (manufactured after 1996) have “rolling
code protection”. To program a garage door
opener equipped with “rolling code protection”;
you will need to use a ladder to get up to the
garage door opener motor to be able to access
the “smart or learn” program button.
1. To begin, press and hold the 2 outer
HomeLink
buttons (to clear the memory)
until the indicator light blinks slowly (after 20
seconds). Release both buttons.
2. Position the end of the hand-held transmitter
1-3 inches away from the HomeLink
sur-
face.
SIC2247
2-40
Instruments and controls
�
04.5.17/Z33-D/V5.0
�
Page 102 of 262
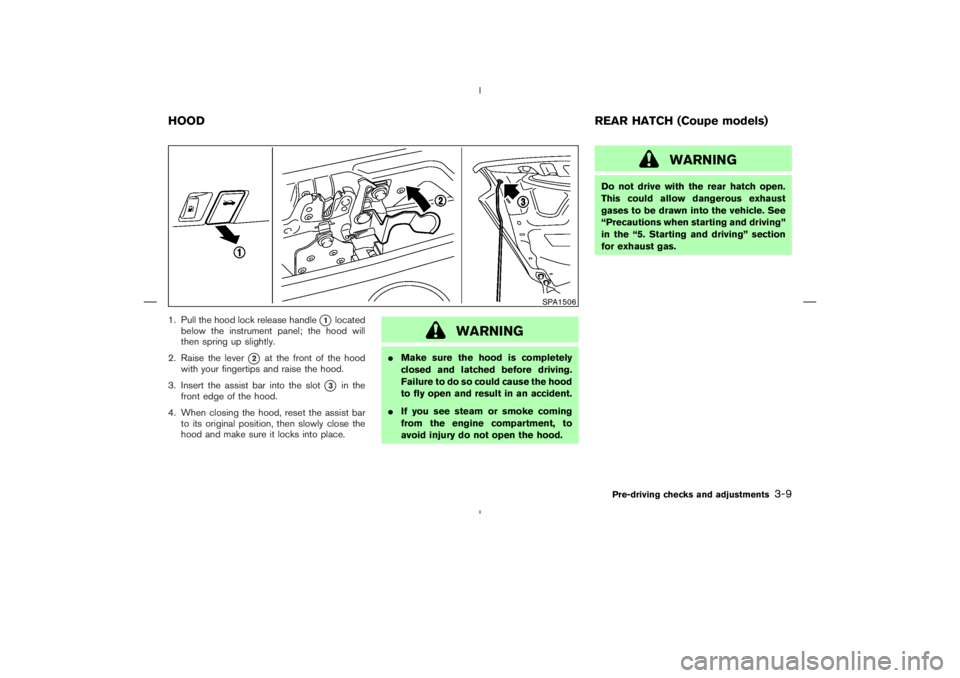
1. Pull the hood lock release handle
�1
located
below the instrument panel; the hood will
then spring up slightly.
2. Raise the lever
�2
at the front of the hood
with your fingertips and raise the hood.
3. Insert the assist bar into the slot
�3
in the
front edge of the hood.
4. When closing the hood, reset the assist bar
to its original position, then slowly close the
hood and make sure it locks into place.
WARNING
�Make sure the hood is completely
closed and latched before driving.
Failure to do so could cause the hood
to fly open and result in an accident.
�If you see steam or smoke coming
from the engine compartment, to
avoid injury do not open the hood.
WARNING
Do not drive with the rear hatch open.
This could allow dangerous exhaust
gases to be drawn into the vehicle. See
“Precautions when starting and driving”
in the “5. Starting and driving” section
for exhaust gas.
SPA1506
HOODREAR HATCH (Coupe models)
Pre-driving checks and adjustments
3-9
�
04.5.17/Z33-D/V5.0
�
Page 107 of 262

FUEL FILLER CAPThe fuel filler cap is a ratcheting type. Tighten the
cap clockwise until ratcheting clicks are heard.
Hang the string of the cap on the hook as shown
while refueling.
WARNING
�Gasoline is extremely flammable and
highly explosive under certain condi-
tions. You could be burned or seri-
ously injured if it is misused ormishandled. Always stop the engine
and do not smoke or allow open
flames or sparks near the vehicle
when refueling.
�Fuel may be under pressure. Turn the
cap a third of a turn, and wait for any
hissing sound to stop to prevent fuel
from spraying out and possible per-
sonal injury. Then remove the cap.
�Do not attempt to top off the fuel
tank after the fuel pump nozzle shutsoff automatically.
Continued refueling may cause fuel
overflow, resulting in fuel spray and
possibly a fire.
�Use only an original equipment type
fuel filler cap as a replacement. It has
a built-in safety valve needed for
proper operation of the fuel system
and emission control system. An in-
correct cap can result in a serious
malfunction and possible injury. It
could also cause the
malfunc-
tion indicator lamp to come on.
�Do not fill a portable fuel container in
the vehicle or trailer. Static electricity
can cause an explosion of flammable
liquid, vapor or gas in any vehicle or
trailer. To reduce the risk of serious
injury or death when filling portable
fuel containers:
— Always place the container on the
ground when filling.
— Do not use electronic devices
while filling.
SPA1509
3-14
Pre-driving checks and adjustments
�
04.5.17/Z33-D/V5.0
�
Page 111 of 262
Foldable outside mirrorsFold the outside mirror by pushing it toward the
rear of the vehicle.1. Soft top operating switch
2. Soft top indicator light (on the combination
meter)
3. Top side rail
4. Top latch lever
5. Soft top
6. Top storage lid
7. Trunk lid
8. Rear window
9. Rear section of the top
BEFORE OPERATING THE TOPThe soft top of your 350Z Roadster is electrically
operated. You can fully open or close the top
only by pressing the operating switch (on the
lower side of the instrument panel).
The soft top operating switch must be operated
under all of the following conditions:
�When the foot brake pedal is depressed.
�When the vehicle is stopped.
�When the engine is running.
IC0565
SPA1689
Interior/exterior view
SOFT TOP OPERATION(Roadster
models)
3-18
Pre-driving checks and adjustments
�
04.5.17/Z33-D/V5.0
�

3. Top side rail
4. Top")