Page 2992 of 3870
Fig. 54: Tooth Contact Pattern Specification Chart
Courtesy of MITSUBISHI MOTOR SALES OF AMERICA.
<> DIFFERENTIAL CASE ASSEMBLY/DIFFERENTIAL SIDE BEARING SPACER/DIFFERENTIAL SIDE BEARING
OUTER RACE REMOVAL NOTE: Check the tooth contact pattern to confirm that the
adjustments of the pinion height and backlash have been
done properly. Continue to adjust the pinion height and
backlash until the tooth contact pattern resembles the
standard pattern. If, even after adjustments have been
made, the correct tooth contact pattern cannot be obtained,
it means that the drive gear and the drive pinion have
become worn beyond the allowable limit. Replace the gear
set.
CAUTION: When taking out the differential case assembly, be
2004 Mitsubishi Endeavor LS
2004 SUSPENSION Rear Axle < AWD > - Endeavor
Page 3007 of 3870
Fig. 68: Pressing Drive Pinion Rear Bearing Outer Race
Courtesy of MITSUBISHI MOTOR SALES OF AMERICA.
>>D<< DRIVE PINION HEIGHT ADJUSTMENT
2004 Mitsubishi Endeavor LS
2004 SUSPENSION Rear Axle < AWD > - Endeavor
Page 3008 of 3870
Adjust the drive pinion height by the following procedures:
1. Apply multipurpose grease to the washer of special tool MB990903.
Fig. 69: Applying Multipurpose Grease To Washer Of Special Tool
Courtesy of MITSUBISHI MOTOR SALES OF AMERICA.
2. Install special tools MB990903 (MB990901) and MB991366(MB991378),
drive pinion front and rear bearing inner races to the differential carrier as
shown in the illustration.
CAUTION: There should be no gear oil adhered to the
bearing.
2004 Mitsubishi Endeavor LS
2004 SUSPENSION Rear Axle < AWD > - Endeavor
Page 3016 of 3870
spacer.
Fig. 78: Identifying Height
Courtesy of MITSUBISHI MOTOR SALES OF AMERICA.
NOTE: When selecting the drive pinion front shims, if the
number of shims is large, reduce the number of shims
to a minimum by selecting the drive pinion spacers.
Select the drive pinion spacer from the following two
types.
2004 Mitsubishi Endeavor LS
2004 SUSPENSION Rear Axle < AWD > - Endeavor
Page 3099 of 3870

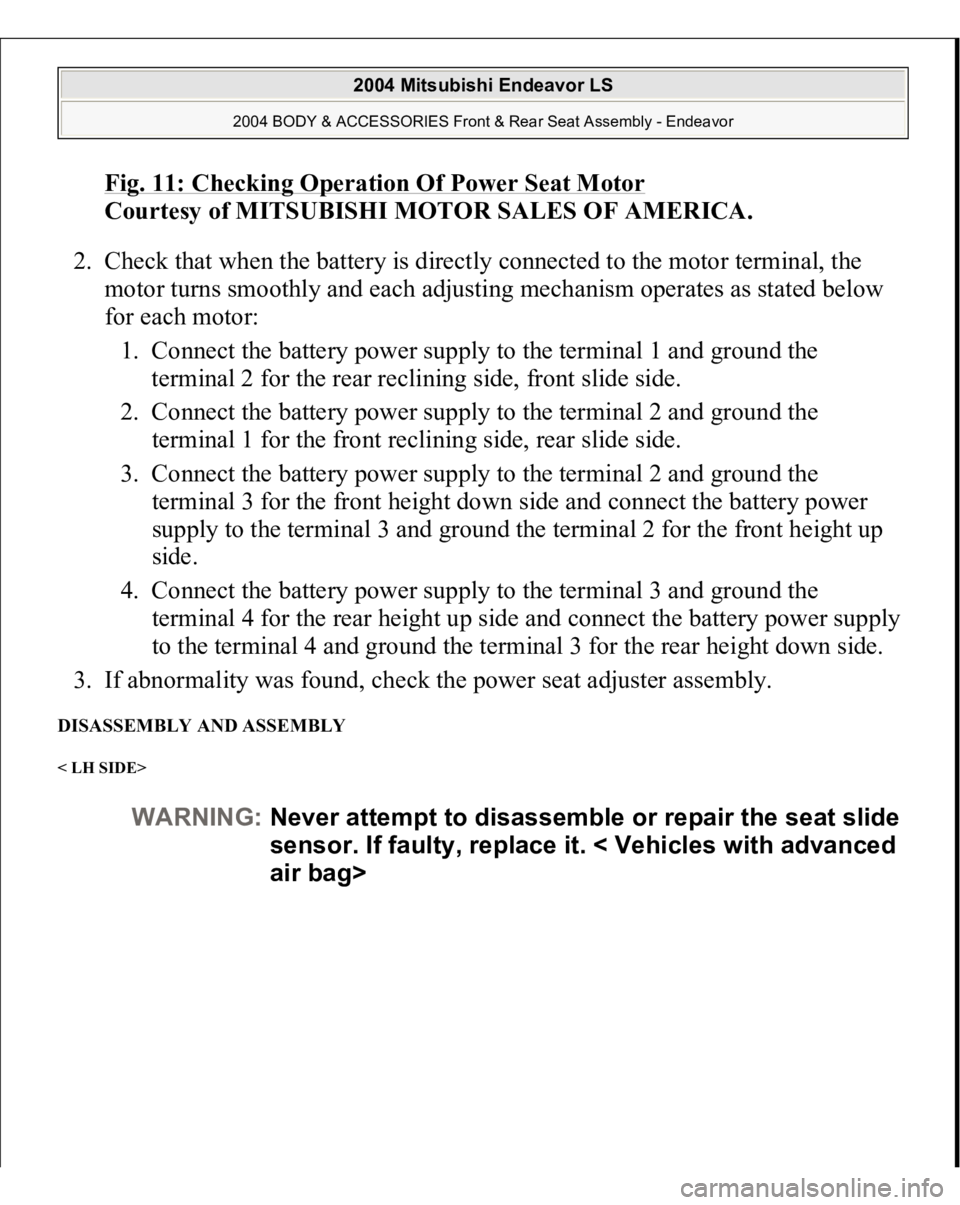
Fig. 11: Checking Operation Of Power Seat Motor
Courtesy of MITSUBISHI MOTOR SALES OF AMERICA.
2. Check that when the battery is directly connected to the motor terminal, the
motor turns smoothly and each adjusting mechanism operates as stated below
for each motor:
1. Connect the battery power supply to the terminal 1 and ground the
terminal 2 for the rear reclining side, front slide side.
2. Connect the battery power supply to the terminal 2 and ground the
terminal 1 for the front reclining side, rear slide side.
3. Connect the battery power supply to the terminal 2 and ground the
terminal 3 for the front height down side and connect the battery power
supply to the terminal 3 and ground the terminal 2 for the front height up
side.
4. Connect the battery power supply to the terminal 3 and ground the
terminal 4 for the rear height up side and connect the battery power supply
to the terminal 4 and ground the terminal 3 for the rear height down side.
3. If abnormality was found, check the power seat adjuster assembly.
DISASSEMBLY AND ASSEMBLY < LH SIDE>
WARNING:Never attempt to disassemble or repair the seat slide
sensor. If faulty, replace it. < Vehicles with advanced
air bag>
2004 Mitsubishi Endeavor LS
2004 BODY & ACCESSORIES Front & Rear Seat Assembly - Endeavor
Page 3554 of 3870
1. Fully close the roof lid glass.
2. Adjust the water pressure so that water comes out of the hose to a height of
approximately 50 cm (19.7 inches) when the hose is held vertically facing
upwards.
3. Hold the end of the hose approximately 30 cm (11.8 inches) above the roof and
let the water run onto the weatherstrip for 5 minutes or more.
Fig. 2: Performing Water Test
Courtesy of MITSUBISHI MOTOR SALES OF AMERICA.
4. Check if any water leaks can be found in the room while watering. Even
though there are any water leaks around the roof lid glass, it can be acceptable
as long as water is caught in the drip area.
SUNROOF TIMER FUNCTION CHECK Keep the door closed, turn OFF the ignition switch and check to see if the sunroof
2004 Mitsubishi Endeavor LS
2004 BODY & ACCESSORIES Sunroof Assembly - Endeavor
Page:
< prev 1-8 9-16 17-24