Page 117 of 434
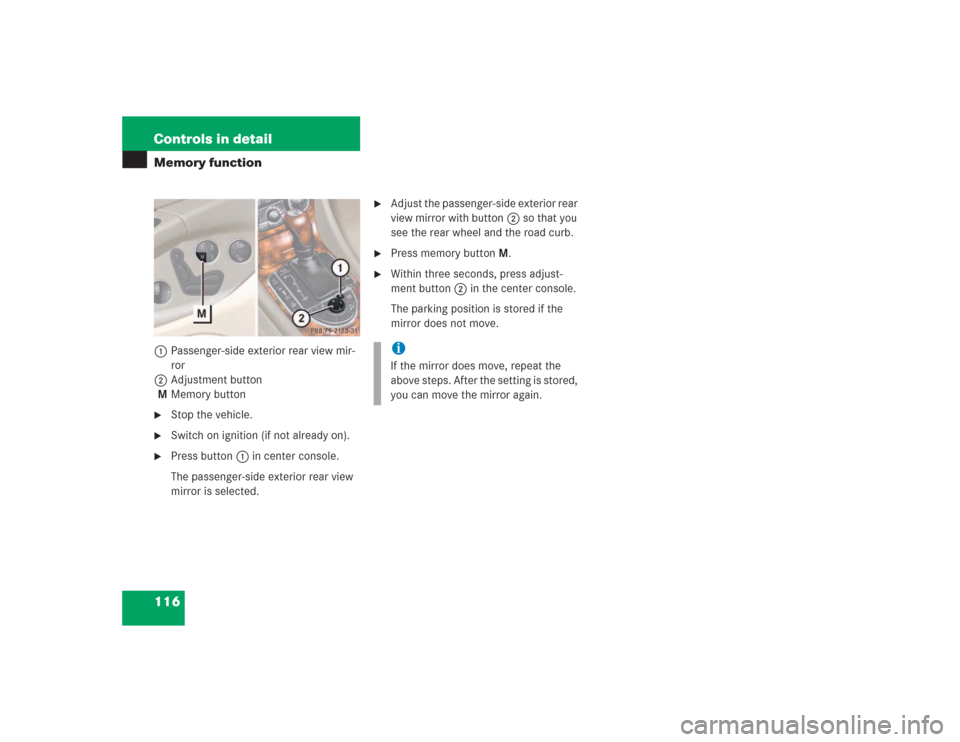
116 Controls in detailMemory function1Passenger-side exterior rear view mir-
ror
2Adjustment button
MMemory button�
Stop the vehicle.
�
Switch on ignition (if not already on).
�
Press button1 in center console.
The passenger-side exterior rear view
mirror is selected.
�
Adjust the passenger-side exterior rear
view mirror with button2 so that you
see the rear wheel and the road curb.
�
Press memory buttonM.
�
Within three seconds, press adjust-
ment button2 in the center console.
The parking position is stored if the
mirror does not move.iIf the mirror does move, repeat the
above steps. After the setting is stored,
you can move the mirror again.
Page 125 of 434
.
The instrument cluster is activated when")
124 Controls in detailInstrument cluster
�Instrument clusterFor a full view illustration of the instrument
cluster, see “Instrument cluster”
(�page 22).
The instrument cluster is activated when
you
�
open a door
�
switch on the ignition
�
press the reset button (
�page 22)
�
switch on the exterior lamps
Opening a door will activate the instrument
cluster only for about 30 seconds.
You can change the instrument cluster set-
tings in the Instrument cluster submenu of
the control system (
�page 140).
Instrument cluster illumination
Use the reset button to adjust the illumina-
tion brightness for the instrument cluster
and the switches on the center console.
To brighten illumination�
Turn the reset button in the instrument
cluster (
�page 22) clockwise.
The instrument cluster illumination will
brighten.
To dim illumination
�
Turn the reset button in the instrument
cluster (
�page 22) counterclockwise.
The instrument cluster illumination will
dim.
Coolant temperature gauge
iThe instrument cluster illumination is
dimmed or brightened to suit ambient
light conditions.
Warning
G
�
Driving when your engine is badly over-
heated can cause some fluids which
may have leaked into the engine com-
partment to catch fire. You could be se-
riously burned.
�
Steam from an overheated engine can
cause serious burns an can occur just by
opening the hood. Stay away from the
engine if you see or hear steam coming
from it.
Turn off the engine, get out of the vehicle
and do not stand near the vehicle until the
engine has cooled down.
Page 126 of 434
.
The engine should not be operated")
125 Controls in detail
Instrument cluster
During severe operating conditions, e.g.
stop-and-go traffic, the coolant tempera-
ture may rise close to 248°F (120°C).
The engine should not be operated with
the coolant temperature above 248°F
(120°C). Doing so may cause serious en-
gine damage which is not covered by the
Mercedes-Benz Limited Warranty.
Trip odometer�
Make sure you are viewing the trip
odometer display (
�page 127).
�
If it is not displayed, press the j or
k button on the multifunction
steering wheel repeatedly until the trip
odometer appears.
�
Press and hold reset button4
(�page 22) until the trip odometer is
reset.
Tachometer
The red marking on the tachometer de-
notes excessive engine speed.
To help protect the engine, the fuel supply
is interrupted if the engine is operated
within the red marking.
SL 55 AMG
The tachometer of the SL 55 AMG does not
have a red marking denoting excessive en-
gine speed.
To help protect the engine, the fuel supply
is interrupted if the engine is operated at
an excessive speed.
!Excessive coolant temperature triggers
the coolant temperature warning lamp
(�page 304) and a warning in the
multifunction display (
�page 286).
!Avoid driving at excessive engine
speeds, as it may result in serious en-
gine damage that is not covered by the
Mercedes-Benz Limited Warranty.
Page 128 of 434

127 Controls in detail
Control system
�Control system
The control system is activated as soon as
the SmartKey in the starter switch is
turned to position1 or as soon as the
KEYLESS-GO start/stop button is in posi-
tion 1. The control system enables you to�
call up information about your vehicle
�
change vehicle settings
For example, you can use the control sys-
tem to find out when your vehicle is next
due for service, to set the language for
messages in the instrument cluster dis-
play, and much more.
The control system relays information to
the multifunction display.
Multifunction display
The multifunction display consists of the
display fields in the speedometer and the
tachometer. In its default state, the left
display field shows the trip and main
odometer, while the present outside tem-
perature appears in the right display field.
This default setting is referred to as the
standard display.
1Main odometer
2Trip odometer
3Current gear selector lever position
4Outside temperature
5Automatic transmission program mode
Warning!
G
A driver’s attention to the road and traffic
conditions must always be his /her primary
focus when driving.
For your safety and the safety of others, se-
lecting features through the multifunction
steering wheel should only be done by the
driver when traffic and road conditions per-
mit it to be done safely.
Bear in mind that at a speed of just 30 mph
(approximately 50 km / h), your vehicle is
covering a distance of 44 feet (approximate-
ly 14 m) every second.
Page 129 of 434

128 Controls in detailControl systemMultifunction steering wheel
The displays in the multifunction display
and the settings in the control system are
controlled by the buttons on the multifunc-
tion steering wheel.Pressing any of the buttons on the multi-
function steering wheel will alter what is
shown in the multifunction display.
The information available in the multifunc-
tion display is arranged in menus, each
containing a number of functions or sub-
menus.
The individual functions are then found
within the relevant menu (radio or CD op-
erations under
AUDIO
, for example). These
functions serve to call up relevant informa-
tion or to customize the settings for your
vehicle.
It is helpful to think of the menus, and the
functions within each menu, as being ar-
ranged in a circular pattern.
�
If you press button è or ÿ re-
peatedly, you will pass through each
menu one after the other.
�
If you press button k or j re-
peatedly, you will pass through each
function display, one after the other, in
the current menu.
1
Left multifunction display in the
speedometer
2
Right multifunction display in the
tachometerOperating the control system
3
Selecting the submenu or setting
the volumeçdown / to decreaseæup / to increase
4
Telephone*íto take a callìto end a call
5
Menu systemsèfor next menuÿfor previous menu
6
Moving within a menujfor next displaykfor previous display
Page 133 of 434

132 Controls in detailControl system
Standard display menu
You can select the functions in the stan-
dard display menu with button k or
j.
The following functions are available:
Display digital speedometer�
Press button j once.
The current vehicle speed is shown in
the right display field.
AUDIO menu
The functions in the
AUDIO
menu operate
the audio equipment which you currently
have turned on.
If no audio equipment is currently turned
on, the message
AUDIO off
is shown in the
right display.
The following functions are available:
iThe headings used in the menus table
are designed to facilitate navigation
within the system and are not neces-
sarily identical to those shown in the
control system displays.
The first function displayed in each
menu will automatically show you
which part of the system you are in.
Function
Page
Call up digital speedometer
132
Call up FSS
272
Check tire pressure*
264
Check engine oil level
255
Function
Page
Select radio station
133
Select satellite radio station*
(USA only)
133
Operate CD player
134
Page 134 of 434

133 Controls in detail
Control system
Select radio station�
Turn on the radio. Refer to the separate
operating instructions.
�
Press button è or ÿ repeatedly
until you see the currently tuned sta-
tion in the right display.
1Station frequency
2Waveband setting
3Setting for station selection using
memory
�
Press button k or j repeatedly
until the desired station is found.
The type of search depends on the set-
ting for the station tuning
(�page 146):
�
Memory: the next stored station is
selected (SP)
�
Station searchSelect satellite radio station*
(USA only)
The satellite radio is treated as a radio ap-
plication.
�
Select satellite radio with the corre-
sponding key on the COMAND control
panel (SAT).
�
Press button è or ÿ repeatedly
until you see the currently tuned sta-
tion in the right display.
1SAT mode and preset number
2Setting for station selection using
memory
3Channel name or number
�
Press button k or j repeatedly
until the desired channel is found.
iYou can only store new stations using
the designated feature on the radio.
Refer to the separate operating instruc-
tions.
You can also operate the radio in the
usual manner.
Page 135 of 434

134 Controls in detailControl system
Operate the CD player�
Turn on the radio and select the CD
player. Refer to the separate operating
instructions.
�
Press button è or ÿ repeatedly
until the settings for the CD currently
being played are shown in the right dis-
play field.
1Current track
2Current CD (for CD changer)
�
Press button k or j repeatedly
until the desired track is selected.
NAVI menu
The
NAVI
menu contains the functions
needed to operate your navigation system.
�
Press button è or ÿ repeatedly
until you see the message
NAVI
in the
left display.
The message shown in the right display
field depends on the status of the naviga-
tion system:
�
If the navigation system is off, the mes-
sage
NAVI OFF
is shown in the display.
�
If the navigation system is on, the mes-
sage
NAVI READY
is shown in the dis-
play.
Please refer to the COMAND manual for in-
structions on how to activate the route
guidance system.
iFeature description is based on prelim-
inary information available at time of
printing.
Additional optional satellite radio
equipment and a subscription to satel-
lite radio service provider are required
for satellite radio operation. At time of
printing, no date for the availability of
optional equipment required for satel-
lite radio operation had been set. Con-
tact an authorized Mercedes-Benz
Center for details and availability for
your vehicle.
For more information, refer to separate
COMAND operating instructions.