Page 70 of 434

69 Safety and Security
Occupant safety
Roll barThe roll bar raises automatically in an acci-
dent or in a critical driving situation. You
can also raise and lower the roll bar manu-
ally using the buttons provided.
The buttons for the roll bar are on the cen-
ter console under the roof switch.
1Lower roll bar
2Raise roll bar
The roll bar can be moved manually when
the ignition is switched on.Raising the roll bar
�
Lift the switch for the retractable hard-
top.
�
Press and hold button2 until the roll
bar is raised.
Warning!
G
This vehicle is a two occupant vehicle. The
rear storage area is not intended for use by
occupants and is not equipped for properly
seating or restraining occupants. Thus this
area should never be used by any persons.
Before operating the roll bar switch make
sure that the roll bar’s path is clear and no
persons are injured by the moving roll bar
due to inattention. Raising or lowering of the
roll bar could injure someone inadvertently
occupying the rear storage area.
For your own safety, we recommend to drive
with the roll bar raised if the outside temper-
ature is below +5°F (-15°C).!If the outside temperature falls below
+5°F (-15°C), the roll bar must be
raised manually using the buttons pro-
vided to avoid damaging the hydraulics.
iWhen the roll bar is raised automatical-
ly, you will hear a ratcheting sound.
Warning!
G
If the roll bar warning light
in the ta-
chometer remains lit after starting the en-
gine, there is a malfunction. In the display
you see the message
Raise the
roll-over bar
.
For safety reasons, drive only with the roll
bar upright until the malfunction is repaired.
Have your vehicle checked at an authorized
Mercedes-Benz Center.
Page 88 of 434

87 Safety and Security
Anti-theft systems
Arming tow-away alarm
When you lock your vehicle, the tow-away
alarm is automatically armed after about
30 seconds.
When you unlock your vehicle, the
tow-away protection disarms automatical-
ly.
Disarming tow-away alarm
To prevent triggering the tow-away alarm,
switch off the tow-away alarm feature be-
fore towing the vehicle, or when parking on
a surface subject to movement, such as a
ferry or auto train.
The switch is located on the center console
between the driver’s seat and the passen-
ger seat.1Tow-away alarm off switch
2Indicator lamp
�
Switch off ignition and remove the
SmartKey.
�
Press switch1.
The indicator lamp2 in the switch
comes on briefly.
�
Exit and lock your vehicle with the
SmartKey or (vehicles with
KEYLESS-GO*) the lock button at each
door handle.
The tow-away alarm remains disarmed un-
til you lock your vehicle again.
Canceling tow-away alarm
To cancel the alarm:
With the SmartKey
�
Insert the SmartKey in the starter
switch.
or
�
Press the Œ or ‹ button on the
SmartKey.
With KEYLESS-GO*
�
Grasp the outside door handle.
or
�
Press the KEYLESS-GO start/stop but-
ton.
iYou cannot disarm the tow-away alarm
if the ignition is switched on.
Page 106 of 434

105 Controls in detail
Locking and unlocking
Automatic central locking
The doors and the trunk lid lock automati-
cally when the vehicle is set into motion.
You can open a locked door from the in-
side. Open door only when conditions are
safe to do so.
You can deactivate the automatic locking
using the control system (
�page 146).
Locking and unlocking from the inside
You can lock or unlock the vehicle from in-
side using the central locking switches.
This can be useful, for example, if you want
to unlock the passenger door from the in-
side or want to lock the vehicle before
starting to drive.
The central locking switch does not lock or
unlock the fuel filler flap.The switches are located above and be-
tween the center air vents of the air condi-
tioning.
Central locking switches1Locking
2Unlocking
iThe doors unlock automatically after an
accident if the force of the impact ex-
ceeds a preset threshold.
The vehicle locks automatically when
the ignition is switched on and the
wheels are turning at vehicle speeds of
approximately 9 mph (15 km/h) or
more. You could therefore lock yourself
out when the vehicle �
is pushed
�
is on a test stand
Warning!
G
When leaving the vehicle, always remove the
SmartKey from the starter switch, take the
SmartKey with KEYLESS-GO
* with you and
lock the vehicle. Do not leave children unat-
tended in the vehicle, or with access to an
unlocked vehicle. Unsupervised use of vehi-
cle equipment may cause an accident
and/or serious personal injury.
Warning!
G
You can open a locked door from inside at
any time. Open door only when conditions
are safe to do so.
Page 109 of 434

108 Controls in detailSeatsMoving the seats forward and backward
You can move the seats forward and back
to facilitate loading and unloading.The switch is located on the top side of the
seat.
1Seat forward
2Seat backward
Moving the seat forward
�
Press switch at1.
Moving the seat backward
�
Press switch at2.
Lumbar support
You can adjust the contour of the seat’s
lumbar support to best support your spine.
The thumbwheel is located on the lower
side of the seat.
1Thumb wheel�
Make sure the ignition is switched on.
All the lamps in the instrument cluster
come on.
�
Set the lumbar support between 0
and 5.
Warning!
G
When moving the seats, be sure that no one
can be caught by them. Never place hands
under seat or near any moving parts during
a seat adjustment procedure. To stop the
seat from moving when potential danger ex-
ists:�
press the switch again
�
move the seat adjustment switch on the
door (
�page 34)
!When moving the seats, make sure that
there are no items in the footwell or be-
hind the seats. Otherwise you could
damage the seats.
Page 110 of 434
109 Controls in detailSeats
Multicontour backrest* (standard on SL 600 and SL 55 AMG)
The multicontour backrest has inflatable
air cushions built into the seat backrest to
provide additional lumbar and side sup-
port.
The seat backrest cushion height and cur-
vature can be continuously varied with
switches on the lower side of the seat
when the ignition is switched on.1Shoulder region support
2Side bolsters adjustment
3Massage function (PULSE)
4Lumbar region support
�
Make sure the ignition is switched on.
All the lamps in the instrument cluster
come on.
Shoulder region support
�
Press æ or ç on switch1.
The air cushion inflates or deflates.Lumbar region support
�
Press k or j on rocker
switch4.
This selects the air cushion you wish to
adjust.
�
Press æ or ç on rocker
switch4.
The air cushion inflates or deflates.
Side bolsters adjustment
�
Press switch2 to the right or left.
The lateral support increases or de-
creases.
Page 111 of 434

You can reduce muscle tension during long
trips by periodically using the massage
function. �
Press button3.
The indicator lamp on button3 comes")
110 Controls in detailSeatsMassage function (PULSE)
You can reduce muscle tension during long
trips by periodically using the massage
function. �
Press button3.
The indicator lamp on button3 comes
on. The air cushions in the lumbar re-
gion inflate and deflate rhythmically.
Seat heating
Vehicles without seat ventilation*
The switch is located on the door.
1Normal heating
2Rapid heating�
Make sure the ignition is switched on.
All the lamps in the instrument cluster
come on.Switching on seat heating
�
Press lower switch position1.
A red indicator lamp on the switch
comes on.
Switching off seat heating
�
Press lower switch position1 again.
Switching on rapid seat heating
�
Press upper switch position2.
Both red indicator lamps on the switch
come on.
iThe massage function switches off au-
tomatically after approximately eight
minutes. The indicator lamp goes out.
iThe seat heating will be automatically
switched off after approximately
30 minutes. iThe system switches to normal heating
mode after approximately five minutes.
Only the right-hand indicator lamp re-
mains lit.
Page 112 of 434

111 Controls in detailSeats
Switching off rapid seat heating�
Press upper switch position2 again. Vehicles with seat ventilation*
The switch is located on the door. The red
indicator lamps on the switch indicate the
selected heating level:
1Seat heating switch
�
Make sure the ignition is switched on.
All the lamps in the instrument cluster
come on.Switching on seat heating
�
Press upper switch position1 twice.
A red indicator lamp on the switch
comes on.
Switching off seat heating
�
Press upper switch position1 again.
Switching on rapid seat heating
�
Press upper switch position1 once.
Both indicator lamps on the switch
come on.
!If one or both of the lamps on the seat
heating switch are flashing, there is in-
sufficient voltage available since too
many electrical consumers are turned
on. The seat heating switches off auto-
matically.
The seat heating will switch back on
again automatically as soon as suffi-
cient voltage is available.
Leveloff
No indicator lamp on
1
One indicator lamp on
2
Two indicator lamps on
iThe seat heating will be automatically
switched off after approximately
30 minutes. iThe system switches to normal heating
mode after approximately five minutes.
Only the right-hand indicator lamp re-
mains lit.
Page 113 of 434
112 Controls in detailSeatsSwitching off rapid seat heating�
Press upper switch position1 twice.
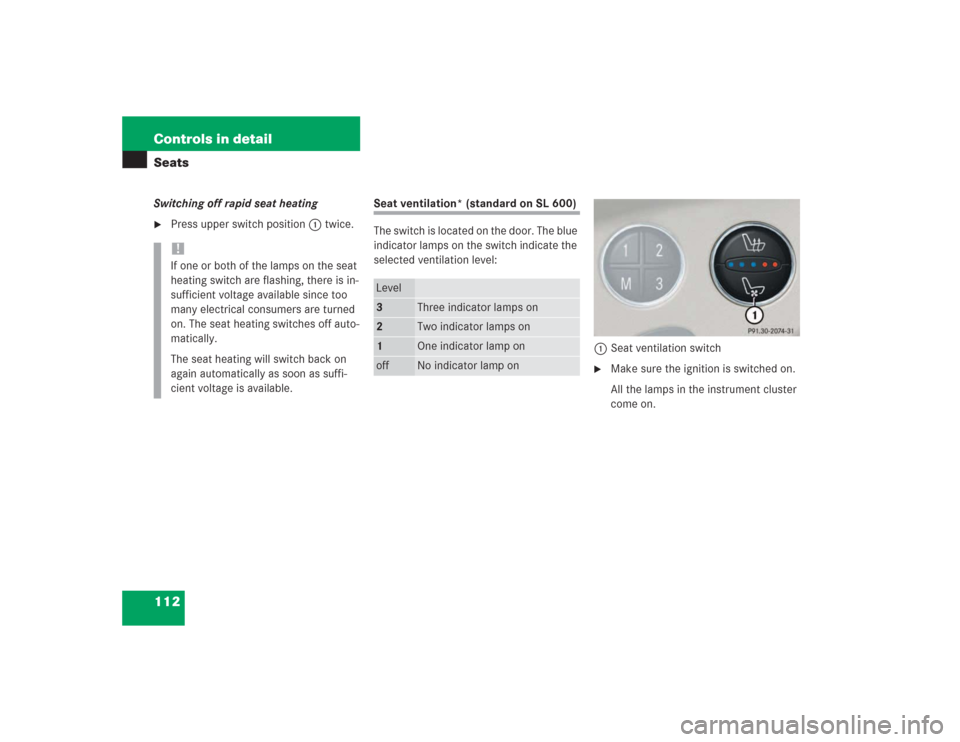
Seat ventilation* (standard on SL 600)
The switch is located on the door. The blue
indicator lamps on the switch indicate the
selected ventilation level:
1Seat ventilation switch
�
Make sure the ignition is switched on.
All the lamps in the instrument cluster
come on.
!If one or both of the lamps on the seat
heating switch are flashing, there is in-
sufficient voltage available since too
many electrical consumers are turned
on. The seat heating switches off auto-
matically.
The seat heating will switch back on
again automatically as soon as suffi-
cient voltage is available.
Level3
Three indicator lamps on
2
Two indicator lamps on
1
One indicator lamp on
off
No indicator lamp on

The multicontour backrest has inflatable
air cushions built into the seat backrest to
provide additional lumbar")