Page 122 of 434
121 Controls in detail
Lighting
Switching on high beams�
Turn the exterior lamp switch toB
or toU (
�page 117).
�
Push the combination switch in
direction1.
The high beam indicator A in the ta-
chometer comes on.
High beam flasher
�
Pull the combination switch briefly in
direction2.
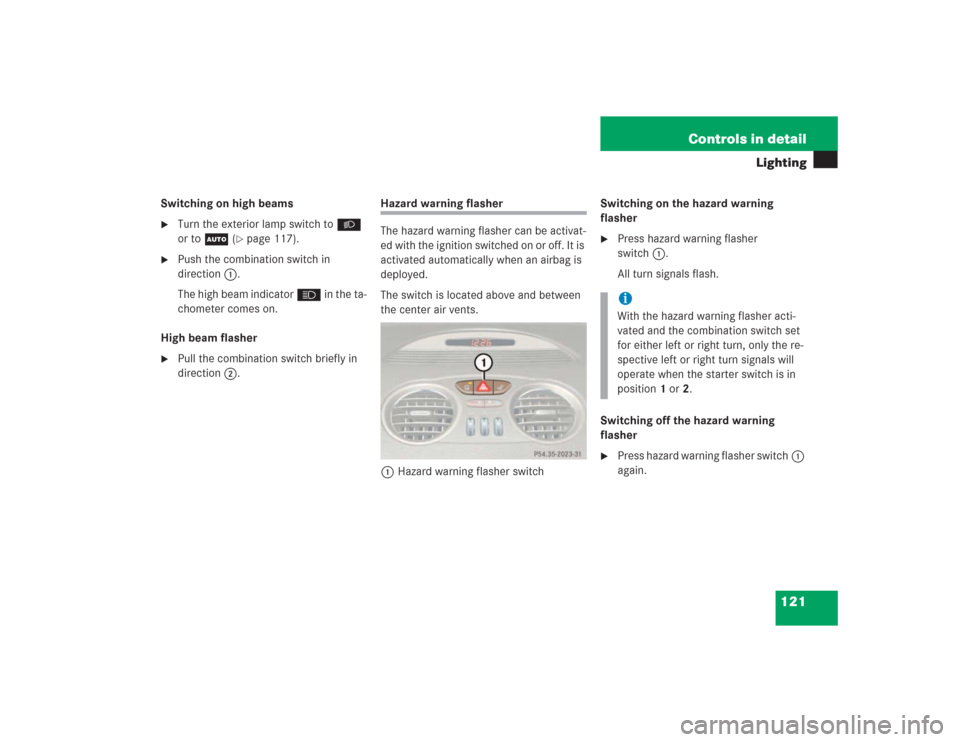
Hazard warning flasher
The hazard warning flasher can be activat-
ed with the ignition switched on or off. It is
activated automatically when an airbag is
deployed.
The switch is located above and between
the center air vents.
1Hazard warning flasher switchSwitching on the hazard warning
flasher
�
Press hazard warning flasher
switch1.
All turn signals flash.
Switching off the hazard warning
flasher
�
Press hazard warning flasher switch1
again.iWith the hazard warning flasher acti-
vated and the combination switch set
for either left or right turn, only the re-
spective left or right turn signals will
operate when the starter switch is in
position 1 or 2.
Page 123 of 434
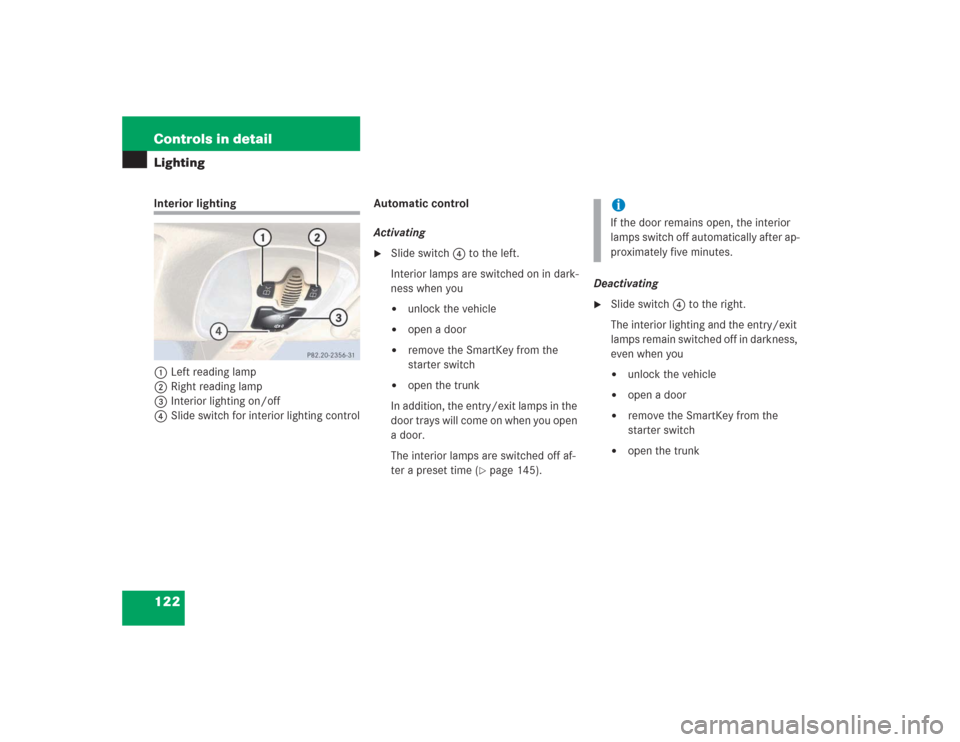
122 Controls in detailLightingInterior lighting
1Left reading lamp
2Right reading lamp
3Interior lighting on/off
4Slide switch for interior lighting controlAutomatic control
Activating
�
Slide switch4 to the left.
Interior lamps are switched on in dark-
ness when you �
unlock the vehicle
�
open a door
�
remove the SmartKey from the
starter switch
�
open the trunk
In addition, the entry/exit lamps in the
door trays will come on when you open
a door.
The interior lamps are switched off af-
ter a preset time (
�page 145).Deactivating
�
Slide switch4 to the right.
The interior lighting and the entry/exit
lamps remain switched off in darkness,
even when you�
unlock the vehicle
�
open a door
�
remove the SmartKey from the
starter switch
�
open the trunk
iIf the door remains open, the interior
lamps switch off automatically after ap-
proximately five minutes.
Page 125 of 434
.
The instrument cluster is activated when")
124 Controls in detailInstrument cluster
�Instrument clusterFor a full view illustration of the instrument
cluster, see “Instrument cluster”
(�page 22).
The instrument cluster is activated when
you
�
open a door
�
switch on the ignition
�
press the reset button (
�page 22)
�
switch on the exterior lamps
Opening a door will activate the instrument
cluster only for about 30 seconds.
You can change the instrument cluster set-
tings in the Instrument cluster submenu of
the control system (
�page 140).
Instrument cluster illumination
Use the reset button to adjust the illumina-
tion brightness for the instrument cluster
and the switches on the center console.
To brighten illumination�
Turn the reset button in the instrument
cluster (
�page 22) clockwise.
The instrument cluster illumination will
brighten.
To dim illumination
�
Turn the reset button in the instrument
cluster (
�page 22) counterclockwise.
The instrument cluster illumination will
dim.
Coolant temperature gauge
iThe instrument cluster illumination is
dimmed or brightened to suit ambient
light conditions.
Warning
G
�
Driving when your engine is badly over-
heated can cause some fluids which
may have leaked into the engine com-
partment to catch fire. You could be se-
riously burned.
�
Steam from an overheated engine can
cause serious burns an can occur just by
opening the hood. Stay away from the
engine if you see or hear steam coming
from it.
Turn off the engine, get out of the vehicle
and do not stand near the vehicle until the
engine has cooled down.
Page 126 of 434
.
The engine should not be operated")
125 Controls in detail
Instrument cluster
During severe operating conditions, e.g.
stop-and-go traffic, the coolant tempera-
ture may rise close to 248°F (120°C).
The engine should not be operated with
the coolant temperature above 248°F
(120°C). Doing so may cause serious en-
gine damage which is not covered by the
Mercedes-Benz Limited Warranty.
Trip odometer�
Make sure you are viewing the trip
odometer display (
�page 127).
�
If it is not displayed, press the j or
k button on the multifunction
steering wheel repeatedly until the trip
odometer appears.
�
Press and hold reset button4
(�page 22) until the trip odometer is
reset.
Tachometer
The red marking on the tachometer de-
notes excessive engine speed.
To help protect the engine, the fuel supply
is interrupted if the engine is operated
within the red marking.
SL 55 AMG
The tachometer of the SL 55 AMG does not
have a red marking denoting excessive en-
gine speed.
To help protect the engine, the fuel supply
is interrupted if the engine is operated at
an excessive speed.
!Excessive coolant temperature triggers
the coolant temperature warning lamp
(�page 304) and a warning in the
multifunction display (
�page 286).
!Avoid driving at excessive engine
speeds, as it may result in serious en-
gine damage that is not covered by the
Mercedes-Benz Limited Warranty.
Page 127 of 434
. For information on how to se-
lect the unit")
126 Controls in detailInstrument clusterOutside temperature indicator
The outside temperature is displayed in
the right multifunction display
(�page 22). For information on how to se-
lect the unit of the displayed temperature,
i.e. degrees Celsius (°C) or degrees Fahr-
enheit (°F), see “Selecting temperature
display mode” (
�page 140).The temperature sensor is located in the
front bumper area. Due to its location, the
sensor can be affected by road or engine
heat during idling or slow driving. There-
fore, the accuracy of the displayed temper-
ature can only be verified by comparison to
a thermometer placed next the sensor, not
by comparison to external displays, e.g.
bank signs, etc.
When moving the vehicle into colder ambi-
ent temperatures (e.g. when leaving your
garage), you will notice a delay before the
lower temperature is displayed.
A delay also occurs when ambient temper-
atures rise. This prevents inaccurate tem-
perature indications caused by heat
radiated from the engine during idling or
slow driving.
Warning!
G
The outside temperature indicator is not de-
signed to serve as an Ice-Warning Device
and is therefore unsuitable for that purpose.
Indicated temperatures just above the freez-
ing point do not guarantee that the road sur-
face is free of ice. The road may still be icy,
especially in wooded areas or on bridges.
Page 130 of 434
129 Controls in detail
Control system
In the
Settings
menu, instead of functions
you will find a number of submenus for
calling up and changing settings. For in-
structions on using these submenus, see
“Settings menu” (�page 137).
The number of menus available in the sys-
tem depends on which optional equipment
is installed in your vehicle.The menus are described on the following
pages.
Page 133 of 434

132 Controls in detailControl system
Standard display menu
You can select the functions in the stan-
dard display menu with button k or
j.
The following functions are available:
Display digital speedometer�
Press button j once.
The current vehicle speed is shown in
the right display field.
AUDIO menu
The functions in the
AUDIO
menu operate
the audio equipment which you currently
have turned on.
If no audio equipment is currently turned
on, the message
AUDIO off
is shown in the
right display.
The following functions are available:
iThe headings used in the menus table
are designed to facilitate navigation
within the system and are not neces-
sarily identical to those shown in the
control system displays.
The first function displayed in each
menu will automatically show you
which part of the system you are in.
Function
Page
Call up digital speedometer
132
Call up FSS
272
Check tire pressure*
264
Check engine oil level
255
Function
Page
Select radio station
133
Select satellite radio station*
(USA only)
133
Operate CD player
134
Page 134 of 434

133 Controls in detail
Control system
Select radio station�
Turn on the radio. Refer to the separate
operating instructions.
�
Press button è or ÿ repeatedly
until you see the currently tuned sta-
tion in the right display.
1Station frequency
2Waveband setting
3Setting for station selection using
memory
�
Press button k or j repeatedly
until the desired station is found.
The type of search depends on the set-
ting for the station tuning
(�page 146):
�
Memory: the next stored station is
selected (SP)
�
Station searchSelect satellite radio station*
(USA only)
The satellite radio is treated as a radio ap-
plication.
�
Select satellite radio with the corre-
sponding key on the COMAND control
panel (SAT).
�
Press button è or ÿ repeatedly
until you see the currently tuned sta-
tion in the right display.
1SAT mode and preset number
2Setting for station selection using
memory
3Channel name or number
�
Press button k or j repeatedly
until the desired channel is found.
iYou can only store new stations using
the designated feature on the radio.
Refer to the separate operating instruc-
tions.
You can also operate the radio in the
usual manner.