Page 136 of 434
135 Controls in detail
Control system
Distronic* menu
Use the Distronic menu to display the cur-
rent settings for your Distronic system.
What information is shown in the left dis-
play field depends on whether the Distron-
ic system is active or inactive.
Please refer to the “Driving systems” sec-
tion of this manual (
�page 196) for in-
structions on how to activate Distronic.
�
Press button è or ÿ repeatedly
until you see one of the following two
pictures in the display.Distronic deactivated
When Distronic is deactivated you will see
the standard display in the left display
field.
1Vehicle ahead, if detected
2Actual distance to vehicle ahead
3Preset distance threshold to vehicle
ahead
4Your vehicle
5Symbol for activated distance warning
functionDistronic activated
When Distronic is activated the DTR sym-
bol and the set speed are seen in the left
display.
1Symbol for activated Distronic
2Set speed
Page 137 of 434

136 Controls in detailControl systemMalfunction memory menu
Use the malfunction memory menu to scan
malfunction and warning messages that
may be stored in the system. What infor-
mation is shown in the display fields de-
pends on whether malfunctions have
actually occurred.
�
Press button è or ÿ repeatedly
until you see the message
Malfunction
memory
in the right display.
No malfunction messages
If no malfunctions have occurred, the mes-
sage in the right display is:
Malfunction
memory, no malfunctions.
Malfunctions have occurred
If malfunctions have occurred, you will see
the number of malfunctions in the right dis-
play:
1Number of malfunctions
�
Press button k or j.The stored messages will now be displayed
in order. See the “Practical hints” section
for malfunction and warning messages
(
�page 291).
Should any malfunctions occur while driv-
ing, the number of malfunctions will reap-
pear in the right display field when the
SmartKey in the starter switch is turned to
position0 or removed from the starter
switch.
Warning!
G
Malfunction and warning messages are only
indicated for certain systems and are inten-
tionally not very detailed. The malfunction
and warning messages are simply a remind-
er with respect to the operation of certain
systems and do not replace the owner’s
and/or driver’s responsibility to maintain
the vehicle’s operating safety by having all
required maintenance and safety checks
performed on the vehicle and by bringing
the vehicle to an authorized Mercedes-Benz
Center to address the malfunction and
warning messages (
�page 291).
iThe message memory will be cleared
when you switch on the ignition. You
will then only see high priority malfunc-
tions (
�page 291).
Page 138 of 434

137 Controls in detail
Control system
Settings menu
In the
Settings
menu there are two func-
tions:
�
The function
Reset
, with which you can
reset all the settings to those set at the
factory.
�
A collection of submenus with which
you can make individual settings for
your vehicle.
�
Press button è or ÿ repeatedly
until the
Settings...
menu appears in
the left display.The following settings and submenus are
available:Resetting all settings
You can reset all the functions of all sub-
menus to the factory settings.
�
Press the reset button in the instru-
ment cluster for approximately three
seconds.
In the right display you will see the re-
quest to press the reset button again to
confirm.
�
Press the reset button again.
The functions of all the submenus will
reset to factory settings.
Function
Page
Resetting all settings
137
Submenus in the Settings menu
138
Resetting the functions of a sub-
menu
138
Instrument cluster submenu
140
Lighting submenu
142
Vehicle submenu
145
Convenience submenu
148
iThe settings you have changed will not
be reset unless you confirm the action
by pressing the reset button a second
time.
Page 141 of 434

140 Controls in detailControl systemInstrument cluster submenu
Access the
Inst. cluster
menu via the
Settings
menu. Use the
Inst. cluster
submenu to change the instrument cluster
display settings. The following functions
are available:Selecting time display mode
�
Move the selection marker with the
æ or ç button to the
Inst.
cluster
submenu.
�
Press button j or k repeatedly
until you see this message in the left
display:
Clock
.
The selection marker is on the current
setting.
�
Press æ or ç to set the
12-hour
or
24-hour
time display mode.Selecting temperature display mode
�
Move the selection marker with button
æ or ç to the
Inst. cluster
submenu.
�
Press button j or k repeatedly
until you see this message in the left
display:
Temp. indicator
.
The selection marker is on the current
setting.
�
Press æ or ç to set temperature
unit to degrees Celsius (
°C) or degrees
Fahrenheit (
°F).
Function
Page
Select time display mode
140
Select temperature display
mode
140
Select speedometer display
mode
141
Select language
141
iFor information on setting the time, re-
fer to the separate COMAND operating
instructions.
Page 143 of 434

142 Controls in detailControl systemLighting submenu
Access the
Lighting
submenu via the
Settings
menu. Use the
Lighting
sub-
menu to change the lamp and lighting set-
tings on your vehicle. The following
functions are available:Setting daytime running lamp mode
(USA only)
�
Move the selection marker with button
æ or ç to the
Lighting
sub-
menu.
�
Press button j or k repeatedly
until you see this message in the left
display:
Light circuit Headlamp
mode
.
The selection marker is on the current
setting.
�
Press æ or ç to select manual or
daytime running lamp (constant) mode.
This function is not available in coun-
tries where daytime running lamps are
mandatory.With daytime running lamp mode se-
lected and the exterior lamp switch at
positionM, the following lamps will
come on automatically when the en-
gine is turned on:
�
Parking lamps and low beam head-
lamps
�
License plate lamps
Function
Page
Set daytime running lamp mode
(USA only)
142
Set locator lighting
143
Exterior lamps delayed
switch-off
143
Interior lighting delayed
switch-off
145
iIf you turn the exterior lamp switch to
another position, the corresponding
lamp(s) will switch on.
For safety reasons, resetting the Lighting
submenu to factory settings
(
�page 111) will not reset the daytime
running lamp mode.
In the right display you will then see the
message:
Cannot be fully reset to
factory settings while driv.!
.
Page 145 of 434

144 Controls in detailControl systemTo select delayed switch-off period:�
Move the selection marker with button
æ or ç to the
Lighting
sub-
menu.
�
Press button j or k repeatedly
until you see this message in the left
display:
Headlamps delayed
switch-off
.
The selection marker is on the current
setting.
�
Press æ or ç to select the de-
sired lamp-on period.
You can select:�
0 s
, the delayed switch-off feature
is deactivated
�
15 s
, 30 s
, 45 s
or
60 s
, the delayed
switch-off feature is activatedYou can temporarily deactivate the de-
layed switch-off feature:
�
Before leaving the vehicle turn the
SmartKey in the starter switch to
position0.
�
Then turn it to position2 and back
to0.
The delayed switch-off feature is deac-
tivated. It will reactivate as soon as you
reinsert the SmartKey in the starter
switch.
For vehicles with KEYLESS-GO*:
�
Press the KEYLESS-GO start/stop but-
ton on the gear selector (
�page 33).
iYou can reactivate this function within
ten minutes by opening a door.
If you do not open a door after remov-
ing the SmartKey from the starter
switch, the lamps will automatically
switch off after 60 seconds.
Page 146 of 434
145 Controls in detail
Control system
Interior lighting delayed switch-off
Use this function to set whether and for
how long you would like the interior light-
ing to remain lit during darkness after the
SmartKey is removed from the starter
switch. �
Move the selection marker with button
æ or ç to the
Lighting
sub-
menu.
�
Press button j or k repeatedly
until you see this message in the left
display:
Int. lighting delayed
switch-off
.
The selection marker is on the current
setting.
�
Press æ or ç to select the de-
sired lamp-on time period. You can se-
lect:�
0 s
, the delayed switch-off feature
is deactivated
�
5 s
, 10 s
, 15 s
or
20 s
, the delayed
switch-off feature is activatedVehicle submenu
Access the
Vehicle
submenu via the
Set-
tings
menu. Use the
Vehicle
submenu to
make general vehicle settings. The follow-
ing functions are available:
Function
Page
Set station selection mode
(radio)
146
Set automatic locking
146
Tire pressure display*
147
Page 147 of 434
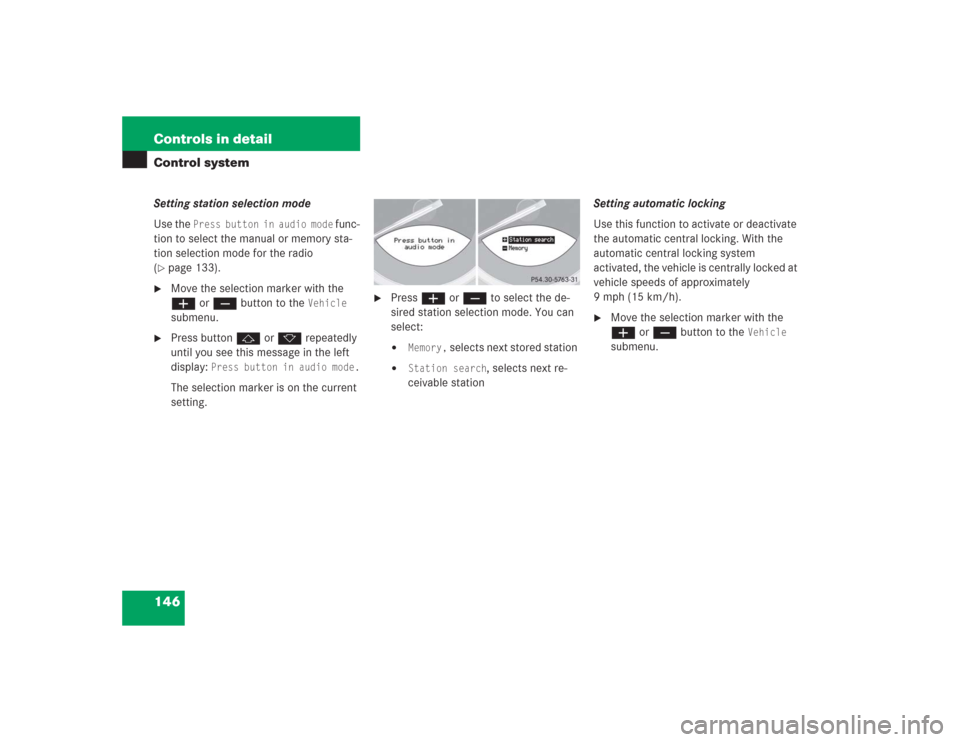
146 Controls in detailControl systemSetting station selection mode
Use the
Press button in audio mode
func-
tion to select the manual or memory sta-
tion selection mode for the radio
(
�page 133).
�
Move the selection marker with the
æ or ç button to the
Vehicle
submenu.
�
Press button j or k repeatedly
until you see this message in the left
display:
Press button in audio mode.
The selection marker is on the current
setting.
�
Press æ or ç to select the de-
sired station selection mode. You can
select:�
Memory,
selects next stored station
�
Station search
, selects next re-
ceivable stationSetting automatic locking
Use this function to activate or deactivate
the automatic central locking. With the
automatic central locking system
activated, the vehicle is centrally locked at
vehicle speeds of approximately
9mph(15km/h).
�
Move the selection marker with the
æ or ç button to the
Vehicle
submenu.