Page 126 of 435
” (
�page 156).Manual headlamp mode
The low beam headlamps and parking")
125 Controls in detail
Lighting
To activate the daytime running lamp
mode, see “Setting daytime running lamp
mode (USA only)” (
�page 156).Manual headlamp mode
The low beam headlamps and parking
lamps can be switched on and off with the
exterior lamp switch. For exterior lamp
switch, see (
�page 124).
Automatic headlamp mode
The parking lamps, low beam headlamps
and license plate lamps switch on and off
automatically depending on the brightness
of the ambient light.
�
Turn the exterior lamp switch to U.
iIf you remove the SmartKey and open
the driver’s door while the parking
lamps or low beam headlamps are
switched on, then:�
a warning sounds
�
$ appears in the multifunction
display.
�
the message
SWITCH OFF LIGHTS!
appears in the multifunction display
iWith the daytime running lamp mode
activated and the engine running, the
low beam headlamps cannot be
switched off manually.
Warning!
G
If the exterior lamp switch is set toU,�
the headlamps may switch off unexpect-
edly when the system senses bright am-
bient light, for example light from
oncoming traffic.
�
the headlamps will not be automatically
switched on under foggy conditions.
To minimize risk to you and to others, acti-
vate headlamps by turning exterior lamp
switch to B when driving or when traffic
and / or ambient lighting conditions require
you to do so.
In low ambient lighting conditions, only
switch from position U to B with the
vehicle at a standstill. Switching from U
to B will briefly switch off the head-
lamps. Doing so while driving in low ambient
lighting conditions may result in an acci-
dent.
The automatic headlamp feature is only an
aid to the driver. The driver is responsible for
the operation of the vehicle's lights at all
times.
Page 130 of 435

129 Controls in detail
Lighting
Switching on the hazard warning
flasher�
Press hazard warning flasher switch.
All turn signals will flash.
Switching off the hazard warning
flasher
�
Press hazard warning flasher switch
again.
Interior lighting
The controls are located in the overhead
control panel.
1Left front reading lamp
2Rear interior lamps
3Right front reading lamp
4Rocker switch for automatic control
systemActivating automatic control
�
Press rocker switch 4 to the center
position.
Interior lamps are switched on in dark-
ness, even when you:�
unlock the vehicle
�
open a door
�
remove the SmartKey from the
starter switch
The interior lamps are switched off after a
present time (
�page 158).
iWith the hazard warning flasher acti-
vated and the combination switch set
for either left or right turn, only the re-
spective left or right turn signals will
operate when the SmartKey in the
starter switch is in position1 or2.iIf the hazard warning flasher was acti-
vated automatically, press switch1
twice.
iIf the door remains open, the interior
lamps switch off automatically after ap-
proximately five minutes, when the
SmartKey is removed or in the switch
position0.
Page 131 of 435

130 Controls in detailLightingDeactivating automatic control�
Press the ñ symbol on rocker
switch 4.
The interior lighting remains switched
off in darkness, even when you:�
unlock the vehicle
�
open a door
�
remove the SmartKey from the
starter switch
Manual control
Switching front interior lamps on and off
�
Press the ð symbol on rocker
switch 4.
The front interior lighting switches on.
�
Press the ñ symbol on rocker
switch 4 again.
The interior lighting switches off. The
automatic control function is activated.Switching rear interior lamps on and off
�
Press switch2 on theò symbol.
The rear compartment lighting is
switched on.
�
Press switch2 on theò symbol
again.
The rear compartment lighting is
switched off.
Switching front reading lamps on and
off
�
Press switch 1 or 3.
The corresponding reading lamp is
switched on.
�
Press switch 1 or 3 again.
The corresponding reading lamp is
switched off.
Courtesy lighting
For better orientation in the dark, courtesy
lamps will illuminate the interior of your ve-
hicle as follows:
With parking lamps switched on:�
the door entry lamps
�
the driver and passenger footwells
With SmartKey in starter switch position1:
�
the door entry lamps
�
the center consoleiIf you turn the SmartKey in the starter
switch to position0 and switch off the
exterior headlamps, the door entry
lamps will remain lit for approximately
five minutes.
Page 135 of 435

134 Controls in detailControl system
�Control systemThe control system is activated as soon as
the SmartKey in the starter switch is
turned to position1 or as soon as the
KEYLESS-GO start/stop button* is in
position1. The control system enables you
to:�
call up information about your vehicle
�
change vehicle settings
For example, you can use the control sys-
tem to find out when your vehicle is next
due for service, to set the language for
messages in the instrument cluster dis-
play, and much more.
The control system relays information to
the multifunction display.
Multifunction display
1Trip odometer
2Main odometer
iThe displays for the audio systems (ra-
dio, CD player) will appear in English,
regardless of the language selected.
Warning!
G
A driver’s attention to the road and traffic
conditions must always be his /her primary
focus when driving.
For your safety and the safety of others, se-
lecting features through the multifunction
steering wheel should only be done by the
driver when traffic and road conditions per-
mit it to be done safely.
Bear in mind that at a speed of just 30 mph
(approximately 50 km/h), your vehicle is
covering a distance of 44 feet (approximate-
ly 14 m) every second.
Page 141 of 435

140 Controls in detailControl systemSelect radio station�
Turn on the radio. Refer to separate
COMAND operating instructions.
�
Press buttonè orÿ repeatedly
until you see the currently tuned sta-
tion in the display.
1Waveband
2Station frequency
�
Press buttonk orj repeatedly
until the desired station is found.Select satellite radio* station
(USA only)
The satellite radio is treated as a radio ap-
plication.
�
Select satellite radio with the corre-
sponding key on the COMAND control
panel (SAT).
�
Press buttonè orÿ repeatedly
until you see the currently tuned sta-
tion in the display.
1SAT mode and preset number
2Channel name or number
�
Press buttonk orj repeatedly
until the desired channel is found.
iYou can only store new stations using
the corresponding feature on the radio.
Refer to separate COMAND operating
instructions.
You can also operate the radio in the
usual manner.
iFeature description is based on prelim-
inary information available at time of
printing.
Additional optional satellite radio
equipment and a subscription to satel-
lite radio service provider are required
for satellite radio operation. At time of
printing, no date for the availability of
optional equipment required for satel-
lite radio operation had been set.
Contact an authorized Mercedes-Benz
Center for details and availability for
your vehicle.
For more information, refer to separate
COMAND operating instructions.
Page 142 of 435
141 Controls in detail
Control system
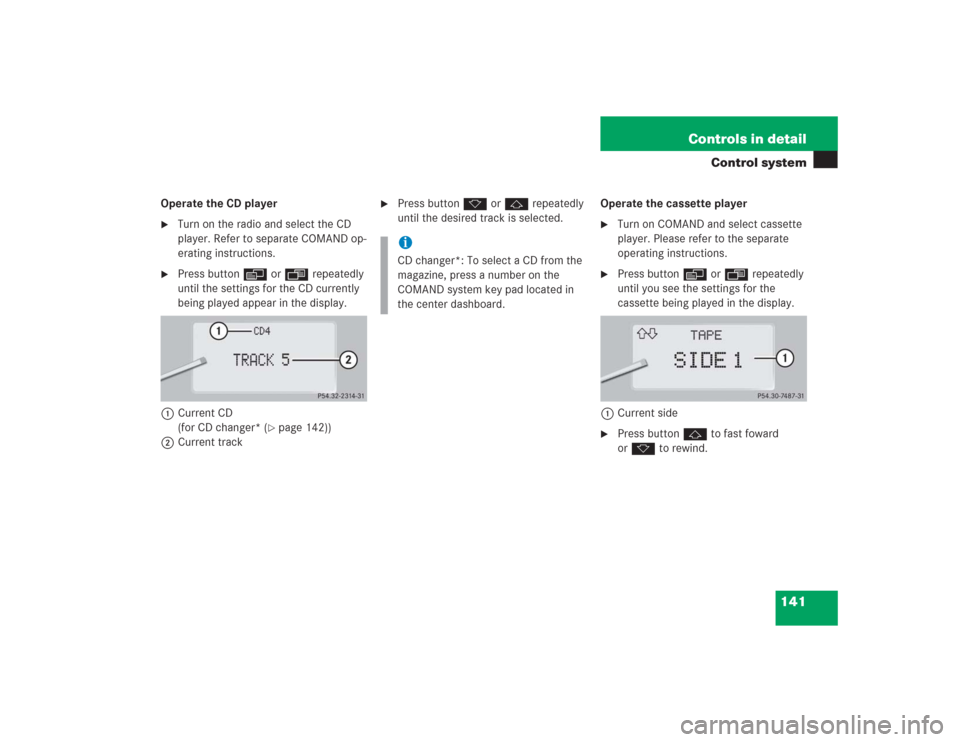
Operate the CD player�
Turn on the radio and select the CD
player. Refer to separate COMAND op-
erating instructions.
�
Press buttonè orÿ repeatedly
until the settings for the CD currently
being played appear in the display.
1Current CD
(for CD changer* (
�page 142))
2Current track
�
Press buttonk orj repeatedly
until the desired track is selected.Operate the cassette player
�
Turn on COMAND and select cassette
player. Please refer to the separate
operating instructions.
�
Press buttonè orÿ repeatedly
until you see the settings for the
cassette being played in the display.
1Current side
�
Press buttonj to fast foward
ork to rewind.
iCD changer*: To select a CD from the
magazine, press a number on the
COMAND system key pad located in
the center dashboard.
Page 144 of 435

143 Controls in detail
Control system
Operational readiness of CD changer
If a CD changer has been installed in the
system, it can be operated from the
COMAND system key pad located in the
center dashboard. A loaded magazine
must be installed for CD playing.Loading/unloading the CD magazine
The CD changer is located behind the cov-
er on the left hand side in the trunk.
�
Remove the CD changer cover.
�
Slide the CD changer door to the right
and press the eject button 3.
�
The magazine is ejected.
1CD
2CD changer
3CD tray
4CD magazine
�
Remove the magazine and completely
pull out the CD tray.
�
Place the CD in the recess of the tray,
label side up.
�
Push the tray into the magazine in the
direction shown by the arrow.
�
Push the magazine into the CD changer
in the direction shown by the arrow and
close the CD changer door.
Warning!
G
The CD changer is a Class 1 laser product.
There is a danger of invisible laser radiation
if the cover is opened or damaged.
Do not remove the cover. The CD changer
does not contain any parts which can be ser-
viced by the user. For safety reasons, have
any service work which may be necessary
performed only by qualified personnel.
iCDs which have been inserted improp-
erly or are unreadable will not be
played.
Page 152 of 435

151 Controls in detail
Control system
�
Press buttonk orj.
The stored messages will now be dis-
played in the order in which the mal-
functions have occurred. See the
“Practical hints” section for malfunc-
tion and warning messages
(�page 312).
Should any malfunctions occur while driv-
ing, the number of malfunctions will reap-
pear in the display when the SmartKey in
the starter switch is turned to position0 or
removed from the starter switch.
Settings menu
In the
SETTINGS
menu there are two func-
tions:
�
The function
RESET WITH R BUTTON FOR
3 SEC.
, with which you can reset all
settings to the original factory settings.
�
A collection of submenus with which
you can make individual settings for
your vehicle.
�
Press buttonè orÿ repeatedly
until the
SETTINGS
menu appears in the
display.Resetting all settings
You can reset all the functions of all sub-
menus to the factory settings.
�
Press the reset button on the instru-
ment cluster (
�page 22) for approxi-
mately three seconds.
In the display you will see the request
to press the reset button again to con-
firm.
�
Press the reset button again.
The functions of all the submenus will
reset to factory settings.
iThe message memory will be cleared
when you turn the SmartKey in the
starter switch to position1 or2. You
will then only see high priority malfunc-
tions (
�page 312).
iThe settings you have changed will not
be reset unless you confirm the action
by pressing the reset button a second
time.
Due to safety reasons, resetting all of
the settings while driving will not reset
all of the values in the
LIGHTING
or the
VEHICLE
menu.