Page 332 of 435

331 Practical hints
What to do if …?
Display symbol
Display message
Possible cause
Possible solution
.
LIGHT SENSOR
DRIVE TO WORKSHOP!
The lamp sensor is malfunctioning. The
headlamps switch on automatically.
�
In the control system, set lamp operation
to manual (
�page 154).
�
Switch on headlamps using the exterior
lamp switch.
�
Visit an authorized Mercedes-Benz Cen-
ter as soon as possible.
LOW BEAM, L
CHECK LAMP!
The left low beam lamp is malfunctioning.
�
Visit an authorized Mercedes-Benz Cen-
ter as soon as possible.
LOW BEAM, R
CHECK LAMP!
The right low beam lamp is malfunction-
ing.
�
Visit an authorized Mercedes-Benz Cen-
ter as soon as possible.
MARKER LIGHT, FL
CHECK LAMP!
The front left side marker lamp is mal-
functioning.
�
Replace the bulb as soon as possible.
MARKER LIGHT, FR
CHECK LAMP!
The front right side marker lamp is mal-
functioning.
�
Replace the bulb as soon as possible.
REAR FOGLAMP
CHECK LAMP!
The rear fog lamp is malfunctioning.
�
Replace the bulb as soon as possible.
REVERSE LIGHT, L
CHECK LAMP!
The left reverse lamp is malfunctioning.
�
Replace the bulb as soon as possible.
REVERSE LIGHT, R
CHECK LAMP!
The right reverse lamp is malfunctioning.
�
Replace the bulb as soon as possible.
Page 354 of 435
353 Practical hints
Replacing bulbs
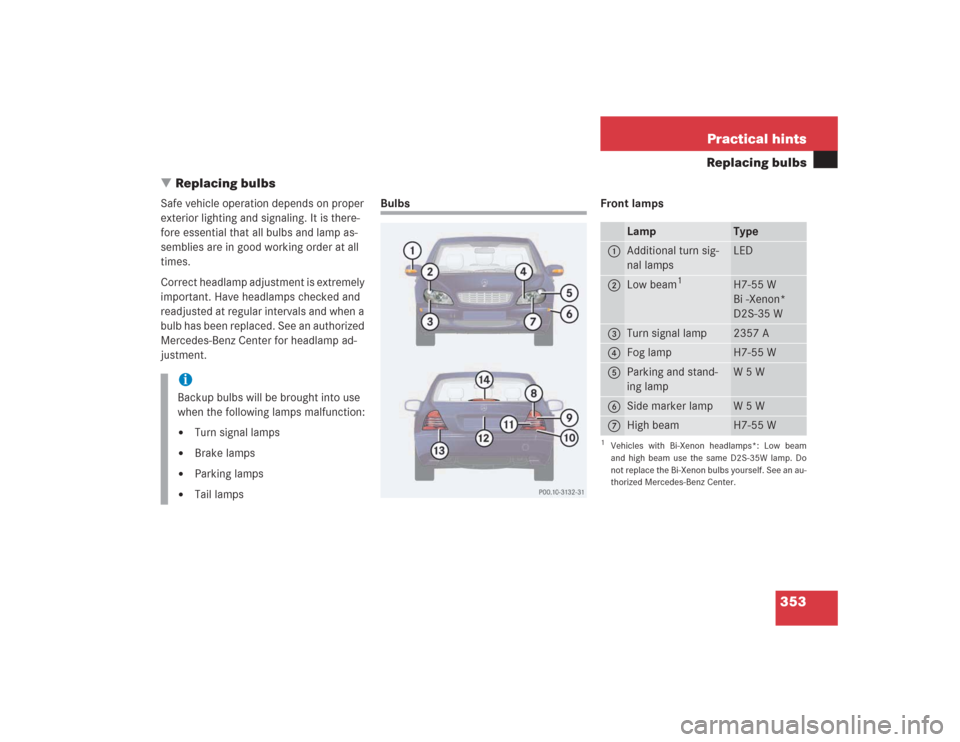
�Replacing bulbs
Safe vehicle operation depends on proper
exterior lighting and signaling. It is there-
fore essential that all bulbs and lamp as-
semblies are in good working order at all
times.
Correct headlamp adjustment is extremely
important. Have headlamps checked and
readjusted at regular intervals and when a
bulb has been replaced. See an authorized
Mercedes-Benz Center for headlamp ad-
justment.
Bulbs Front lamps
iBackup bulbs will be brought into use
when the following lamps malfunction:�
Turn signal lamps
�
Brake lamps
�
Parking lamps
�
Tail lamps
Lamp
Type
1
Additional turn sig-
nal lamps
LED
2
Low beam
1
1Vehicles with Bi-Xenon headlamps*: Low beam
and high beam use the same D2S-35W lamp. Do
not replace the Bi-Xenon bulbs yourself. See an au-
thorized Mercedes-Benz Center.
H7-55 W
Bi -Xenon*
D2S-35 W
3
Turn signal lamp
2357 A
4
Fog lamp
H7-55 W
5
Parking and stand-
ing lamp
W5W
6
Side marker lamp
W5W
7
High beam
H7-55 W
Page 355 of 435

354 Practical hintsReplacing bulbsRear lamps Notes on bulb replacement
�
Only use 12 volt bulbs of the same type
and with the specified watt rating.
�
Switch lights off before changing a bulb
to prevent short circuits.
�
Always use a clean lint-free cloth when
handling bulbs.
�
Your hands should be dry and free of oil
and grease.
�
If the newly installed bulb does not
come on, visit an authorized
Mercedes-Benz Center.
�
Have the LEDs and bulbs for the follow-
ing lamps replaced by an authorized
Mercedes-Benz Center.�
Additional turn signal lamps in the
exterior rear view mirrors
�
High mounted brake lamp
�
Bi-Xenon lamps*
�
Front fog lamps
Lamp
Type
8
Brake lamp
LED
9
Turn signal lamp
PY 21 W
a
Tail and standing
lamp, side marker
P 21/4 W
b
Backup lamp
P21W
c
License plate lamps
C5W
d
Tail lamp, Rear fog
lamp
P 21/4 W
e
High mounted brake
lamp
LED
Warning!
G
Keep bulbs out of reach of children.
Bulbs and bulb sockets can be very hot. Al-
low the lamp to cool down before changing
a bulb.
Halogen lamps contain pressurized gas. A
bulb can explode if you:�
touch or move it when hot
�
drop the bulb
�
scratch the bulb
Wear eye and hand protection.
Because of high voltage in Bi-Xenon lamps,
it is dangerous to replace the bulb or repair
the lamp and its components. We recom-
mend that you have such work done by a
qualified technician.
Page 356 of 435
355 Practical hints
Replacing bulbs
Replacing bulbs for front lamps
1Headlamp cover for fog lamp
2Headlamp cover for high beam halogen
headlamp bulb, parking and standing
lamp
3Headlamp cover for Bi-Xenon* (low and
high beam) or halogen (low beam)
headlamp bulb4Bulb socket for fog lamp
5Bulb socket for parking and standing
lamp
6Electrical connector for high beam
halogen headlamp bulb
7Electrical connector for low beam
headlamp bulb
8Bulb socket for turn signal lampReplacing low beam bulbs
Bi-Xenon* headlamp
Halogen headlamp
�
Switch off the lights.
�
Open the hood (
�page 272).
�
Press the tab on cover3 and remove
cover.
�
Pull connector7 off of the lamp.
�
Release the retaining springs and take
out the bulb.Warning!
G
Do not remove the cover for the Bi-Xenon
headlamp. Because of high voltage in Xenon
lamps, it is dangerous to replace the bulb or
repair the lamp and its components. We rec-
ommend that you have such work done by a
qualified technician.
��
Page 359 of 435
358 Practical hintsReplacing bulbsReplacing bulbs for rear lamps
Tail lamp assemblies
1Turn signal lamp (white socket)
2Tail, parking, standing, and side marker
lamp (red socket)
3Tail lamp, rear fog lamp (red socket)
4Backup lamp (black socket)
�
Switch off the lights.
�
Open trunk.
�
Turn the catch, and move the trim to
the side.
�
Turn bulb socket counterclockwise and
pull out.
�
Gently twist bulb counterclockwise and
pull out of bulb holder.
�
Insert new bulb into the holder and turn
it clockwise.
�
Reinstall bulb socket.
The bulb socket should audibly click.
�
Replace trim and secure with lock. License plate lamp
1Screws
�
Switch off the lights.
�
Loosen both screws1 and remove
lamp.
�
Replace the tubular lamp and reinstall
it.
�
Retighten the screws.
Page 420 of 435

419 Index
CHECK ENGINE 306
Coolant 322
DTR* 208
Engine diagnostics 306
ESP 307, 308
Fuel reserve 308
Instrument cluster 308
Seat belts 308
Service indicator 294
SRS 59
Language
Multifunction display 155
Setting 155
LATCH child seat anchors 73
Layout of poly-V-belt drive 381
Leather upholstery
Cleaning 302
Lever
For cruise control 210
License plate lamps
Replacing bulbs 354, 358
Light alloy wheels
Cleaning 301
Light sensor 331Lighter see Cigarette lighter 239
Lighting 124
Automatic headlamp mode 125
Combination switch 128
Daytime running lamp mode 126
Exterior lamp switch 124
Front fog lamps 127
High beam flasher 128
High beams 128
Instrument cluster illumination 131
Interior 129
Locator lighting 126
Low beam 124
Manual headlamp mode 125
Night security illumination 126
Parking lamps 124
Rear fog lamp 127
Settings (control system) 155
Limiting the gear range 166
Limp Home Mode 173
Loading 229
Cargo tie-down hooks 230
Instructions 229
Roof rack 229Locator lighting 126
Setting 156
Lock button 403
Lock buttons
Door handle (KEYLESS-GO*) 55
Locking 51, 88
Fuel filler flap 269
Global (SmartKey with
KEYLESS-GO*) 94
Global, SmartKey 89
Glove box 231
The vehicle with KEYLESS-GO* 95
Trunk lid, separately 105
Vehicle in an emergency 349
Loss of SmartKey 91
Loss of Smartkey with KEYLESS-GO* 96
Low beam headlamps
Messages in display 330, 331
Replacing bulbs 353
Lowering
Vehicle 365
Lumbar support adjustment 112


2Tail, parking, standing, and side marker
lamp (red socket)
3Tail lamp, rear fog")