Page 202 of 435
 will also
be opened or closed when you operate the
sliding/po")
201 Controls in detail
Sliding/pop-up roof
Opening and closing the
sliding/pop-up roof with the SmartKey
The power windows (
�page 195) will also
be opened or closed when you operate the
sliding/pop-up roof with the SmartKey.
�
Aim transmitter eye at the driver’s door
handle.Opening (Summer opening feature)
If the weather is warm, you can ventilate
the vehicle before driving off by simulta-
neously:
�
opening the sliding/pop-up roof
�
opening the side windows
�
turning on the seat ventilation* for the
driver’s seat
To do so, follow the instructions below:
�
Press and hold button Πafter un-
locking the vehicle.
The windows and sliding/pop-up roof
begin to open after approximately one
second.
�
Release the Πbutton to stop proce-
dure.Closing (Convenience feature)
�
Press and hold button ‹ after lock-
ing the vehicle.
The windows and sliding/pop-up roof
begin to close after approximately one
second.
�
Release the ‹ button to stop proce-
dure.
Make sure all the side windows and the
sliding/pop-up roof are properly closed
before leaving the vehicle.
Warning!
G
Never operate the windows or
sliding/pop-up roof if there is the possibility
of anyone being harmed by the opening or
closing procedure.
In the event that the procedure causes po-
tential danger, the procedure can be imme-
diately halted by releasing the remote
control button. To reverse direction of
movement, press Œ for opening or ‹
for closing.
Page 203 of 435

The power window (
�page 195) will also
be closed when the sliding/pop-up roof is
ope")
202 Controls in detailSliding/pop-up roofClosing the sliding/pop-up roof with
KEYLESS-GO* (Convenience feature)
The power window (
�page 195) will also
be closed when the sliding/pop-up roof is
operated with KEYLESS-GO.
�
Press and hold lock button at door
(�page 55) until the sliding/pop-up
roof and the side windows are closed.
Synchronizing the sliding / pop-up roof
The power sliding/pop-up roof must be re-
synchronized each time after:�
the battery has been disconnected
�
the sliding/pop-up roof has been
closed manually
�
the sliding/pop-up roof does not open
smoothly
�
a malfunction
Synchronizing
�
Switch on ignition.
�
Press and hold the switch in
direction1 until the sliding/pop-up
roof is fully raised at the rear.
Hold the switch for approximately one
second.
The sliding/pop-up roof is synchro-
nized.
Warning!
G
When closing the windows and the
sliding/pop-up roof, make sure that there is
no danger of anyone being harmed by the
closing procedure.
The sliding/pop-up roof will not automati-
cally reopen if blocked during convenience
closing.
If potential danger exists, proceed as fol-
lows:�
Release the lock button.
�
Pull on the door handle and hold firmly.
The side windows and the
sliding/pop-up roof will open for as long
as the door handle is held but the door
is not opened.
Page 219 of 435

218 Controls in detailDriving systemsAIRMATIC
AIRMATIC automatically selects the opti-
mum suspension tuning and ride height for
your vehicle. AIRMATIC consists of two
components:�
Adaptive Damping System (ADS)
�
Level control system
The ADS automatically selects the opti-
mum damping for the respective driving
conditions. At the same time the suspen-
sion is set to either sporty or regular.Suspension tuning
The suspension tuning is set according to:
�
Your driving style
�
Road surface conditions
�
Your choice of suspension style,
“sport” or “convenience”, which you
select using the damping switch.
The following suspension styles are avail-
able:
�
Convenience
Both indicator lamps1 are off.
�
Sports 1
One indicator lamp1 is on.
�
Sports 2
Both indicator lamps1 are on.1Indicator lamps
2Damping switch
�
Start the engine.
�
Press the damping switch2 until the
desired suspension style is set.iThe selected suspension style is stored
in memory, even after the SmartKey is
removed from the starter switch.
Page 221 of 435

220 Controls in detailDriving systems
The indicator lamp is then lit. The dis-
play switches off when the vehicle is
raised.
�
Press switch2 again to lower the ve-
hicle. The indicator lamp is off.
The selected vehicle level setting remains
stored in memory even if the engine is
turned off and restarted except when you
�
exceed a speed of 75 mph (120 km/h)
or
�
maintain a speed of between 50 mph
(80 km/h) and 75 mph (120 km/h) for
more than 5 minutes
The vehicle then lowers to regular level.
The message:
AIRMATIC
LEV. SELECT. CANCELED!appears in the multifunction display and
the indicator lamp is off. The display
switches off when the vehicle is raised.
Active Body Control (ABC)*
The ABC system automatically selects the
optimum suspension tuning and ride
height for your vehicle.
Suspension tuning
The suspension tuning is set according to:�
Your driving style
�
Road surface conditions
�
The vehicle loading
�
Your choice of suspension style,
“sporty” or “regular”, which you select
using the ABC button
The selected suspension style is stored
in memory, even after the SmartKey is
removed from the starter switch.The ABC switch with the indicator lamps is
located in the upper part of the center con-
sole.
1Indicator lamp
2ABC switch
�
Start the engine.
��
Page 232 of 435
231 Controls in detail
Useful features
�Useful features
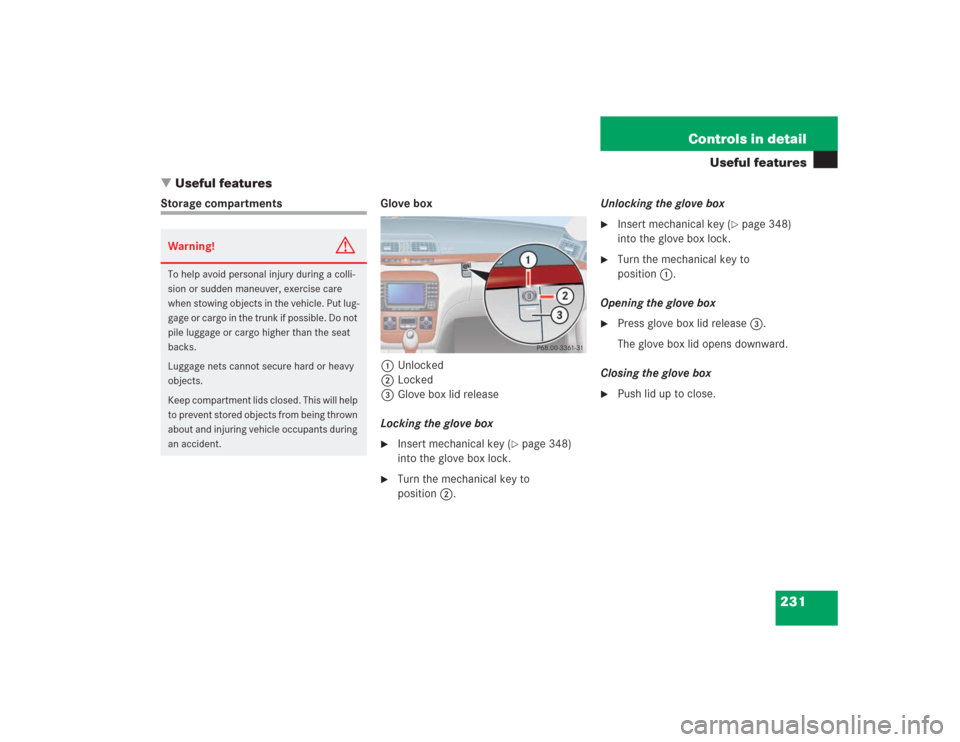
Storage compartments Glove box
1Unlocked
2Locked
3Glove box lid release
Locking the glove box
�
Insert mechanical key (
�page 348)
into the glove box lock.
�
Turn the mechanical key to
position2.Unlocking the glove box
�
Insert mechanical key (
�page 348)
into the glove box lock.
�
Turn the mechanical key to
position1.
Opening the glove box
�
Press glove box lid release3.
The glove box lid opens downward.
Closing the glove box
�
Push lid up to close.
Warning!
G
To help avoid personal injury during a colli-
sion or sudden maneuver, exercise care
when stowing objects in the vehicle. Put lug-
gage or cargo in the trunk if possible. Do not
pile luggage or cargo higher than the seat
backs.
Luggage nets cannot secure hard or heavy
objects.
Keep compartment lids closed. This will help
to prevent stored objects from being thrown
about and injuring vehicle occupants during
an accident.
Page 240 of 435

239 Controls in detail
Useful features
Rear door ashtray
Opening ashtray�
Lightly touch the back of the ashtray.
Removing ashtray insert
�
Pull the ashtray back slightly and re-
move the insert (see arrows).
Reinstalling the ashtray insert
�
Position the insert and press down
while sliding forward.
Cigarette lighters
1Center console cigarette lighter�
Make sure the ignition is switched on.
All the lamps in the instrument cluster
should come on.
�
Push in cigarette lighter1.
The lighter will pop out automatically
when hot.
Warning!
G
Never touch the heating element or sides of
the lighter; they are extremely hot. Hold the
knob only.
When leaving the vehicle, always remove the
SmartKey from the starter switch, take the
SmartKey with KEYLESS-GO* with you and
lock your vehicle. Do not leave children un-
attended in the vehicle, or with access to an
unlocked vehicle. Unsupervised use of vehi-
cle equipment may cause an accident
and/or serious personal injury.iThe lighter socket can be used to ac-
commodate electrical accessories up
to a maximum 85 W.
Page 241 of 435

240 Controls in detailUseful features1Rear door lighters�
Make sure the ignition is switched on.
All the lamps in the instrument cluster
should come on.
�
Lightly touch the back of the ashtray to
open it (
�page 239).
�
Push in cigarette lighter1.
The lighter will pop out automatically
when hot.
Heated steering wheel*
The steering wheel heating warms up the
leather area of the steering wheel.
The stalk with the heated steering wheel
swith is on the lower left-hand side of the
steering wheel.
1Switching on
2Indicator lamp
3Switching off
iOperation of the rear door lighters is
only possible, if the override switch
(�page 74) is deactivated.
Warning!
G
Never touch the heating element or sides of
the lighter; they are extremely hot. Hold the
knob only.
To avoid possible injury to children sitting in
the rear seat, deactivate the operation of
the rear door windows, see (
�page 74). De-
activation of the rear windows also deacti-
vates the lighters.
When leaving the vehicle, always remove the
SmartKey from the starter switch, take the
SmartKey with KEYLESS-GO* with you and
lock your vehicle. Do not leave children un-
attended in the vehicle, or with access to an
unlocked vehicle. Unsupervised use of vehi-
cle equipment may cause an accident
and/or serious personal injury.
Page 243 of 435

242 Controls in detailUseful featuresYou can take and place telephone calls us-
ing thes andt buttons on the
steering wheel. To carry out other tele-
phone functions, use the control system
(�page 134).
See separate operating manual for instruc-
tions on how to use the telephone.
Tele Aid The Tele Aid system
(Tele
matic A
larm I
dentification on D
e-
mand)
The Tele Aid system consists of three
types of response:
�
automatic and manual emergency
�
roadside assistance, and
�
information
The Tele Aid system is operational provid-
ing that the vehicle’s battery is charged,
properly connected, not damaged and cel-
lular and GPS coverage is available.
The speaker volume of a Tele Aid call can
be adjusted when using the volume control
on the multifunction steering wheel. To
raise, press buttonæ and to lower,
press buttonç.
�
To activate, press the SOS button, the
Roadside Assistance button• or
the Information button¡, depend-
ing on the type of response required.
Bear in mind that at a speed of just 30 mph
(approximately 50 km / h), your vehicle is
covering a distance of 44 feet (approximate-
ly 14 m) every second.
!The initial activation of the Tele Aid sys-
tem may only be performed by com-
pleting the subscriber agreement and
placing an acquaintance call using the
SOS button. Failure to complete either
of these steps will result in a system
that is not activated. If the system is
not activated, the indicator lamp in the
SOS button stays on after turning the
SmartKey in starter switch to
position2, or pressing the
KEYLESS-GO* start/stop button twice
to position2 . The message
TELE AID –
NOT ACTIVATED
will be shown in the
multifunction display for approximately
ten seconds.
If you have any questions regarding ac-
tivation, please call the Response Cen-
ter at 1-800-756-9018 (in the USA) or
1-888-923-8367 (in Canada).
��