Page 239 of 435
.
1Hook�
Hang th")
238 Controls in detailUseful featuresParcel net in trunk
You can hang a parcel net in the trunk. The
hooks and the parcel net in the trunk can
hold a load of up to 29.8 lbs (13.5 kg).
1Hook�
Hang the parcel net on hooks1 on the
left and right sides of the trunk.
Ashtrays
Center console ashtray
1Cover plate
2Button for disengaging ashtray
Opening ashtray�
Briefly touch cover plate1.
The ashtray opens automatically.Removing ashtray insert
�
Secure vehicle from movement by set-
ting the parking brake. Move the gear
selector lever to positionN.
Now you have more room to take out
the insert.
�
Push sliding button2 to the right.
The ashtray is disengaged and slides
out a short way.
�
Remove insert from ashtray frame.
Reinstalling the ashtray insert
�
Install insert by pushing it back into the
frame until it engages.
!The parcel net cannot protect or suffi-
ciently secure goods in the event of an
accident.
Warning!
G
Remove front ashtray only with vehicle
standing still. Set the parking brake to se-
cure vehicle from movement. Move gear se-
lector lever to positionN. With gear selector
lever in positionN turn off the engine.
Page 251 of 435

250 Controls in detailUseful featuresThe Response Center will then unlock your
vehicle with the remote door unlocking
feature.Stolen vehicle tracking services
In the event your vehicle was stolen:
�
Report the incident to the police.
The police will issue a numbered inci-
dent report.
�
Pass this number on to the
Mercedes-Benz Response Center along
with your password issued to you when
you subscribed to the service.
The Response Center will then attempt
to covertly contact the vehicle’s
Tele Aid system. Once the vehicle is lo-
cated, the Response Center will con-
tact the local law enforcement and you.
The vehicle’s location will only be pro-
vided to law enforcement.
Garage door opener
The built-in remote control is capable of
operating up to three separately controlled
devices, for example garage door openers,
gate openers, or other devices compatible
with HomeLink
® or some other systems.
You can program the signal transmitter
buttons.
iThe remote door unlock feature is avail-
able if the relevant cellular phone net-
work is available.
The SOS button will flash and the mes-
sage
EMERGENCY CALL –
CALL CONNECTED
will appear in the mul-
tifunction display to indicate receipt of
the door unlock command.
Once the vehicle is unlocked, a Re-
sponse Center specialist will attempt
to establish voice contact with the ve-
hicle occupants.
If the trunk lid button was pressed for
more than 20 seconds before door un-
lock authorization was received by the
Response Center, you must wait
15 minutes before pressing the trunk
lid button again.
Page 335 of 435

334 Practical hintsWhat to do if …?Display symbol
Display message
Possible cause
Possible solution
L
TELE AID
DRIVE TO WORKSHOP!
One or more main functions of the Tele
Aid system are malfunctioning.
�
Have the Tele Aid system checked by an
authorized Mercedes-Benz Center.
TELE AID BATTERY
DRIVE TO WORKSHOP!
The emergency power battery for the Tele
Aid system is malfunctioning. If the vehi-
cle battery is also discharged, Tele Aid
will not be operational.
�
Have the Tele Aid system checked by an
authorized Mercedes-Benz Center.
t
FUNCTION
NOT AVAILABLE!
This display appears if button t or
s on the multifunction steering wheel
is pressed and the vehicle is not equipped
with a telephone.
Ê
TRUNK OPEN!
This message will appear whenever the
trunk lid is open.
�
Close the trunk lid.
W
WASHER FLUID
CHECK LEVEL!
The fluid level has dropped to about
1/3
of total reservoir capacity.�
Add washer fluid (
�page 281).
Warning!
G
Do not spill antifreeze on hot engine parts.
Antifreeze contains ethylene glycol which
may burn if it comes into contact with hot
engine parts. You could be seriously burned.
Page 349 of 435
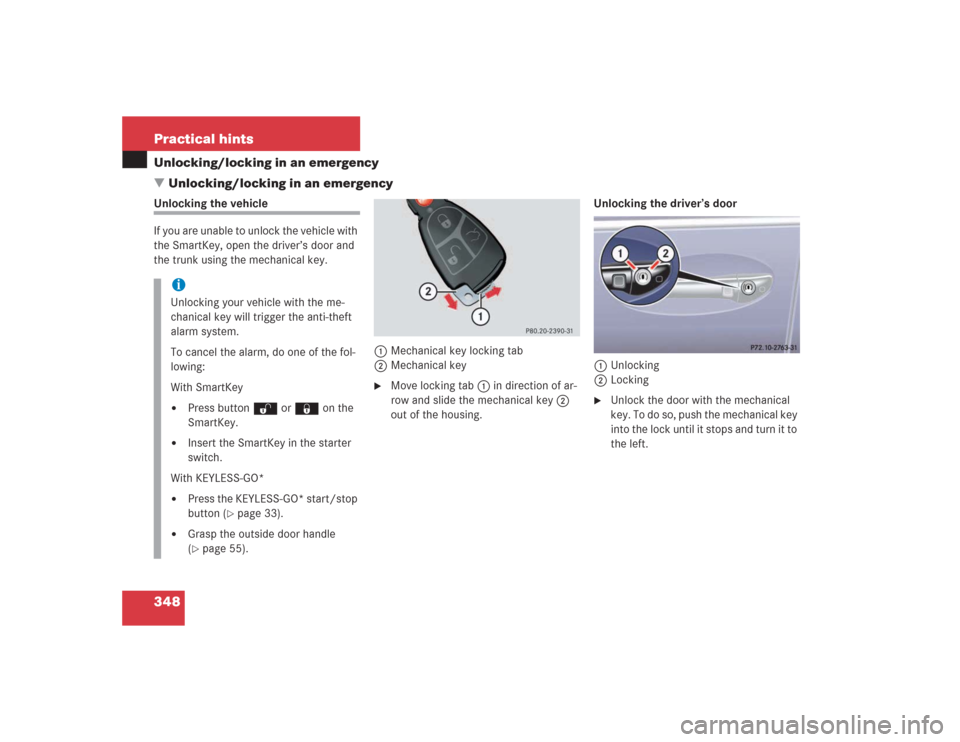
348 Practical hintsUnlocking/locking in an emergency
�Unlocking/locking in an emergencyUnlocking the vehicle
If you are unable to unlock the vehicle with
the SmartKey, open the driver’s door and
the trunk using the mechanical key.
1Mechanical key locking tab
2Mechanical key
�
Move locking tab1 in direction of ar-
row and slide the mechanical key2
out of the housing.Unlocking the driver’s door
1Unlocking
2Locking
�
Unlock the door with the mechanical
key. To do so, push the mechanical key
into the lock until it stops and turn it to
the left.
iUnlocking your vehicle with the me-
chanical key will trigger the anti-theft
alarm system.
To cancel the alarm, do one of the fol-
lowing:
With SmartKey�
Press button Œ or ‹ on the
SmartKey.
�
Insert the SmartKey in the starter
switch.
With KEYLESS-GO*
�
Press the KEYLESS-GO* start/stop
button (
�page 33).
�
Grasp the outside door handle
(�page 55).
Page 350 of 435
 is required to open the trunk lid.
If you are unable to unlock the trunk with")
349 Practical hints
Unlocking/locking in an emergency
Unlocking the trunk
A minimum height clearance of 6 ft.
(1.85 m) is required to open the trunk lid.
If you are unable to unlock the trunk with
the SmartKey or KEYLESS-GO*, open the
trunk with the mechanical key.
The trunk lid lock is located above the rear
license plate recess.
1Unlocking and opening�
Insert the mechanical key into the
trunk lid lock.
�
Turn the mechanical key counterclock-
wise to position1.
The trunk unlocks and opens.
Locking the vehicle
If you are unable to lock the vehicle with
the SmartKey or the SmartKey with
KEYLESS-GO*, lock it with the mechanical
key as follows:�
Close the passenger doors and the
trunk lid.
�
Press the central locking switch in the
center console (
�page 107).
�
Check to see whether the locking knob
on the passenger door is still visible. If
necessary push it down manually.
�
Slide mechanical key2 out of the
SmartKey (
�page 348).
�
Lock the driver’s door with the me-
chanical key (
�page 348).
�
Lock the trunk lid if necessary with the
mechanical key (if applicable)
(�page 105).
Replacing batteries in the SmartKey/
SmartKey with KEYLESS-GO*
If the batteries in the SmartKey or the
SmartKey with KEYLESS-GO* are dis-
charged, the vehicle can no longer be
locked or unlocked. It is recommended to
have the batteries replaced at an autho-
rized Mercedes-Benz Center.
!The trunk lid swings open upwards au-
tomatically. Always make sure that
there is sufficient overhead clearance.
Warning!
G
Keep the batteries out of reach of children.
If a battery is swallowed, seek medical help
immediately.
Page 352 of 435

351 Practical hints
Unlocking/locking in an emergency
SmartKey with KEYLESS-GO*
1Battery
2Tilt battery up
3Mechanical keyReplacement battery: Lithium, type
CR 2025 or equivalent.
�
Remove mechanical key (
�page 348).
�
Insert the mechanical key in side open-
ing and push gray slide.
The battery compartment is unlatched.
�
Pull the battery compartment out of the
SmartKey housing.
�
Using mechanical key3, apply pres-
sure to position2.
Battery1 tilts up slightly.
�
Pull out battery1 in direction of ar-
row.
�
Using a lint-free cloth, insert new bat-
tery with the plus (+) side facing up.
�
Return battery compartment into hous-
ing until it locks into place.
Fuel filler flap
In case the central locking system does
not release the fuel filler flap, you can it
manually.
1Release knob�
Open the trunk.
�
Remove the trim inside the trunk on the
right-hand side.
�
Pull release knob1 in the direction of
arrow.
The fuel filler flap can be opened.
iThe required replacement battery is
available at any authorized
Mercedes-Benz Center.
Page 359 of 435
358 Practical hintsReplacing bulbsReplacing bulbs for rear lamps
Tail lamp assemblies
1Turn signal lamp (white socket)
2Tail, parking, standing, and side marker
lamp (red socket)
3Tail lamp, rear fog lamp (red socket)
4Backup lamp (black socket)
�
Switch off the lights.
�
Open trunk.
�
Turn the catch, and move the trim to
the side.
�
Turn bulb socket counterclockwise and
pull out.
�
Gently twist bulb counterclockwise and
pull out of bulb holder.
�
Insert new bulb into the holder and turn
it clockwise.
�
Reinstall bulb socket.
The bulb socket should audibly click.
�
Replace trim and secure with lock. License plate lamp
1Screws
�
Switch off the lights.
�
Loosen both screws1 and remove
lamp.
�
Replace the tubular lamp and reinstall
it.
�
Retighten the screws.
Page 363 of 435
.
Lifting the vehicle
�
Prevent the")
362 Practical hintsFlat tirePreparing the vehicle�
Take vehicle tool kit tray and vehicle
jack out of trunk .
�
Take the spare wheel out of wheel well
(�page 344).
Lifting the vehicle
�
Prevent the vehicle from rolling away
by blocking wheels with wheel chocks
(not included) or other sizable objects.
When changing wheel on a level surface:
�
Place one chock in front of and one be-
hind the wheel that is diagonally oppo-
site to the wheel being changed.
When changing wheel on a hill:
�
Place chocks behind the downhill sides
of both wheels of the axle not being
worked on.
�
Take the two-piece wheel wrench out
of the vehicle tool kit tray. Assemble
wheel wrench.
�
On wheel to be changed, loosen but do
not yet remove the wheel bolts (ap-
proximately one full turn with wrench).
The tube openings are located directly be-
hind the front wheel housings and in front
of the rear wheel housings.
Warning!
G
The jack is designed exclusively for jacking
up the vehicle at the jack tubes built both
sides of the vehicle. To help avoid personal
injury, use the jack only to lift the vehicle
during a wheel change. Never get beneath
the vehicle while it is supported by the jack.
Keep hands and feet away from the area un-
der the lifted vehicle. Always firmly set park-
ing brake and block wheels before raising
vehicle with jack.
Do not disengage parking brake while the
vehicle is raised. Be certain that the jack is
always vertical (plumb line) when in use, es-
pecially on hills. Always try to use the jack
on level surface. Make sure the jack arm is
fully inserted in the jack tube. Always lower
the vehicle onto sufficient capacity jack-
stands before working under the vehicle.

2Tail, parking, standing, and side marker
lamp (red socket)
3Tail lamp, rear fog")