Page 111 of 344

111 Controls in detail
Lighting
Fog lamps
The switch is located on the upper center
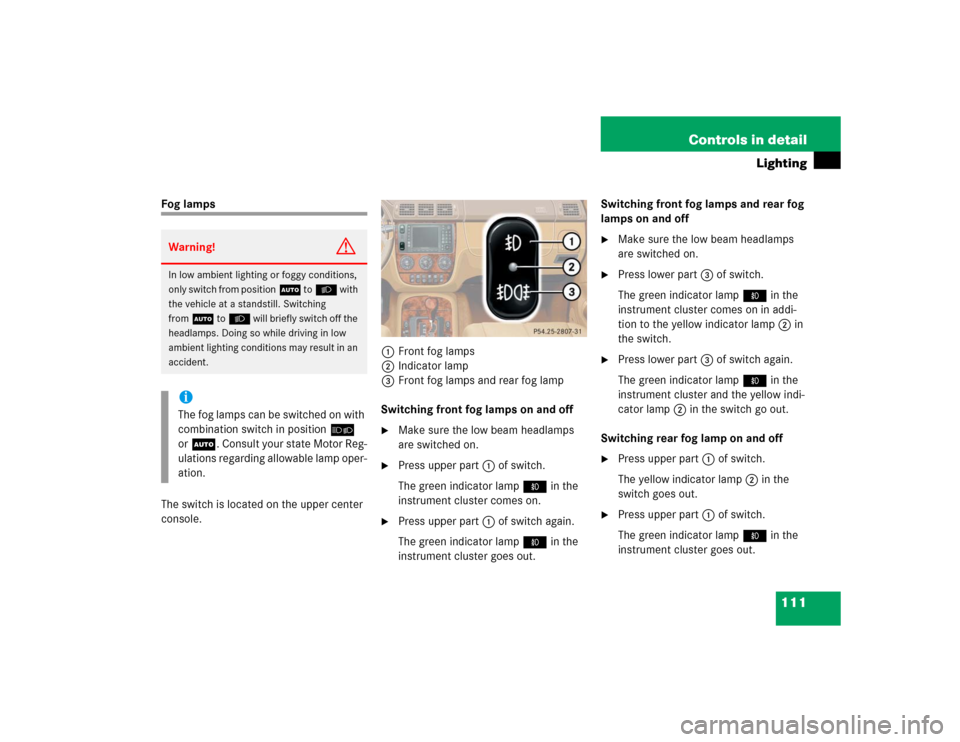
console.1Front fog lamps
2Indicator lamp
3Front fog lamps and rear fog lamp
Switching front fog lamps on and off
�
Make sure the low beam headlamps
are switched on.
�
Press upper part1 of switch.
The green indicator lamp‡ in the
instrument cluster comes on.
�
Press upper part1 of switch again.
The green indicator lamp‡ in the
instrument cluster goes out.Switching front fog lamps and rear fog
lamps on and off
�
Make sure the low beam headlamps
are switched on.
�
Press lower part3 of switch.
The green indicator lamp‡ in the
instrument cluster comes on in addi-
tion to the yellow indicator lamp2 in
the switch.
�
Press lower part3 of switch again.
The green indicator lamp‡ in the
instrument cluster and the yellow indi-
cator lamp2 in the switch go out.
Switching rear fog lamp on and off
�
Press upper part1 of switch.
The yellow indicator lamp2 in the
switch goes out.
�
Press upper part1 of switch.
The green indicator lamp‡ in the
instrument cluster goes out.
Warning!
G
In low ambient lighting or foggy conditions,
only switch from positionU toB with
the vehicle at a standstill. Switching
fromU toB will briefly switch off the
headlamps. Doing so while driving in low
ambient lighting conditions may result in an
accident.iThe fog lamps can be switched on with
combination switch in positionõ
orU. Consult your state Motor Reg-
ulations regarding allowable lamp oper-
ation.
Page 112 of 344
112 Controls in detailLightingHazard warning flasher
The hazard warning flasher can be activa-
ted with the ignition switched on or off. It
is activated automatically when an airbag
is deployed.
The switch is located on top of the steering
column.Hazard warning flasher switch
Switching on hazard warning flasher�
Press the hazard warning flasher
switch.
All the turn signals will flash.
Switching off hazard warning flasher
�
Press hazard warning flasher switch
again.
Interior lighting
The controls are located in the overhead
control panel.
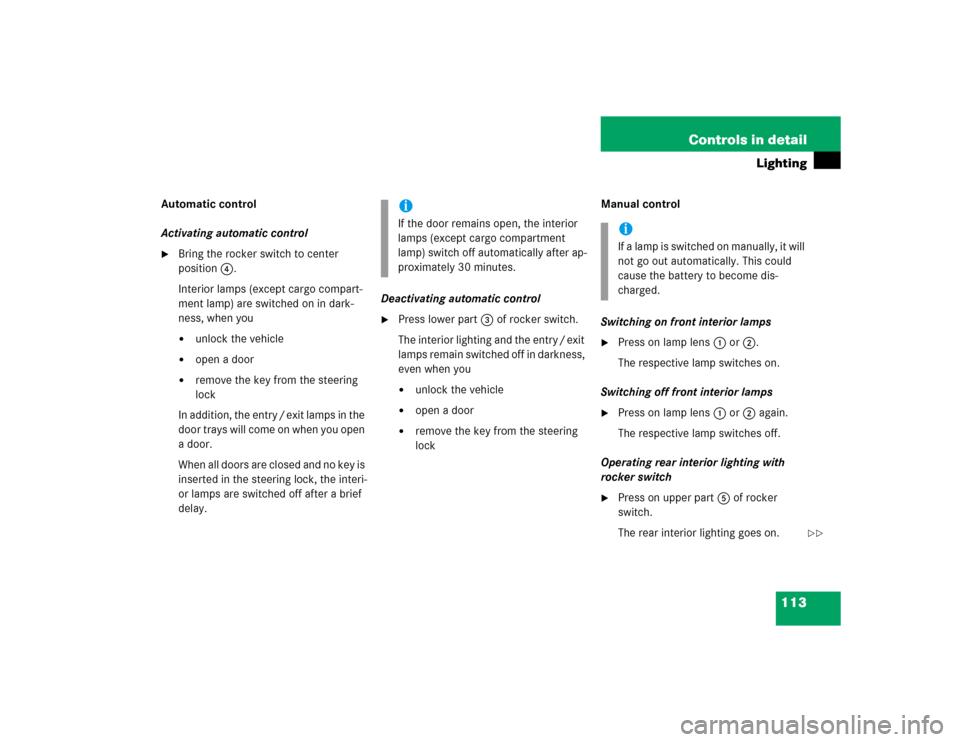
1Left front interior lamp lens
2Right front interior lamp lens
3Automatic function off
4Automatic function on
5Rear interior lighting
iIf the hazard warning flasher was acti-
vated automatically, press the hazard
warning flasher switch twice to deacti-
vate.
Page 113 of 344

113 Controls in detail
Lighting
Automatic control
Activating automatic control�
Bring the rocker switch to center
position4.
Interior lamps (except cargo compart-
ment lamp) are switched on in dark-
ness, when you�
unlock the vehicle
�
open a door
�
remove the key from the steering
lock
In addition, the entry / exit lamps in the
door trays will come on when you open
a door.
When all doors are closed and no key is
inserted in the steering lock, the interi-
or lamps are switched off after a brief
delay.Deactivating automatic control
�
Press lower part3 of rocker switch.
The interior lighting and the entry / exit
lamps remain switched off in darkness,
even when you�
unlock the vehicle
�
open a door
�
remove the key from the steering
lockManual control
Switching on front interior lamps
�
Press on lamp lens1 or2.
The respective lamp switches on.
Switching off front interior lamps
�
Press on lamp lens1 or2 again.
The respective lamp switches off.
Operating rear interior lighting with
rocker switch
�
Press on upper part5 of rocker
switch.
The rear interior lighting goes on.
iIf the door remains open, the interior
lamps (except cargo compartment
lamp) switch off automatically after ap-
proximately 30 minutes.
iIf a lamp is switched on manually, it will
not go out automatically. This could
cause the battery to become dis-
charged.
��
Page 114 of 344
114 Controls in detailLighting�
Press on upper part5 of rocker
switch again.
The rear interior lighting goes off.
If the switch is pressed while the rear
interior lighting is on, the function is re-
versed.
Operating rear interior lighting with
lamp lens
Rear interior lighting�
Push on lamp lens (arrow) to switch
rear interior lighting on or off.Reading lamps in inside rear view
mirror
1Reading lamps
2Reading lamps on / off
Switching reading lamp on and off
�
Press button2.
The lamp switches on.
�
Press button2 again.
The lamp switches off.Cargo compartment lamp
1Switched off
2Switched on continuously
3Automatic control
Switching off cargo compartment lamp
�
Slide the switch to position1.
The cargo compartment lamp is
switched off, even when the liftgate is
opened.
��
Page 115 of 344
115 Controls in detail
Lighting
Switching on continuous cargo
compartment lamp�
Slide the switch to position2.
The cargo compartment lamp is
switched on continuously.Automatic control
�
Slide the switch to position3.
The cargo compartment lamp is
switched on and off by opening or clos-
ing the liftgate.
iTo prevent the vehicle battery from be-
ing discharged, make sure the switch is
not in position2 when leaving the ve-
hicle.
Page 124 of 344

124 Controls in detailAutomatic transmissionTowing a trailer
If you tow a trailer, note the following
points:�
Manually shift to a lower gear range
(4,3, 2, 1), if the transmission hunts
between gears on inclines
(�page 121).
A lower gear range and reduction of
speed reduces the change to overload
or overheat the engine.
�
At very steep inclines switch transfer
case to LOW RANGE mode
(�page 125).
For more information on trailer towing, see
the “Operation” section (
�page 206).Emergency operation (Limp Home
Mode)
If vehicle acceleration worsens or the
transmission no longer shifts, the trans-
mission is most likely operating in limp
home (emergency operation) mode. In this
mode only second gear and reverse gear
can be activated.�
Stop the vehicle.
�
Move gear selector lever to positionP.
�
Turn off the engine.
�
Wait at least ten seconds before
restarting.
�
Restart the engine.
�
Move selector lever to positionD
(for second gear) orR.
�
Have the transmission checked at an
authorized Mercedes-Benz Light Truck
Center as soon as possible.
Page 126 of 344

126 Controls in detailGood visibility
�Good visibilityInformation on the windshield wipers
(�page 49) and for setting the rear view
mirrors (
�page 40) is found in the
“Getting started” section.
Rear view mirror
Interior rear view mirror, antiglare
position
1Lever�
Tilt the mirror to the antiglare night po-
sition by moving lever1 towards the
windshield.
The interior rear view mirror is dimmed.Automatic antiglare rear view mirror*
The reflection brightness of the exterior
rear view mirror on the driver’s side and
the interior rear view mirror will respond
automatically to glare when:
�
the automatic antiglare function is acti-
vated (
�page 127)
�
the ignition is switched on
�
incoming light from headlamps falls on
the sensor in the interior rear view
mirror
The rear view mirror will not react if
�
reverse gear is engaged
�
the interior light is turned on
Warning!
G
The automatic antiglare function does not
react if incoming light is not aimed directly
at sensors in the inside rear view mirror.
The interior rear view mirror and the exterior
rear view mirror on the driver’s side do not
react, for example, if the cargo area is fully
loaded.
Glare can endanger you and others.Warning!
G
In the case of an accident, liquid electrolyte
may escape the mirror housing if the mirror
glass breaks.
Electrolyte has an irritating effect. Do not al-
low the liquid to come into contact with
eyes, skin, clothing, or the respiratory sys-
tem. In case it does, immediately flush af-
fected area with water, and seek medical
help if necessary.
Page 129 of 344

129 Controls in detail
Good visibility
Folding in�
Briefly press button1 (
�page 127).
The mirrors fold in.Folding out
�
Briefly press button2.
The mirrors fold out.
Windshield wipers
Information on the windshield wipers is
found in the “Getting started” section
(�page 49).
!Before you drive the vehicle through an
automatic car wash, fold the exterior
mirrors in, otherwise they may get
damaged.iIf you are driving at more than approxi-
mately 9 mph (15 km / h), you will not
able to fold the exterior mirrors in.
!If an exterior rear view mirror housing
is forcibly pushed forward (hit from the
rear), reposition it manually by applying
firm pressure until it snaps back into
place.
If an exterior rear view mirror is forcibly
pushed rearward (hit from the front)
press button1 to fold mirrors in, then
press button2 to fold mirrors out. Do
not force mirrors by hand as this may
damage the adjustment mechanism.
The mirror housing is now properly po-
sitioned and you can adjust the mirror
normally.
!If leaves, snow, etc. block the wind-
shield wipers, the wiper motor turns
off.�
For safety reasons, withdraw key
from steering lock. Remove block-
age.
�
Turn the windshield wipers on
again.
If windshield wipers fail to function at
all in switch position1,
�
set the wiper switch to the next
highest wiper speed.
�
have the windshield wipers
checked at the nearest authorized
Mercedes-Benz Light Truck Center.