Page 87 of 344
87 Controls in detail
Locking and unlocking
Seats
Memory function*
Lighting
Instrument cluster
Automatic transmission
Transmission control – LOW RANGE mode
Good visibility
Automatic climate control
Power windows
Sliding / pop-up roof*
Driving systems
Loading
Useful features
Page 90 of 344

90 Controls in detailLocking and unlocking
Loss of remote control with folding key
If you lose a remote control or the folding
key, you should do the following:�
Have the remote control deactivated
by an authorized Mercedes-Benz Light
Truck Center.
�
Report the loss of the remote control or
the folding key immediately to your car
insurance company.
�
If necessary have the mechanical lock
replaced.
Your authorized Mercedes-Benz Light
Truck Center will be glad to supply you
with a replacement.
Opening the doors from the inside
You can open a locked door from the in-
side. Open door only when conditions are
safe to do so.
1Locking knob
2Inside door handle�
Pull on door handle2.
If a door was locked, locking knob1
will move up.
!If you can no longer lock or unlock the
vehicle with the remote control, then
the batteries in the remote control are
discharged, the remote control is mal-
functioning or the vehicle battery is
drained.�
Check the batteries in the remote
control and replace them if neces-
sary (
�page 262).
�
Use the folding key to unlock or
lock the doors and the liftgate.
�
Check the vehicle battery
(�page 278).
�
Synchronize the remote control
(�page 263).
If the remote control is malfunctioning,
contact an authorized Mercedes-Benz
Light Truck Center.
Page 93 of 344

93 Controls in detail
Locking and unlocking
Automatic central locking
The doors and the liftgate automatically
lock when the ignition is switched on and
the left front wheel turns at vehicle speeds
of approximately 9mph (15km/h) or
more.
If one of the front doors is then opened
from the inside, the vehicle is unlocked
centrally unless only the driver's door was
previously unlocked.Information on towing the vehicle can be
found in the “Practical hints” section
(
�page 241).
The switch is located on the lower center
console.
Central locking switch1Locking
2UnlockingActivating
�
Make sure the ignition is switched on.
All the lamps in the instrument cluster
light up.
�
Press and hold upper part1 of the
central locking button for approximate-
ly six seconds.
The automatic central locking is
activated.
Deactivating
�
Make sure the ignition is switched on.
All the lamps in the instrument cluster
light up.
�
Press and hold lower part2 of the
central locking button for approximate-
ly six seconds.
The automatic central locking is deacti-
vated.
iThe doors unlock automatically after an
accident if the force of the impact ex-
ceeds a preset threshold.
To prevent the vehicle door locks from
locking, deactivate the automatic cen-
tral locking when the vehicle�
is pushed or towed
�
is on a test stand
Page 98 of 344
.
�
If necessary, remove cargo floor plates,
see “Removing cargo floor plates”
(�page 162).
�
Slide rear seats forward, s")
98 Controls in detailSeats�
Remove rear center head restraint
(�page 96).
�
If necessary, remove cargo floor plates,
see “Removing cargo floor plates”
(�page 162).
�
Slide rear seats forward, see “Adjusting
rear seat fore and aft” (
�page 99).
�
Fold rear seat backrests down, see
“Folding down the backrest”
(�page 100).
�
From cargo compartment, attach rear
center head restraint1 to underside
of rear center seat.
Make sure front side of head
restraint1 is facing upward.
�
Press bar2 on both sides into
clips3.
Heated seats*
Both switches for the front seats are loca-
ted in the center console.
1Normal heating
2Rapid heating�
Start the engine.
Switching on seat heating
�
Press upper switch position1.
A red indicator lamp on the switch
lights up.Switching off seat heating
�
Press upper switch position1 again.
The indicator lamp on the switch turns
off.
Switching on rapid seat heating
�
Press lower switch position2.
Both red indicator lamps on the switch
turn on.iThe seat heater will be automatically
switched off after approximately
20 minutes.iThe system switches over to normal
heating mode after approximately five
minutes. Only one red indicator lamp
remains on.
��
Page 107 of 344
107 Controls in detail
Lighting
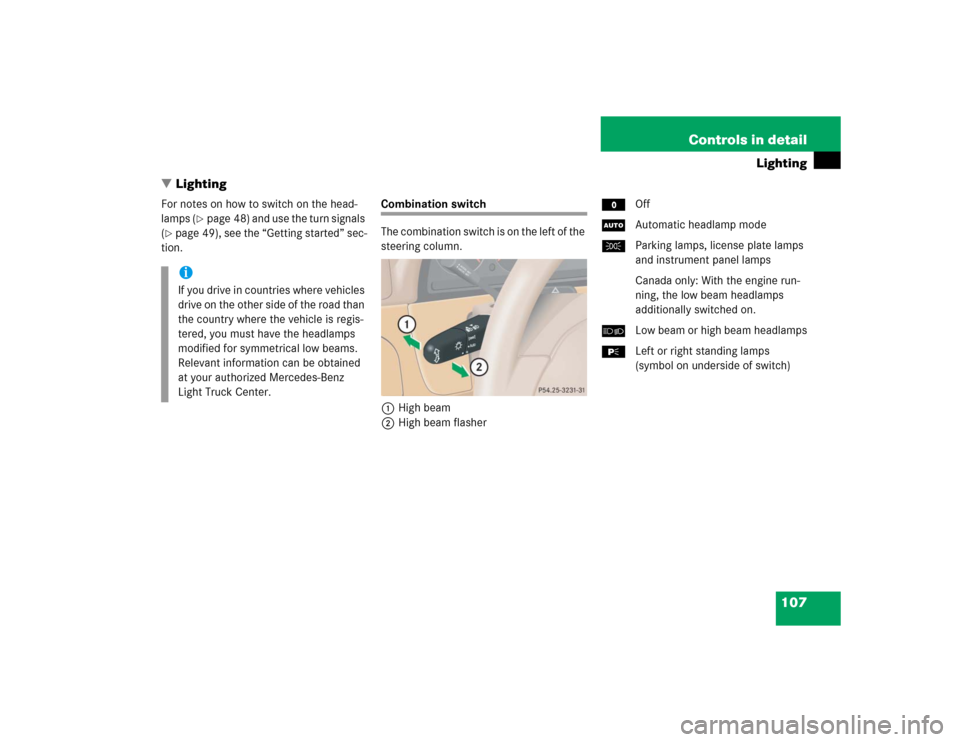
�Lighting
For notes on how to switch on the head-
lamps (
�page 48) and use the turn signals
(
�page 49), see the “Getting started” sec-
tion.
Combination switch
The combination switch is on the left of the
steering column.
1High beam
2High beam flasherMOff
UAutomatic headlamp mode
CParking lamps, license plate lamps
and instrument panel lamps
Canada only: With the engine run-
ning, the low beam headlamps
additionally switched on.
õLow beam or high beam headlamps
ƒLeft or right standing lamps
(symbol on underside of switch)
iIf you drive in countries where vehicles
drive on the other side of the road than
the country where the vehicle is regis-
tered, you must have the headlamps
modified for symmetrical low beams.
Relevant information can be obtained
at your authorized Mercedes-Benz
Light Truck Center.
Page 108 of 344
.
Automat")
108 Controls in detailLightingManual headlamp mode
The low beam headlamps and parking
lamps can be switched on and off with the
combination switch. For combination
switch, see (
�page 107).
Automatic headlamp mode
The parking lamps, low beam headlamps
and license plate lamps switch on and off
automatically depending on the brightness
of the ambient light.
�
Turn the combination switch toU.iIf you remove the key and open the
driver’s door while the parking lamps or
low beam headlamps are switched on,
then a warning sounds.
Warning!
G
If the combination switch is set toU,�
the headlamps may switch off unexpect-
edly when the system senses bright am-
bient light, for example light from
oncoming traffic.
�
the headlamps will not be automatically
switched on under foggy conditions.
To minimize risk to you and to others, acti-
vate headlamps by turning combination
switch toõ when driving or when traffic
and / or ambient lighting conditions require
you to do so.
In low ambient lighting conditions, only
switch from positionU toõ with the
vehicle at a standstill. Switching fromU
toõ will briefly switch off the head-
lamps. Doing so while driving in low ambient
lighting conditions may result in an acci-
dent.
The automatic headlamp feature is only an
aid to the driver. The driver is responsible for
the operation of the vehicle's lights at all
times.iIf the automatic headlamp mode is ac-
tivated, the fog lamps can also be
switched on (
�page 111). The low
beam headlamp and parking lamps are
activated simultaneously.
Page 109 of 344

109 Controls in detail
Lighting
Daytime running lamp mode
Canada only:�
Turn combination switch to
positionM orU.
When the engine is running, the low beam
headlamps are automatically switched on.
In low ambient light conditions, the parking
lamps will also switch on.
When you shift from a driving position to
positionN orP, the low beam switches off
(three minutes delay).
For nighttime driving you should turn the
combination switch to positionõ to
permit activation of the high beam head-
lamps.Night security illumination
When you turn off the engine and the last
door has been closed, the following lamps
will remain lit:
�
Parking lamps
�
Tail lamps
�
License plate lamps
�
Front fog lamps
The combination switch must be set to
positionU (
�page 107).Deactivating night security illumination
temporarily
�
Before leaving the vehicle, turn the key
in the steering lock to position0
(�page 33) then turn it to position2
and back to0.
The night security illumination is deac-
tivated. It will reactivate as soon as you
start the engine.
Setting illumination time
1Switch for fog lamps
iThe high beam flasher is always avail-
able.
iYou can reactivate this function within
ten minutes by opening a door or the
liftgate.
If you do not open a door or the liftgate
after turning off the engine, the lamps
will automatically switch off after
60 seconds.
Page 110 of 344

110 Controls in detailLighting�
Stop the vehicle.
�
Make sure the ignition is switched on.
All the lamps in the instrument cluster
light up.
�
Turn combination switch to
positionM.
�
Press upper part1 of switch until the
clock, located in the instrument clus-
ter, displays the actual illumination
time.
�
Press upper part1 of switch again.
Each time the switch is pressed, the
illumination time increases by
15 seconds. You can set the illumina-
tion time between 0 (off) and
60 seconds.
Approximately five seconds after pressing
the switch, the illumination time is set and
the clock is displayed again.Locator lighting
During darkness, the following lamps will
come on when the vehicle is unlocked by
remote control:
�
Parking lamps
�
Tail lamps
�
License plate lamps
�
Front fog lamps
The combination switch must be set to
positionU (
�page 107).
The locator lighting switches off when the
driver’s door is opened. It switches off au-
tomatically after a period of approximately
40 seconds.Switching on high beams
�
Turn the combination switch
toõ(
�page 107).
�
Push the combination switch forward.
The high beam indicatorA in the
instrument cluster comes on.
High beam flasher
�
Pull the combination switch briefly in
direction2.