Page 264 of 344
264 Practical hintsUnlocking / locking in an emergencyManually unlocking the transmission gear selector lever
In the case of power failure the transmis-
sion gear selector lever can be manually
unlocked, e.g. to tow the vehicle.
1Pin
�
Insert a pin1, e.g. ball point pen, into
the covered opening below the
position D of the shift pattern.
�
Perform the following two steps simul-
taneously:�
Push the pin down.
�
Move gear selector lever from
positionP.
�
Remove pin1.
The cover returns to its closed position
after moving the gear selector lever to
positionD.iThe gear selector lever is locked again
when moving it to positionP.
Page 265 of 344
265 Practical hints
Opening / closing in an emergency
�Opening / closing in an emergency
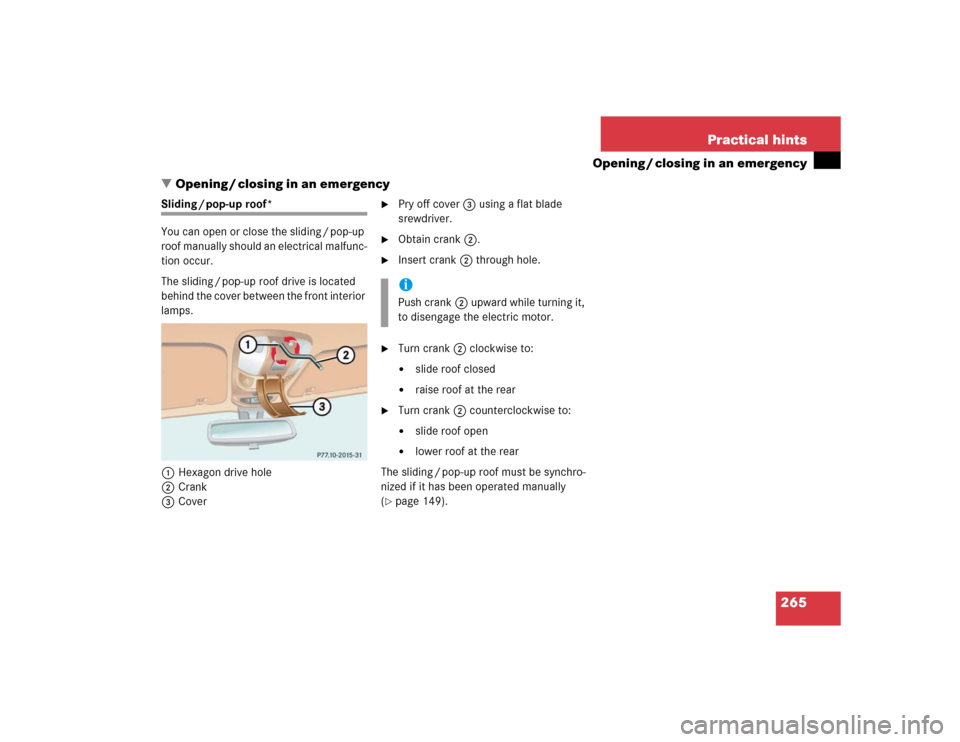
Sliding / pop-up roof*
You can open or close the sliding / pop-up
r o o f m a n u a l l y s h o u l d a n e l e c t r i c a l m a l f u n c -
tion occur.
The sliding / pop-up roof drive is located
behind the cover between the front interior
lamps.
1Hexagon drive hole
2Crank
3Cover
�
Pry off cover3 using a flat blade
srewdriver.
�
Obtain crank2.
�
Insert crank2 through hole.
�
Turn crank2 clockwise to:�
slide roof closed
�
raise roof at the rear
�
Turn crank2 counterclockwise to:�
slide roof open
�
lower roof at the rear
The sliding / pop-up roof must be synchro-
nized if it has been operated manually
(
�page 149).iPush crank2 upward while turning it,
to disengage the electric motor.
Page 268 of 344
268 Practical hintsReplacing bulbsReplacing bulbs for front lamps
Replacing low beam bulbs
1Low beam halogen or Bi-Xenon* head-
lamp cover with locking tab2Electrical connector
Bi-Xenon* headlampHalogen headlamp
�
Switch off the lights.
�
Open the hood (
�page 217).
�
Push down tab at top end of cover1
and remove.
�
Pull electrical connector2 off.
�
Unclip the retainer springs and take out
the bulb.
�
Insert the new bulb so that the base lo-
cates in the recess on the holder.
�
Clip the retainer springs.
�
Plug the connector2 onto the bulb.
�
Align headlamp cover and click into
place.
Warning!
G
Do not remove the cover
1
for the
Bi-Xenon headlamp. Because of high voltage
in xenon lamps, it is dangerous to replace
the bulb or repair the lamp and its compo-
nents. We recommend that you have such
work done by a qualified technician.
Page 269 of 344
269 Practical hints
Replacing bulbs
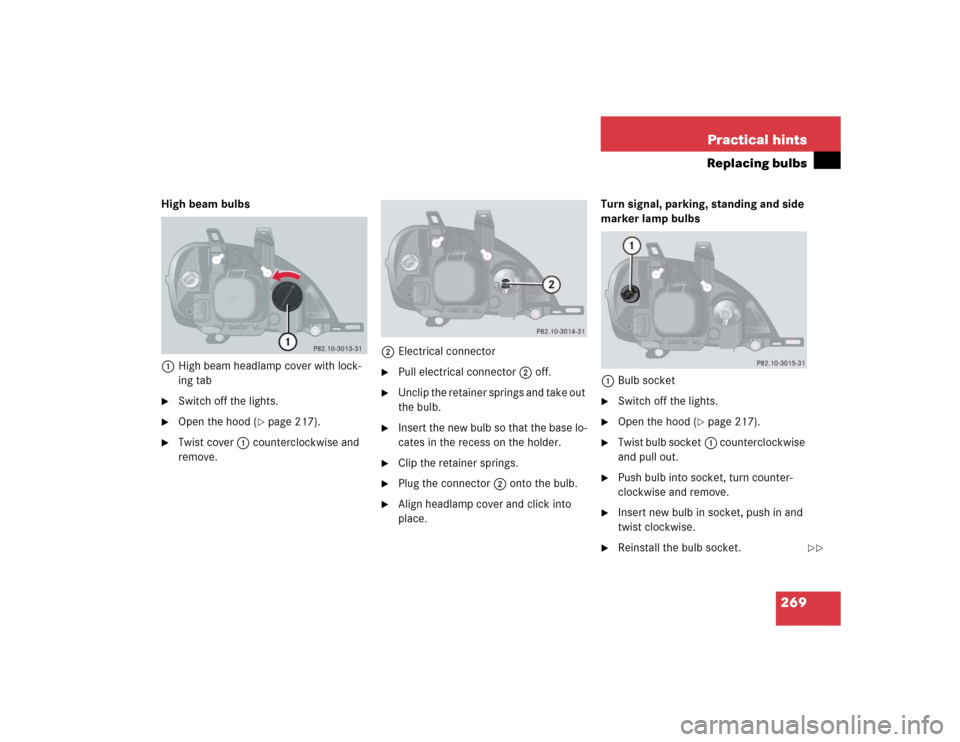
High beam bulbs
1High beam headlamp cover with lock-
ing tab�
Switch off the lights.
�
Open the hood (
�page 217).
�
Twist cover1 counterclockwise and
remove.2Electrical connector
�
Pull electrical connector2 off.
�
Unclip the retainer springs and take out
the bulb.
�
Insert the new bulb so that the base lo-
cates in the recess on the holder.
�
Clip the retainer springs.
�
Plug the connector2 onto the bulb.
�
Align headlamp cover and click into
place.Turn signal, parking, standing and side
marker lamp bulbs
1Bulb socket
�
Switch off the lights.
�
Open the hood (
�page 217).
�
Twist bulb socket1 counterclockwise
and pull out.
�
Push bulb into socket, turn counter-
clockwise and remove.
�
Insert new bulb in socket, push in and
twist clockwise.
�
Reinstall the bulb socket.
��
Page 270 of 344
270 Practical hintsReplacing bulbs�
Align headlamp cover and click into
place.
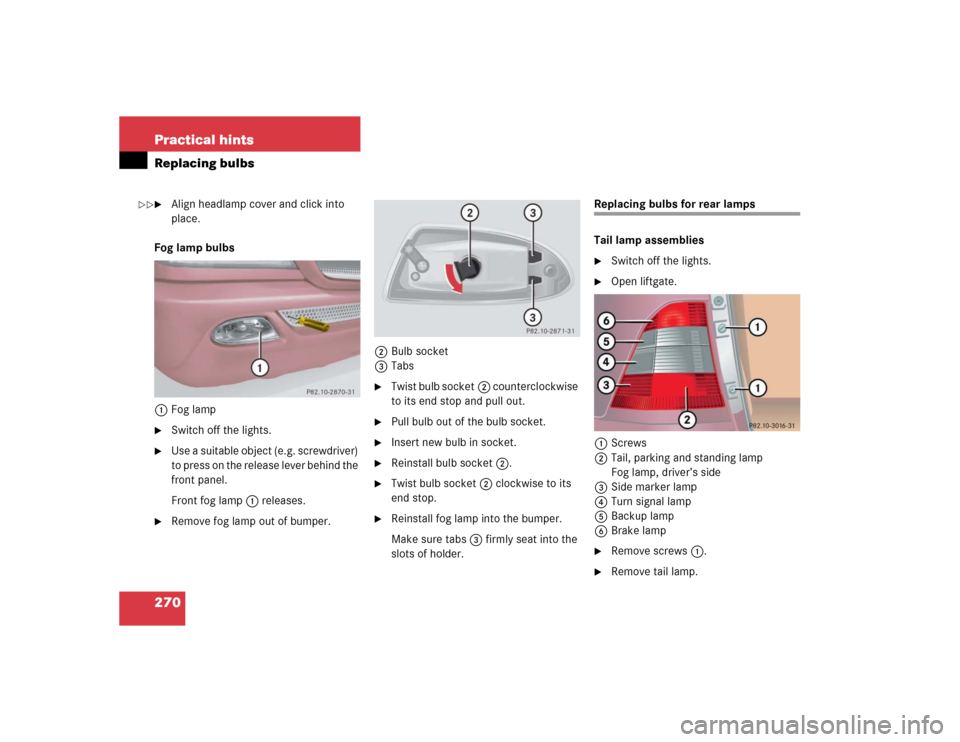
Fog lamp bulbs
1Fog lamp
�
Switch off the lights.
�
Use a suitable object (e.g. screwdriver)
to press on the release lever behind the
front panel.
Front fog lamp1 releases.
�
Remove fog lamp out of bumper.2Bulb socket
3Tabs
�
Twist bulb socket2 counterclockwise
to its end stop and pull out.
�
Pull bulb out of the bulb socket.
�
Insert new bulb in socket.
�
Reinstall bulb socket2.
�
Twist bulb socket2 clockwise to its
end stop.
�
Reinstall fog lamp into the bumper.
Make sure tabs3 firmly seat into the
slots of holder.
Replacing bulbs for rear lamps
Tail lamp assemblies�
Switch off the lights.
�
Open liftgate.
1Screws
2Tail, parking and standing lamp
Fog lamp, driver’s side
3Side marker lamp
4Turn signal lamp
5Backup lamp
6Brake lamp
�
Remove screws1.
�
Remove tail lamp.
��
Page 271 of 344
271 Practical hints
Replacing bulbs
7Tabs�
Squeeze tabs7 together and remove
bulb holder.
�
Gently push bulb into socket, turn
counterclockwise and remove.
�
Insert new bulb in socket, push in and
turn clockwise.
�
Reinstall bulb holder. You should hear
it engage.
�
Insert the tail lamp in the body, lower
edge first. Make sure it engages.
�
Retighten screws with washers on
them.License plate lamp
1License plate lamp
2Screws
�
Switch off the lights.
�
Loosen both screws2 and remove
lamp.
�
Replace the tubular lamp and reinstall
lamp.
�
Retighten the screws.High mounted brake lamp
1Cover
2Tab
�
Switch off the lights.
�
Squeeze both sides of cover1, fold it
forward and remove.
�
Press tab2 on reflector and remove
reflector.
�
Gently push bulb into socket, turn
counterclockwise and remove.
�
Insert new bulb in socket, push in and
turn clockwise.
��
Page 272 of 344

272 Practical hintsReplacing bulbs�
Insert reflector from the left so that it
engages on the right.
�
Position tabs of cover in slots and rein-
stall cover until properly seated.
Adjusting headlamp aim
VVertical centerline
HHeadlamp mounting high, measured
from the centerCorrect headlamp adjustment is extremely
important. To check and readjust a head-
lamp, follow the steps described:
�
Park the vehicle on a level surface
25 feet (7.6 m) from a vertical test
screen or wall.
�
Switch the headlamps on
(�page 110).
If the beam does not show a beam pattern
as indicated in the figure left, then follow
the steps below:
�
Open hood (
�page 217).
2Headlamp vertical adjustment screw
3Headlamp vertical adjustment screw
�
Always turn adjustment screws2
and3 simultaneously for vertical ad-
justment until the headlamp is adjust-
ed as shown1. Turn clockwise for
upward movement and counterclock-
wise for downward movement.
Graduations:
screw2: 0.50° pitch
screw3: 0.67° pitch
The left and right headlamps must be ad-
justed individually.
iHigh beam adjustments simultaneous-
ly aim the low beam.
Vehicle should have a normal trunk
load.
iIf it is not possible to obtain a proper
headlamp adjustment, have the system
checked at your authorized
Mercedes-Benz Light Truck Center.
��
Page 273 of 344

273 Practical hints
Replacing wiper blades
�Replacing wiper blades
Removing�
Fold the wiper arm forward.
�
Turn wiper blade at a right angle to wip-
er arm.
1Wiper blade
2Safety tab
�
Press safety tab down2.
�
Push wiper blade downward1 and re-
move.
Installing�
Slide the wiper blade into end of wiper
arm until it locks in place.
�
Fold the wiper arm back to rest on the
windshield. Make sure you hold onto
the wiper when folding the wiper arm
back.
Warning!
G
For safety reasons, remove key from steer-
ing lock before replacing a wiper blade. Oth-
erwise the motor could suddenly turn on and
cause injury.
!Never open the hood when the wiper
arms are folded forward.
Hold on to the wiper when folding the
wiper arm back. If released, the force
of the impact from the tensioning
spring could crack the windshield.
Do not allow the wiper arms to contact
the windshield glass without a wiper
blade inserted.
Make certain that the wiper blades are
properly installed. Improperly installed
wiper blades may cause windshield
damage.
For your convenience, we recommend
that you have this work carried out by
an authorized Mercedes-Benz Center.