Page 166 of 376

166 Controls in detailSliding/pop-up roof
�Sliding/pop-up roofOpening and closing the sliding/pop-up roof
1Push up to raise roof at rear
2Pull down to lower roof at rear
3Push forward to slide roof closed
4Push back to slide roof open
With the roof closed or tilted open, a
screen can be slid into the roof opening to
guard against sun rays. When sliding the
roof open, the screen will also retract.
�
Turn the SmartKey in the starter switch
to position1 or2.
Warning!
G
When closing the sliding/pop-up roof, make
sure there is no danger of anyone being
harmed by the closing procedure.
The closing procedure of the sliding/pop-up
roof can be immediately halted by releasing
the switch.
When leaving the vehicle, always remove the
SmartKey from starter switch, and lock your
vehicle. Do not leave children unattended in
the vehicle, or with access to an unlocked
vehicle. Unsupervised use of vehicle equip-
ment can cause an accident and/or serious
personal injury.
!To avoid damaging the seals, do not
transport any objects with sharp edges
which can stick out of the
sliding/pop-up roof.
Do not open the sliding/pop-up roof if
there is snow or ice on the roof, as this
could result in malfunctions.
The sliding/pop-up roof can be opened
or closed manually should an electrical
malfunction occur (
�page 292).
iYou can also open or close the
sliding/pop-up roof using the
SmartKey (summer opening/conve-
nience feature) (
�page 167).
Page 167 of 376

167 Controls in detail
Sliding/pop-up roof
Opening and closing the sliding/pop-up
roof�
To open, close, raise or lower the slid-
ing/pop-up roof, move the switch to
the resistance point in the required
direction1to4.
Release the switch when the roof has
reached the required position.Fully opening (Express-open)
�
To open the sliding/pop-up roof, move
the switch past the resistance point in
direction4 and release.
The sliding/pop up roof opens com-
pletely.
Stopping the sliding / pop-up roof
�
Move the switch in any direction.Opening and closing the sliding/pop-up
roof with the SmartKey
The power windows (
�page 164) will also
be opened or closed when you operate the
sliding/pop-up roof with the SmartKey.
�
Aim transmitter eye at the driver’s door
handle.
iIf the movement of the sliding/pop-up
roof is blocked during the closing pro-
cedure, the roof will stop and reopen
slightly.
Warning!
G
Never operate the windows or slid-
ing/pop-up roof if there is the possibility of
anyone being harmed by the opening or
closing procedure.
In case the procedure causes potential dan-
ger, the procedure can be immediately halt-
ed by releasing the button on the SmartKey.
To reverse direction of movement,
pressŒ for opening or ‹ for closing.
Page 168 of 376
168 Controls in detailSliding/pop-up roofOpening (Summer opening feature)�
Press and hold buttonΠafter un-
locking the vehicle.
The windows and sliding/pop-up roof
begin to open after approximately one
second.
�
Release transmit button to interrupt
procedure.Closing (Convenience feature)
�
Press and hold button‹ after lock-
ing the vehicle.
The windows and sliding/pop-up roof
begin to close after approximately one
second.
�
Release transmit button to interrupt
procedure.
Make sure all side windows and the slid-
ing/pop-up roof are properly closed before
leaving the vehicle.
Page 176 of 376

176 Controls in detailLoadingRemoving and installing the cover
Removing the cover�
Open latch1 on right and left side in
direction of arrow.
�
Pull cover2 out upwards.
Installing the cover
�
Place cover into recesses.
�
Press right and left sides of cover down
until it locks into place.
Enlarged cargo compartment
The rear seat bench can be folded and low-
ered to increase the cargo compartment.
The left, right or both seat backrests sec-
tions may folded down according to need.
For more information, see “Split rear seat
bench” (
�page 176).
Split rear seat bench
1Lever for seat backrest sections
2Lever for seat bench sections
The rear seat bench can be folded and low-
ered to enlarge the cargo compartment.
The left, right or both seat backrest sec-
tions may be folded down as required.
Warning!
G
Always lock seat backrest in its upright po-
sition when rear seat bench is occupied by
passengers, or cargo is being carried behind
the seat bench.
To help avoid personal injury from smaller
objects flying in the occupant area during a
collision or sudden maneuver, always use
partition net when transporting cargo
(�page 178).
Page 177 of 376
.
�
Pull release lever1 in direction of ar-
row and fold seat backrest forward un-
til it locks in p")
177 Controls in detail
Loading
Folding seat backrest forward�
Remove the head restraints
(�page 96).
�
Pull release lever1 in direction of ar-
row and fold seat backrest forward un-
til it locks in place.
Folding seat bench forward
�
Fold seat backrest forward.
�
Pull release lever2 in direction of ar-
row and fold seat bench forward to-
gether with the seat backrest.Returning seat bench and seat back-
rest to sitting position
�
Fold up seat bench until it locks in
place.
�
Pull release lever1 and raise seat
backrest until it locks in place.
�
Check to ensure the seat is locked by
pushing and pulling on the seat back-
rest.
Warning!
G
Failure to assure that seats and seat back-
rest are locked into place could result in an
increased chance of injury in an accident.
Never place hands under seat or near any
moving parts while a seat is being adjusted.
For safety reasons, the rear seat bench
must only be adjusted when the vehicle is
stationary.
Never ride vehicle with the tailgate open.
Deadly carbon monoxide (CO) gases may
enter vehicle interior resulting in uncon-
sciousness and death.!Before folding the seat backrest for-
ward and the rear seat bench down, be
sure that all containers in the rear cup
holder are removed.
Warning!
G
Failure to assure that seats and seat back-
rests are locked into place could result in an
increased chance of injury in an accident.
Page 179 of 376
179 Controls in detail
Loading
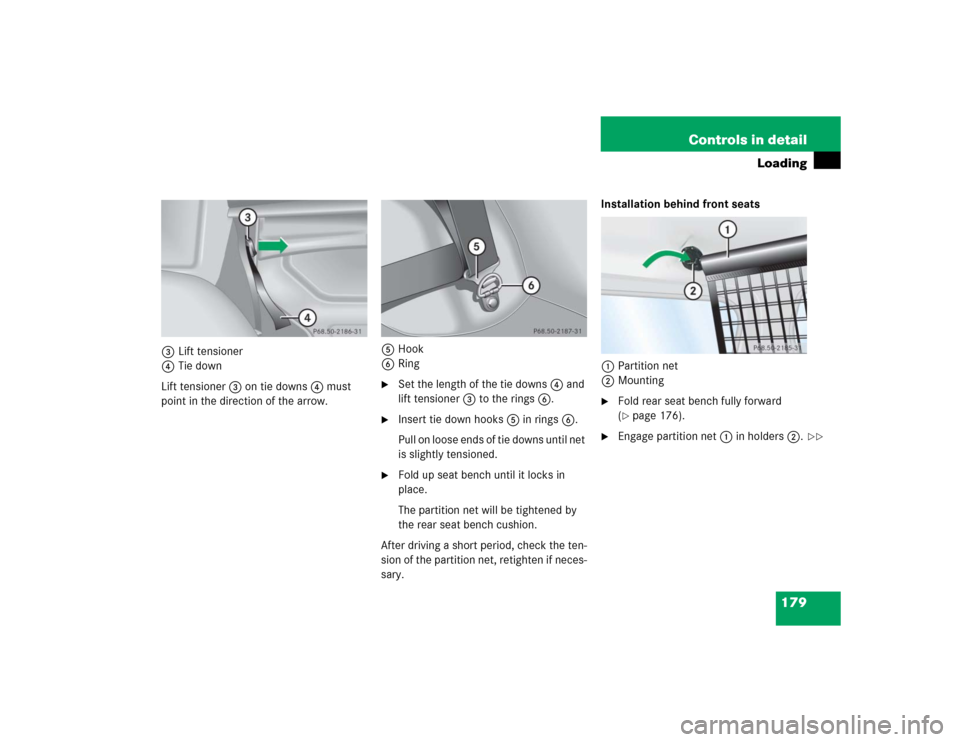
3Lift tensioner
4Tie down
Lift tensioner3 on tie downs4 must
point in the direction of the arrow.5Hook
6Ring
�
Set the length of the tie downs4 and
lift tensioner3 to the rings6.
�
Insert tie down hooks5 in rings6.
Pull on loose ends of tie downs until net
is slightly tensioned.
�
Fold up seat bench until it locks in
place.
The partition net will be tightened by
the rear seat bench cushion.
After driving a short period, check the ten-
sion of the partition net, retighten if neces-
sary.Installation behind front seats
1Partition net
2Mounting
�
Fold rear seat bench fully forward
(�page 176).
�
Engage partition net1 in holders2.
��
Page 183 of 376

183 Controls in detail
Useful features
�Useful features
Interior storage spaces
Glove box
1Unlocked position
2Locked position
3HandleOpening the glove box
�
Pull handle to open.
The glove box is illuminated with SmartKey
in starter switch position1 or2 when
opening the lid.
Closing the glove box
�
Push lid up to close.
Warning!
G
To help avoid personal injury during a colli-
sion or sudden maneuver, exercise care
when stowing objects in the vehicle. Put lug-
gage or cargo in the cargo compartment if
possible. Do not pile luggage or cargo higher
than the seat backs.
Luggage nets cannot secure hard or heavy
objects.Warning!
G
Do not load items on the roof. It may cause
instability during some maneuvers which
could result in an accident.
Warning!
G
Keep compartment lids closed. This will help
to prevent stored objects from being thrown
about and injuring vehicle occupants during
an accident and sudden maneuvers.
iThe glove box can be locked and un-
locked with the mechanical key.
Page 184 of 376
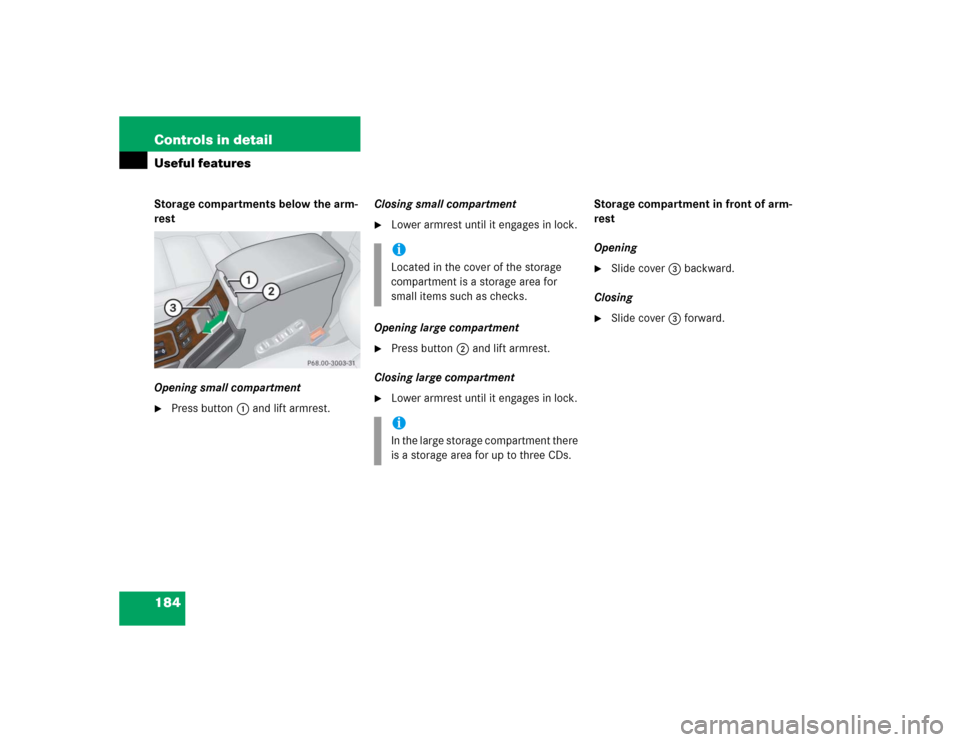
184 Controls in detailUseful featuresStorage compartments below the arm-
rest
Opening small compartment�
Press button1 and lift armrest.Closing small compartment
�
Lower armrest until it engages in lock.
Opening large compartment
�
Press button2 and lift armrest.
Closing large compartment
�
Lower armrest until it engages in lock.Storage compartment in front of arm-
rest
Opening
�
Slide cover3 backward.
Closing
�
Slide cover3 forward.
iLocated in the cover of the storage
compartment is a storage area for
small items such as checks.iIn the large storage compartment there
is a storage area for up to three CDs.