Page 261 of 376

261 Practical hints
What to do if …
Text messagesDisplay symbol
Display message
Possible cause
Possible solution
ABS
ABS SYSTEM
VISIT WORKSHOP!
The ABS has detected a malfunction and
has switched off. The ESP, BAS, EBB and
4-ETS are also deactivated.
The brake system is still functioning nor-
mally but without the ABS available.
Wheels will lock during hard braking, re-
ducing steering capability.
�
Continue driving with added caution.
�
Have the system checked at an autho-
rized Mercedes-Benz Light Truck Cen-
ter as soon as possible.
Failure to follow these instructions in-
creases the risk of accident.
VISIT WORKSHOP!
DISPLAY MALFUNCTION:
The ABS or the ABS display is malfunc-
tioning.
Wheels will lock in hard braking reducing
steering capability.
�
Continue driving with added caution.
�
Have the system checked at an autho-
rized Mercedes-Benz Light Truck Cen-
ter as soon as possible.
Failure to follow these instructions in-
creases the risk of accident.
BAS
BRAKE ASSIST
VISIT WORKSHOP!
The BAS has detected a malfunction and
switched off.
The brake system is still functioning nor-
mally but without the BAS available.
Wheels will lock in hard braking reducing
steering capability.
�
Continue driving with added caution.
�
Have the system checked at an autho-
rized Mercedes-Benz Light Truck Cen-
ter as soon as possible.
Failure to follow these instructions in-
creases the risk of accident.
Page 262 of 376

262 Practical hintsWhat to do if …Display
Display message
Possible cause
Possible solution
BAS
VISIT WORKSHOP!
DISPLAY MALFUNCTION:
The BAS or the BAS display is malfunc-
tioning.
�
Continue driving with added caution.
�
Have the system checked at an autho-
rized Mercedes-Benz Light Truck Center
as soon as possible.
Failure to follow these instructions increas-
es the risk of accident.
DIFFERENTIAL
LOCK
ABS NOT AVAILABLE
DIFFERENTIAL LOCKED
You have engaged the differential locks.
�
The ABS switches on again after the dif-
ferential locks have been disengaged.
ESP
VISIT WORKSHOP!
DISPLAY MALFUNCTION:
The ESP or the ESP display is malfunc-
tioning.
�
Continue driving with added caution.
�
Have the system checked at an autho-
rized Mercedes-Benz Light Truck Center
as soon as possible.
Failure to follow these instructions increas-
es the risk of accident.
ESP
NOT AVAILABLE
The ESP is temporarily unavailable. The
self-diagnosis has not been completed.
The display will clear itself after driving a
short-distance at more than approximately
12 mph (20 km/h).
Page 284 of 376
.
�
Open cover1.
�
Open ta")
284 Practical hintsWhere will I find ...?Vehicle jack
The vehicle jack is under the rear bench
seat.
1Cover
2Tab
3Vehicle jack�
Fold the rear bench seat forward
(�page 177).
�
Open cover1.
�
Open tab2 and remove vehicle
jack3.
Please also observe the safety guidelines
in the “Flat tire” section (
�page 306)
when using the jack.
CD changer
The CD changer is located on the left side
of the cargo compartment.CD changer
Warning!
G
The jack is designed exclusively for jacking
up the vehicle under the axle housing. To
help avoid personal injury, use the jack only
to lift the vehicle during a wheel change.
Never get beneath the vehicle while it is sup-
ported by the jack. Keep hands and feet
away from the area under the lifted vehicle.
Always firmly set parking brake and block
wheels before raising vehicle with jack.
Do not disengage parking brake while the
vehicle is raised. Be certain that the jack is
always vertical (plumb line) when in use, es-
pecially on hills. Always try to use the jack
on level surface. Make sure the jack is posi-
tioned correctly under the axle housing. Al-
ways lower the vehicle onto sufficient
capacity jackstands before working under
the vehicle.
iFor CD changer instructions, see sepa-
rate COMAND operator’s manual.
Page 285 of 376
285 Practical hints
Where will I find ...?
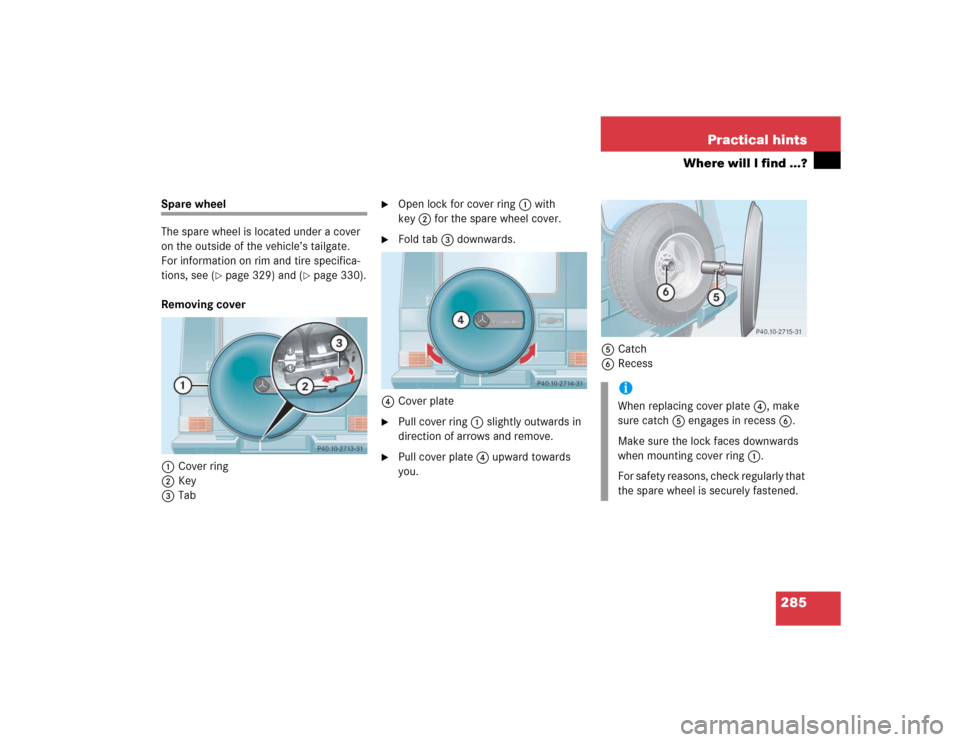
Spare wheel
The spare wheel is located under a cover
on the outside of the vehicle’s tailgate.
For information on rim and tire specifica-
tions, see (
�page 329) and (
�page 330).
Removing cover
1Cover ring
2Key
3Tab
�
Open lock for cover ring1 with
key2 for the spare wheel cover.
�
Fold tab3 downwards.
4Cover plate
�
Pull cover ring1 slightly outwards in
direction of arrows and remove.
�
Pull cover plate4 upward towards
you.5Catch
6Recess
iWhen replacing cover plate4, make
sure catch5 engages in recess6.
Make sure the lock faces downwards
when mounting cover ring1.
For safety reasons, check regularly that
the spare wheel is securely fastened.
Page 287 of 376

287 Practical hints
Unlocking/locking in an emergency
�Unlocking/locking in an emergency
Unlocking the vehicle
If you are unable to unlock the vehicle with
the SmartKey, open the driver’s door and
the tailgate using the mechanical key.
The passenger door cannot be unlocked
manually.
1Mechanical key locking tab
2Mechanical key
�
Move locking tab1 in direction of ar-
row and slide the mechanical key2
out of the housing.
Unlocking the driver’s door
�
Unlock the door with the mechanical
key. To do so, push the mechanical key
in the lock until it stops and turn it to
the left.Unlocking the tailgate
If you are unable to unlock the tailgate with
the SmartKey, open the tailgate with the
mechanical key as follows:
1Unlocking in an emergency
2Lock cylinder
3Handle
�
Insert the mechanical key into the tail-
gate lock.
�
Turn the mechanical key counterclock-
wise to position1 and hold it in this
position.
iUnlocking your vehicle with the me-
chanical key will trigger the anti-theft
alarm system. To cancel the alarm, do
one of the following:�
Press button Œ or ‹ on the
SmartKey.
�
Insert the SmartKey in the starter
switch.
��
Page 288 of 376

288 Practical hintsUnlocking/locking in an emergency�
Press lock cylinder2 and pull on tail-
gate handle3.
�
Open the tailgate to the side.
Locking the vehicle
If you are unable to lock the vehicle with
the SmartKey, lock it with the mechanical
key as follows:�
Close the passenger doors and the tail-
gate.
�
Press the central locking switch in the
cockpit (
�page 92).
�
Check to see whether the locking
knobs on the passenger doors are still
visible. If necessary, push them down
manually.
�
Slide the mechanical key2 out of the
SmartKey.
�
Lock the driver’s door with the me-
chanical key.
�
Check if the tailgate is locked. If nec-
cessary lock the tailgate with the me-
chanical key.
Changing batteries in the SmartKey
If the batteries in the SmartKey are dis-
charged, the vehicle can no longer be
locked or unlocked. It is recommended to
have the batteries replaced at an autho-
rized Mercedes-Benz Light Truck Center.
Batteries contain materials that can harm
the environment if disposed of improperly.
Recycling of batteries is the preferred
method of disposal. Many states require
sellers of batteries to accept old batteries
for recycling.
Warning!
G
The tailgate swings open to one side. Always
make sure there is sufficient clearance for
tailgate.iUnlocking your vehicle with the me-
chanical key will trigger the anti-theft
alarm system. To cancel the alarm, do
one of the following:�
Press button Œ or ‹ on the
SmartKey.
�
Insert the SmartKey in the starter
switch.
Warning!
G
Keep the batteries out of reach of children.
If a battery is swallowed, seek medical help
immediately.
��
Page 289 of 376
289 Practical hints
Unlocking/locking in an emergency
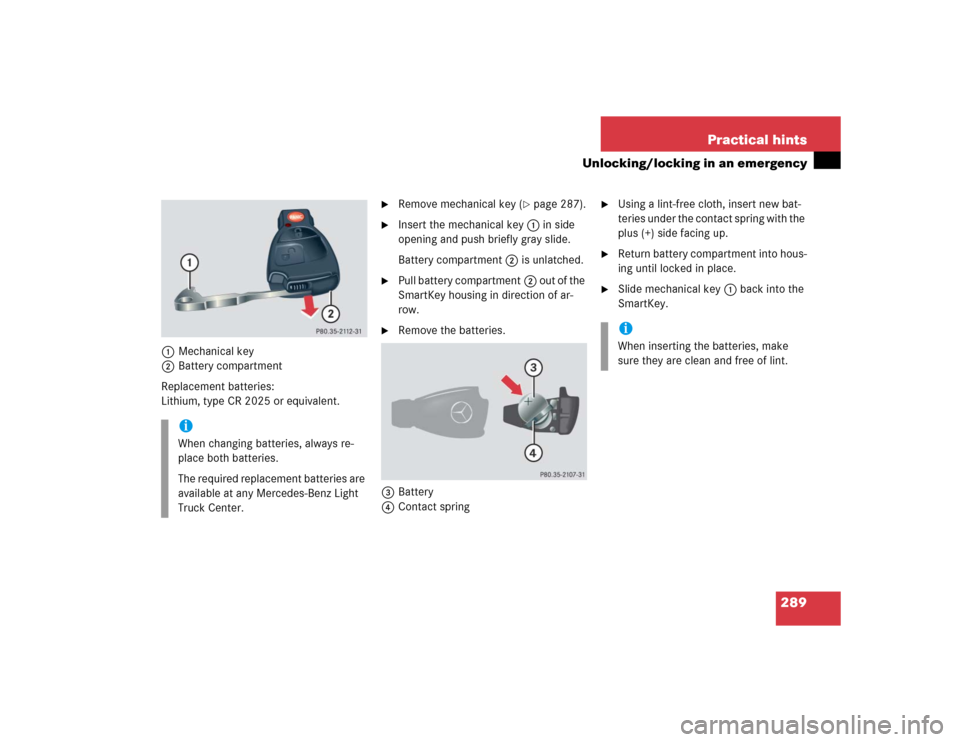
1Mechanical key
2Battery compartment
Replacement batteries:
Lithium, type CR 2025 or equivalent.
�
Remove mechanical key (
�page 287).
�
Insert the mechanical key1 in side
opening and push briefly gray slide.
Battery compartment2 is unlatched.
�
Pull battery compartment2 out of the
SmartKey housing in direction of ar-
row.
�
Remove the batteries.
3Battery
4Contact spring
�
Using a lint-free cloth, insert new bat-
teries under the contact spring with the
plus (+) side facing up.
�
Return battery compartment into hous-
ing until locked in place.
�
Slide mechanical key1 back into the
SmartKey.
iWhen changing batteries, always re-
place both batteries.
The required replacement batteries are
available at any Mercedes-Benz Light
Truck Center.
iWhen inserting the batteries, make
sure they are clean and free of lint.
Page 290 of 376
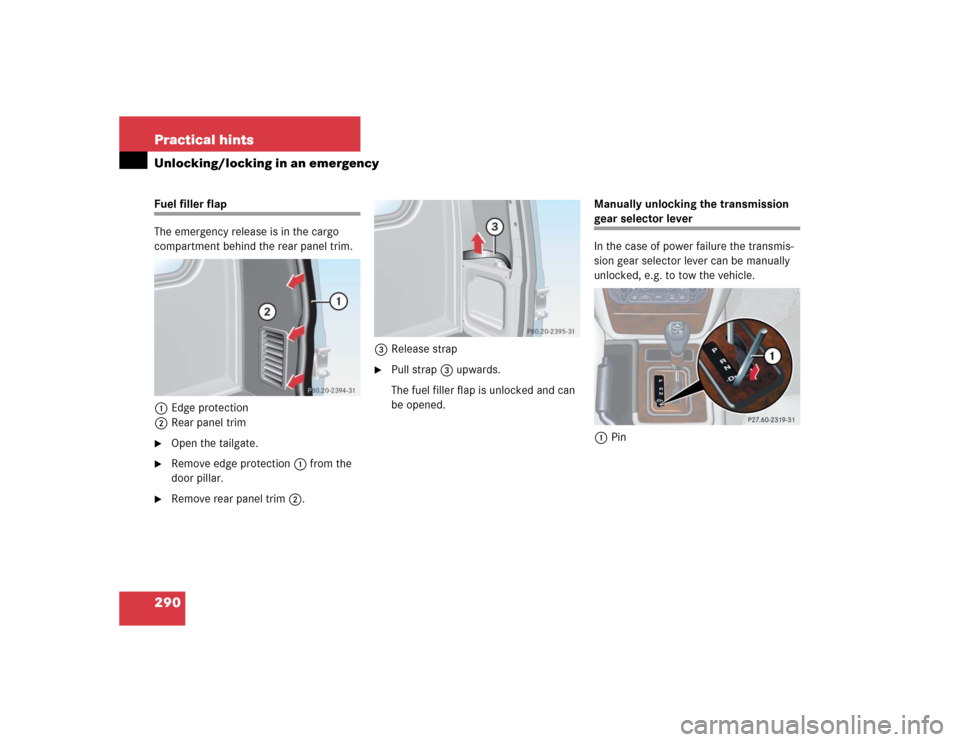
290 Practical hintsUnlocking/locking in an emergencyFuel filler flap
The emergency release is in the cargo
compartment behind the rear panel trim.
1Edge protection
2Rear panel trim�
Open the tailgate.
�
Remove edge protection1 from the
door pillar.
�
Remove rear panel trim2.3Release strap
�
Pull strap 3 upwards.
The fuel filler flap is unlocked and can
be opened. Manually unlocking the transmission
gear selector lever
In the case of power failure the transmis-
sion gear selector lever can be manually
unlocked, e.g. to tow the vehicle.
1Pin