Page 161 of 442

161 Controls in detail
Automatic transmission
Gear selector lever position
Effect
ì
Park position
Gear selector lever position
when the vehicle is parked. Place
gear selector lever in positionP
only when vehicle is stopped.
The park position is not intended
to serve as a brake when the
vehicle is parked. Rather, the
driver should always set the
parking brake in addition to
placing the gear selector lever in
positionP to secure the vehicle.
EffectThe SmartKey can only be
removed from the starter switch
with the gear selector lever in
positionP. With the SmartKey
removed, the gear selector lever
is locked in positionP.
If the vehicle’s electrical system
is malfunctioning, the gear
selector lever could remain
locked in positionP
(�page 357).
í
Reverse gear
Place gear selector lever in
positionR only when vehicle is
stopped.
Effect
ë
Neutral
No power is transmitted from the
engine to the drive axle. When
the brakes are released, the
vehicle can be moved freely
(pushed or towed).
To avoid damage to the trans-
mission, never engageN while
driving.
If the ESP is deactivated or
malfunctioning:
Move gear selector lever toN
only if the vehicle is in danger of
skidding, e.g. on icy roads.
ê
Drive
The transmission shifts
automatically. All forward gears
are available.
Page 211 of 442

211 Controls in detail
Driving systems
�Driving systems
The following driving systems are ex-
plained on the following pages:�
Cruise control and Distronic*, with
which the vehicle can maintain a preset
speed
�
Airmatic* adjusts the vehicle suspen-
sion characteristics automatically and
controls the vehicle level
�
Parktronic system*, which assists the
driver during parking maneuvers
The BAS, ABS, ESP and SBC are described
in the “Safety and Security” section
(
�page 74).
Cruise control
The cruise control automatically maintains
the speed you set for your vehicle.
Use of cruise control is recommended for
driving at a constant speed for extended
periods of time. You can set any speed
over 20 mph (30 km / h).
The cruise control function is operated by
means of the cruise control lever.
The cruise control lever is the uppermost
lever found on the left-hand side of the
steering column (
�page 20).
Warning!
G
Cruise control is a convenience system de-
signed to assist the driver during vehicle op-
eration. The driver is and must always
remain responsible for the vehicle speed
and for safe brake operation.
Only use cruise control if the road, traffic
and weather conditions make it advisable to
travel at a steady speed.�
The use of cruise control can be danger-
ous on winding roads or in heavy traffic
because conditions do not allow safe
driving at a steady speed.
�
The use of cruise control can be danger-
ous on slippery roads. Rapid changes in
tire traction can result in wheel spin and
loss of control.
�
Deactivate cruise control when driving
in fog.
The “Resume” function should only be oper-
ated if the driver is fully aware of the previ-
ously set speed and wishes to resume this
particular preset speed.
Page 233 of 442
233 Controls in detail
Loading
�Loading
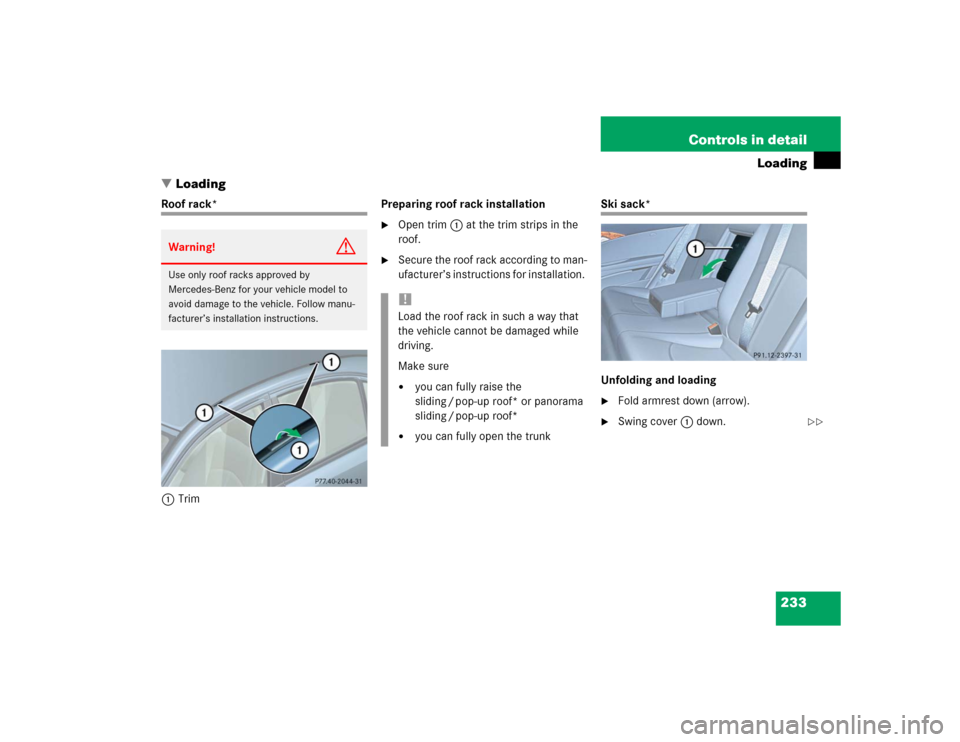
Roof rack*
1TrimPreparing roof rack installation
�
Open trim1 at the trim strips in the
roof.
�
Secure the roof rack according to man-
ufacturer’s instructions for installation.
Ski sack*
Unfolding and loading�
Fold armrest down (arrow).
�
Swing cover1 down.
Warning!
G
Use only roof racks approved by
Mercedes-Benz for your vehicle model to
avoid damage to the vehicle. Follow manu-
facturer’s installation instructions.
!Load the roof rack in such a way that
the vehicle cannot be damaged while
driving.
Make sure�
you can fully raise the
sliding / pop-up roof* or panorama
sliding / pop-up roof*
�
you can fully open the trunk
��
Page 234 of 442
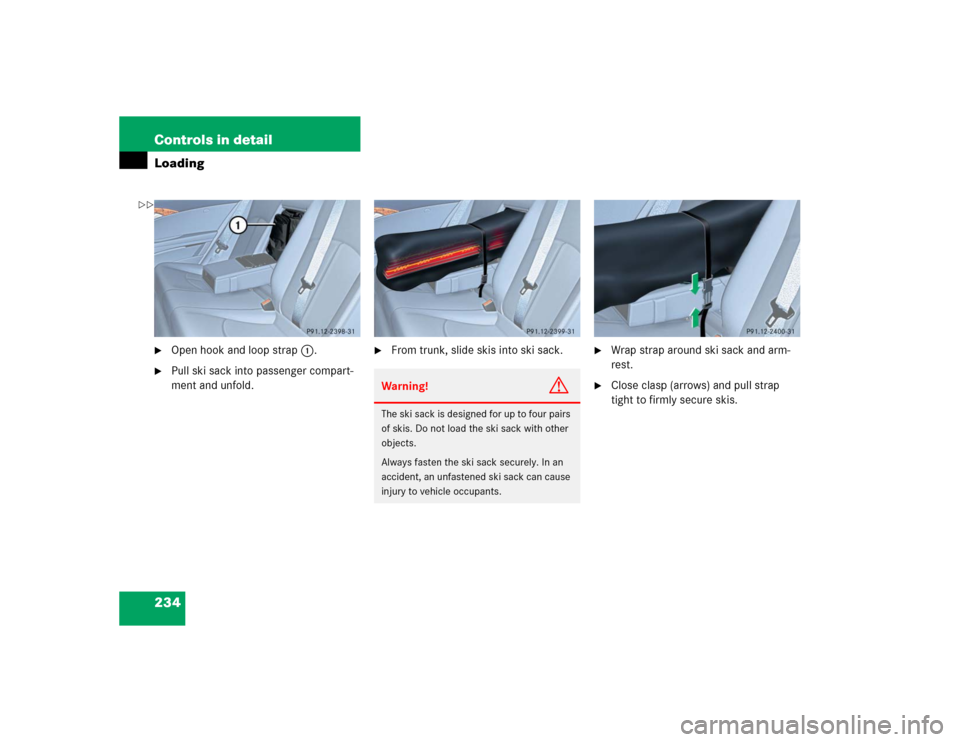
234 Controls in detailLoading�
Open hook and loop strap1.
�
Pull ski sack into passenger compart-
ment and unfold.
�
From trunk, slide skis into ski sack.
�
Wrap strap around ski sack and arm-
rest.
�
Close clasp (arrows) and pull strap
tight to firmly secure skis.
Warning!
G
The ski sack is designed for up to four pairs
of skis. Do not load the ski sack with other
objects.
Always fasten the ski sack securely. In an
accident, an unfastened ski sack can cause
injury to vehicle occupants.
��
Page 236 of 442

236 Controls in detailLoadingRemoval of ski sack
For removal of the ski sack we recommend
that you contact an authorized
Mercedes-Benz Center.
Split rear bench seat*
To expand the trunk, you can fold down the
left and right rear seat backrests.
The two sections can be folded down sep-
arately to enlarge the trunk.Folding the backrest forward
1Release handle
Warning!
G
Never drive vehicle with trunk open while
the ski sack is removed. Deadly carbon
monoxide (CO) gases may enter vehicle in-
terior, resulting in unconsciousness and
death.iTo prevent unauthorized persons from
access to the trunk, always close the
cover.
Warning!
G
When expanding the luggage compartment,
always fold the seat cushions fully forward.
Unless you are transporting cargo, the back-
rests must remain properly locked in the up-
right position.
In an accident, during hard braking or sud-
den maneuvers, loose items will be thrown
around inside the vehicle, and cause injury
to vehicle occupants unless the items are
securely fastened in the vehicle.
Always use the cargo tie down rings
(�page 241).
!You must always release the seat cush-
ion and fold it up before folding the seat
backrests forward. The upholstery on
the seat backrest may otherwise be
damaged.
Page 238 of 442
238 Controls in detailLoadingReturning seat backrest to original po-
sition
1Seat cushion
2Seat backrest�
Swing seat backrest2 to the rear until
it engages.
�
Swing seat cushion1 to the rear and
press the center front of the cushion
until it audibly engages.
�
Swing the head restraint forward by
hand until it engages.
Warning!
G
Always lock backrest in its upright position
when rear seat bench is occupied, or the ex-
tended trunk compartment is not in use.
Check for secure locking by pushing and
pulling on the backrest.
In an accident, during hard braking or sud-
den maneuvers, loose items will be thrown
around inside the vehicle, and cause injury
to vehicle occupants unless the items are
securely fastened in the vehicle.
To help avoid personal injury during a colli-
sion or sudden maneuver, exercise care
when transporting cargo.
Page 240 of 442

240 Controls in detailLoadingLoading instructions
The total load weight including vehicle oc-
cupants and luggage / cargo should not ex-
ceed the vehicle capacity weight indicated
on the certification tag which can be found
on the left door pillar.The handling characteristics of a fully load-
ed vehicle depend greatly on the load dis-
tribution. It is therefore recommended to
load the vehicle according to the illustra-
tions shown, with the heaviest items being
placed towards the front of the vehicle.
Always place items being carried against
front or rear seat backrests, and fasten
them as securely as possible.
The heaviest portion of the cargo should al-
ways be kept as low as possible since it in-
fluences the handling characteristics of
the vehicle.
Warning!
G
Always fasten items being carried as secure-
ly as possible.
In an accident, during hard braking or sud-
den maneuvers, loose items will be thrown
around inside the vehicle and can cause in-
jury to vehicle occupants unless the items
are securely fastened in the vehicle.
To help avoid personal injury during a colli-
sion or sudden maneuver, exercise care
when transporting cargo. Put luggage or car-
go in the trunk if possible. Do not pile lug-
gage or cargo higher than the seat backs.
Do not place anything on the rear-window
shelf.
Never drive vehicle with trunk open. Deadly
carbon monoxide (CO) gases may enter ve-
hicle interior resulting in unconsciousness
and death.
Page 241 of 442
241 Controls in detail
Loading
Cargo tie-down rings*
Four rings1 are located in the trunk.�
Carefully secure cargo by applying
even load on all rings with rope of suffi-
cient strength to hold down the cargo.
Always follow loading instructions
(�page 240).Rear seat
There is a cargo tie-down ring located on
each side of the footwell under the rear
seat.