Page 304 of 400
304 Practical hintsWhere will I find ...?Minispare wheel bolts
1Wheel bolt for light alloy rims
2Wheel bolt for Minispare wheel or other
steel rims (located in vehicle tool kit)
!Wheel bolts2 must be used when
mounting the Minispare wheel or other
steel rims. The use of any wheel bolts
other than wheel bolts2 for the
Minispare wheel or other steel rims will
physically damage the vehicle’s
brakes.
Warning!
G
Make sure to use the original length wheel
bolts when remounting the original wheel
after it has been repaired.
Page 318 of 400

318 Practical hintsFlat tire
�Flat tirePreparing the vehicle�
Park the vehicle as far as possible from
moving traffic on a hard surface.
�
Turn on the hazard warning flashers.
�
Engage the steering wheel lock in the
straight ahead position and set the
parking brake.
�
Move the gear selector lever toP.
�
Have any passenger exit the vehicle at
a safe distance from the roadway.
Mounting the Minispare wheel
In the case of a flat tire, you may
temporarily use the Minispare wheel when
observing the following restrictions:�
Do not exceed vehicle speed of 50 mph
(80 km/h).
�
Drive to the nearest tire repair facility
to have the flat tire repaired or
replaced as appropriate.
�
Do not operate vehicle with more than
one spare wheel mounted.Preparing the vehicle
Prepare the vehicle as described on
(
�page 318).
�
Take the wheel wrench, jack and wheel
bolts out of the storage compartment
behind the left trim panel
(�page 300).
�
Take the Minispare wheel out of the
storage compartment underneath the
cargo compartment floor
(�page 302).
Lifting the vehicle
�
Prevent the vehicle from rolling away
by blocking wheels with wheel chocks
(not included) or other sizable objects.
When changing wheel on a level surface:
�
Place one chock in front of and one
behind the wheel that is diagonally
opposite to the wheel being changed.
When changing wheel on a hill:
�
Place chocks on the downhill side
blocking both wheels of the other axle.
Warning!
G
The dimensions of the Minispare wheel are
different from those of the road wheels. As
a result, the vehicle handling characteristics
change when driving with a Minispare wheel
mounted.
The spare wheel should only be used
temporarily, and replaced with a regular
road wheel as quick as possible.
Page 321 of 400
�
Clean contact surfaces of whee")
321 Practical hints
Flat tire
Mounting the new wheel
1Wheel bolt for light alloy rims
2Wheel bolt for Minispare wheel or other
steel rims (located in vehicle tool kit)�
Clean contact surfaces of wheel and
wheel hub.
�
Guide Minispare wheel onto alignment
bolt and push it on.
�
Insert wheel bolts and tighten them
slightly.
!Wheel bolts2 must be used when
mounting the Minispare wheel or other
steel rims. The use of any wheel bolts
other than wheel bolts2 for the
Minispare wheel or other steel rims will
physically damage the vehicle’s
brakes.
!To avoid paint damage, place wheel flat
against hub and hold it there while
installing first wheel bolt.Warning!
G
Always replace wheel bolts that are
damaged or rusted.
Never apply oil or grease to wheel bolts.
Damaged wheel hub threads should be
repaired immediately. Do not continue to
drive under these circumstances! Contact
an authorized Mercedes-Benz Center or call
Roadside Assistance.
Incorrect wheel bolts or improperly tight-
ened wheel bolts can cause the wheel to
come off. This could cause an accident.
Make sure to use the correct mounting
bolts.
Page 323 of 400
323 Practical hints
Flat tire
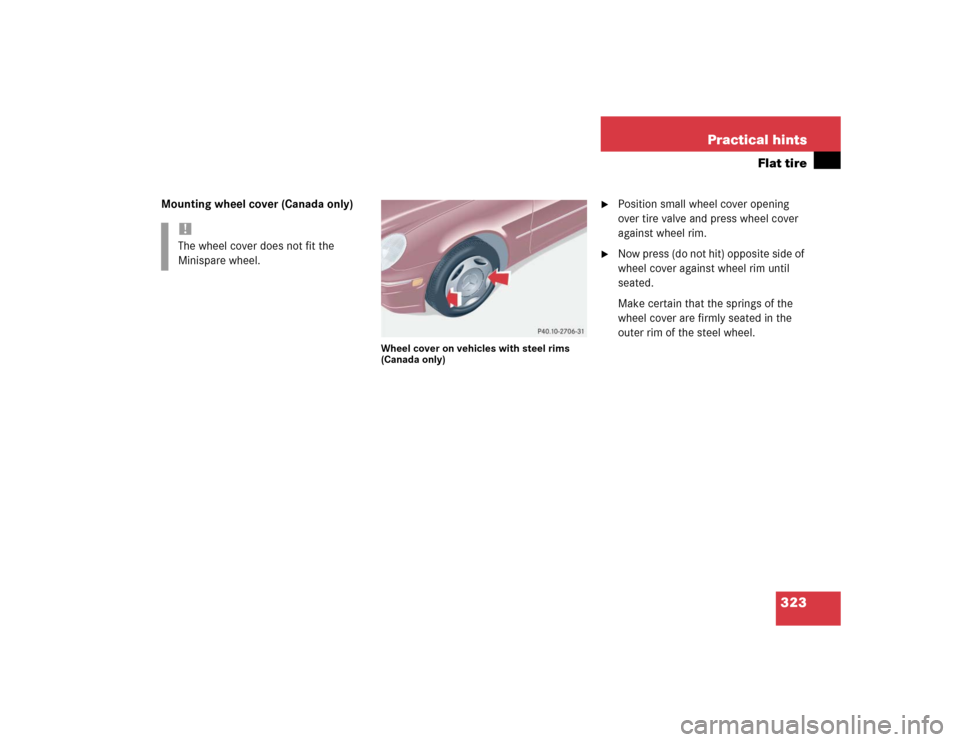
Mounting wheel cover (Canada only)
Wheel cover on vehicles with steel rims
(Canada only)
�
Position small wheel cover opening
over tire valve and press wheel cover
against wheel rim.
�
Now press (do not hit) opposite side of
wheel cover against wheel rim until
seated.
Make certain that the springs of the
wheel cover are firmly seated in the
outer rim of the steel wheel.
!The wheel cover does not fit the
Minispare wheel.
Page 342 of 400
342 Technical dataRims and TiresSame size tiresMinispare wheelModel
C240
C2404MATIC
C320
C3204MATIC
Rims (light alloy)
7 J x16 H2
7 J x16 H2
Rims (steel – Canada only)
7 J x16 H2
-
Wheel offset
1.46 in (37 mm)
1.46 in (37 mm)
Summer tires (radial-ply tires)
225/50 R16 91H
225/50 R16 91H
All-season tires (radial-ply tires)
205/55 R16 91H
205/55 R16 91H
Winter tires (radial-ply tires)
205/55 R16 91H M+S
205/55 R16 91H M+S
Rim (steel)
3.5 B x16 H2
Wheel offset
0.67 in (17 mm)
Tire
T 125/90 R16 98M
1
1Must not be used with snow chains.
Page 366 of 400

366 IndexBattery discharged
Jump starting 327
Battery, vehicle 258, 324
Charging 325
Disconnecting 325
Messages in display 285
Reconnecting 326
Reinstalling 325
Removing 325
Bi-Xenon headlamps* 357
Bi-Xenon type
Front lamp bulbs 313
Block heater 264
Blocking
Rear door window operation 72
Bolts
For Minispare wheel 304
Brake assist system (BAS) 357
Brake fluid 251, 348Brake lamp bulbs 311
Brake lamp, high mounted 311
Brake pads
Message in display 286
Brakes 240
Warning lamp 275
Break-in period 238
Bulbs, replacing 310
Additional turn signals 310
Backup lamps 311
Brake lamps 311
Fog lamps 310
Front lamps 310
High beam 310
High mounted brake lamp 311
License plate lamps 311, 316
Low beam 310
Parking lamps 310, 311, 313, 314
Rear fog lamp 311
Rear fog lamps 315Side marker lamps 310, 315
Standing lamps 310, 311, 313, 314
Tail lamp assemblies 311, 315
Turn signal lamps 310, 311
Button
Audio system 172
C
CAC (Customer assistance center) 357
California
Important notice 11
Calling up
Range (distance to empty) 136
Service indicator 266
CAN system 357
Capacities
Fuels, coolants, lubricants, etc. 346
Cargo area see Cargo compartment
Cargo compartment
Auxiliary fuse box 334
Lighting 106
Parcel net 208
Page 372 of 400

372 IndexF
Fahrenheit
Setting temperature units 125
Fastening the seat belts 40
Fine adjustment
Cruise control 204
First aid kit 300
Flat tire 318
Lowering the vehicle 322
Minispare wheel 302
Mounting the Minispare wheel 318
Preparing the vehicle 318
Flexible fuel vehicles 350
At the gas station 249
Switching fuels 350
Flexible Service System (FSS) 265
Flexible service system (FSS) 358
Fog lamp, rear 103, 311Fog lamps
Replacing bulbs 310
Fog lamps, front
Messages in display 294
Replacing bulbs 311
Switching on 102
Four wheel electronic
traction system (4MATIC) with ESP 79
4MATIC 79
Front airbags 61
Front lamps
Bi-Xenon type 313
Halogen-type 312
Messages in display 293–296
Replacing bulbs 310, 312
Front seat head restraints
Installing 91
Manual seat 91
Power seat* 92
Removing 91Front seats
Heater* 95
FSS 358
FSS (Flexible Service System) 265
Fuel 250
Additives 350
Cruising range 351
E85 (Ethanol fuel) 351
Fuel reserve warning lamp 278
Gasoline additives 350
Premium unleaded
gasoline 250, 347, 349
Requirements 349
Reserve warning 23
Switching (Flexible fuel vehicle) 350
Technical data 346
Fuel additives 350
Fuel consumption statistics
After start 135
Since last reset 135
Page 378 of 400

378 IndexMenus 112
AUDIO 116
In control system 114, 115
Malfunction memory 120
NAVI 119
Settings menu 121
Standard display 116
Submenus 113
TEL* 136
Trip computer 134
Microphone
Hands-free microphone 27
Miles/kilometers in speedometer
Setting 126
Minispare wheel 302, 342
Bolts 304
Mounting 318
Mirrors
Activating exterior rear view mirror
parking position 147
Adjusting 38
Automatic antiglare for
rear view mirror 146Exterior rear view mirror 38
Exterior rear view mirror parking
positions 134
Interior rear view mirror 38
Storing exterior rear view mirror
parking position 99
MON 250
MON (Motor Octane Number) 359
Mph or km/h in speedometer 126
Multicontour seat* 95
Multifunction display 111, 359
Selecting language 126
Standard display 115
Multifunction display messages
ABS 284
BAS 281
Battery 285
Brake fluid 286
Brake pads 286
Check engine 276
Coolant 288
Coolant level 287Cruise control 290
Display 290
Doors 290
Engine 276
Engine oil level 291
ESP 282
Fuel reserve tank 293
Hood 293
Key 293
Lamps 293, 296
Parking brake 286
Sliding/pop-up roof 299
Steering column not
properly locked 298
Steering gear oil level 298
Tele Aid* 299
Telephone* 299
Trunk lid 299
Washer fluid 299
Multifunction
steering wheel 24, 112, 359
Buttons 112

!Wheel bolts2 must be")

7 J x16 H2
7 J x16 H2
Rims (steel – Canada only)
7 J x16 H2
-
Wheel offset
1.46")