Page 311 of 400
311 Practical hints
Replacing bulbs
Rear lamps Notes on bulb replacement
�
Only use 12 volt bulbs of the same type
and with the specified watt rating.
�
Switch lights off before changing a bulb
to prevent short circuits.
�
Always use a clean lint-free cloth when
handling bulbs.
�
Your hands should be dry and free of oil
and grease.
�
If the newly installed bulb does not
come on, visit an authorized
Mercedes-Benz Center.
�
Have the LEDs and bulbs for the
following lamps replaced by an
authorized Mercedes-Benz Center:�
Additional turn signals in the
exterior rear view mirrors
�
High mounted brake lamp
�
Xenon lamps
�
Front fog lamps
Lamp
Type
7
High mounted brake
lamp
LED
8
Brake lamp
P21W
9
Turn signal lamp
PY 21 W
a
Backup lamp
P21W
b
Tail, parking,
standing and side
marker lamp
P21/5W
c
License plate lamps
C5W
d
Rear fog lamp,
driver’s side
P21/4W
Warning!
G
Keep bulbs out of reach of children.
Bulbs and bulb sockets can be very hot.
Allow the lamp to cool down before
changing a bulb.
Halogen lamps contain pressurized gas.
A bulb can explode if you:�
touch or move it when hot
�
drop the bulb
�
scratch the bulb
Wear eye and hand protection.
Because of high voltage in Xenon lamps, it is
dangerous to replace the bulb or repair the
lamp and its components. We recommend
that you have such work done by a qualified
technician.
Page 312 of 400
312 Practical hintsReplacing bulbsReplacing bulbs for front lamps
Halogen headlamps
1Bulb socket for turn signal lamp
2Headlamp cover for high beam head-
lamp and for parking and standing
lamp
3Headlamp cover for low beam head-
lamp4Low beam bulb
5High beam bulb
6Bulb socket for parking and standing
lamp
Low and high beam bulb
�
Switch off the lights.
�
Open the hood (
�page 252).
�
Press the clamp and remove headlamp
cover2 or3.
�
Pull electrical connector off.
�
Unclip the retainer springs and take out
the bulb.
�
Insert the new bulb so that the base
locates in the recess on the holder.
�
Clip the retainer springs and plug the
connector onto the bulb.
�
Align headlamp cover2 or3 and
click into place.
Front turn signal lamp bulb
�
Switch off the lights.
�
Open the hood (
�page 252).
�
Twist bulb socket1 counterclockwise
and pull out.
�
Push bulb into socket, turn counter-
clockwise and remove.
�
Insert new bulb in socket, push in and
twist clockwise.
�
Reinsert bulb socket in lamp and twist
clockwise.
Page 313 of 400
313 Practical hints
Replacing bulbs
Parking and standing lamp bulb�
Switch off the lights.
�
Open the hood (
�page 252).
�
Press the clamp and remove headlamp
cover2.
�
Pull out bulb socket6 with the bulb.
�
Pull the bulb out of bulb socket.
�
Insert a new bulb in the socket.
�
Reinstall bulb socket.
�
Align headlamp cover2 and click into
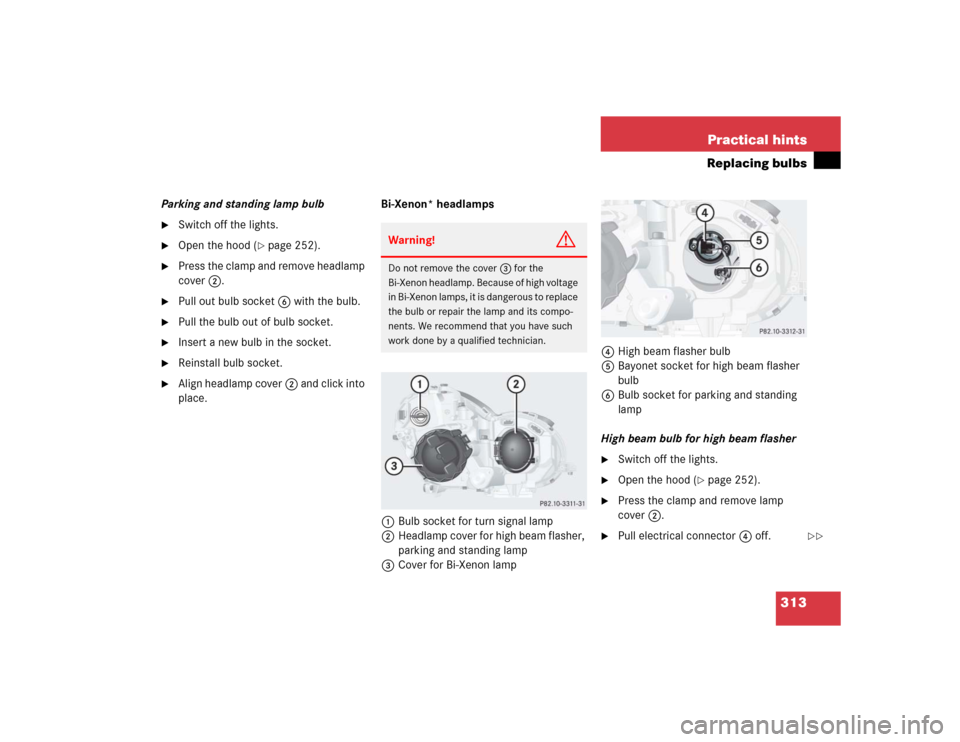
place.Bi-Xenon* headlamps
1Bulb socket for turn signal lamp
2Headlamp cover for high beam flasher,
parking and standing lamp
3Cover for Bi-Xenon lamp4High beam flasher bulb
5Bayonet socket for high beam flasher
bulb
6Bulb socket for parking and standing
lamp
High beam bulb for high beam flasher
�
Switch off the lights.
�
Open the hood (
�page 252).
�
Press the clamp and remove lamp
cover2.
�
Pull electrical connector4 off.
Warning!
G
Do not remove the cover3 for the
Bi-Xenon headlamp. Because of high voltage
in Bi-Xenon lamps, it is dangerous to replace
the bulb or repair the lamp and its compo-
nents. We recommend that you have such
work done by a qualified technician.
��
Page 314 of 400
314 Practical hintsReplacing bulbs�
Twist bayonet socket5 counterclock-
wise to the stop (do not remove).
�
Pull the bulb out of the socket.
�
Insert the new bulb so that the base
locates in the recess in bayonet
socket5.
�
Twist bayonet socket clockwise until
you hear it snap into place.
�
Plug the connector onto the bulb.
�
Align lamp cover2 and click into
place.Front turn signal lamp bulb
�
Switch off the lights.
�
Open the hood (
�page 252).
�
Twist bulb socket1 counterclockwise
and pull out.
�
Push bulb into socket, turn counter-
clockwise and remove.
�
Insert new bulb in socket, push in and
twist clockwise.
�
Reinsert bulb socket in lamp and twist
clockwise.Parking and standing lamp bulb
�
Switch off the lights.
�
Open the hood (
�page 252).
�
Press the clamp and remove lamp
cover2.
�
Pull out bulb socket6 with the bulb.
�
Pull the bulb out of bulb socket.
�
Insert a new bulb in the socket.
�
Reinstall bulb socket.
�
Align lamp cover2 and click into
place.
��
Page 315 of 400
315 Practical hints
Replacing bulbs
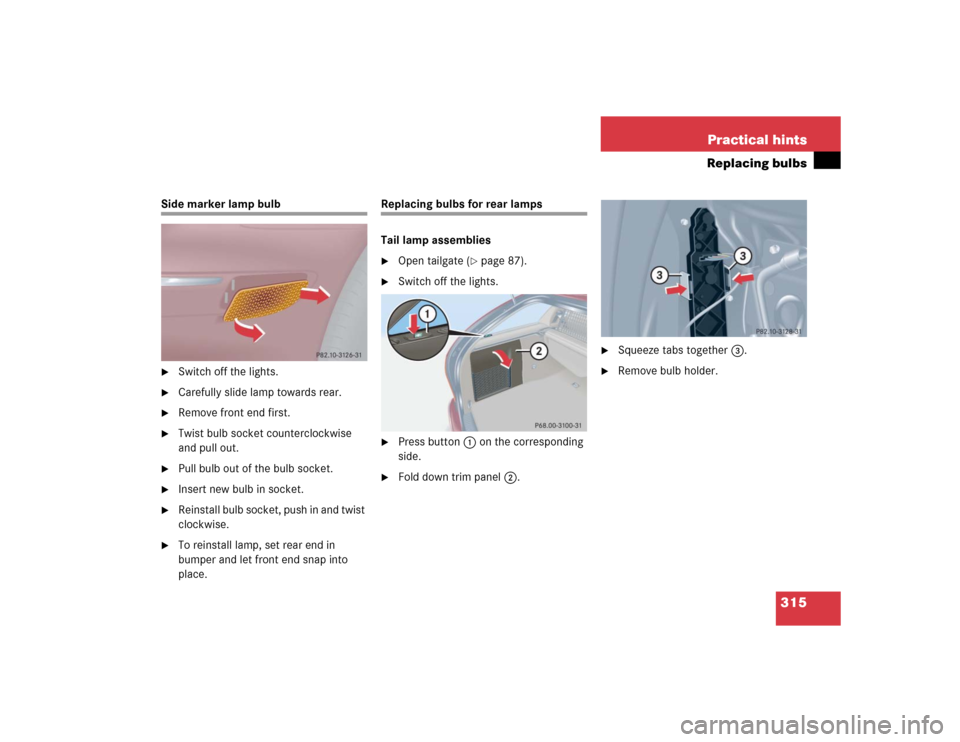
Side marker lamp bulb�
Switch off the lights.
�
Carefully slide lamp towards rear.
�
Remove front end first.
�
Twist bulb socket counterclockwise
and pull out.
�
Pull bulb out of the bulb socket.
�
Insert new bulb in socket.
�
Reinstall bulb socket, push in and twist
clockwise.
�
To reinstall lamp, set rear end in
bumper and let front end snap into
place.
Replacing bulbs for rear lamps
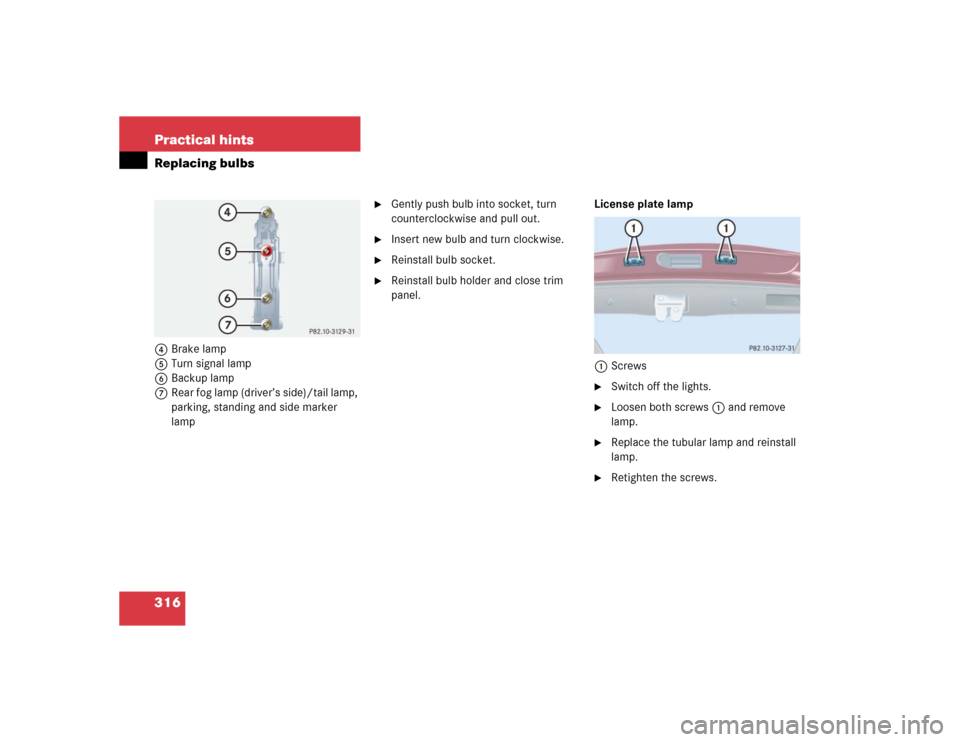
Tail lamp assemblies�
Open tailgate (
�page 87).
�
Switch off the lights.
�
Press button1 on the corresponding
side.
�
Fold down trim panel2.
�
Squeeze tabs together3.
�
Remove bulb holder.
Page 316 of 400
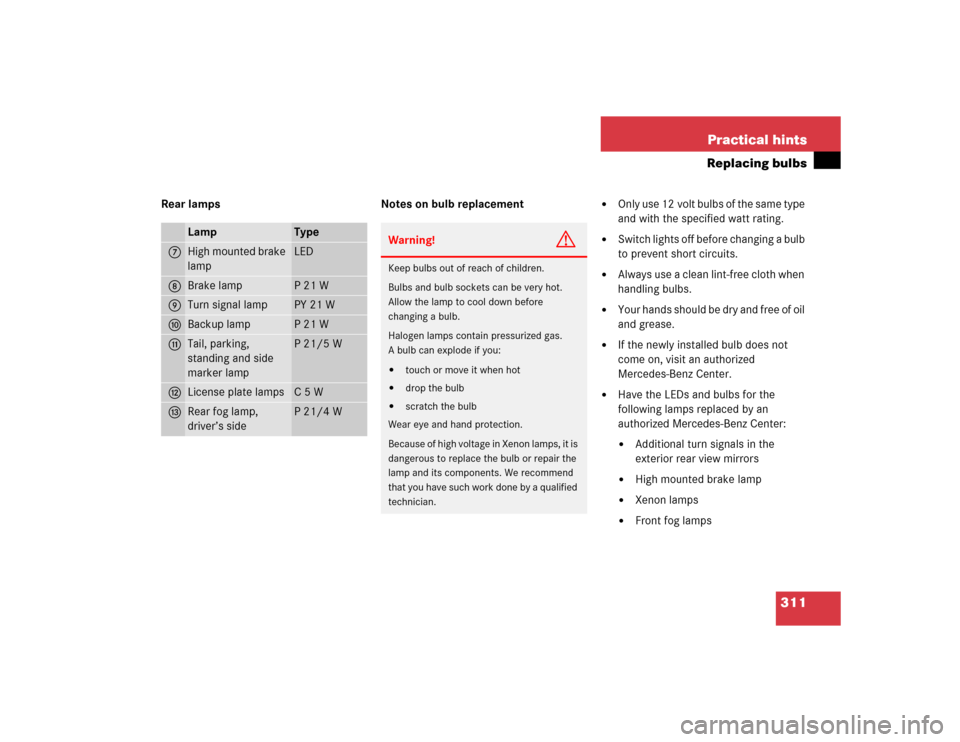
316 Practical hintsReplacing bulbs4Brake lamp
5Turn signal lamp
6Backup lamp
7Rear fog lamp (driver’s side)/tail lamp,
parking, standing and side marker
lamp
�
Gently push bulb into socket, turn
counterclockwise and pull out.
�
Insert new bulb and turn clockwise.
�
Reinstall bulb socket.
�
Reinstall bulb holder and close trim
panel.License plate lamp
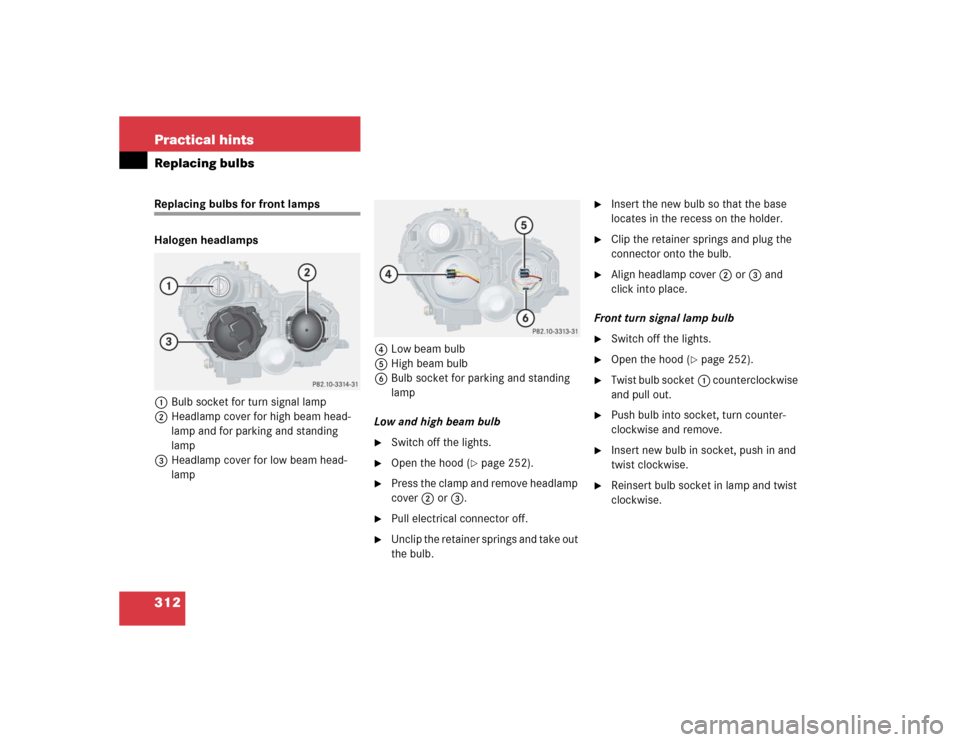
1Screws
�
Switch off the lights.
�
Loosen both screws1 and remove
lamp.
�
Replace the tubular lamp and reinstall
lamp.
�
Retighten the screws.
Page 365 of 400

365 Index
Operating safety 169
Operation 172
Radio operation 175
Switching off 172
Switching on 172
Telephone operation 189
Automatic antiglare
for rear view mirror 146
Automatic central locking
Activating/deactivating
(control system) 131
Automatic climate control* 158
Activating 159
Adjusting air distribution 162
Adjusting air volume 162
Air recirculation mode 163
Deactivating 159
Defrosting 163
Rear window defroster 149
Residual heat utilization 167
Residual ventilation 167
Setting the temperature 161Automatic headlamp mode 101
Automatic lighting control
Activating 105
Deactivating 105
Automatic locking when driving 88
Automatic transmission 139
Accelerator position 144
Comfort program mode 143
Emergency operation
(Limp Home Mode) 144
Fluid level 256
Gear ranges 141
Gear selector lever position 139, 142
Gear shifting malfunctions 144
Kickdown 144
Manual shifting 140
One-touch gearshifting 140
Program mode selector switch 143
Starting with 43
Transmission fluid 256
Auxiliary fuse box 334B
BabySmart
TM
Airbag deactivation system 68
Compatible child seats 68
Self-test 68
BabySmart
TM airbag
deactivation system 357
BabySmartTM compatible
child seats 357
Backrest
Folding forward 211
Folding rearward 212
Backrest tilt 33
Backup lamps 311, 316
Bulbs 311
BAS 75, 357
Messages in display 281
Batteries, SmartKey
Changing 306
Check lamp 85
Checking 86
Page 366 of 400

366 IndexBattery discharged
Jump starting 327
Battery, vehicle 258, 324
Charging 325
Disconnecting 325
Messages in display 285
Reconnecting 326
Reinstalling 325
Removing 325
Bi-Xenon headlamps* 357
Bi-Xenon type
Front lamp bulbs 313
Block heater 264
Blocking
Rear door window operation 72
Bolts
For Minispare wheel 304
Brake assist system (BAS) 357
Brake fluid 251, 348Brake lamp bulbs 311
Brake lamp, high mounted 311
Brake pads
Message in display 286
Brakes 240
Warning lamp 275
Break-in period 238
Bulbs, replacing 310
Additional turn signals 310
Backup lamps 311
Brake lamps 311
Fog lamps 310
Front lamps 310
High beam 310
High mounted brake lamp 311
License plate lamps 311, 316
Low beam 310
Parking lamps 310, 311, 313, 314
Rear fog lamp 311
Rear fog lamps 315Side marker lamps 310, 315
Standing lamps 310, 311, 313, 314
Tail lamp assemblies 311, 315
Turn signal lamps 310, 311
Button
Audio system 172
C
CAC (Customer assistance center) 357
California
Important notice 11
Calling up
Range (distance to empty) 136
Service indicator 266
CAN system 357
Capacities
Fuels, coolants, lubricants, etc. 346
Cargo area see Cargo compartment
Cargo compartment
Auxiliary fuse box 334
Lighting 106
Parcel net 208