Page 7 of 400

Contents
Practical hints................................. 273
What to do if … .................................. 274
Lamps in instrument cluster ........ 274
Lamp in center console................ 279
Messages in the display ............... 280
Where will I find ...? ........................... 300
First aid kit ................................... 300
Vehicle tool kit ............................. 300
Minispare wheel ........................... 302
Unlocking/locking in an emergency .. 305
Unlocking the vehicle ................... 305
Locking the vehicle ...................... 306
Changing batteries in
the SmartKey ............................... 306
Fuel filler flap ............................... 308
Manually unlocking the
transmission gear selector lever .. 308
Opening/closing in an emergency..... 309
Sliding/pop-up roof* ................... 309Replacing bulbs .................................. 310
Bulbs ............................................. 310
Replacing bulbs for front lamps .... 312
Side marker lamp bulb .................. 315
Replacing bulbs for rear lamps ..... 315
Replacing wiper blades....................... 317
Removing wiper blades ................. 317
Installing wiper blades .................. 317
Flat tire ............................................... 318
Preparing the vehicle .................... 318
Mounting the Minispare wheel...... 318
Battery................................................ 324
Disconnecting the battery............. 325
Removing the battery.................... 325
Charging and reinstalling
the battery .................................... 325
Reconnecting the battery.............. 326Jump starting...................................... 327
Towing the vehicle.............................. 329
Installing towing eye bolt .............. 332
Fuses.................................................. 333
Fuse box in
passenger compartment ............... 333
Fuse box in engine compartment . 333
Auxiliary fuse box in
cargo compartment ...................... 334
Page 251 of 400
.
2Brake fluid (fuse box cover removed)
Rem")
251 Operation
At the gas station
Check regularly and before a long trip
1Coolant level
For more information on coolant, see
“Coolant level” (
�page 257).
2Brake fluid (fuse box cover removed)
Removing fuse box cover
(
�page 333).
3Windshield washer and headlamp
cleaning system*
For more information on filling up the
washer reservoir, see “Windshield
washer system and headlamp cleaning
system*” (
�page 259).Engine oil level
For more information on engine oil level,
see “Engine oil” (
�page 254).
Opening hood (
�page 252).
Vehicle lighting
Check function and cleanliness. For more
information on replacing light bulbs, see
“Replacing bulbs” (�page 310).
Exterior lamp switch (�page 100).
Tire inflation pressure
More information on tire inflation pressure
(
�page 261).
!If you find that the brake fluid in the
brake fluid reservoir has fallen to the
minimum mark or below, have the
brake system checked for brake pad
thickness and leaks immediately.
Notify an authorized Mercedes-Benz
Center immediately. Do not add brake
fluid as this will not solve the problem.
For more information, see “Practical
hints” (
�page 275).
Page 273 of 400
273 Practical hints
What to do if …
Where will I find ...?
Unlocking/locking in an emergency
Opening/closing in an emergency
Replacing bulbs
Replacing wiper blades
Flat tire
Battery
Jump starting
Towing the vehicle
Fuses
Page 274 of 400

274 Practical hintsWhat to do if …
�What to do if …Lamps in instrument clusterGeneral information:
If a bulb in the instrument cluster fails to
come on during the bulb self-check when turning the SmartKey in the starter switch
to position2, have it checked and replaced
if necessary.Problem
Possible cause
Suggested solution
-
The yellow ABS malfunction
indicator lamp comes on while
driving.
The ABS has detected a malfunction and has
switched off. The BAS and the ESP are also
switched off (see messages in display).
The brake system is still functioning normally
but without the ABS available.
�
Continue driving with added caution.
Wheels may lock during hard braking,
reducing steering capability.
�
Have the system checked at an autho-
rized Mercedes-Benz Center as soon
as possible.
Failure to follow these instructions
increases the risk of an accident.
�
Read and observe messages in the
display (
�page 280).
The charging voltage has fallen below ten
volts. The ABS has switched off.
�
When the voltage is above this value
again, the ABS is operational again.
�
If necessary, have the generator
(alternator) and battery checked.
Page 294 of 400

294 Practical hintsWhat to do if …Display symbol
Display message
Possible cause
Possible solution
.
FRONT FOGLIGHT, L
CHECK LIGHT!
The left front fog lamp is malfunctioning.
�
Replace the bulb as soon as possible.
FRONT FOGLIGHT, R
CHECK LIGHT!
The right front fog lamp is malfunctioning.
�
Replace the bulb as soon as possible.
REAR FOGLIGHT
CHECK LIGHT!
The rear fog lamp is malfunctioning.
�
Replace the bulb as soon as possible.
HIGH BEAM, L
CHECK LIGHT!
The left high beam lamp is
malfunctioning.
�
Replace the bulb as soon as possible.
HIGH BEAM, R
CHECK LIGHT!
The right high beam lamp is
malfunctioning.
�
Replace the bulb as soon as possible.
LIGHT SENSOR
VISIT WORKSHOP!
The lamp sensor is malfunctioning. The
headlamps switch on automatically.
�
In the control system, set lamp
operation to manual (
�page 121).
�
Switch on headlamps using the
exterior lamp switch.
�
Visit an authorized Mercedes-Benz
Center as soon as possible.
LICENSE PLATE LIGHT, L
CHECK LIGHT!
The left license plate lamp is
malfunctioning.
�
Replace the bulb as soon as possible.
LICENSE PLATE LIGHT, R
CHECK LIGHT!
The right license plate lamp is
malfunctioning.
�
Replace the bulb as soon as possible.
Page 295 of 400

295 Practical hints
What to do if …
Display symbol
Display message
Possible cause
Possible solution
.
LIGHTS
TURN OFF LIGHTS!
This display appears if the driver’s door is
opened and no SmartKey in the starter
switch.
�
Insert SmartKey in the starter switch.
�
Switch off the headlights.
LOW BEAM, L
CHECK LIGHT!
The left low beam lamp is malfunctioning.
�
Visit an authorized Mercedes-Benz
Center as soon as possible.
LOW BEAM, R
CHECK LIGHT!
The right low beam lamp is
malfunctioning.
�
Visit an authorized Mercedes-Benz
Center as soon as possible.
REVERSE LIGHT, L
CHECK LIGHT!
The left backup lamp is malfunctioning.
�
Replace the bulb as soon as possible.
REVERSE LIGHT, R
CHECK LIGHT!
The right backup lamp is malfunctioning.
�
Replace the bulb as soon as possible.
MARKER LIGHT, FL
CHECK LIGHTS!
BACK-UP LIGHT ON!
The left parking lamps are
malfunctioning. A backup bulb is being
used.
�
Visit an authorized Mercedes-Benz
Center as soon as possible.
MARKER LIGHT, FR
CHECK LIGHTS!
BACK-UP LIGHT ON!
The right parking lamps are
malfunctioning. A backup bulb is being
used.
�
Visit an authorized Mercedes-Benz
Center as soon as possible.
TAIL LIGHT, L
CHECK LIGHTS!
BACK-UP LIGHT ON!
The left tail lamp is malfunctioning.
A backup bulb is being used.
�
Visit an authorized Mercedes-Benz
Center as soon as possible.
Page 296 of 400

296 Practical hintsWhat to do if …Display symbol
Display message
Possible cause
Possible solution
.
TAIL LIGHT, R
CHECK LIGHTS!
BACK-UP LIGHT ON!
The right tail lamp is malfunctioning.
A backup bulb is being used.
�
Visit an authorized Mercedes-Benz
Center as soon as possible.
TURN SIG., LF
CHECK LIGHT!
The left front turn signal lamp is
malfunctioning.
�
Replace the bulb as soon as possible.
TURN SIG., RF
CHECK LIGHT!
The right front turn signal lamp is
malfunctioning.
�
Replace the bulb as soon as possible.
TURN SIG., LR
CHECK LIGHT!
The left rear turn signal lamp is
malfunctioning.
�
Replace the bulb as soon as possible.
TURN SIG., RR
CHECK LIGHT!
The right rear turn signal lamp is
malfunctioning.
�
Replace the bulb as soon as possible.
TURN SIG. MIRROR, L
CHECK LIGHT!
The left turn signal in the side mirror is
malfunctioning. This message will only
appear if all light emitting diodes have
stopped working.
�
Have the LEDs replaced as soon as
possible.
TURN SIG. MIRROR, R
CHECK LIGHT!
The right turn signal in the side mirror is
malfunctioning. This message will only
appear if all light emitting diodes have
stopped working.
�
Have the LEDs replaced as soon as
possible.
Page 310 of 400
310 Practical hintsReplacing bulbs
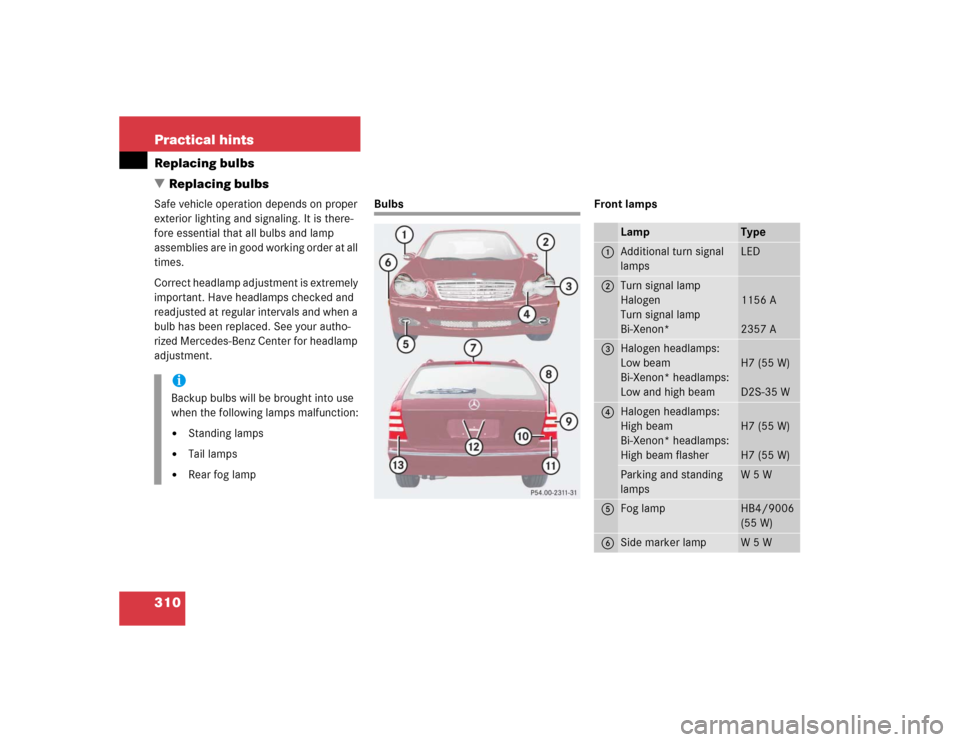
�Replacing bulbsSafe vehicle operation depends on proper
exterior lighting and signaling. It is there-
fore essential that all bulbs and lamp
assemblies are in good working order at all
times.
Correct headlamp adjustment is extremely
important. Have headlamps checked and
readjusted at regular intervals and when a
bulb has been replaced. See your autho-
rized Mercedes-Benz Center for headlamp
adjustment.
Bulbs Front lamps
iBackup bulbs will be brought into use
when the following lamps malfunction:�
Standing lamps
�
Tail lamps
�
Rear fog lamp
Lamp
Type
1
Additional turn signal
lamps
LED
2
Turn signal lamp
Halogen
Turn signal lamp
Bi-Xenon*
1156 A
2357 A
3
Halogen headlamps:
Low beam
Bi-Xenon* headlamps:
Low and high beam
H7 (55 W)
D2S-35 W
4
Halogen headlamps:
High beam
Bi-Xenon* headlamps:
High beam flasher
H7 (55 W)
H7 (55 W)
Parking and standing
lamps
W5W
5
Fog lamp
HB4/9006
(55 W)
6
Side marker lamp
W5W