Page 72 of 400

72 Safety and SecurityOccupant safety
Blocking of rear door window operation
The override switch is located on the door
control panel of the driver’s door.
1Override switch�
Slide override switch1 to the right.
The rear door windows can no longer
be operated using the switch located in
the rear doors.For more information, see “Power win-
dows” (
�page 196).
Warning!
G
Children too big for child restraint systems
must ride in back seats using regular seat
belts. Position shoulder belt across chest
and shoulder, not face or neck. A booster
seat may be necessary to achieve proper
belt positioning for children from 41 lbs until
they reach a height where a lap/shoulder
belt fits properly without a booster.
Before installing the child seat, make sure
anchors1 are folded out and locked in
place.
Install child seat according to manufactur-
er’s instructions.
T h e c h i l d s e a t m u s t b e f i r m l y a t t a c h e d i n t h e
right and left side anchors1.
An incorrectly mounted child seat may come
loose during an accident which could result
in serious injury or death to your child.
Damaged or impact damaged child seats or
child seat anchors1 must be replaced.
Do not leave children unattended in the
vehicle, even if the children are secured in a
child restraint system.
iOperation of the rear door windows
with the switches located on the door
control panel of the driver’s door is still
possible.Warning!
G
Activate the override switch when children
are riding in the back seats of the vehicle.
The children may otherwise injure them-
selves, e.g. by becoming trapped in the win-
dow opening.
When leaving the vehicle, always remove the
SmartKey from the starter switch, and lock
the vehicle. Do not leave children unattend-
ed in the vehicle, or with access to an un-
locked vehicle. Unsupervised use of vehicle
equipment may cause an accident and/or
serious personal injury.
Page 90 of 400
.
Easy-entry/exit feature*
With the easy-entry/exit feature activated,
the steering wheel tilts upward")
90 Controls in detailSeats
�SeatsFor information on seat adjustment, see
“Seats” (
�page 32).
Easy-entry/exit feature*
With the easy-entry/exit feature activated,
the steering wheel tilts upwards and the
driver’s seat moves to the rear.
This allows easier entry into and exit from
the vehicle when the driver’s door is
opened. However, the engine must be
turned off.
When the SmartKey is inserted in the
starter switch and the driver’s door is
closed, the steering wheel and the driver’s
seat return to their last set positions.You can activate the following functions:
�
Steering column:
Only the steering column is adjusted.
�
Steering column and seat:
The steering column and the seat are
adjusted.
The easy-entry/exit feature can be
switched on or off in the convenience
submenu of the control system
(
�page 132).
Warning!
G
You must make sure no one can become
trapped or injured by the moving steering
wheel and the driver’s seat when the
easy-entry/exit feature* is activated, the
driver’s door is being opened and the engine
is turned off or the SmartKey is removed
from the starter switch.
Do not leave children unattended in the
vehicle, or with access to an unlocked
vehicle. Children could open the driver’s
door and unintentionally activate the
easy-entry/exit feature*, which could result
in an accident and/or serious personal
injury.
iTo cancel seat/steering wheel
movement, do one of the following:�
Press the seat adjustment switch*
(�page 28)
�
Move the steering column stalk*
(�page 37)
�
Press the memory button*
(�page 28)
Page 91 of 400
.
Front seat head restraints, manual seat
1Rele")
91 Controls in detail
Seats
Removing and installing front seat head restraints
For information on head restraint
adjustment, see “Seats” (
�page 32).
Front seat head restraints, manual seat
1Release buttonRemoving front seat head restraints
�
Pull head restraint to its highest
position.
�
Push release button1 and pull out
head restraint.
Installing front seat head restraints
�
Insert head restraint and push it down
until it engages.
�
Push release button1 and adjust
head restraint to desired position.
Warning!
G
For your protection, drive only with properly
positioned head restraints.
Adjust head restraint so that the head
restraint supports the back of the head at
eye level. This will reduce the potential for
injury to the head and neck in the event of
an accident or similar situation.
Do not drive the vehicle without the seat
head restraints. Head restraints are intend-
ed to help reduce injuries during an acci-
dent.
Do not interchange head restraints from
front and rear seat.
iTilt the backrest to the rear for easier
removal and installation of the head
restraints.
Page 92 of 400

92 Controls in detailSeatsFront seat head restraints, power seat*
Removing front seat head restraints�
Press switch1 upwards and hold until
head restraint is fully extended.
�
Pull out head restraint.
Installing front seat head restraints
�
Press switch1 upwards and hold for
about five seconds.
�
Push head restraint down until it
engages.
�
Adjust head restraint to desired
position (
�page 35).
Rear seat head restraints
Head restraint height (rear outer seats)
1Release button
Raising:�
Manually adjust the height of the head
restraint by pulling it upward.
If the head restraint is fully retracted,
push release button1 and pull the
head restraint out.Lowering:
�
To lower the head restraint, push
release button1 and push down on
the head restraint.Warning!
G
For your protection, drive only with properly
positioned head restraints.
Adjust head restraint so that the head
restraint supports the back of the head at
eye level. This will reduce the potential for
injury to the head and neck in the event of
an accident or similar situation.
Do not drive the vehicle without the seat
head restraints. Head restraints are
intended to help reduce injuries during an
accident.
Page 93 of 400
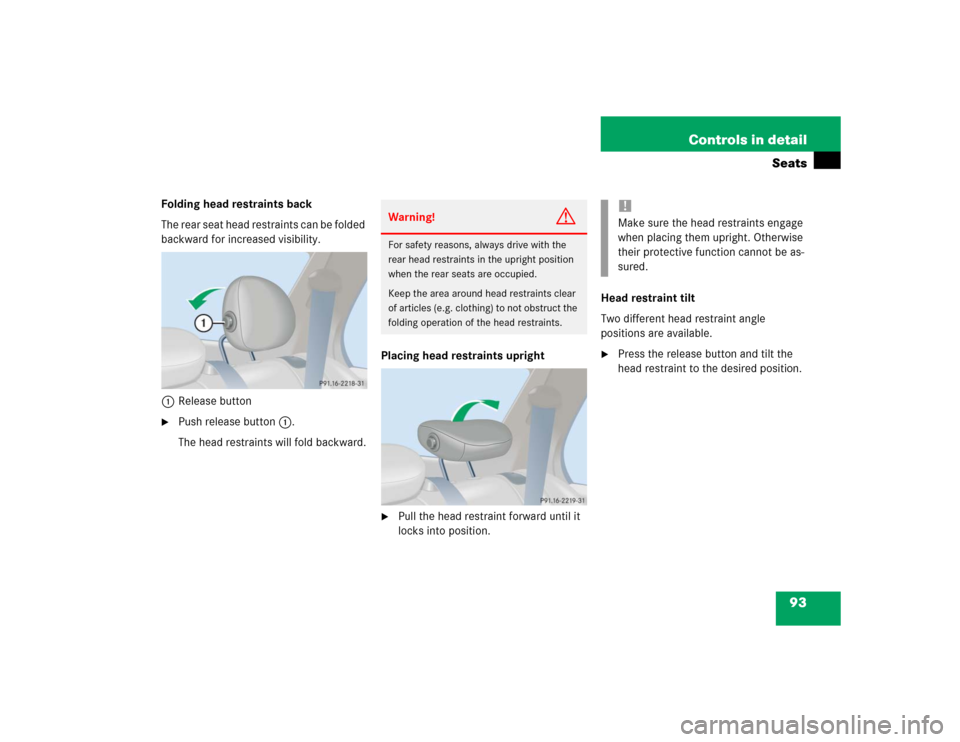
93 Controls in detail
Seats
Folding head restraints back
T h e r e a r s e a t h e a d r e s t r a i n t s c a n b e f o l d e d
backward for increased visibility.
1Release button�
Push release button1.
The head restraints will fold backward.Placing head restraints upright
�
Pull the head restraint forward until it
locks into position.Head restraint tilt
Two different head restraint angle
positions are available.
�
Press the release button and tilt the
head restraint to the desired position.
Warning!
G
For safety reasons, always drive with the
rear head restraints in the upright position
when the rear seats are occupied.
Keep the area around head restraints clear
of articles (e.g. clothing) to not obstruct the
folding operation of the head restraints.
!Make sure the head restraints engage
when placing them upright. Otherwise
their protective function cannot be as-
sured.
Page 94 of 400
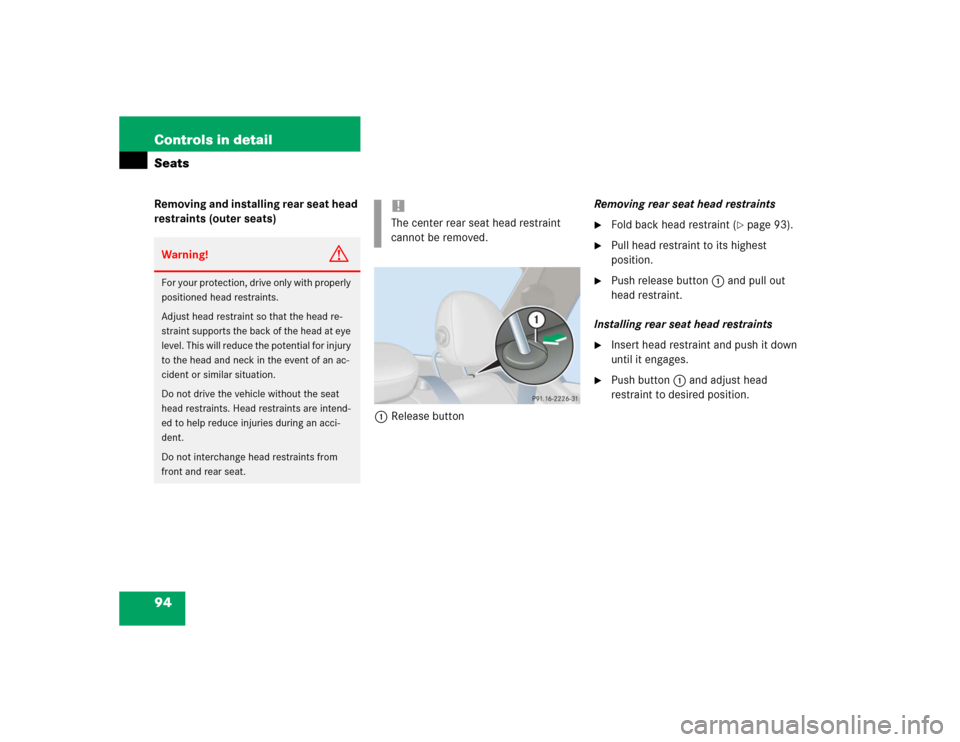
94 Controls in detailSeatsRemoving and installing rear seat head
restraints (outer seats)
1Release buttonRemoving rear seat head restraints
�
Fold back head restraint (
�page 93).
�
Pull head restraint to its highest
position.
�
Push release button1 and pull out
head restraint.
Installing rear seat head restraints
�
Insert head restraint and push it down
until it engages.
�
Push button1 and adjust head
restraint to desired position.
Warning!
G
For your protection, drive only with properly
positioned head restraints.
Adjust head restraint so that the head re-
straint supports the back of the head at eye
level. This will reduce the potential for injury
to the head and neck in the event of an ac-
cident or similar situation.
Do not drive the vehicle without the seat
head restraints. Head restraints are intend-
ed to help reduce injuries during an acci-
dent.
Do not interchange head restraints from
front and rear seat.
!The center rear seat head restraint
cannot be removed.
Page 98 of 400
98 Controls in detailMemory function*Storing positions into memory�
Adjust the seats, steering wheel and
rear view mirrors to the desired posi-
tion (
�page 32).
�
Turn button2 to selected memory
position.
�
Press memory button1.
�
Release memory button and push
button2 within three seconds.
All the settings are stored at the
selected position.
Recalling positions from memory�
Turn button2 to selected memory
position.
�
Press and hold button2 until the seat,
steering wheel and rear view mirrors
have fully moved to the stored posi-
tions.iReleasing the button immediately
stops movement to the stored posi-
tions.
Warning!
G
Do not operate the power seats using the
memory button if the seat backrest is in an
excessively reclined position. Doing so
could cause damage to front or rear seats.
First move backrest to an upright position.
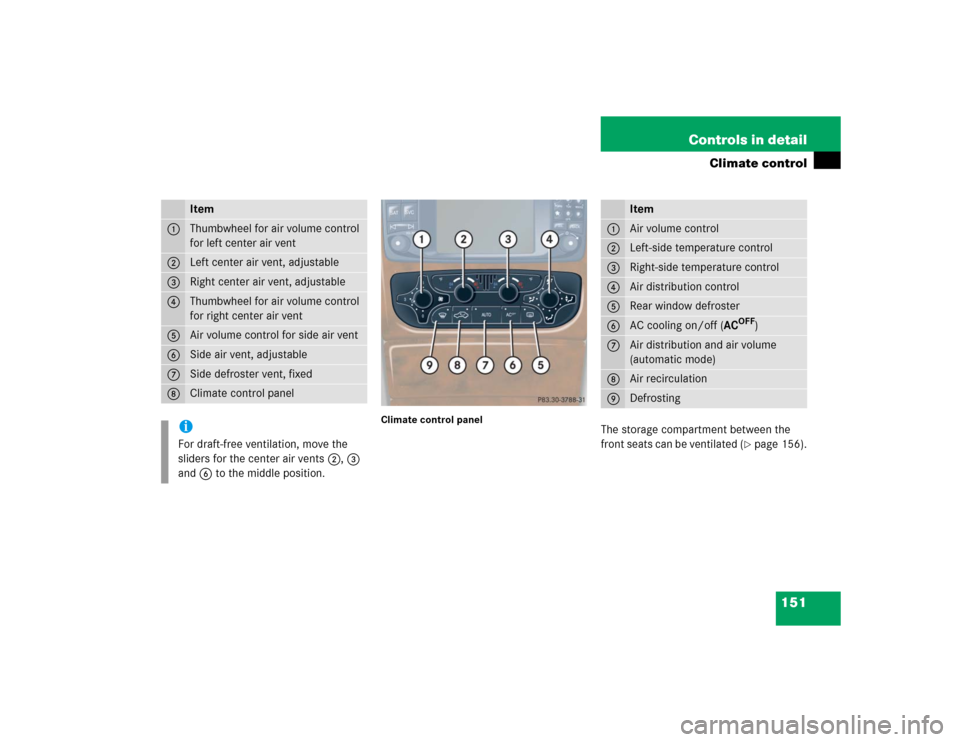
Page 151 of 400
151 Controls in detail
Climate control
Climate control panel
The storage compartment between the
front seats can be ventilated (
�page 156).
Item
1
Thumbwheel for air volume control
for left center air vent
2
Left center air vent, adjustable
3
Right center air vent, adjustable
4
Thumbwheel for air volume control
for right center air vent
5
Air volume control for side air vent
6
Side air vent, adjustable
7
Side defroster vent, fixed
8
Climate control paneliFor draft-free ventilation, move the
sliders for the center air vents2, 3
and6 to the middle position.
Item
1
Air volume control
2
Left-side temperature control
3
Right-side temperature control
4
Air distribution control
5
Rear window defroster
6
AC cooling on/off (AC
OFF
)
7
Air distribution and air volume
(automatic mode)
8
Air recirculation
9
Defrosting