Page 216 of 243
209
Info Services*/System settings
System settings
Setting the time in increments of 30 mi-
nutes
You can set the the time to any local time
(time zone) in increments of 30 minutes.
1COMAND receives GPS time
2Setting the clock (increments of 30 mi-
nutes)
3Selects the country and the time zone
(
�page 210)
4Selects the time format (
�page 214)
�
Turn the right-hand rotary/push-button
v to highlight “Date/Time...” in the
settings menu and press to confirm.
The menu displays the date and the
time, minutes are highlighted.Activating the setting mode
�
Press the right-hand rotary/push-
button v.
Setting mode is active, the minutes will
appear in red.
P82.85-7714-312
3
41
P82.85-7715-31
Page 218 of 243

211
Info Services*/System settings
System settings
�
Turn the right-hand rotary/push-button
v to highlight “Country (Time)...” in
the settings menu and press to con-
firm.
An input menu will appear.
�
Turn the right-hand rotary/push-button
v to highlight the initial letter for the
country name and press to confirm.
The letter appears in 1.
�
Enter additional letters.
�
Press the right-hand rotary/push-
button v longer than 2 seconds.
or
�
Turn the right-hand rotary/push-button
v to highlight “Country List” and press
to confirm.
The country list appears.
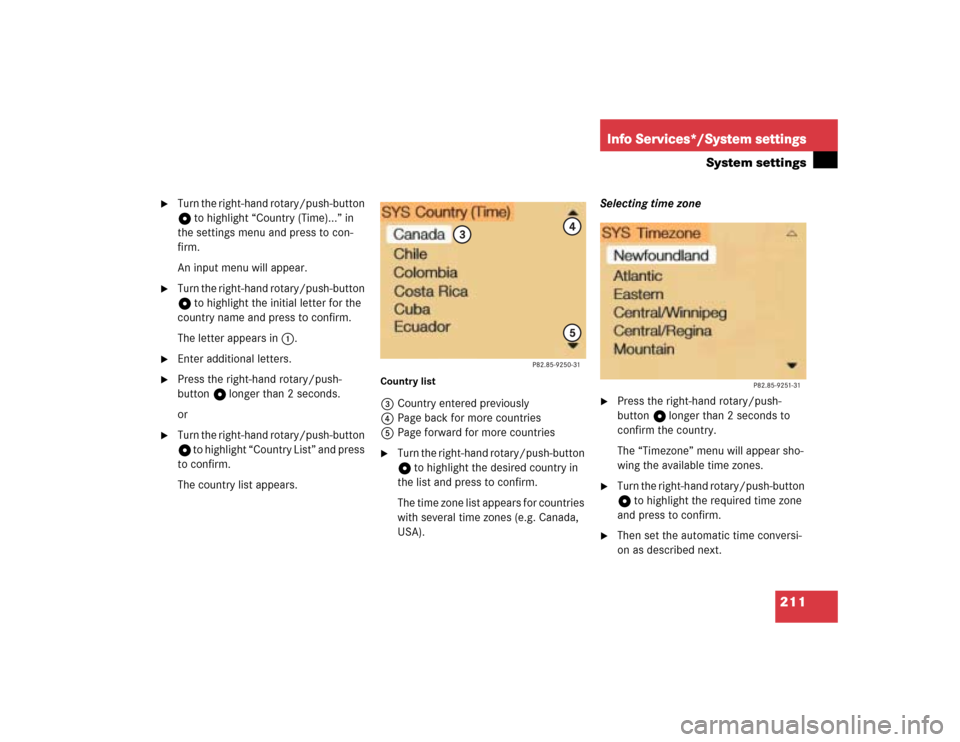
Country list3Country entered previously
4Page back for more countries
5Page forward for more countries�
Turn the right-hand rotary/push-button
v to highlight the desired country in
the list and press to confirm.
The time zone list appears for countries
with several time zones (e.g. Canada,
USA).Selecting time zone
�
Press the right-hand rotary/push-
button v longer than 2 seconds to
confirm the country.
The “Timezone” menu will appear sho-
wing the available time zones.
�
Turn the right-hand rotary/push-button
v to highlight the required time zone
and press to confirm.
�
Then set the automatic time conversi-
on as described next.
Page 220 of 243

213
Info Services*/System settings
System settings
Manually setting date and clock
You must manually set the date and clock,
if�
COMAND does not receive a GPS time
�
the clock has been disconnected from
the vehicle battery
�
the dates of the change between sum-
mer and winter time are not available
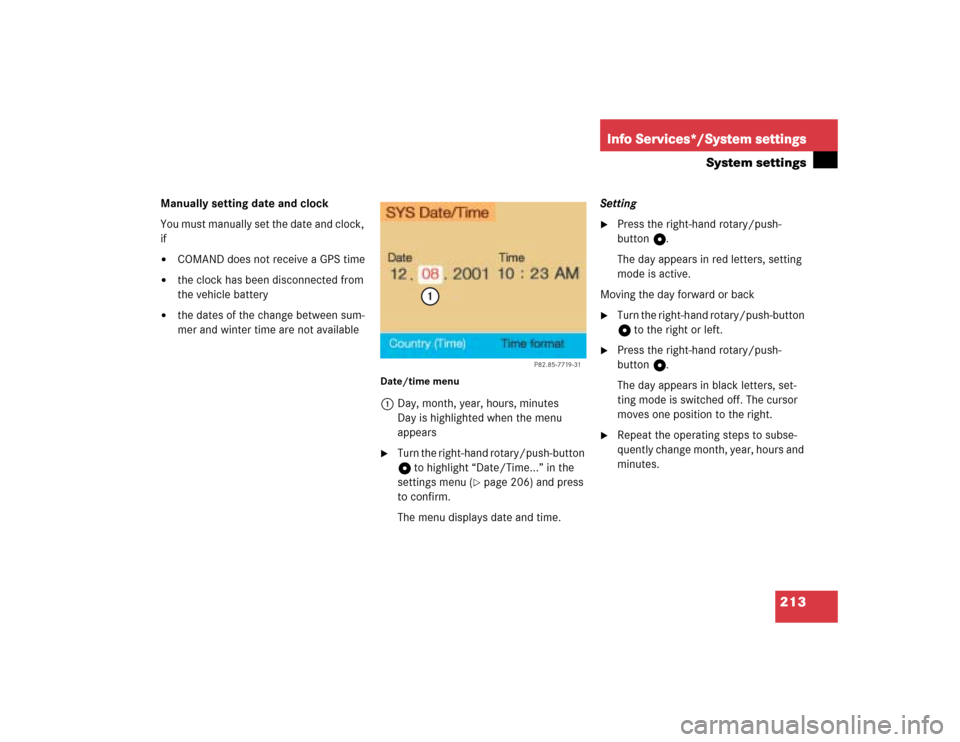
Date/time menu1Day, month, year, hours, minutes
Day is highlighted when the menu
appears�
Turn the right-hand rotary/push-button
v to highlight “Date/Time...” in the
settings menu (
�page 206) and press
to confirm.
The menu displays date and time.Setting
�
Press the right-hand rotary/push-
button v.
The day appears in red letters, setting
mode is active.
Moving the day forward or back
�
Turn the right-hand rotary/push-button
v to the right or left.
�
Press the right-hand rotary/push-
button v.
The day appears in black letters, set-
ting mode is switched off. The cursor
moves one position to the right.
�
Repeat the operating steps to subse-
quently change month, year, hours and
minutes.
P82.85-7719-31
1
Page 221 of 243
214Info Services*/System settingsSystem settingsAdopting settings�
Press the right-hand rotary/push-
button v longer than 2 seconds.
The main system settings menu will ap-
pear with the changed settings.Selecting the time format
1Date display in day, month format
2Date display in month, day format
3Time display in 24-hour format
4Time display in 12-hour format
P Setting is active
Q Setting is not activeIn the “Date/Time” menu
�
Turn the right-hand rotary/push-button
v to highlight “Time format” and press
to confirm.
The “Time format” menu will appear.
Setting
�
Turn the right-hand rotary/push-button
v to highlight the desired entry and
press to confirm. A checkmark will ap-
pear P.
iIf you have selected an invalid setting,
the message “Invalid input” will appear.
iIf the 12-hour format is selected, either
AM (a
nte m
eridiem) or PM (p
ost m
eri-
diem) will appear after the time.
Page 222 of 243
215
Info Services*/System settings
System settings
Adopting settings�
Press the right-hand rotary/push-
button v longer than 2 seconds.
The main system setting menu will ap-
pear.
or
�
Press *.
The “Date/Time” menu will appear.
1Acknowledgement beep
2Info beep
P Tone is switched on
Q Tone is switched off
�
Turn the right-hand rotary/push-button
v to highlight “Beeps” in the settings
menu and press to confirm.
The “Beeps” menu will appear.
�
Turn the right-hand rotary/push-button
v to highlight 1 or 2 and press to
confirm.
The beep selected is switched on or off
accordingly.
Acknowledgement beep
You will hear this beep if you confirm a
function or select an entry.
Info beep
You will hear this beep if COMAND pro-
vides information, e.g. navigation turn
is approaching.
Switching beep tones on and off
Page 223 of 243
216Info Services*/System settingsSystem settings1Changes by pressing Ä
2Changes by pressing Ä and head-
lights switch
P Setting active
Q Setting not activeIf the settings menu (
�page 206) is dis-
played
�
Turn the right-hand rotary/push-button
v to highlight “Display (day/night)...”
and press to confirm.
The “Display (Day/Night)” menu will
appear. The setting 2 is active, when
calling up the menu for the first time.
�
Turn the right-hand rotary/push-button
v to highlight the desired setting and
press to confirm.
The desired setting is active.
Setting 2 has been selected
When the headlights are switched on, the
screen will change to night display.Changing the display
�
Press Ä to access the following dis-
plays in succession.�
Day display
�
Night display
�
Screen off
�
and the Day display again
Setting the display dimming charac-
teristics (day and night display)
P82.85-9255-3112
Page 224 of 243
217
Info Services*/System settings
System settings
If the settings menu is displayed�
Turn the right-hand rotary/push-button
v to highlight “Factory settings” and
press to confirm.
An inquiry menu will appear. “Yes” is
highlighted.
Accepting the factory settings
�
Press the right-hand rotary/push-
button v.
A screen with the factory setting will
appear for 8 seconds.
The main system settings menu is reac-
tivated.The factory settings are:
�
Acknowledgement beep – off
�
Info beep – off
�
Language – English (imp.)
�
Time display – 24 h
�
Date format –DD.MM (day, month)
If you do not wish to reset to factory
settings
�
Turn the right-hand rotary/push-button
v to highlight “No” and press to con-
firm.
The main system settings menu will ap-
pear.
Resetting all settings to the
factory settings
P82.85-7723-31
Page 226 of 243

219
Info Services*/System settings
Auxiliary audio source
�
Turn the right-hand rotary/push-button
v to highlight “Aux” in the main sys-
tem settings menu and press to con-
firm.
The “Aux” menu will appear. The auxili-
ary audio source will switch on if it has
been connected to the COMAND cont-
rol unit.
Adjusting the volume (
�page 14).Adjusting the volume level of an auxilia-
ry audio source
�
Adjust volume of vehicle radio to a
comfortable listening level.
�
Connect adapter cable to portable tape
deck and to vehicle (socket in glove
box).
�
Press ( button on COMAND unit.
�
Activate the “Aux” menu as described.
�
Press “Play” button on the portable
tape deck.
�
Adjust the volume on the portable tape
deck so that the audio system output is
at or near the same comfortable level
previously set in radio mode.
�
Volume can now be adjusted using
either COMAND or volume controls on
multifunction steering wheel.Muting auxiliary audio source
�
Press Ö.
Symbol R will appear.
Canceling mute function
�
Press Ö again.
Symbol R will disappear.
iThe sound adjustments for the auxiliary
audio source are independent of those
selected for the COMAND audio sour-
ces.
iOnly the volume setting of the tape play-
er can be controlled using the
COMAND system.