Page 639 of 4264
CLUTCH 7C-37
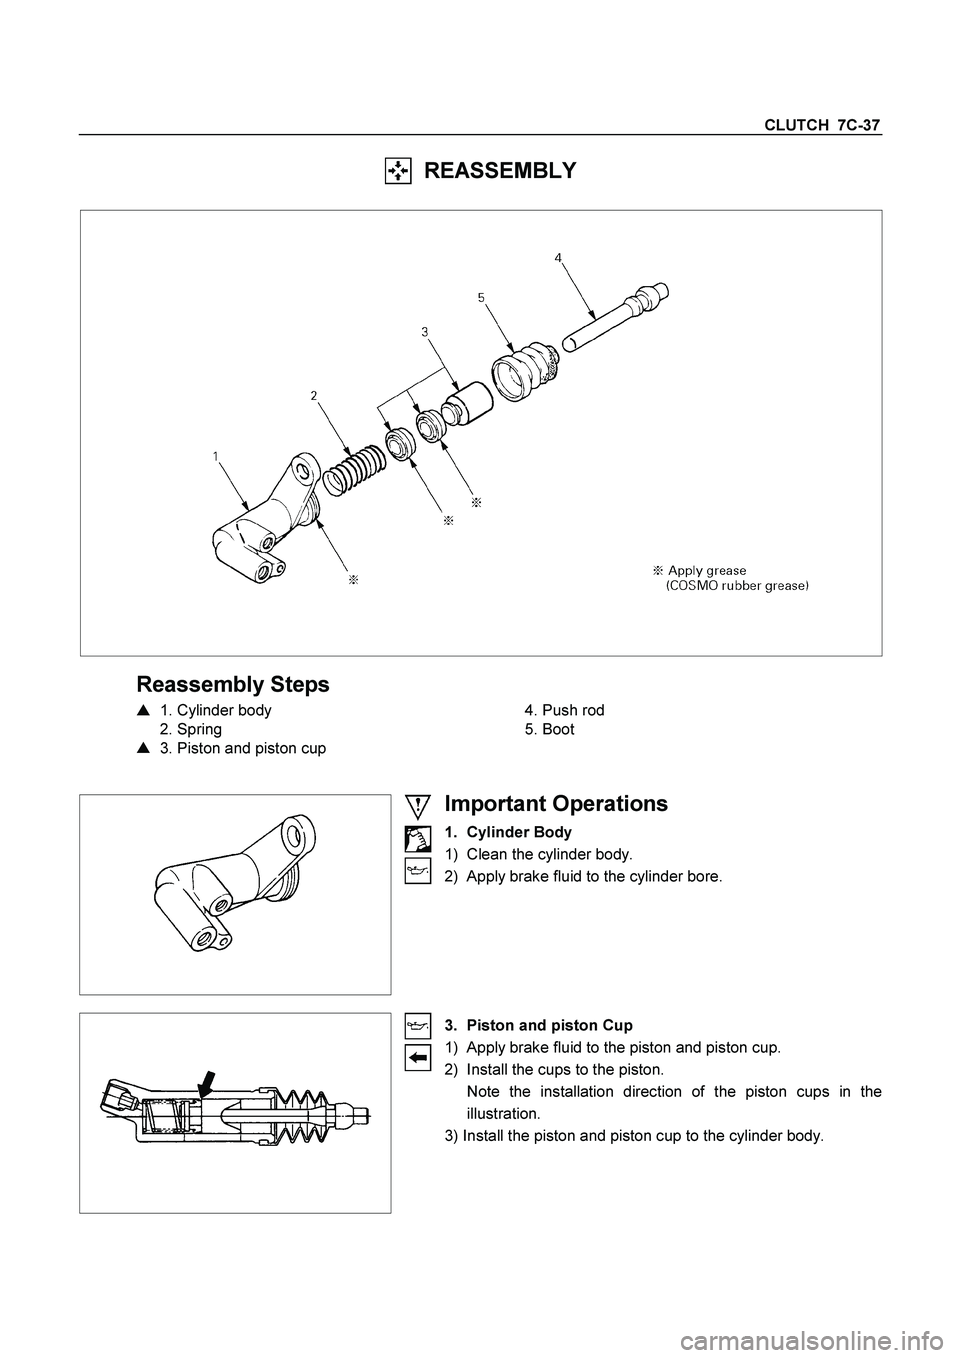
REASSEMBLY
Reassembly Steps
�
1. Cylinder body
2. Spring
�
3. Piston and piston cup
4. Push rod
5. Boot
Important Operations
1. Cylinder Body
1) Clean the cylinder body.
2) Apply brake fluid to the cylinder bore.
3. Piston and piston Cup
1) Apply brake fluid to the piston and piston cup.
2) Install the cups to the piston.
Note the installation direction of the piston cups in the
illustration.
3) Install the piston and piston cup to the cylinder body.
Page 640 of 4264
7C-38 CLUTCH
SLAVE CYLINDER (6VE1)
DISASSEMBLY
206RW004-X
Disassembly Steps
1. Boot
2. Push rod
3. Piston and piston cup
4. Spring
5. Cylinder body
Page 641 of 4264
CLUTCH 7C-39
INSPECTION AND REPAIR
Make the necessary adjustments, repairs, and part replacements if excessive wear or damage is discovered during
inspection.
206RS003
Cylinder Body
1. Clean the cylinder body.
2. Check the fluid return port for restrictions and clean it i
f
necessary.
206RS004
Piston and Piston Cup
1. Visually inspect the disassembled piston and piston cup for
excessive wear and damage.
2. Replace the inner parts with new parts shown in the
illustration.
206RS005
3. Measure the clearance between slave cylinder wall and
piston.
4. If the measured value exceeds the specified limit, the slave
cylinder assembly must be replaced.
mm(in)
Standard Limit
0.07 (0.0028) 0.15 (0.006)
Page 642 of 4264
7C-40 CLUTCH
REASSEMBLY
To reassemble, follow the disassembly steps in the reverse order, noting the following points:
206RS006
1. Before installing the parts, apply a thin coat of rubber
grease.
2. Install cup in groove in piston with the lip turned to the fron
t
of cylinder. Use care so as not to scratch the cylinder.
Page 643 of 4264
CLUTCH 7C-41
HYDRAULIC DAMPER CYLINDER
INSPECTION AND REPAIR
Make the necessary adjustments, repairs, and part replacements if excessive wear or damage is discovered during
inspection.
Visually check for oil leakage and other damage.
If oil leakage or other damage is discovered during the
inspection; the damper cylinder assembly must be replaced as
a unit.
Page 644 of 4264
7C-42 CLUTCH
TROUBLESHOOTING
Refer to this Section to quickly diagnose and repair clutch problems.
Each troubleshooting chart has three headings arranged from left to right.
(1) checkpoint (2) Trouble Cause (3) Countermeasure
This Section is divided into five sub-sections:
1. Clutch Slippage
2. Clutch Does Not Release Properly
3. Clutch Shudder
4. Clutch Noise
1) Clutch pedal Depressed (Clutch Disengaged)
2) Clutch pedal Not Depressed (Clutch Engaged)
5. Oil Leakage
Page 645 of 4264
CLUTCH 7C-43
1. CLUTCH SLIPPAGE
Checkpoint
Trouble Cause
Countermeasure
Adjust the push rod play
No push rod play in the master
cylinder
NG
Clutch pedal free play
Clean the related parts and/or
replace the facing
Replace the transmission front
cover oil seal
Clean the related parts and/or
replace the facing
Repair or replace the
transmission front cover
Defective transmission front
cover oil seal
Continued on the next page
Grease or oil adhering to the
facing
Too much grease
Transmission front cover
unevenly worn
Clean and grease the release
bearing
Release bearing
Insufficient grease on the front
cover contact surfaces
NG NG NG NG OK
OK
OK
Page 646 of 4264
7C-44 CLUTCH
Checkpoint Trouble Cause Countermeasure
Replace the release bearingRelease bearing broken
Clean the related parts and/or
replace the facing
Replace the crankshaft rear oil
seal
Defective crankshaft rear oil
seal
NG NG
OK OKGrease or oil adhering to the
facing
Clutch diaphragm springReplace the clutch pressure
plate assemblyWeak or broken clutch
diaphragm spring
Replace the driven plate
assemblyWorn facing
NG NG
OKFacing Continued from the previous page

DISASSEMBLY
206RW004-X
Disassembly Steps
1. Boot
2. Push rod
3. Piston and piston cup
4. Spring
5. Cylinder body")


 checkpoint (2)")

