Page 1918 of 4264
6A-94 ENGINE MECHANICAL (6VE1 3.5L)
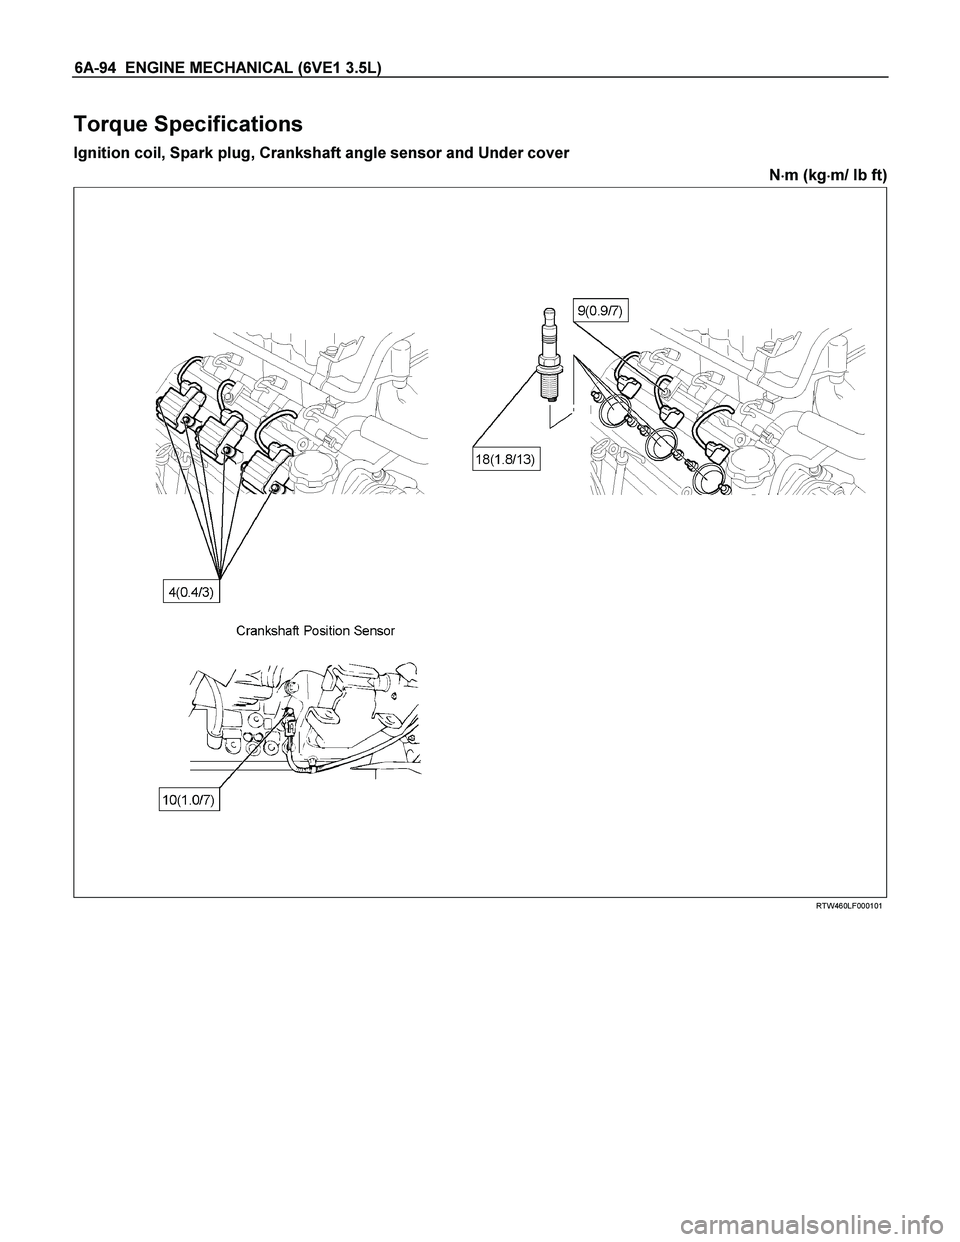
Torque Specifications
Ignition coil, Spark plug, Crankshaft angle sensor and Under cover
N�
�� �m (kg�
�� �m/ lb ft)
RTW460LF000101
Page 1920 of 4264
6A-96 ENGINE MECHANICAL (6VE1 3.5L)
Crankshaft main bearing, Flywheel, Crankcase, Oil pan, Timing belt tensioner, Timing pulley, timing belt
cover, Oil pump, Oil gallery, Oil strainer and water pump
N�
�� �m (kg�
�� �m/ lb ft)
RTW46ALF000701
Page 1923 of 4264
ENGINE MECHANICAL (6VE1 3.5L) 6A-99
Special Tool
ILLUSTRATION PART NO.
PART NAME
ILLUSTRATION PART NO.
PART NAME
5-8840-0011-0
(J-21687-02)
Remover; tie rod end 5-8840-2445-0
(J-42985)
Installer; Camshaft
oil seal
5-8840-0203-0
(J-36390)
Wrench; Oil filter (79�) 5-8840-2545-0
(J-39206)
Installer; Pilot bearing
5-8840-2446-0
(J-8062)
Compressor;
Valve spring (1)
5-8840-2547-0
(J-42898)
Adapter; Compressor,
Valve spring (2) 5-8840-0133-0
(J-8614-01)
Holder; Crankshaft
5-8840-0623-0
(J-37281)
Remover; Oil controller 5-8840-2153-0
(J-37228)
Seal cutter
5-8840-0624-0
(J-38537)
Installer; Oil controller 5-8840-2286-0
(J-39201)
Installer; Real oil seal
5-8840-2005-0
(J-29107)
Universal pitman arm
remover 5-8840-2287-0
(J-39202)
Installer; Oil pump
oil seal
Page 1927 of 4264
ENGINE COOLING (6VE1 3.5L) 6B-3
Water Pump
The EC pump is a centrifugal impeller type and is driven
by a timing belt.
030RS001
Thermostat
The thermostat is a wax pellet type with a air hole(1)
and is installed in the thermostat housing.
031RW002
Radiator
The radiator is a tube type with corrugated fins. In order
to raise the boiling point of the coolant, the radiator is
fitted with a cap in which the valve is operated at 93.3
�
122.7 kPa (13.5 � 17.8 psi) pressure. (No oil cooler
provided for M/T)
110RS001
Antifreeze Solution
Calculating mixing ratio
F06RW005
Page 1929 of 4264
ENGINE COOLING (6VE1 3.5L) 6B-5
Diagnosis
Engine Cooling Trouble
Symptom Possible Cause Action
Engine overheating Low Engine Coolant level Replenish
Thermo meter unit faulty Replace
Faulty thermostat Replace
Faulty Engine Coolant temperature
sensor Repair or replace
Clogged radiator Clean or replace
Faulty radiator cap Replace
Low engine oil level or use of
improper engine oil Replenish or change oil
Clogged exhaust system Clean exhaust system or replace
faulty parts
Faulty Throttle Position sensor Replace throttle valve assembly
Open or shorted Throttle Position
sensor circuit Repair or replace
Damaged cylinder head gasket Replace
Engine overcooling Faulty thermostat Replace
Engine slow to warm–up Faulty thermostat Replace
Thermo unit faulty Replace
Page 1930 of 4264

Draining and Refilling Cooling
System
Before draining the cooling system, inspect the system
and perform any necessary service to ensure that it is
clean, does n")
6B-6 ENGINE COOLING (6VE1 3.5L)
Draining and Refilling Cooling
System
Before draining the cooling system, inspect the system
and perform any necessary service to ensure that it is
clean, does not leak and is in proper working order.
The engine coolant (EC) level should be between the
“ MIN" and “MAX" lines of reserve tank when the engine
is cold. If low, check for leakage and add EC up to the
“ MAX" line.
There should not be any excessive deposit of rust o
r
scales around the radiator cap or radiator filler hole, and
the EC should also be free from oil.
Replace the EC if excessively dirty.
1. Completely drain the cooling system by opening the
drain plug at the bottom of the radiator.
P1010064
2. Remove the radiator cap.
WARNING: To avoid the danger of being burned, do
not remove the cap while the engine and radiato
r
are still hot. Scalding fluid and steam can be blown
out under pressure.
3. Disconnect all hoses from the EC reserve tank.
Scrub and clean the inside of the reserve tank with
soap and water. Flush it well with clean water, then
drain it. Install the reserve tank and hoses.
4. Refill the cooling system with the EC using a
solution that is 50 percent antifreeze.
Procedure for filling with coolant (in case of full change)
Make sure that the engine is cool.
Open radiator cap pour coolant up to filler neck.
Pour coolant into reservoir tank up to “MAX" line.
Tighten radiator cap and start the engine. Afte
r
idling for 2 to 3 minutes, stop the engine and reopen
radiator cap. If the water level is lower, replenish.
WARNING: When the coolant is heated to a high
temperature, be sure not to loosen or remove the
radiator cap. Otherwise you might get scalded by
not vapor or boiling water. To open the radiato
r
cap, put a piece of thick cloth on the cap and
loosen the cap slowly to reduce the pressure when
the coolant has become cooler.
After tightening radiator cap, warm up the engine at
about 2000 rpm. Set heater adjustment to the
highest temperature position, and let the coolan
t
circulate also into heater water system.
Check to see the thermostat has opened through
the needle position of water thermometer, conduct a
5 –minute idling again and stop the engine.
When the engine has been cooled, check filler neck
for water level and replenish if required. Should
extreme shortage of coolant is found, check the
cooling system and reservoir tank hose for leakage.
Pour coolant into the reservoir tank up to “MAX"
line.
Page 1932 of 4264
6B-8 ENGINE COOLING (6VE1 3.5L)
NOTE: To prevent the oil leakage, apply the LOCTITE
262 or an equivalent, to the arrow marked fixing bol
t
thread.
030RW008
3. Idle pulley
Install idle pulley and tighten bolt to the specified
torque.
Torque: 52 N�
�� �m (5.3 kg�
�� �m/38 lb ft)
4. Timing belt
Install timing belt. Refer to timing belt installation
step in “Timing Belt" in this manual.
5. Connect radiator inlet hose and replenish EC.
6. Connect battery ground cable.
Page 1935 of 4264
 6B-11
Removal
1. Disconnect battery ground cable.
2. Loosen a drain plug to drain EC.
3. Disconnect oil cooler hose on automatic transmission (A/T).
4. Disconnect")
ENGINE COOLING (6VE1 3.5L) 6B-11
Removal
1. Disconnect battery ground cable.
2. Loosen a drain plug to drain EC.
3. Disconnect oil cooler hose on automatic transmission (A/T).
4. Disconnect radiator inlet hose and outlet hose from the engine.
P1010064
5. Remove fan guide(1), clips(2) on both sides and
the bottom lock, then remove lower fan guide(3)
with fan shroud(4).
RTW46BSH000101
6. Disconnect the reserve tank hose(6) from radiator.
7. Remove bracket(5).
110RW004
8. Lift up and remove the radiator assembly with
hose, taking care not to damage the radiator core
with a fan blade.
Inspection
Radiator Cap
Measure the valve opening pressure of the pressurizing
valve with a radiator filler cap tester.
Replace the cap if the valve opening pressure is outside
the standard range.
Valve opening pressure kPa (psi) 93.3
�
� �
�122.7
(13.5
�
� �
�17.8)
Cap tester: 5 –8840 –0277 –0
Adapter: 5 –8840 –2603 –0
Check the condition of the vacuum valve in the cente
r
of the valve seat side of the cap. If considerable rust or
dirt is found, or if the valve seat cannot be moved by
hand, clean or replace the cap.

Crankshaft main bearing, Flywheel, Crankcase, Oil pan, Timing belt tensioner, Timing pulley, timing belt
cover, Oil pump, Oil gallery, Oil strainer and water pum")
 6A-99
Special Tool
ILLUSTRATION PART NO.
PART NAME
ILLUSTRATION PART NO.
PART NAME
5-8840-0011-0
(J-21687-02)
Remover; tie rod end 5-8840-2445-0
(J-42985")
 6B-3
Water Pump
The EC pump is a centrifugal impeller type and is driven
by a timing belt.
030RS001
Thermostat
The thermostat is a wax pellet type with a air hole(")
 6B-5
Diagnosis
Engine Cooling Trouble
Symptom Possible Cause Action
Engine overheating Low Engine Coolant level Replenish
Thermo meter unit faulty Replace
Faulty")

NOTE: To prevent the oil leakage, apply the LOCTITE
262 or an equivalent, to the arrow marked fixing bol
t
thread.
030RW008
3. Idle pulley
Install idle pul")