Page 272 of 4264
4C1-52 FRONT WHEEL DRIVE
INSPECTION AND REPAIR
Make necessary correction or parts replacement if wear, damage or any other abnormal conditions are found
through inspection.
For inspection and servicing of disc caliper, and relative parts, and ABS parts, refer to Section Brakes.
�
Hub
�
Hub bearing, oil seal
�
Knuckle spindle
�
Disc
�
Caliper
�
ABS sensor rotor
� Cap, Hub flange, Shim, Snap ring
Visual Check
Check the following parts for wear, damage or other abnormal
conditions.
Page 274 of 4264
4C1-54 FRONT WHEEL DRIVE
Important Operations
1. Wheel Pin
(1) Place hub on a wood workbench or a block of wood,
approx. 6” by 6” to protect the wheel stud ends and threads.
(2) Install wheel stud using a hammer.
Be sure wheel stud is started squarely and seats
completely.
(3) Align index marks and install hub to disc.
2. Bolt
Torque N�
m (kgf�
m/lb�
ft)
103 �
10 (10.5 �
1/75.9 �
7.2)
3. ABS sensor rotor
(1) Set a new ABS sensor rotor, if replacement is required.
(2) Install the ABS sensor rotor in the hub, using special tools.
Installer : 5-8840-2789-0
Grip : 5-8840-0007-0
Refer to the section Brake.
4. Inner Bearing
Outer race ; outer bearing
Install the outer race by driving it into the hub.
Installer : 5-8840-2119-0
(J-36829)
Grip : 5-8840-0007-0
(J-8092)
Page 279 of 4264
FRONT WHEEL DRIVE 4C1-59
12. Bolt
13. Wheel Pin ; Front Hub
(1) Scribe mark on hub to disc before disassembly to insure
proper assembly.
(2) Drive out the ABS sensor rotor using a metal bar and
hammer through the two bolt holes.
�
Discard the used ABS sensor rotor
Refer to the section Brake.
(3) Clamp hub and disc assembly in vise using protective pads
and remove six (6) disc to hub retaining bolts.
(4) Place hub on a suitable work surface and remove wheel
studs, as required, using a hammer.
Page 280 of 4264
4C1-60 FRONT WHEEL DRIVE
INSPECTION AND REPAIR
Make necessary correction or parts replacement if wear, damage or any other abnormal conditions are found
through inspection.
For inspection and servicing of disc caliper, and relative parts, and ABS parts, refer to Section Brakes.
�
Hub
� Hub bearing, oil seal
�
Knuckle spindle
�
Disc
�
Caliper
�
ABS sensor rotor
�
Cap, Hub flange, Shim, Snap ring
�
Free wheeling hub parts (Option)
� Clutch, Knob, follower, inner, ring and
spring
Visual Check
Check the following parts for wear, damage or other abnormal
conditions.
Page 283 of 4264
FRONT WHEEL DRIVE 4C1-63
13. Wheel Pin
(1) Place hub on a wood workbench or a block of wood,
approx. 6” by 6” to protect the wheel stud ends and threads.
(2) Install wheel stud using a hammer.
Be sure wheel stud is started squarely and seats
completely.
(3) Align index marks and install hub to disc.
14. Bolt
Torque N�
m (kgf�
m/lb�
ft)
103 �
10 (10.5 �
1/75.9 �
7.2)
15. ABS sensor rotor
(1) Set a new ABS sensor rotor, if replacement is required.
(2) Install the ABS sensor rotor in the hub, using special tools.
Installer : 5-8840-2789-0
Grip : 5-8840-0007-0
Refer to the section Brake.
16. Inner Bearing
Outer race ; outer bearing
Install the outer race by driving it into the hub.
Installer : 5-8840-2119-0
(J-36829)
Grip : 5-8840-0007-0
(J-8092)
Page 335 of 4264

BRAKE CONTROL SYSTEM 5A-19
System Components
Electronic Hydraulic Control Unit (EHCU), four Wheel
Speed Sensors, two Warning Lamps, and G-sensor.
Electronic Hydraulic Control Unit (EHCU)
The EHCU consists of ABS control circuits, fault
detector, and a fail-safe. It drives the EHCU according
to the signal from each sensor, cancelling ABS to return
to normal braking when a malfunction has occurred in
the ABS.
The EHCU has a self-diagnosing function which can
indicate faulty circuits during diagnosis.
The EHCU is mounted on the engine compartment rear
left side. It consists of a motor, solenoid valves fail safe
relay.
Solenoid Valves: Reduces or holds the caliper fluid
pressure for each front brake or both rear brakes
according to the signal sent from the EHCU.
Buffer chamber: Temporarily holds the brake fluid that
returns from the front and rear brake so that pressure
of front brake can be reduced smoothly.
Motor: Drives the pump according to the signal from
EHCU.
Fail safe Relay: When failure occurs in ABS.
The power supply to solenoid Valve is cut.
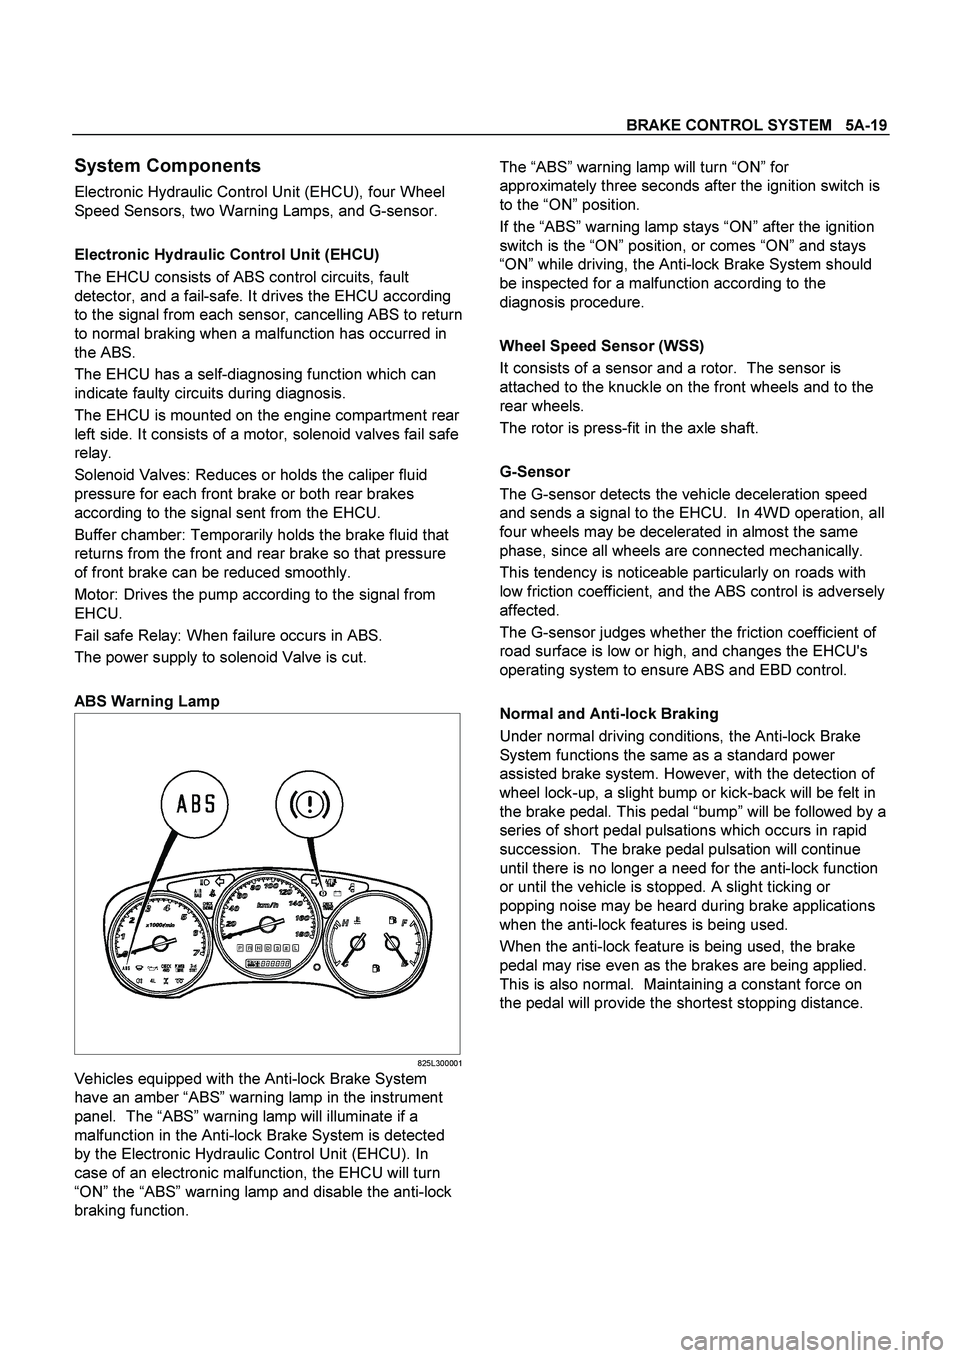
ABS Warning Lamp
825L300001
Vehicles equipped with the Anti-lock Brake System
have an amber “ABS” warning lamp in the instrument
panel. The “ABS” warning lamp will illuminate if a
malfunction in the Anti-lock Brake System is detected
by the Electronic Hydraulic Control Unit (EHCU). In
case of an electronic malfunction, the EHCU will turn
“ON” the “ABS” warning lamp and disable the anti-lock
braking function.
The “ABS” warning lamp will turn “ON” for
approximately three seconds after the ignition switch is
to the “ON” position.
If the “ABS” warning lamp stays “ON” after the ignition
switch is the “ON” position, or comes “ON” and stays
“ON” while driving, the Anti-lock Brake System should
be inspected for a malfunction according to the
diagnosis procedure.
Wheel Speed Sensor (WSS)
It consists of a sensor and a rotor. The sensor is
attached to the knuckle on the front wheels and to the
rear wheels.
The rotor is press-fit in the axle shaft.
G-Sensor
The G-sensor detects the vehicle deceleration speed
and sends a signal to the EHCU. In 4WD operation, all
four wheels may be decelerated in almost the same
phase, since all wheels are connected mechanically.
This tendency is noticeable particularly on roads with
low friction coefficient, and the ABS control is adversely
affected.
The G-sensor judges whether the friction coefficient of
road surface is low or high, and changes the EHCU's
operating system to ensure ABS and EBD control.
Normal and Anti-lock Braking
Under normal driving conditions, the Anti-lock Brake
System functions the same as a standard power
assisted brake system. However, with the detection of
wheel lock-up, a slight bump or kick-back will be felt in
the brake pedal. This pedal “bump” will be followed by a
series of short pedal pulsations which occurs in rapid
succession. The brake pedal pulsation will continue
until there is no longer a need for the anti-lock function
or until the vehicle is stopped. A slight ticking or
popping noise may be heard during brake applications
when the anti-lock features is being used.
When the anti-lock feature is being used, the brake
pedal may rise even as the brakes are being applied.
This is also normal. Maintaining a constant force on
the pedal will provide the shortest stopping distance.
Page 346 of 4264

5A-30 BRAKE CONTROL SYSTEM
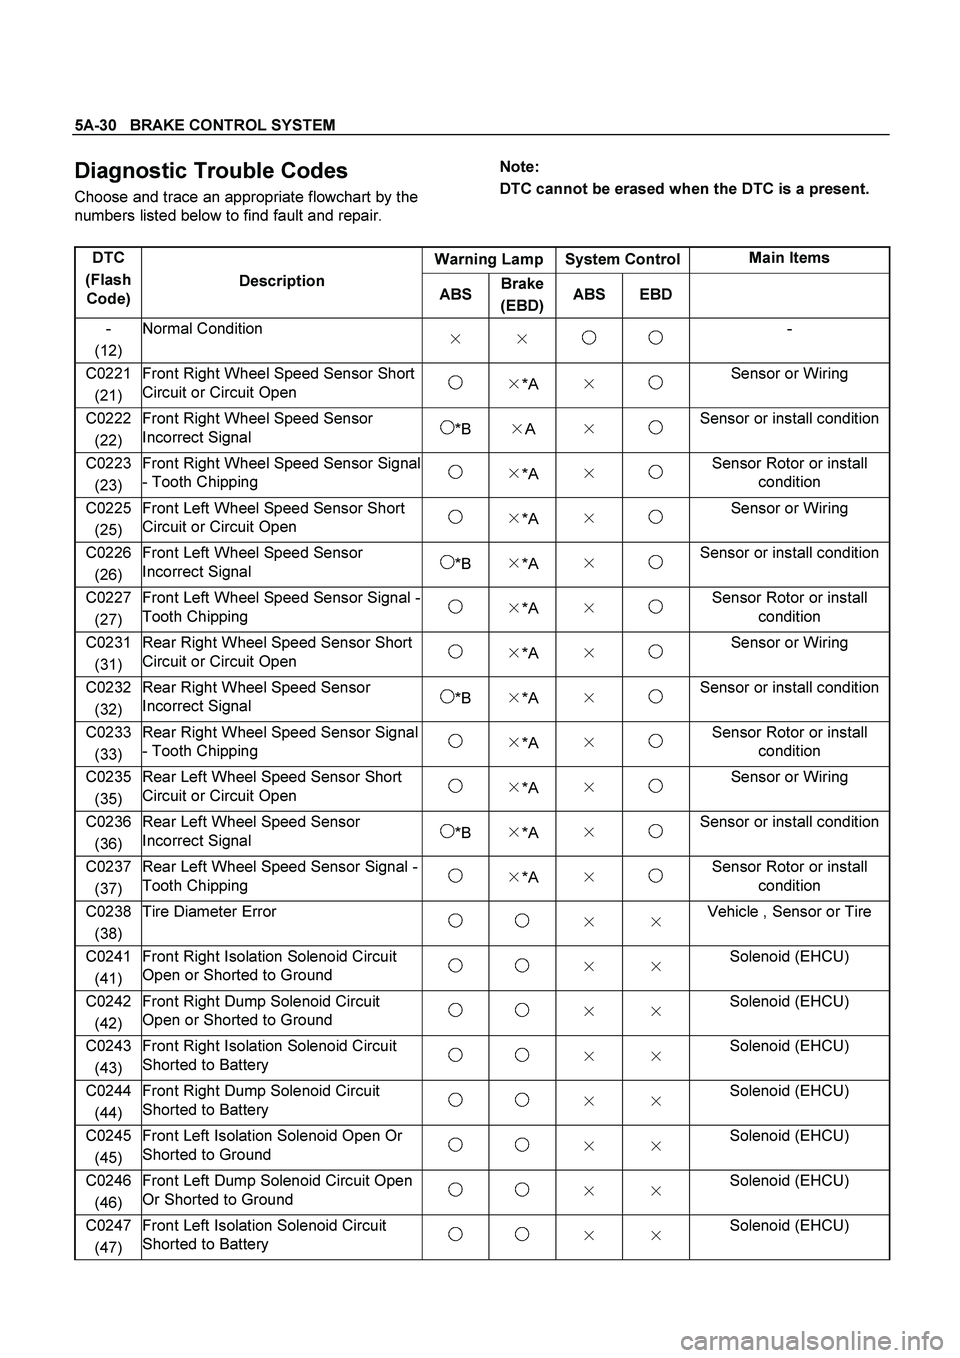
Diagnostic Trouble Codes
Choose and trace an appropriate flowchart by the
numbers listed below to find fault and repair.
Note:
DTC cannot be erased when the DTC is a present.
Warning Lamp System Control Main Items
DTC
(Flash
Code) Description
ABS Brake
(EBD)ABS EBD
-
(12) Normal Condition
�
�
-
C0221
(21) Front Right Wheel Speed Sensor Short
Circuit or Circuit Open �
*A �
Sensor or Wiring
C0222
(22) Front Right Wheel Speed Sensor
Incorrect Signal *B �
A �
Sensor or install condition
C0223
(23) Front Right Wheel Speed Sensor Signal
- Tooth Chipping �
*A �
Sensor Rotor or install
condition
C0225
(25) Front Left Wheel Speed Sensor Short
Circuit or Circuit Open �
*A �
Sensor or Wiring
C0226
(26) Front Left Wheel Speed Sensor
Incorrect Signal *B �
*A �
Sensor or install condition
C0227
(27) Front Left Wheel Speed Sensor Signal -
Tooth Chipping �
*A �
Sensor Rotor or install
condition
C0231
(31) Rear Right Wheel Speed Sensor Short
Circuit or Circuit Open �
*A �
Sensor or Wiring
C0232
(32) Rear Right Wheel Speed Sensor
Incorrect Signal *B �
*A �
Sensor or install condition
C0233
(33) Rear Right Wheel Speed Sensor Signal
- Tooth Chipping �
*A �
Sensor Rotor or install
condition
C0235
(35) Rear Left Wheel Speed Sensor Short
Circuit or Circuit Open �
*A �
Sensor or Wiring
C0236
(36) Rear Left Wheel Speed Sensor
Incorrect Signal *B �
*A �
Sensor or install condition
C0237
(37) Rear Left Wheel Speed Sensor Signal -
Tooth Chipping �
*A �
Sensor Rotor or install
condition
C0238
(38) Tire Diameter Error �
�
Vehicle , Sensor or Tire
C0241
(41) Front Right Isolation Solenoid Circuit
Open or Shorted to Ground �
�
Solenoid (EHCU)
C0242
(42) Front Right Dump Solenoid Circuit
Open or Shorted to Ground �
�
Solenoid (EHCU)
C0243
(43) Front Right Isolation Solenoid Circuit
Shorted to Battery �
�
Solenoid (EHCU)
C0244
(44) Front Right Dump Solenoid Circuit
Shorted to Battery �
�
Solenoid (EHCU)
C0245
(45) Front Left Isolation Solenoid Open Or
Shorted to Ground �
�
Solenoid (EHCU)
C0246
(46) Front Left Dump Solenoid Circuit Open
Or Shorted to Ground �
�
Solenoid (EHCU)
C0247
(47) Front Left Isolation Solenoid Circuit
Shorted to Battery �
�
Solenoid (EHCU)
Page 353 of 4264
BRAKE CONTROL SYSTEM 5A-37
Basic Inspection Procedure
1. Basic Inspection of Service Brake
Step Action
Value(s) Yes No
1 Is the fluid level normal?
- Go to Step 2 Replenish with
fluid
Go to Step 2
2 Does fluid leak?
- Repair
Go to Step 3 Go to Step 3
3 Is the booster function normal?
- Go to Step 4 Repair
Go to Step 4
4 Is the pad and rotor normal?
- Go to Step 5 Repair
Go to Step 5
5 Reconnect all components. Ensure all component
are properly mounted.
Was this step finished? - Finished Go to Step 5
2. Ground Inspection
Step Action
Value(s) Yes No
1 Does ABS related ground points normally?
- Go to Step 2 Repair
Go to Step 2
2 Reconnect all components. Ensure all component
are properly mounted.
Was this step finished? - Finished Go to Step 2