Page 1792 of 3371
FUEL PUMP CIRCUIT
EC-601
C
D
E
F
G
H
I
J
K
L
MA
EC
Revision: August 20072004 QX56
FUEL PUMP CIRCUITPFP:17042
DescriptionUBS00HDB
SYSTEM DESCRIPTION
*: ECM determines the start signal status by the signals of engine speed and battery voltage.
The ECM activates the fuel pump for several seconds after the ignition switch is turned ON to improve engine
startability. If the ECM receives a engine speed signal from the camshaft position sensor (PHASE), it knows
that the engine is rotating, and causes the pump to operate. If the engine speed signal is not received when
the ignition switch is ON, the engine stalls. The ECM stops pump operation and prevents battery discharging,
thereby improving safety. The ECM does not directly drive the fuel pump. It controls the ON/OFF fuel pump
relay, which in turn controls the fuel pump.
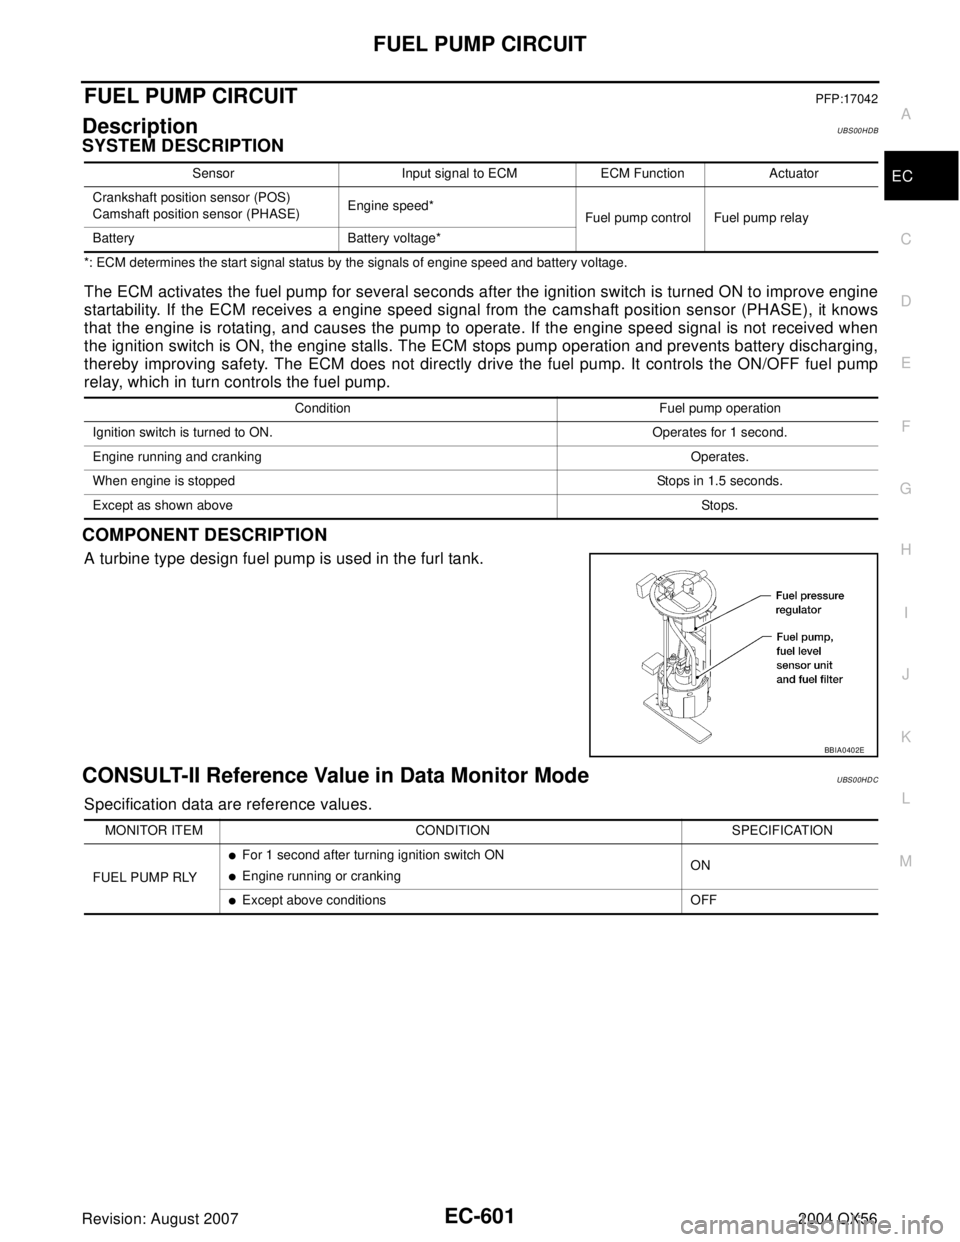
COMPONENT DESCRIPTION
A turbine type design fuel pump is used in the furl tank.
CONSULT-II Reference Value in Data Monitor ModeUBS00HDC
Specification data are reference values.
Sensor Input signal to ECM ECM Function Actuator
Crankshaft position sensor (POS)
Camshaft position sensor (PHASE)Engine speed*
Fuel pump control Fuel pump relay
Battery Battery voltage*
Condition Fuel pump operation
Ignition switch is turned to ON. Operates for 1 second.
Engine running and crankingOperates.
When engine is stoppedStops in 1.5 seconds.
Except as shown aboveSto ps.
BBIA0402E
MONITOR ITEM CONDITION SPECIFICATION
FUEL PUMP RLY
�For 1 second after turning ignition switch ON
�Engine running or crankingON
�Except above conditions OFF
Page 1794 of 3371
FUEL PUMP CIRCUIT
EC-603
C
D
E
F
G
H
I
J
K
L
MA
EC
Revision: August 20072004 QX56
Specification data are reference values and are measured between each terminal and ground.
CAUTION:
Do not use ECM ground terminals when measuring input/output voltage. Doing so may result in dam-
age to the ECM's transistor. Use a ground other than ECM terminals, such as the ground.
Diagnostic ProcedureUBS00HDE
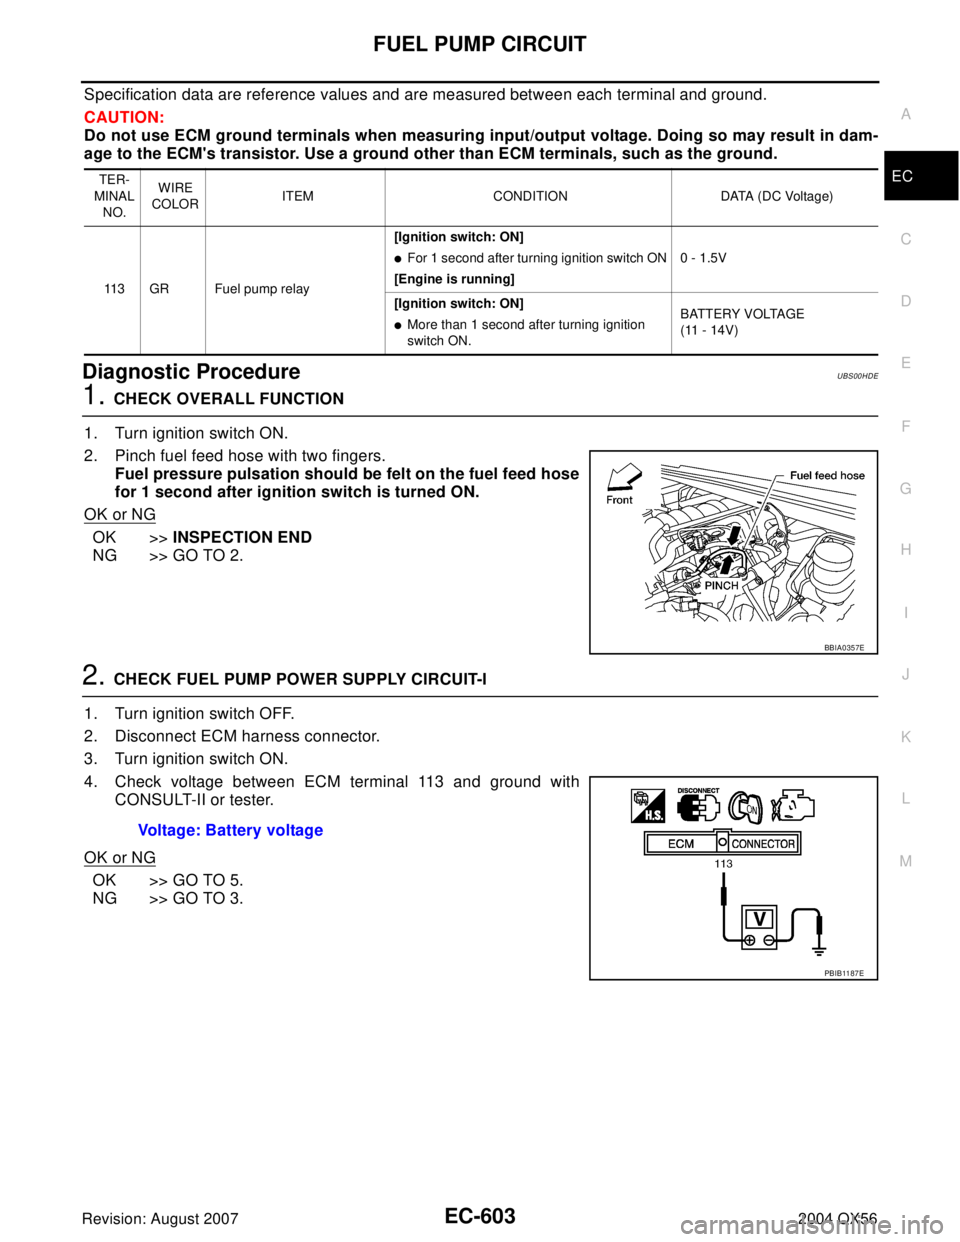
1. CHECK OVERALL FUNCTION
1. Turn ignition switch ON.
2. Pinch fuel feed hose with two fingers.
Fuel pressure pulsation should be felt on the fuel feed hose
for 1 second after ignition switch is turned ON.
OK or NG
OK >>INSPECTION END
NG >> GO TO 2.
2. CHECK FUEL PUMP POWER SUPPLY CIRCUIT-I
1. Turn ignition switch OFF.
2. Disconnect ECM harness connector.
3. Turn ignition switch ON.
4. Check voltage between ECM terminal 113 and ground with
CONSULT-II or tester.
OK or NG
OK >> GO TO 5.
NG >> GO TO 3.
TER-
MINAL
NO.WIRE
COLORITEM CONDITION DATA (DC Voltage)
113 GR Fuel pump relay[Ignition switch: ON]
�For 1 second after turning ignition switch ON
[Engine is running]0 - 1.5V
[Ignition switch: ON]
�More than 1 second after turning ignition
switch ON.BATTERY VOLTAGE
(11 - 14V)
BBIA0357E
Voltage: Battery voltage
PBIB11 87 E
Page 1800 of 3371
REFRIGERANT PRESSURE SENSOR
EC-609
C
D
E
F
G
H
I
J
K
L
MA
EC
Revision: August 20072004 QX56
Specification data are reference values and are measured between each terminal and ground.
CAUTION:
Do not use ECM ground terminals when measuring input/output voltage. Doing so may result in dam-
age to the ECM's transistor. Use a ground other than ECM terminals, such as the ground.
Diagnostic ProcedureUBS00HDJ
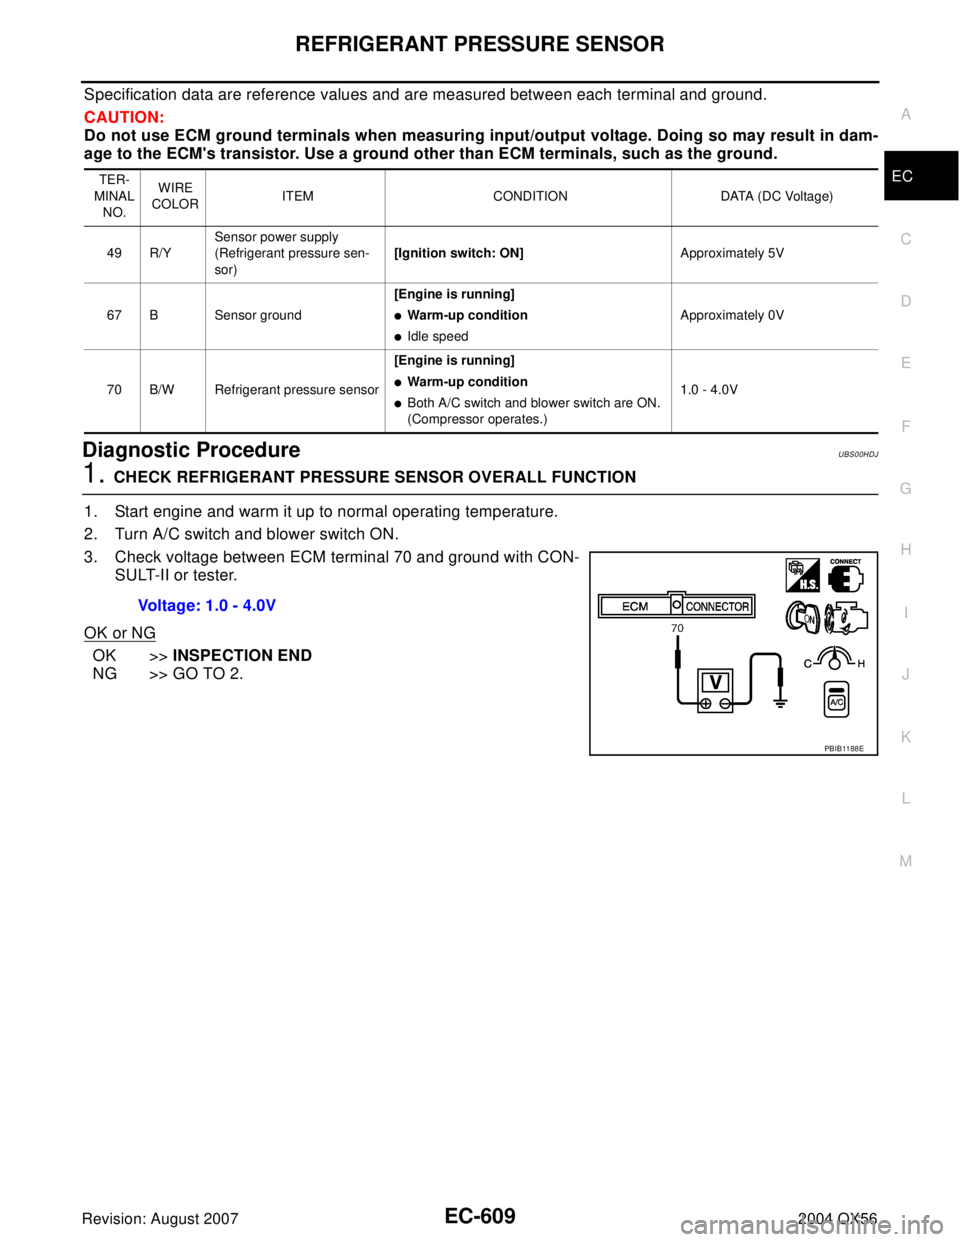
1. CHECK REFRIGERANT PRESSURE SENSOR OVERALL FUNCTION
1. Start engine and warm it up to normal operating temperature.
2. Turn A/C switch and blower switch ON.
3. Check voltage between ECM terminal 70 and ground with CON-
SULT-II or tester.
OK or NG
OK >>INSPECTION END
NG >> GO TO 2.
TER-
MINAL
NO.WIRE
COLORITEM CONDITION DATA (DC Voltage)
49 R/YSensor power supply
(Refrigerant pressure sen-
sor)[Ignition switch: ON]Approximately 5V
67 B Sensor ground[Engine is running]
�Warm-up condition
�Idle speedApproximately 0V
70 B/W Refrigerant pressure sensor[Engine is running]
�Warm-up condition
�Both A/C switch and blower switch are ON.
(Compressor operates.)1.0 - 4.0V
Voltage: 1.0 - 4.0V
PBIB11 88 E
Page 1801 of 3371
EC-610Revision: August 2007
REFRIGERANT PRESSURE SENSOR
2004 QX56
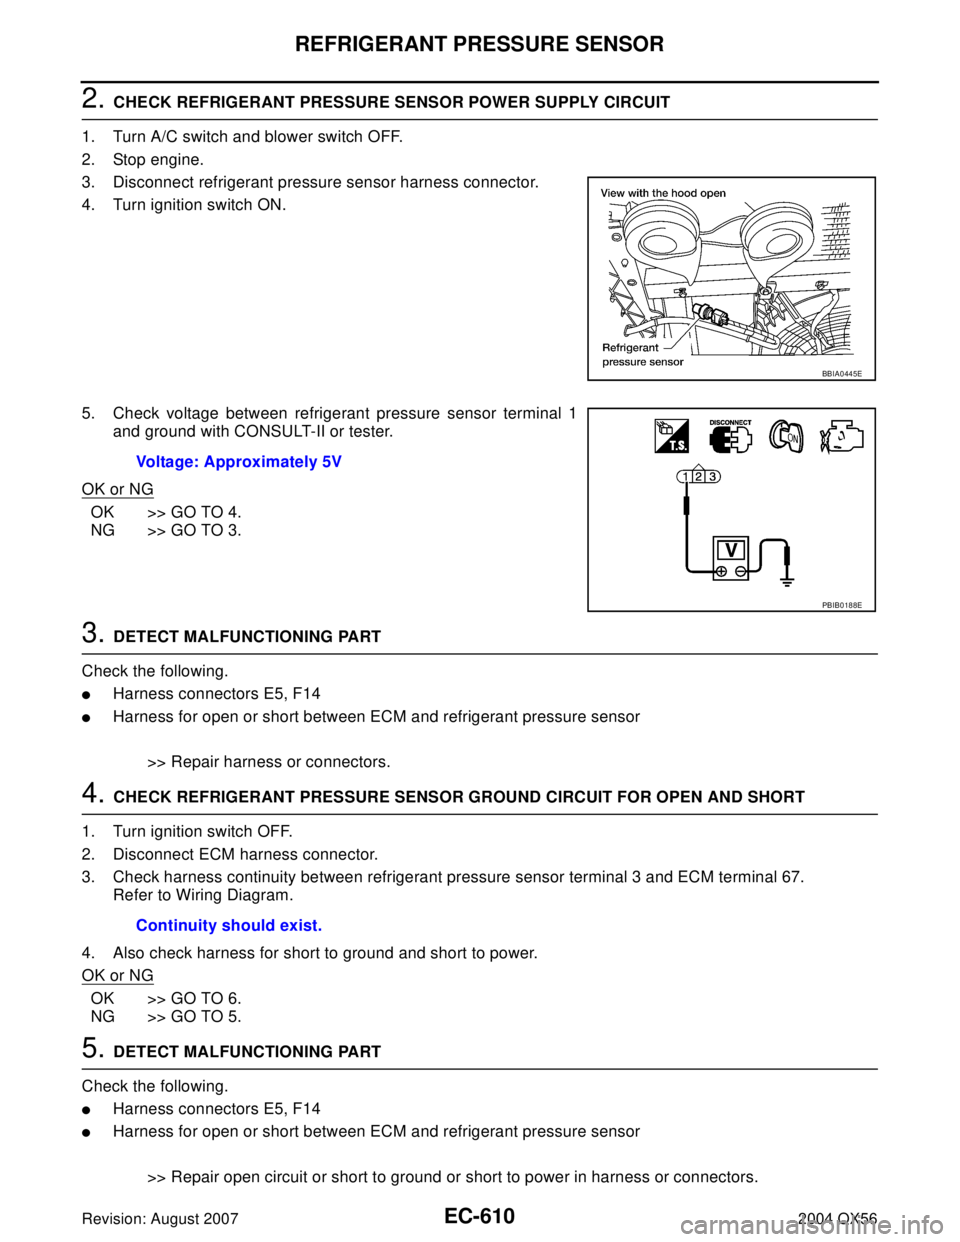
2. CHECK REFRIGERANT PRESSURE SENSOR POWER SUPPLY CIRCUIT
1. Turn A/C switch and blower switch OFF.
2. Stop engine.
3. Disconnect refrigerant pressure sensor harness connector.
4. Turn ignition switch ON.
5. Check voltage between refrigerant pressure sensor terminal 1
and ground with CONSULT-II or tester.
OK or NG
OK >> GO TO 4.
NG >> GO TO 3.
3. DETECT MALFUNCTIONING PART
Check the following.
�Harness connectors E5, F14
�Harness for open or short between ECM and refrigerant pressure sensor
>> Repair harness or connectors.
4. CHECK REFRIGERANT PRESSURE SENSOR GROUND CIRCUIT FOR OPEN AND SHORT
1. Turn ignition switch OFF.
2. Disconnect ECM harness connector.
3. Check harness continuity between refrigerant pressure sensor terminal 3 and ECM terminal 67.
Refer to Wiring Diagram.
4. Also check harness for short to ground and short to power.
OK or NG
OK >> GO TO 6.
NG >> GO TO 5.
5. DETECT MALFUNCTIONING PART
Check the following.
�Harness connectors E5, F14
�Harness for open or short between ECM and refrigerant pressure sensor
>> Repair open circuit or short to ground or short to power in harness or connectors.
BBIA0445E
Voltage: Approximately 5V
PBIB0188E
Continuity should exist.
Page 1824 of 3371
EVAPORATIVE EMISSION SYSTEM
EC-633
C
D
E
F
G
H
I
J
K
L
MA
EC
Revision: August 20072004 QX56
EVAPORATIVE EMISSION SYSTEMPFP:14950
DescriptionUBS00HDY
SYSTEM DESCRIPTION
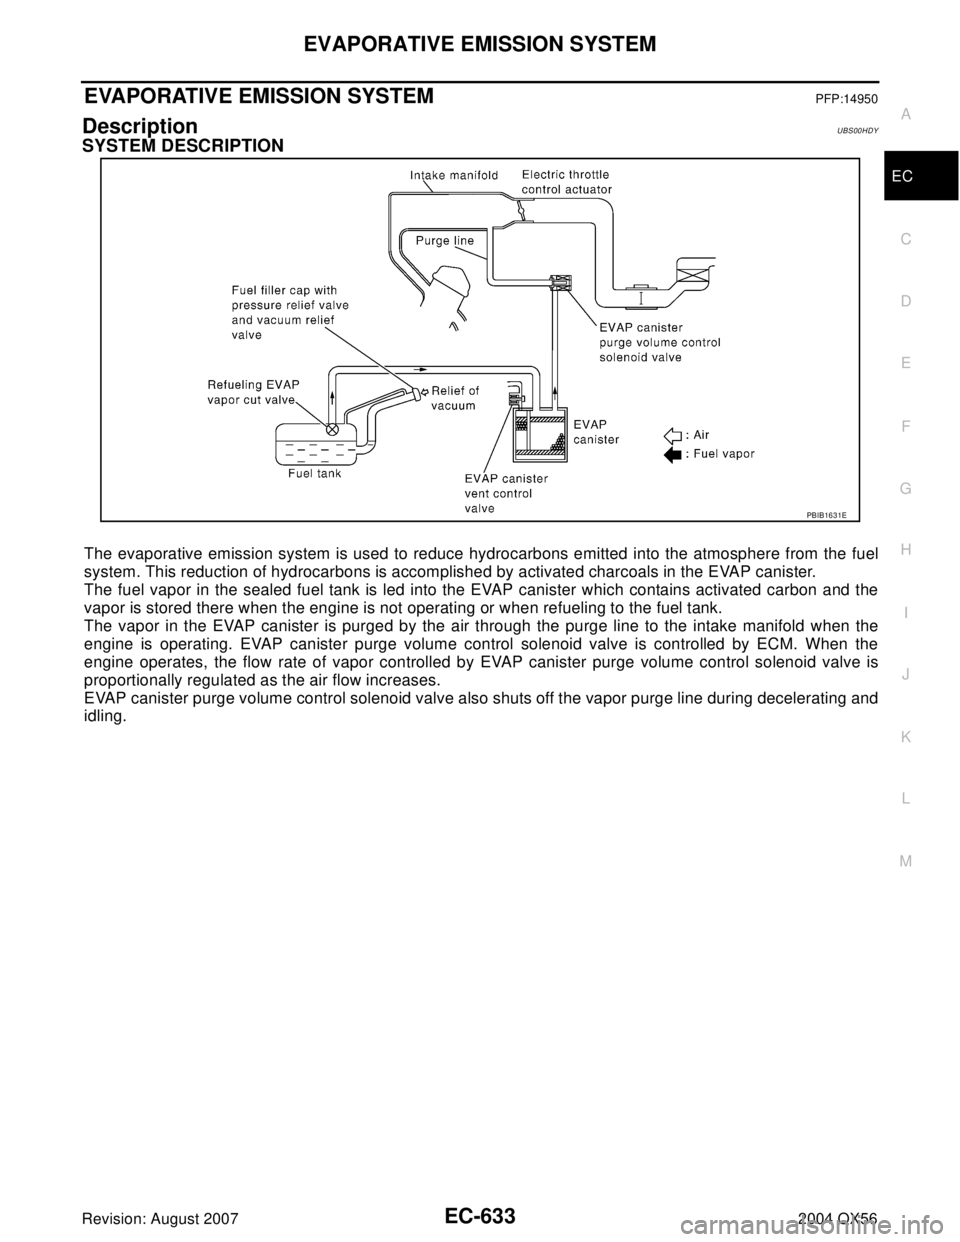
The evaporative emission system is used to reduce hydrocarbons emitted into the atmosphere from the fuel
system. This reduction of hydrocarbons is accomplished by activated charcoals in the EVAP canister.
The fuel vapor in the sealed fuel tank is led into the EVAP canister which contains activated carbon and the
vapor is stored there when the engine is not operating or when refueling to the fuel tank.
The vapor in the EVAP canister is purged by the air through the purge line to the intake manifold when the
engine is operating. EVAP canister purge volume control solenoid valve is controlled by ECM. When the
engine operates, the flow rate of vapor controlled by EVAP canister purge volume control solenoid valve is
proportionally regulated as the air flow increases.
EVAP canister purge volume control solenoid valve also shuts off the vapor purge line during decelerating and
idling.
PBIB1631E
Page 1828 of 3371
EVAPORATIVE EMISSION SYSTEM
EC-637
C
D
E
F
G
H
I
J
K
L
MA
EC
Revision: August 20072004 QX56
EVAP SERVICE PORT
Positive pressure is delivered to the EVAP system through the EVAP
service port. If fuel vapor leakage in the EVAP system occurs, use a
leak detector to locate the leak.
Removal and InstallationUBS00HE0
EVAP CANISTER
Tighten EVAP canister as shown in the figure.
EVAP CANISTER VENT CONTROL VALVE
1. Turn EVAP canister vent control valve counterclockwise.
2. Remove the EVAP canister vent control valve.
Always replace O-ring with a new one.
How to Detect Fuel Vapor LeakageUBS00HE1
CAUTION:
�Do not use compressed air or a high pressure pump.
�Do not exceed 4.12 kPa (0.042 kg/cm2 , 0.6 psi) of pressure in EVAP system.
NOTE:
�Do not start engine.
�Improper installation of EVAP service port adapter to the EVAP service port may cause a leak.
SEF 4 62 UA
BBIA0349E
BBIA0350E
Page 1831 of 3371
EC-640Revision: August 2007
ON BOARD REFUELING VAPOR RECOVERY (ORVR)
2004 QX56
ON BOARD REFUELING VAPOR RECOVERY (ORVR)PFP:00032
System DescriptionUBS00HE2
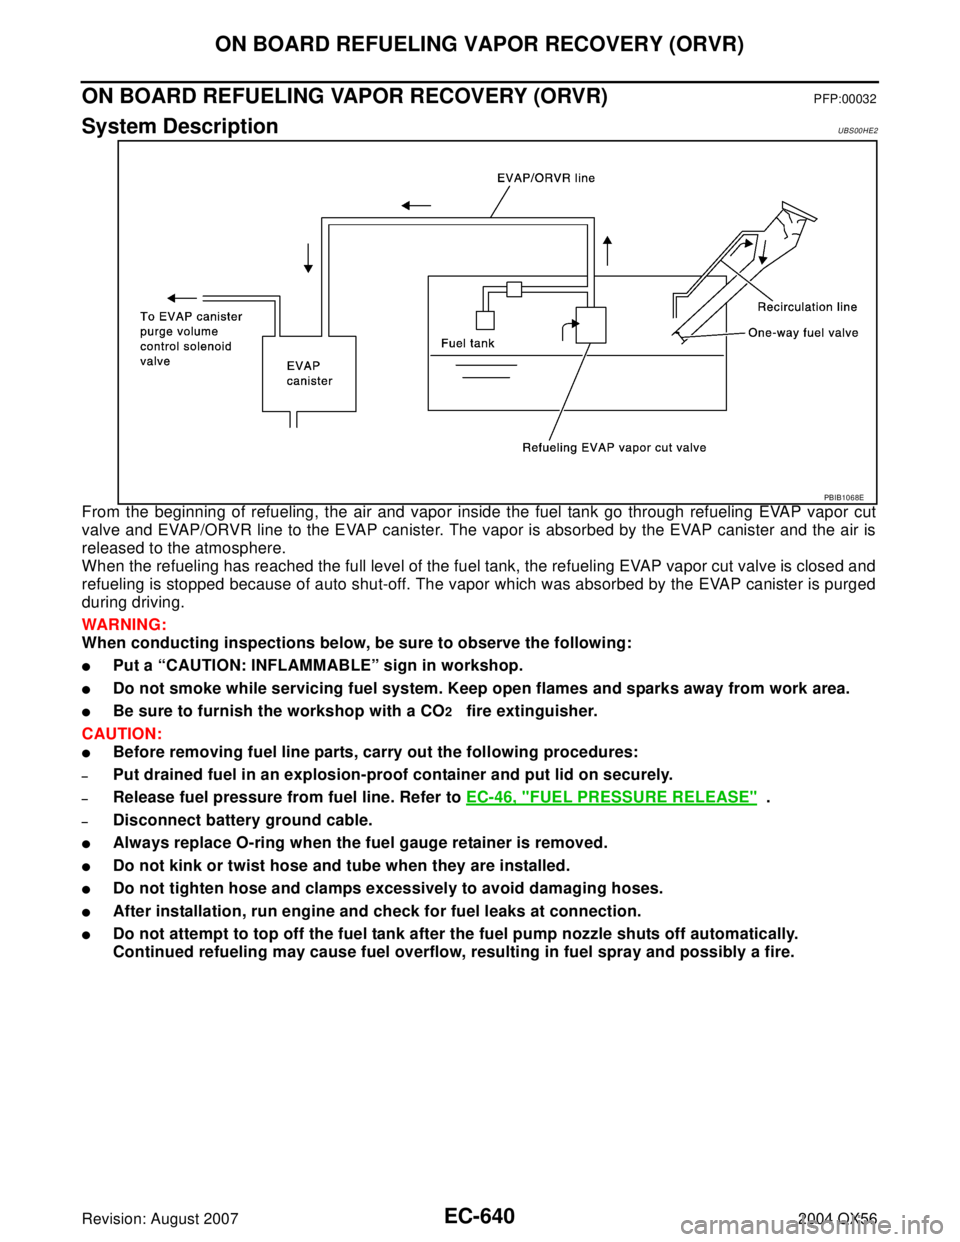
From the beginning of refueling, the air and vapor inside the fuel tank go through refueling EVAP vapor cut
valve and EVAP/ORVR line to the EVAP canister. The vapor is absorbed by the EVAP canister and the air is
released to the atmosphere.
When the refueling has reached the full level of the fuel tank, the refueling EVAP vapor cut valve is closed and
refueling is stopped because of auto shut-off. The vapor which was absorbed by the EVAP canister is purged
during driving.
WAR NIN G:
When conducting inspections below, be sure to observe the following:
�Put a “CAUTION: INFLAMMABLE” sign in workshop.
�Do not smoke while servicing fuel system. Keep open flames and sparks away from work area.
�Be sure to furnish the workshop with a CO2 fire extinguisher.
CAUTION:
�Before removing fuel line parts, carry out the following procedures:
–Put drained fuel in an explosion-proof container and put lid on securely.
–Release fuel pressure from fuel line. Refer to EC-46, "FUEL PRESSURE RELEASE" .
–Disconnect battery ground cable.
�Always replace O-ring when the fuel gauge retainer is removed.
�Do not kink or twist hose and tube when they are installed.
�Do not tighten hose and clamps excessively to avoid damaging hoses.
�After installation, run engine and check for fuel leaks at connection.
�Do not attempt to top off the fuel tank after the fuel pump nozzle shuts off automatically.
Continued refueling may cause fuel overflow, resulting in fuel spray and possibly a fire.
PBIB1068E
Page 1836 of 3371
POSITIVE CRANKCASE VENTILATION
EC-645
C
D
E
F
G
H
I
J
K
L
MA
EC
Revision: August 20072004 QX56
POSITIVE CRANKCASE VENTILATIONPFP:11810
DescriptionUBS00HE5
SYSTEM DESCRIPTION
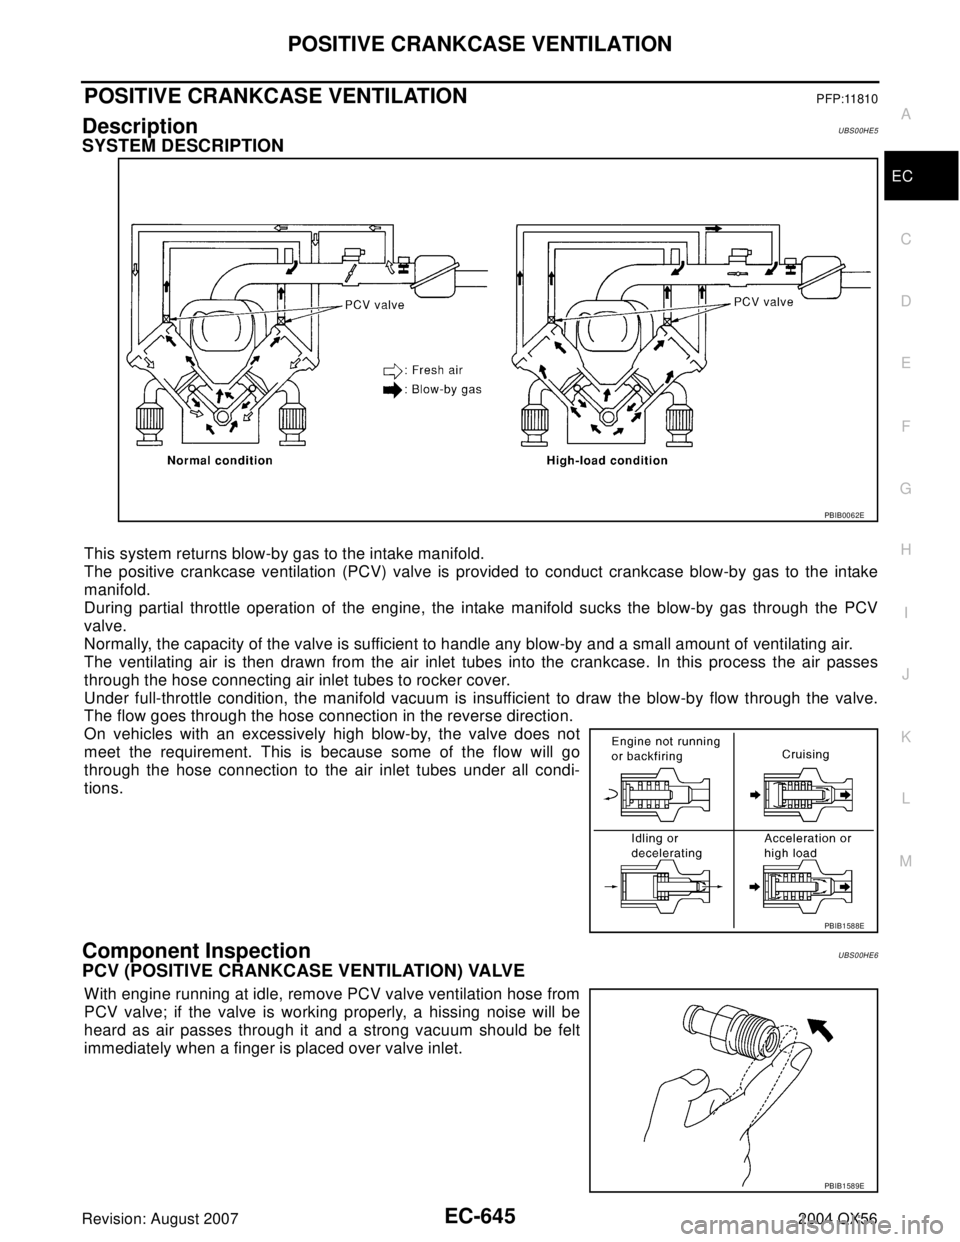
This system returns blow-by gas to the intake manifold.
The positive crankcase ventilation (PCV) valve is provided to conduct crankcase blow-by gas to the intake
manifold.
During partial throttle operation of the engine, the intake manifold sucks the blow-by gas through the PCV
valve.
Normally, the capacity of the valve is sufficient to handle any blow-by and a small amount of ventilating air.
The ventilating air is then drawn from the air inlet tubes into the crankcase. In this process the air passes
through the hose connecting air inlet tubes to rocker cover.
Under full-throttle condition, the manifold vacuum is insufficient to draw the blow-by flow through the valve.
The flow goes through the hose connection in the reverse direction.
On vehicles with an excessively high blow-by, the valve does not
meet the requirement. This is because some of the flow will go
through the hose connection to the air inlet tubes under all condi-
tions.
Component InspectionUBS00HE6
PCV (POSITIVE CRANKCASE VENTILATION) VALVE
With engine running at idle, remove PCV valve ventilation hose from
PCV valve; if the valve is working properly, a hissing noise will be
heard as air passes through it and a strong vacuum should be felt
immediately when a finger is placed over valve inlet.
PBIB0062E
PBIB1588E
PBIB1589E