Page 1669 of 3371
EC-478Revision: August 2007
DTC P1278, P1288 A/F SENSOR 1
2004 QX56
Specification data are reference values and are measured between each terminal and ground.
CAUTION:
Do not use ECM ground terminals when measuring input/output voltage. Doing so may result in dam-
age to the ECM's transistor. Use a ground other than ECM terminals, such as the ground.
Diagnostic ProcedureUBS00HAK
1. CHECK GROUND CONNECTIONS
1. Turn ignition switch OFF.
2. Loosen and retighten three ground screws on the body.
Refer to EC-133, "
Ground Inspection" .
OK or NG
OK >> GO TO 2.
NG >> Repair or replace ground connections.
2. RETIGHTEN A/F SENSOR 1
Loosen and retighten the A/F sensor 1.
>> GO TO 3.
TER-
MINAL
NO.WIRE
COLORITEM CONDITION DATA (DC Voltage)
57 L/P
A/F sensor 1 (Bank 2)[Engine is running]
�Warm-up condition
�Idle speedApproximately 2.6V
58 GR/GApproximately 2.3V
76 G/LApproximately 3.1V
77 BR/BApproximately 2.3V
BBIA0354E
Tightening torque: 50 N-m (5.1 kg-m, 37 ft-lb)
BBIA0375E
Page 1670 of 3371
DTC P1278, P1288 A/F SENSOR 1
EC-479
C
D
E
F
G
H
I
J
K
L
MA
EC
Revision: August 20072004 QX56
3. CHECK EXHAUST GAS LEAK
1. Start engine and run it at idle.
2. Listen for an exhaust gas leak before three way catalyst (manifold).
OK or NG
OK >> GO TO 4.
NG >> Repair or replace.
4. CHECK FOR INTAKE AIR LEAK
Listen for an intake air leak after the mass air flow sensor.
OK or NG
OK >> GO TO 5.
NG >> Repair or replace.
PBIB1216E
Page 1676 of 3371

DTC P1279, P1289 A/F SENSOR 1
EC-485
C
D
E
F
G
H
I
J
K
L
MA
EC
Revision: August 20072004 QX56
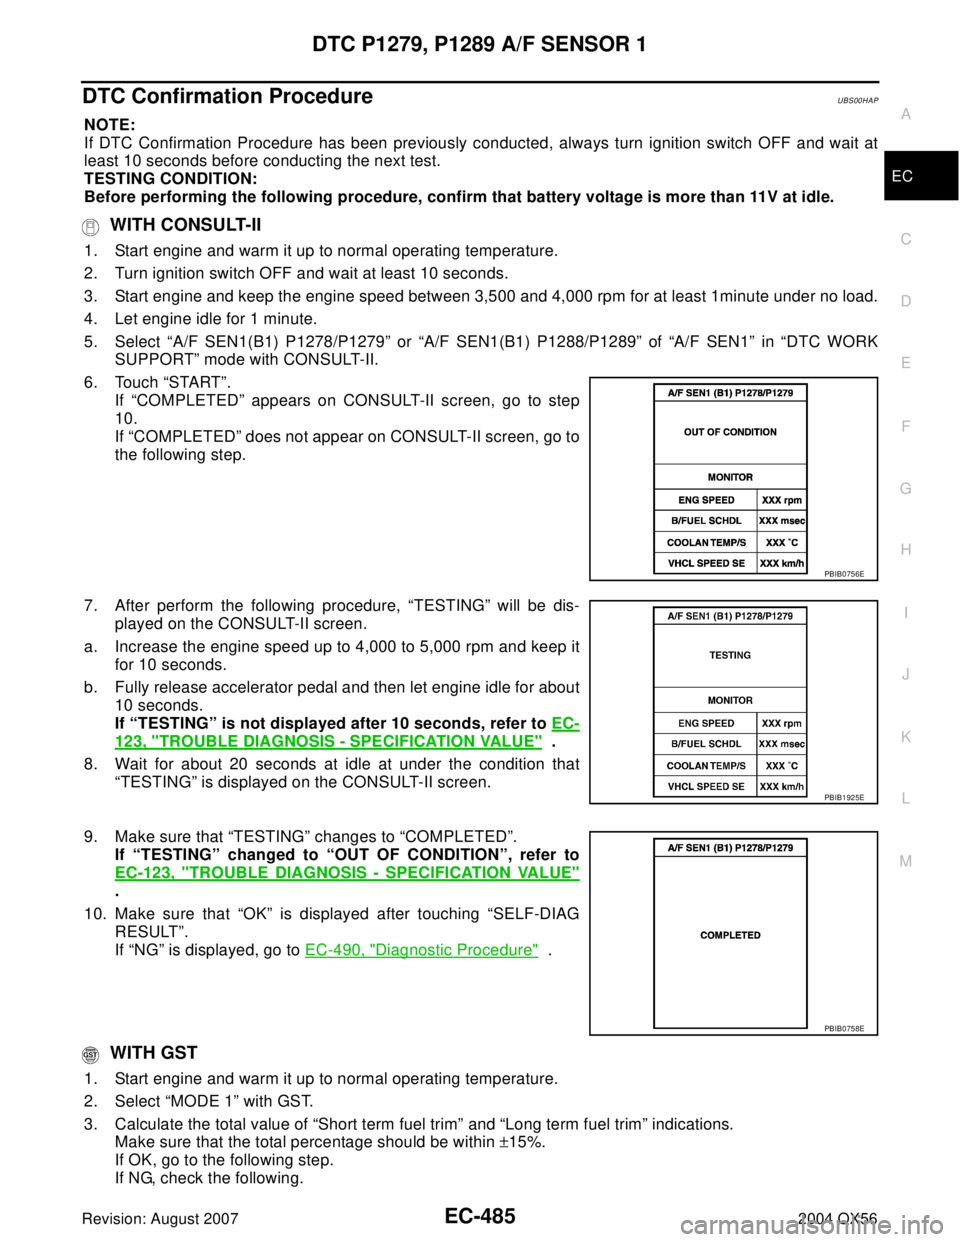
DTC Confirmation ProcedureUBS00HAP
NOTE:
If DTC Confirmation Procedure has been previously conducted, always turn ignition switch OFF and wait at
least 10 seconds before conducting the next test.
TESTING CONDITION:
Before performing the following procedure, confirm that battery voltage is more than 11V at idle.
WITH CONSULT-II
1. Start engine and warm it up to normal operating temperature.
2. Turn ignition switch OFF and wait at least 10 seconds.
3. Start engine and keep the engine speed between 3,500 and 4,000 rpm for at least 1minute under no load.
4. Let engine idle for 1 minute.
5. Select “A/F SEN1(B1) P1278/P1279” or “A/F SEN1(B1) P1288/P1289” of “A/F SEN1” in “DTC WORK
SUPPORT” mode with CONSULT-II.
6. Touch “START”.
If “COMPLETED” appears on CONSULT-II screen, go to step
10.
If “COMPLETED” does not appear on CONSULT-II screen, go to
the following step.
7. After perform the following procedure, “TESTING” will be dis-
played on the CONSULT-II screen.
a. Increase the engine speed up to 4,000 to 5,000 rpm and keep it
for 10 seconds.
b. Fully release accelerator pedal and then let engine idle for about
10 seconds.
If “TESTING” is not displayed after 10 seconds, refer to EC-
123, "TROUBLE DIAGNOSIS - SPECIFICATION VALUE" .
8. Wait for about 20 seconds at idle at under the condition that
“TESTING” is displayed on the CONSULT-II screen.
9. Make sure that “TESTING” changes to “COMPLETED”.
If “TESTING” changed to “OUT OF CONDITION”, refer to
EC-123, "
TROUBLE DIAGNOSIS - SPECIFICATION VALUE"
.
10. Make sure that “OK” is displayed after touching “SELF-DIAG
RESULT”.
If “NG” is displayed, go to EC-490, "
Diagnostic Procedure" .
WITH GST
1. Start engine and warm it up to normal operating temperature.
2. Select “MODE 1” with GST.
3. Calculate the total value of “Short term fuel trim” and “Long term fuel trim” indications.
Make sure that the total percentage should be within ±15%.
If OK, go to the following step.
If NG, check the following.
PBIB0756E
PBIB1925E
PBIB0758E
Page 1681 of 3371
EC-490Revision: August 2007
DTC P1279, P1289 A/F SENSOR 1
2004 QX56
Specification data are reference values and are measured between each terminal and ground.
CAUTION:
Do not use ECM ground terminals when measuring input/output voltage. Doing so may result in dam-
age to the ECM's transistor. Use a ground other than ECM terminals, such as the ground.
Diagnostic ProcedureUBS00HAR
1. CHECK GROUND CONNECTIONS
1. Turn ignition switch OFF.
2. Loosen and retighten three ground screws on the body.
Refer to EC-133, "
Ground Inspection" .
OK or NG
OK >> GO TO 2.
NG >> Repair or replace ground connections.
2. RETIGHTEN A/F SENSOR 1
Loosen and retighten the A/F sensor 1.
>> GO TO 3.
TER-
MINAL
NO.WIRE
COLORITEM CONDITION DATA (DC Voltage)
57 L/P
A/F sensor 1 (Bank 2)[Engine is running]
�Warm-up condition
�Idle speedApproximately 2.6V
58 GR/GApproximately 2.3V
76 G/LApproximately 3.1V
77 BR/BApproximately 2.3V
BBIA0354E
Tightening torque: 50 N-m (5.1 kg-m, 37 ft-lb)
BBIA0375E
Page 1682 of 3371
DTC P1279, P1289 A/F SENSOR 1
EC-491
C
D
E
F
G
H
I
J
K
L
MA
EC
Revision: August 20072004 QX56
3. CHECK EXHAUST GAS LEAK
1. Start engine and run it at idle.
2. Listen for an exhaust gas leak before three way catalyst (Manifold).
OK or NG
OK >> GO TO 4.
NG >> Repair or replace.
4. CHECK FOR INTAKE AIR LEAK
Listen for an intake air leak after the mass air flow sensor.
OK or NG
OK >> GO TO 5.
NG >> Repair or replace.
PBIB1216E
Page 1692 of 3371

DTC P1444 EVAP CANISTER PURGE VOLUME CONTROL SOLENOID VALVE
EC-501
C
D
E
F
G
H
I
J
K
L
MA
EC
Revision: August 20072004 QX56
4. CHECK EVAP CONTROL SYSTEM PRESSURE SENSOR CONNECTOR
1. Disconnect EVAP control system pressure sensor harness connector.
2. Check connectors for water.
OK or NG
OK >> GO TO 5.
NG >> Replace EVAP control system pressure sensor.
5. CHECK EVAP CONTROL SYSTEM PRESSURE SENSOR
Refer to EC-301, "
Component Inspection" .
OK or NG
OK (With CONSULT-II)>>GO TO 6.
OK (Without CONSULT-II)>>GO TO 7.
NG >> Replace EVAP control system pressure sensor.
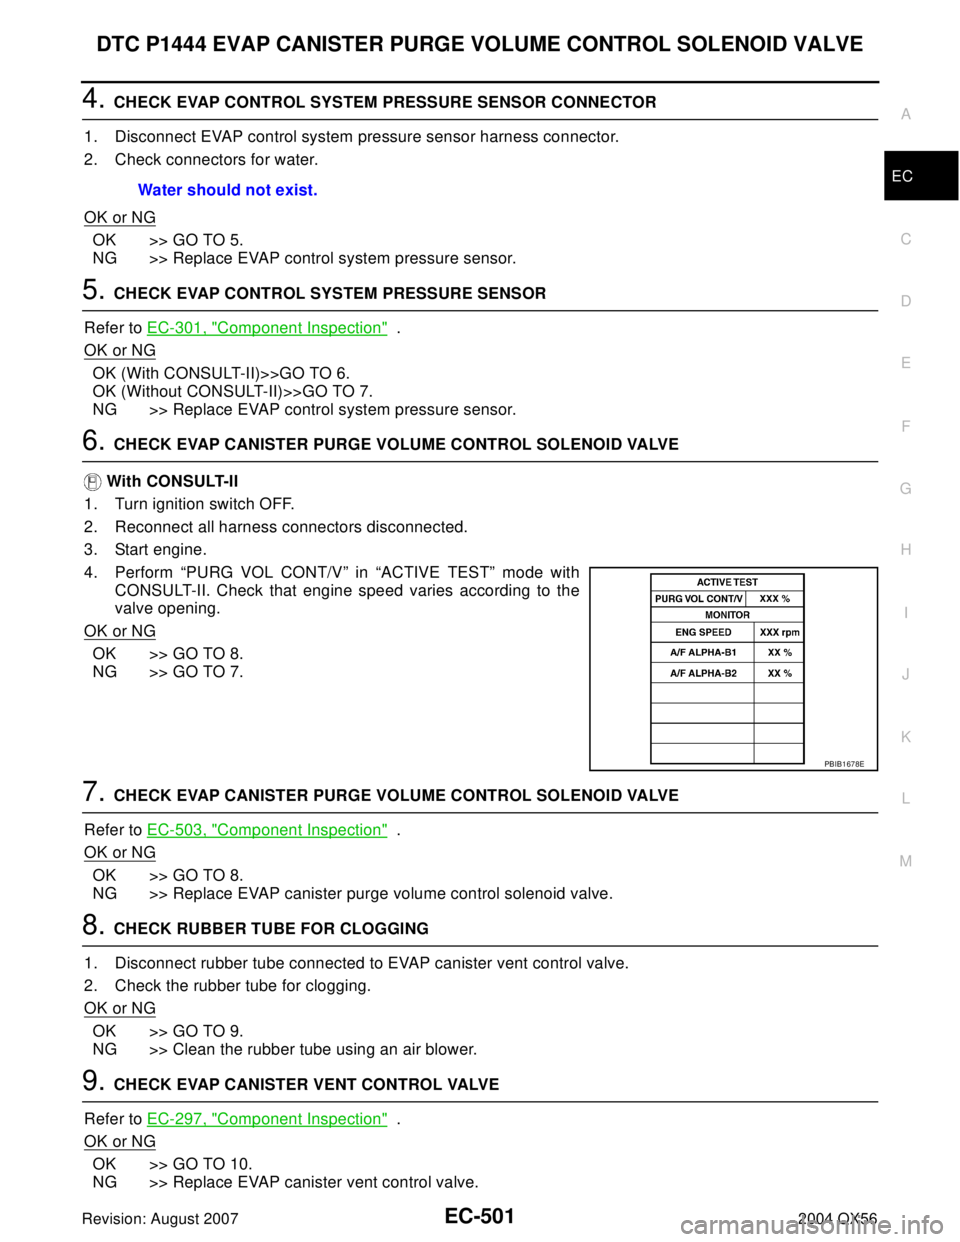
6. CHECK EVAP CANISTER PURGE VOLUME CONTROL SOLENOID VALVE
With CONSULT-II
1. Turn ignition switch OFF.
2. Reconnect all harness connectors disconnected.
3. Start engine.
4. Perform “PURG VOL CONT/V” in “ACTIVE TEST” mode with
CONSULT-II. Check that engine speed varies according to the
valve opening.
OK or NG
OK >> GO TO 8.
NG >> GO TO 7.
7. CHECK EVAP CANISTER PURGE VOLUME CONTROL SOLENOID VALVE
Refer to EC-503, "
Component Inspection" .
OK or NG
OK >> GO TO 8.
NG >> Replace EVAP canister purge volume control solenoid valve.
8. CHECK RUBBER TUBE FOR CLOGGING
1. Disconnect rubber tube connected to EVAP canister vent control valve.
2. Check the rubber tube for clogging.
OK or NG
OK >> GO TO 9.
NG >> Clean the rubber tube using an air blower.
9. CHECK EVAP CANISTER VENT CONTROL VALVE
Refer to EC-297, "
Component Inspection" .
OK or NG
OK >> GO TO 10.
NG >> Replace EVAP canister vent control valve.Water should not exist.
PBIB1678E
Page 1737 of 3371

EC-546Revision: August 2007
DTC P1706 PNP SWITCH
2004 QX56
DTC P1706 PNP SWITCHPFP:32006
Component DescriptionUBS00HBQ
When the gear position is P or N, park/neutral position (PNP) switch is ON.
TCM detects the position because the continuity of the line (the ON signal) exists.
Then the TCM sends the PNP switch signal to the ECM via combination meter.
CONSULT-II Reference Value in Data Monitor ModeUBS00HBR
Specification data are reference values.
On Board Diagnosis LogicUBS00HBS
DTC Confirmation ProcedureUBS00HBT
CAUTION:
Always drive vehicle at a safe speed.
NOTE:
If DTC Confirmation Procedure has been previously conducted, always turn ignition switch OFF and wait at
least 10 seconds before conducting the next test.
WITH CONSULT-II
1. Turn ignition switch ON.
2. Select “P/N POSI SW” in “DATA MONITOR” mode with CON-
SULT-II. Then check the “P/N POSI SW” signal under the follow-
ing conditions.
If NG, go to EC-549, "
Diagnostic Procedure" .
If OK, go to following step.
3. Select “DATA MONITOR” mode with CONSULT-II.
4. Start engine and warm it up to normal operating temperature.
5. Maintain the following conditions for at least 60 consecutive sec-
onds.
6. If 1st trip DTC is detected, go to EC-549, "
Diagnostic Procedure"
.
MONITOR ITEM CONDITION SPECIFICATION
P/N POSI SW
�Ignition switch: ONShift lever: P or N ON
Shift lever: Except above OFF
DTC No. Trouble diagnosis name DTC detecting condition Possible cause
P1706
1706Park/neutral position
switchThe signal of the park/neutral position (PNP)
switch is not changed in the process of engine
starting and driving.
�Harness or connectors
[The park/neutral position (PNP) switch
circuit is open or shorted.]
�Park/neutral position (PNP) switch
�Combination meter
�TCM
Position (Selector lever) Known-good signal
N or P position ON
Except the above position OFF
ENG SPEED More than 1,000 rpm
COOLAN TEMP/S More than 70°C (158°F)
B/FUEL SCHDL More than 2.0 msec
VHCL SPEED SE More than 64 km/h (40 MPH)
Selector lever Suitable position
SEF 2 12 Y
SEF 2 13 Y
Page 1750 of 3371

DTC P2122, P2123 APP SENSOR
EC-559
C
D
E
F
G
H
I
J
K
L
MA
EC
Revision: August 20072004 QX56
Specification data are reference values and are measured between each terminal and ground.
CAUTION:
Do not use ECM ground terminals when measuring input/output voltage. Doing so may result in dam-
age to the ECM's transistor. Use a ground other than ECM terminals, such as the ground.
Diagnostic ProcedureUBS00HC9
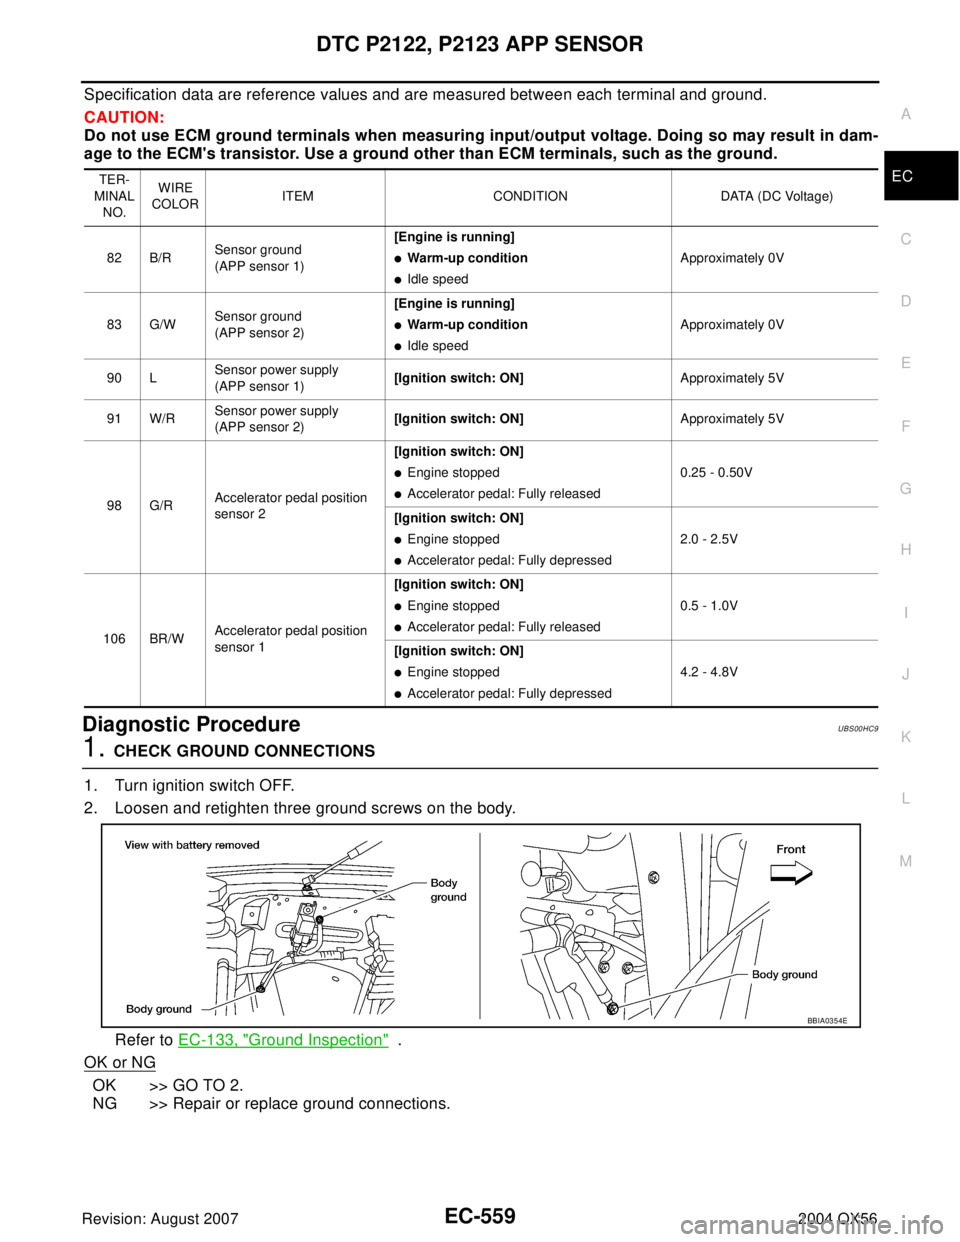
1. CHECK GROUND CONNECTIONS
1. Turn ignition switch OFF.
2. Loosen and retighten three ground screws on the body.
Refer to EC-133, "
Ground Inspection" .
OK or NG
OK >> GO TO 2.
NG >> Repair or replace ground connections.
TER-
MINAL
NO.WIRE
COLORITEM CONDITION DATA (DC Voltage)
82 B/RSensor ground
(APP sensor 1)[Engine is running]
�Warm-up condition
�Idle speedApproximately 0V
83 G/WSensor ground
(APP sensor 2)[Engine is running]
�Warm-up condition
�Idle speedApproximately 0V
90 LSensor power supply
(APP sensor 1)[Ignition switch: ON]Approximately 5V
91 W/RSensor power supply
(APP sensor 2)[Ignition switch: ON]Approximately 5V
98 G/RAccelerator pedal position
sensor 2[Ignition switch: ON]
�Engine stopped
�Accelerator pedal: Fully released0.25 - 0.50V
[Ignition switch: ON]
�Engine stopped
�Accelerator pedal: Fully depressed2.0 - 2.5V
106 BR/WAccelerator pedal position
sensor 1[Ignition switch: ON]
�Engine stopped
�Accelerator pedal: Fully released0.5 - 1.0V
[Ignition switch: ON]
�Engine stopped
�Accelerator pedal: Fully depressed4.2 - 4.8V
BBIA0354E