Page 1925 of 3371
EM-42Revision: August 2007
TIMING CHAIN
2004 QX56
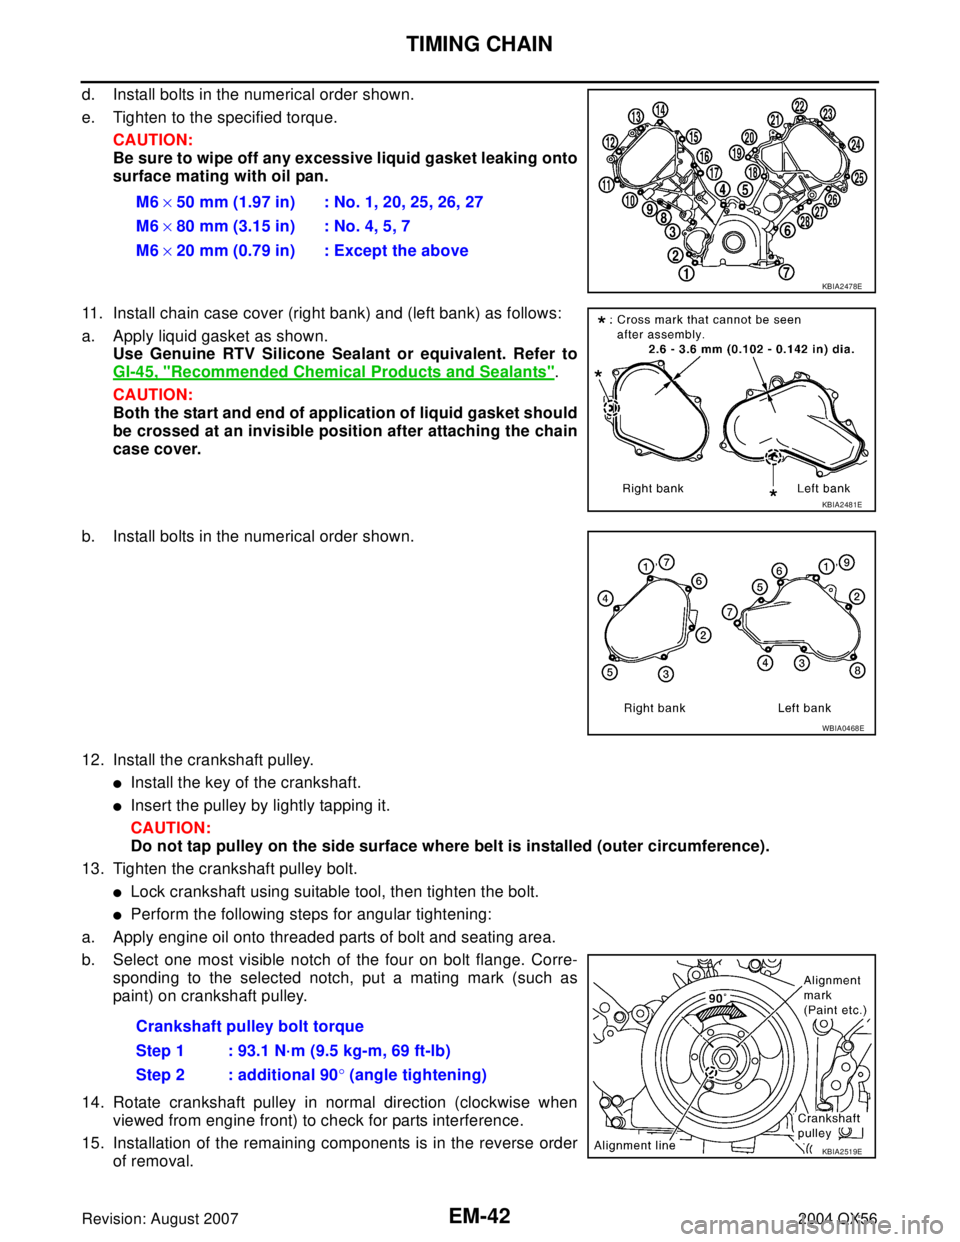
d. Install bolts in the numerical order shown.
e. Tighten to the specified torque.
CAUTION:
Be sure to wipe off any excessive liquid gasket leaking onto
surface mating with oil pan.
11. Install chain case cover (right bank) and (left bank) as follows:
a. Apply liquid gasket as shown.
Use Genuine RTV Silicone Sealant or equivalent. Refer to
GI-45, "
Recommended Chemical Products and Sealants".
CAUTION:
Both the start and end of application of liquid gasket should
be crossed at an invisible position after attaching the chain
case cover.
b. Install bolts in the numerical order shown.
12. Install the crankshaft pulley.
�Install the key of the crankshaft.
�Insert the pulley by lightly tapping it.
CAUTION:
Do not tap pulley on the side surface where belt is installed (outer circumference).
13. Tighten the crankshaft pulley bolt.
�Lock crankshaft using suitable tool, then tighten the bolt.
�Perform the following steps for angular tightening:
a. Apply engine oil onto threaded parts of bolt and seating area.
b. Select one most visible notch of the four on bolt flange. Corre-
sponding to the selected notch, put a mating mark (such as
paint) on crankshaft pulley.
14. Rotate crankshaft pulley in normal direction (clockwise when
viewed from engine front) to check for parts interference.
15. Installation of the remaining components is in the reverse order
of removal.M6 × 50 mm (1.97 in) : No. 1, 20, 25, 26, 27
M6 × 80 mm (3.15 in) : No. 4, 5, 7
M6 × 20 mm (0.79 in) : Except the above
KBIA2478E
KBIA2481E
WBIA0468E
Crankshaft pulley bolt torque
Step 1 : 93.1 N·m (9.5 kg-m, 69 ft-lb)
Step 2 : additional 90° (angle tightening)
KBIA2519E
Page 1926 of 3371
CAMSHAFT
EM-43
C
D
E
F
G
H
I
J
K
L
MA
EM
Revision: August 20072004 QX56
CAMSHAFTPFP:13001
Removal and InstallationEBS00ILN
* Refer to GI-45, "Recommended Chemical Products and Sealants" .
REMOVAL
1. Remove rocker cover (right bank) and (left bank). Refer to EM-33, "ROCKER COVER" .
2. Obtain compression TDC of No. 1 cylinder as follows:
a. Turn crankshaft pulley clockwise to align the TDC identification
notch (without paint mark) with timing indicator on front cover.
1. Cylinder head (right bank) 2. Camshaft bracket (No. 2, 3, 4, 5) 3. Valve lifter
4. Camshaft bracket (No. 1) 5. Seal washer 6. Camshaft (right bank EXH)
7. Camshaft (right bank INT) 8. Camshaft (left bank INT) 9. Camshaft (left bank EXH)
10. Camshaft sprocket (right bank EXH) 11. Camshaft sprocket (right bank INT) 12. Camshaft sprocket (left bank INT)
13. Camshaft sprocket (left bank EXH) 14. Camshaft position sensor (PHASE) 15. O-ring
16. Cylinder head (left bank)
WBIA0469E
KBIA2476E
Page 1930 of 3371
CAMSHAFT
EM-47
C
D
E
F
G
H
I
J
K
L
MA
EM
Revision: August 20072004 QX56
INSPECTION AFTER REMOVAL
Camshaft Runout
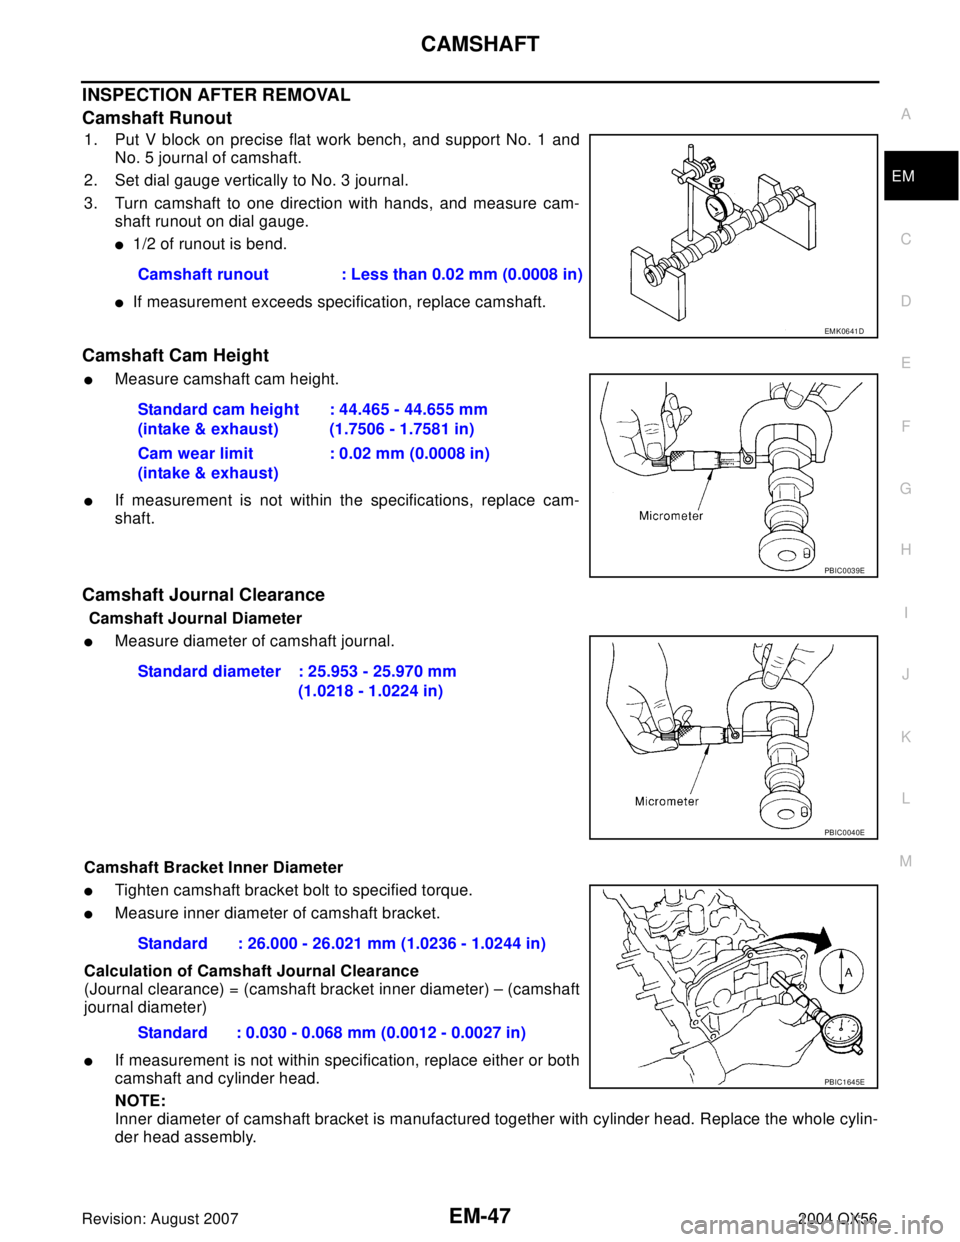
1. Put V block on precise flat work bench, and support No. 1 and
No. 5 journal of camshaft.
2. Set dial gauge vertically to No. 3 journal.
3. Turn camshaft to one direction with hands, and measure cam-
shaft runout on dial gauge.
�1/2 of runout is bend.
�If measurement exceeds specification, replace camshaft.
Camshaft Cam Height
�Measure camshaft cam height.
�If measurement is not within the specifications, replace cam-
shaft.
Camshaft Journal Clearance
Camshaft Journal Diameter
�Measure diameter of camshaft journal.
Camshaft Bracket Inner Diameter
�Tighten camshaft bracket bolt to specified torque.
�Measure inner diameter of camshaft bracket.
Calculation of Camshaft Journal Clearance
(Journal clearance) = (camshaft bracket inner diameter) – (camshaft
journal diameter)
�If measurement is not within specification, replace either or both
camshaft and cylinder head.
NOTE:
Inner diameter of camshaft bracket is manufactured together with cylinder head. Replace the whole cylin-
der head assembly.Camshaft runout : Less than 0.02 mm (0.0008 in)
EMK0641D
Standard cam height
(intake & exhaust): 44.465 - 44.655 mm
(1.7506 - 1.7581 in)
Cam wear limit
(intake & exhaust): 0.02 mm (0.0008 in)
PBIC0039E
Standard diameter : 25.953 - 25.970 mm
(1.0218 - 1.0224 in)
PBIC0040E
Standard : 26.000 - 26.021 mm (1.0236 - 1.0244 in)
Standard : 0.030 - 0.068 mm (0.0012 - 0.0027 in)
PBIC1645E
Page 1935 of 3371
EM-52Revision: August 2007
CAMSHAFT
2004 QX56
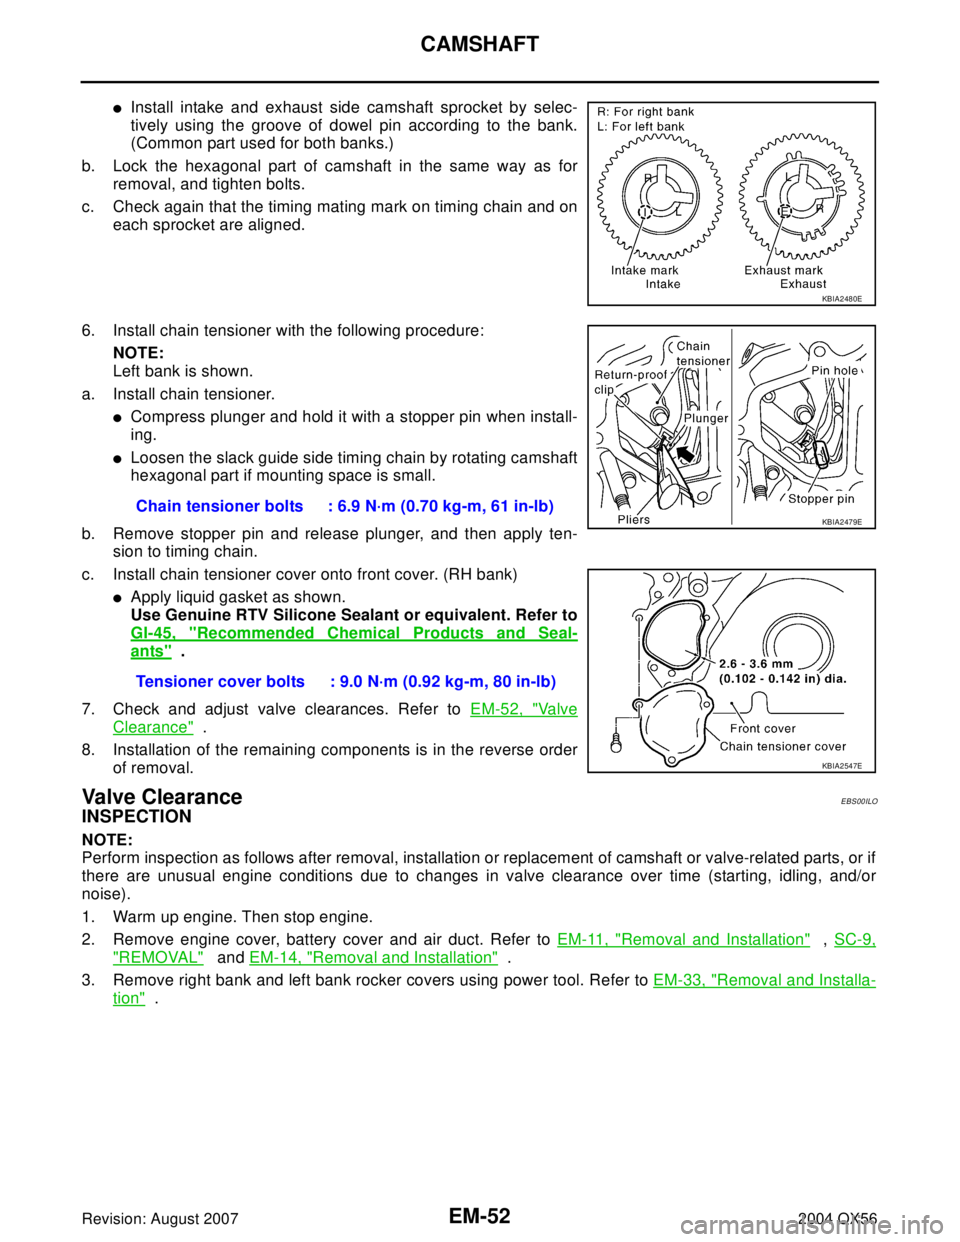
�Install intake and exhaust side camshaft sprocket by selec-
tively using the groove of dowel pin according to the bank.
(Common part used for both banks.)
b. Lock the hexagonal part of camshaft in the same way as for
removal, and tighten bolts.
c. Check again that the timing mating mark on timing chain and on
each sprocket are aligned.
6. Install chain tensioner with the following procedure:
NOTE:
Left bank is shown.
a. Install chain tensioner.
�Compress plunger and hold it with a stopper pin when install-
ing.
�Loosen the slack guide side timing chain by rotating camshaft
hexagonal part if mounting space is small.
b. Remove stopper pin and release plunger, and then apply ten-
sion to timing chain.
c. Install chain tensioner cover onto front cover. (RH bank)
�Apply liquid gasket as shown.
Use Genuine RTV Silicone Sealant or equivalent. Refer to
GI-45, "
Recommended Chemical Products and Seal-
ants" .
7. Check and adjust valve clearances. Refer to EM-52, "
Va l v e
Clearance" .
8. Installation of the remaining components is in the reverse order
of removal.
Va lv e C le a ra n c eEBS00ILO
INSPECTION
NOTE:
Perform inspection as follows after removal, installation or replacement of camshaft or valve-related parts, or if
there are unusual engine conditions due to changes in valve clearance over time (starting, idling, and/or
noise).
1. Warm up engine. Then stop engine.
2. Remove engine cover, battery cover and air duct. Refer to EM-11, "
Removal and Installation" , SC-9,
"REMOVAL" and EM-14, "Removal and Installation" .
3. Remove right bank and left bank rocker covers using power tool. Refer to EM-33, "
Removal and Installa-
tion" .
KBIA2480E
Chain tensioner bolts : 6.9 N·m (0.70 kg-m, 61 in-lb)
Tensioner cover bolts : 9.0 N·m (0.92 kg-m, 80 in-lb)KBIA2479E
KBIA2547E
Page 1936 of 3371
CAMSHAFT
EM-53
C
D
E
F
G
H
I
J
K
L
MA
EM
Revision: August 20072004 QX56
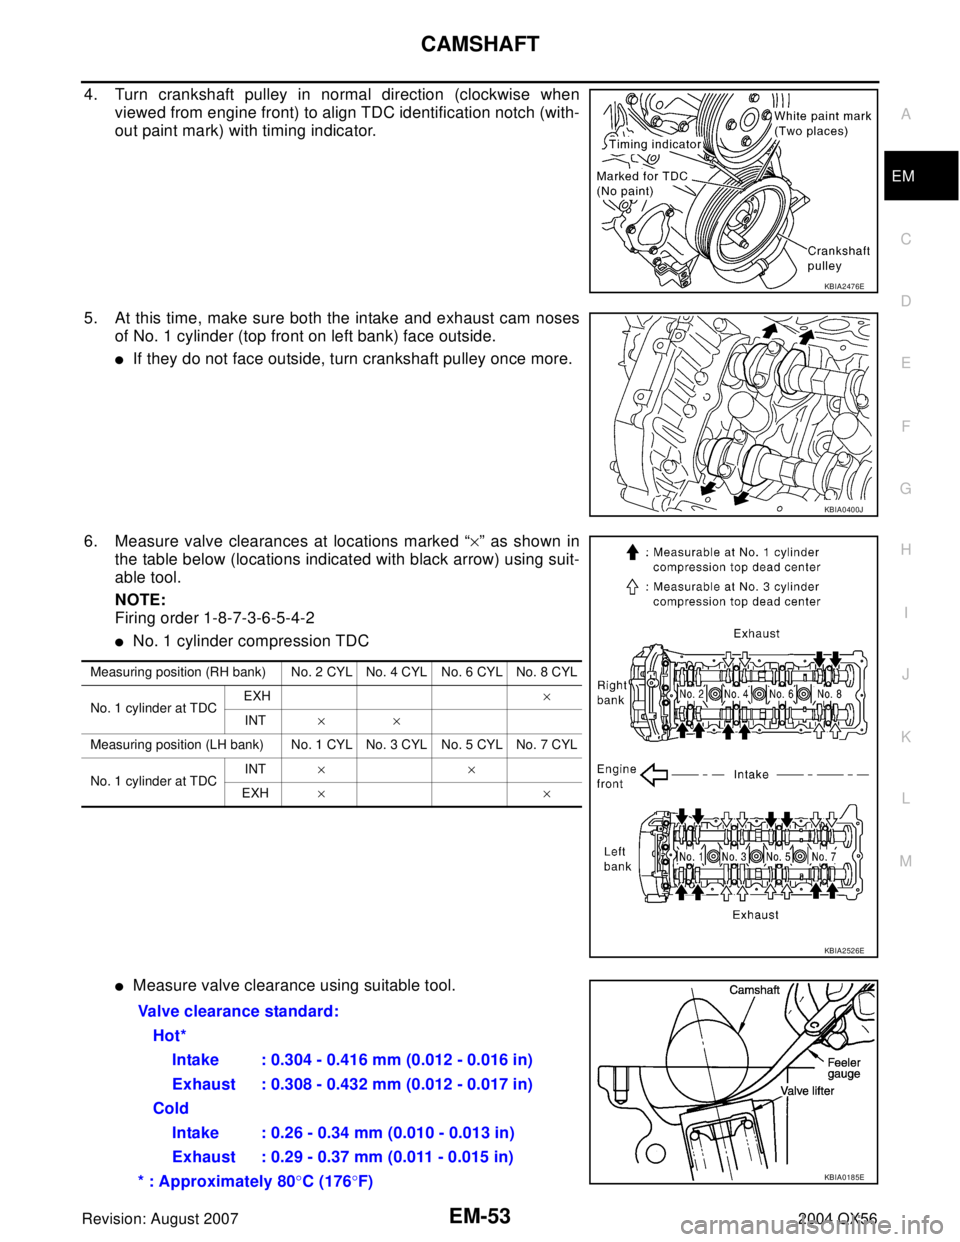
4. Turn crankshaft pulley in normal direction (clockwise when
viewed from engine front) to align TDC identification notch (with-
out paint mark) with timing indicator.
5. At this time, make sure both the intake and exhaust cam noses
of No. 1 cylinder (top front on left bank) face outside.
�If they do not face outside, turn crankshaft pulley once more.
6. Measure valve clearances at locations marked “×” as shown in
the table below (locations indicated with black arrow) using suit-
able tool.
NOTE:
Firing order 1-8-7-3-6-5-4-2
�No. 1 cylinder compression TDC
�Measure valve clearance using suitable tool.
KBIA2476E
KBIA0400J
Measuring position (RH bank) No. 2 CYL No. 4 CYL No. 6 CYL No. 8 CYL
No. 1 cylinder at TDC EXH ×
INT××
Measuring position (LH bank) No. 1 CYL No. 3 CYL No. 5 CYL No. 7 CYL
No. 1 cylinder at TDCINT××
EXH××
KBIA2526E
Valve clearance standard:
Hot*
Intake : 0.304 - 0.416 mm (0.012 - 0.016 in)
Exhaust : 0.308 - 0.432 mm (0.012 - 0.017 in)
Cold
Intake : 0.26 - 0.34 mm (0.010 - 0.013 in)
Exhaust : 0.29 - 0.37 mm (0.011 - 0.015 in)
* : Approximately 80°C (176°F)
KBIA0185E
Page 1937 of 3371
EM-54Revision: August 2007
CAMSHAFT
2004 QX56
CAUTION:
If inspection was carried out with cold engine, make sure values with fully warmed up engine
are still within specifications.
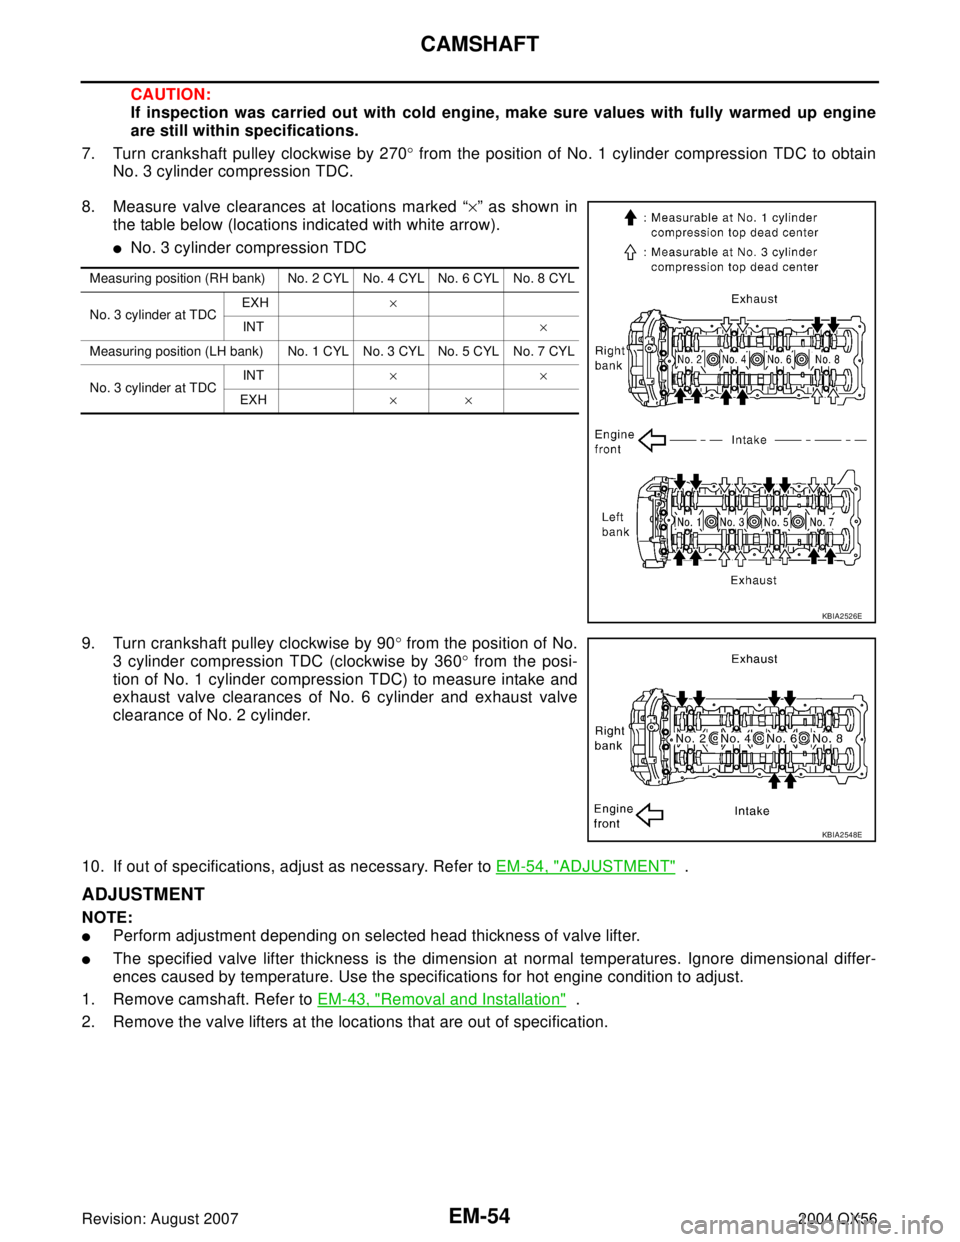
7. Turn crankshaft pulley clockwise by 270° from the position of No. 1 cylinder compression TDC to obtain
No. 3 cylinder compression TDC.
8. Measure valve clearances at locations marked “×” as shown in
the table below (locations indicated with white arrow).
�No. 3 cylinder compression TDC
9. Turn crankshaft pulley clockwise by 90° from the position of No.
3 cylinder compression TDC (clockwise by 360° from the posi-
tion of No. 1 cylinder compression TDC) to measure intake and
exhaust valve clearances of No. 6 cylinder and exhaust valve
clearance of No. 2 cylinder.
10. If out of specifications, adjust as necessary. Refer to EM-54, "
ADJUSTMENT" .
ADJUSTMENT
NOTE:
�Perform adjustment depending on selected head thickness of valve lifter.
�The specified valve lifter thickness is the dimension at normal temperatures. Ignore dimensional differ-
ences caused by temperature. Use the specifications for hot engine condition to adjust.
1. Remove camshaft. Refer to EM-43, "
Removal and Installation" .
2. Remove the valve lifters at the locations that are out of specification.
Measuring position (RH bank) No. 2 CYL No. 4 CYL No. 6 CYL No. 8 CYL
No. 3 cylinder at TDC EXH ×
INT ×
Measuring position (LH bank) No. 1 CYL No. 3 CYL No. 5 CYL No. 7 CYL
No. 3 cylinder at TDCINT××
EXH××
KBIA2526E
KBIA2548E
Page 1940 of 3371
OIL SEAL
EM-57
C
D
E
F
G
H
I
J
K
L
MA
EM
Revision: August 20072004 QX56
Removal and Installation of Front Oil SealEBS00ILQ
REMOVAL
1. Remove the engine. Refer to EM-70, "REMOVAL" .
2. Remove crankshaft pulley. Refer to EM-35, "
TIMING CHAIN" .
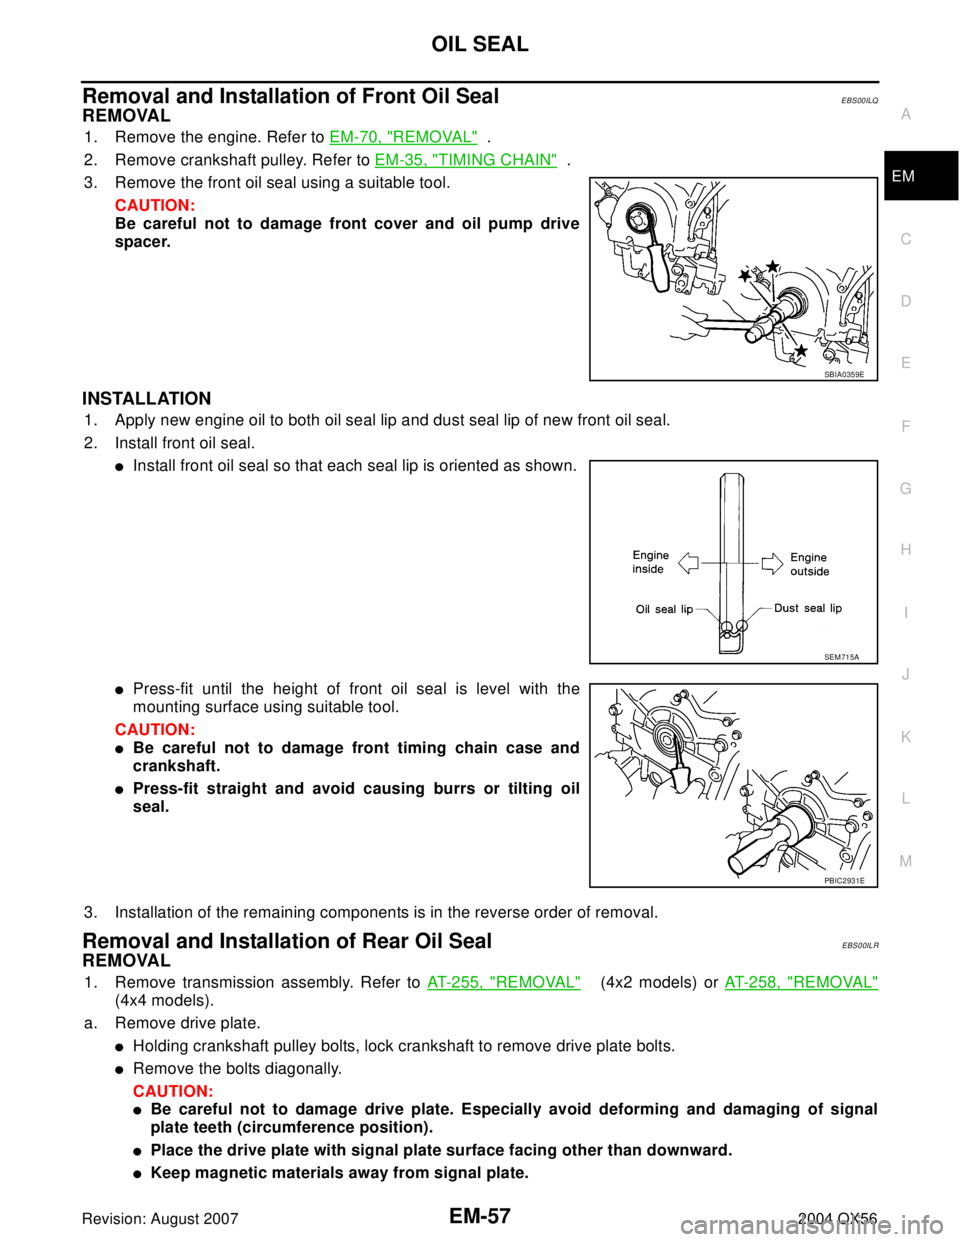
3. Remove the front oil seal using a suitable tool.
CAUTION:
Be careful not to damage front cover and oil pump drive
spacer.
INSTALLATION
1. Apply new engine oil to both oil seal lip and dust seal lip of new front oil seal.
2. Install front oil seal.
�Install front oil seal so that each seal lip is oriented as shown.
�Press-fit until the height of front oil seal is level with the
mounting surface using suitable tool.
CAUTION:
�Be careful not to damage front timing chain case and
crankshaft.
�Press-fit straight and avoid causing burrs or tilting oil
seal.
3. Installation of the remaining components is in the reverse order of removal.
Removal and Installation of Rear Oil SealEBS00ILR
REMOVAL
1. Remove transmission assembly. Refer to AT-255, "REMOVAL" (4x2 models) or AT-258, "REMOVAL"
(4x4 models).
a. Remove drive plate.
�Holding crankshaft pulley bolts, lock crankshaft to remove drive plate bolts.
�Remove the bolts diagonally.
CAUTION:
�Be careful not to damage drive plate. Especially avoid deforming and damaging of signal
plate teeth (circumference position).
�Place the drive plate with signal plate surface facing other than downward.
�Keep magnetic materials away from signal plate.
SBIA0359E
SEM 71 5A
PBIC2931E
Page 1941 of 3371
EM-58Revision: August 2007
OIL SEAL
2004 QX56
b. Remove engine rear plate.
2. Remove the rear oil seal using a suitable tool.
CAUTION:
Be careful not to damage crankshaft and oil seal retainer
surface.
INSTALLATION
1. Apply new engine oil to both oil seal lip and dust seal lip of new rear seal.
2. Install rear oil seal.
�Install rear oil seal so that each seal lip is oriented as shown.
�Press-fit rear oil seal using suitable tool.
CAUTION:
�Be careful not to damage crankshaft and cylinder
block.
�Press-fit oil seal straight to avoid causing burrs or tilt-
ing.
�Do not touch grease applied onto oil seal lip.
�Do not damage or scratch the outer circumference of
the rear oil seal.
�Tap until flattened with the front edge of the oil seal retainer.
3. Installation of the remaining components is in the reverse order of removal.
WBIA0437E
SEM 71 5A
PBIC2933E