Page 2224 of 3371
REAR WINDOW DEFOGGER
GW-89
C
D
E
F
G
H
J
K
L
MA
B
GW
Revision: August 20072004 QX56
BCM Power Supply and Ground Circuit CheckEIS002VW
1. CHECK FUSES AND FUSIBLE LINK
�Check 10A fuse (No. 8, located in the fuse block (J/B)]
�Check 10A fuse (No. 59, located in the fuse and relay box)
�Check 50A fusible link (letter f , located in the fuse and fusible link box)
NOTE:
Refer to GW-78, "
Component Parts and Harness Connector Location" .
OK or NG
OK >> GO TO 2.
NG >> If fuse is blown, be sure to eliminate cause of malfunction before installing new fuse. Refer to PG-
4, "POWER SUPPLY ROUTING CIRCUIT" .
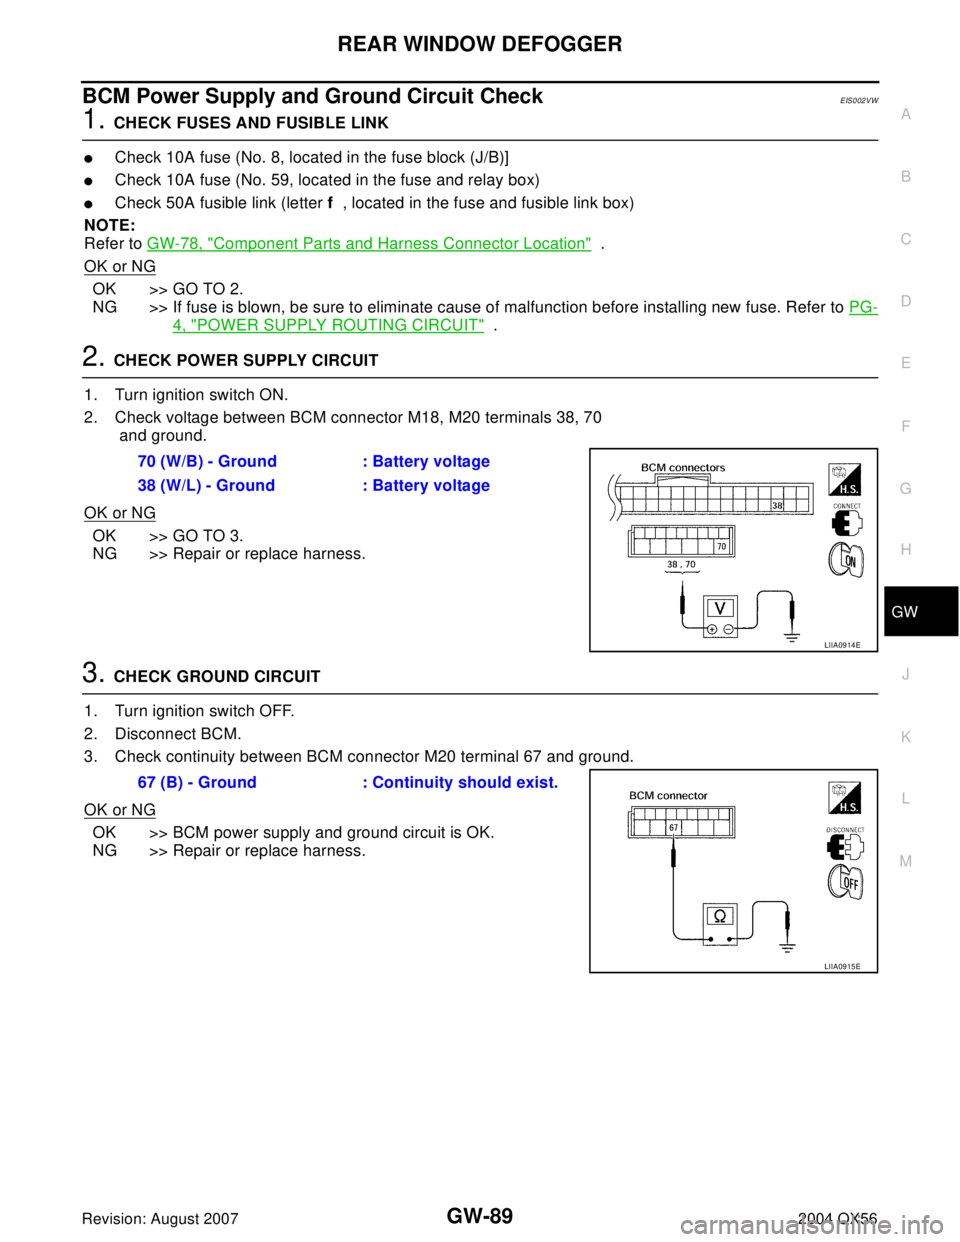
2. CHECK POWER SUPPLY CIRCUIT
1. Turn ignition switch ON.
2. Check voltage between BCM connector M18, M20 terminals 38, 70
and ground.
OK or NG
OK >> GO TO 3.
NG >> Repair or replace harness.
3. CHECK GROUND CIRCUIT
1. Turn ignition switch OFF.
2. Disconnect BCM.
3. Check continuity between BCM connector M20 terminal 67 and ground.
OK or NG
OK >> BCM power supply and ground circuit is OK.
NG >> Repair or replace harness.70 (W/B) - Ground : Battery voltage
38 (W/L) - Ground : Battery voltage
LIIA0914E
67 (B) - Ground : Continuity should exist.
LIIA0915E
Page 2226 of 3371
REAR WINDOW DEFOGGER
GW-91
C
D
E
F
G
H
J
K
L
MA
B
GW
Revision: August 20072004 QX56
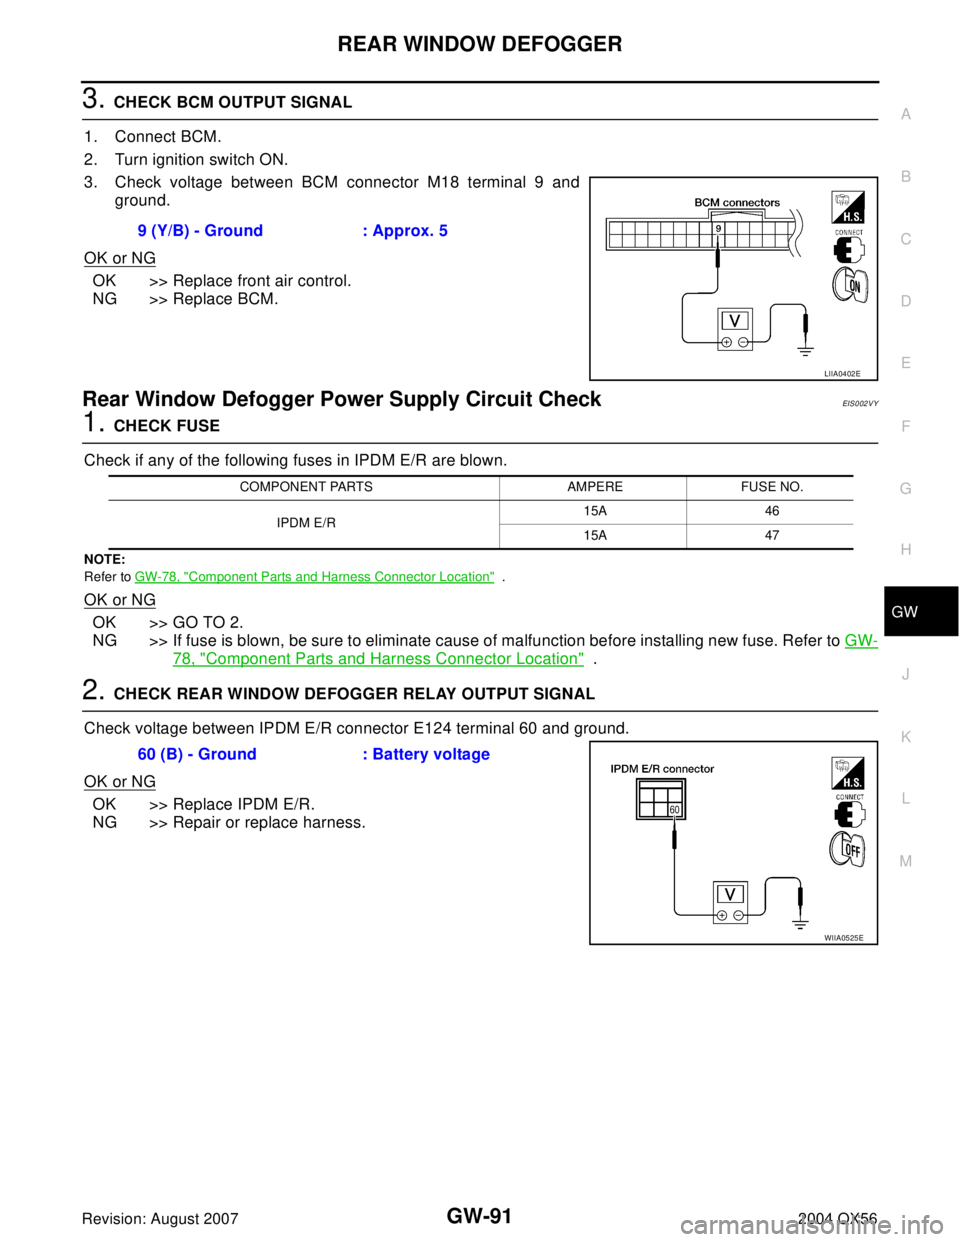
3. CHECK BCM OUTPUT SIGNAL
1. Connect BCM.
2. Turn ignition switch ON.
3. Check voltage between BCM connector M18 terminal 9 and
ground.
OK or NG
OK >> Replace front air control.
NG >> Replace BCM.
Rear Window Defogger Power Supply Circuit CheckEIS002VY
1. CHECK FUSE
Check if any of the following fuses in IPDM E/R are blown.
NOTE:
Refer to GW-78, "
Component Parts and Harness Connector Location" .
OK or NG
OK >> GO TO 2.
NG >> If fuse is blown, be sure to eliminate cause of malfunction before installing new fuse. Refer to GW-
78, "Component Parts and Harness Connector Location" .
2. CHECK REAR WINDOW DEFOGGER RELAY OUTPUT SIGNAL
Check voltage between IPDM E/R connector E124 terminal 60 and ground.
OK or NG
OK >> Replace IPDM E/R.
NG >> Repair or replace harness.9 (Y/B) - Ground : Approx. 5
LIIA0402E
COMPONENT PARTS AMPERE FUSE NO.
IPDM E/R15A 46
15A 47
60 (B) - Ground : Battery voltage
WIIA0525E
Page 2447 of 3371
LT-16
HEADLAMP (FOR USA)
Revision: August 20072004 QX56
Preliminary CheckEKS0079X
CHECK POWER SUPPLY AND GROUND CIRCUIT
1. CHECK FUSES OR FUSIBLE LINK
Check for blown fuses or fusible link.
Refer to LT- 1 0 , "
Wiring Diagram — H/LAMP —" .
OK or NG
OK >> GO TO 2.
NG >> If fuse is blown, be sure to eliminate cause of blown fuse before installing new fuse. Refer to PG-
4, "POWER SUPPLY ROUTING CIRCUIT" .
2. CHECK POWER SUPPLY CIRCUIT
1. Disconnect BCM connectors.
2. Check voltage between BCM harness connector and ground.
OK or NG
OK >> GO TO 3.
NG >> Check harness for open between BCM and fuse or fus-
ible link.
Unit Power source Fuse No.
BCMBattery f
Ignition switch ON or START position 59
IPDM E/R Battery34
35
40
41
53
BCM
(–)Ignition switch position
(+)
OFF ACC ON
ConnectorTe r m i n a l
(wire color)
M18 38 (W/L)
Ground0V 0VBattery
voltage
M20 70 (W/B)Battery
voltageBattery
voltageBattery
voltage
WKIA1436E
Page 2473 of 3371
LT-42
HEADLAMP (FOR CANADA) - DAYTIME LIGHT SYSTEM -
Revision: August 20072004 QX56
How to Proceed With Trouble DiagnosisEKS007AG
1. Confirm the symptom or customer complaint.
2. Understand operation description and function description. Refer to LT-35, "
System Description" .
3. Perform the Preliminary Check. Refer to LT-42, "
Preliminary Check" .
4. Check symptom and repair or replace the cause of malfunction.
5. Does the headlamp operate normally? If YES: GO TO 6. If NO: GO TO 4.
6. Inspection End.
Preliminary CheckEKS007AH
CHECK BCM CONFIGURATION
1. CHECK BCM CONFIGURATION
Confirm BCM configuration for "DTRL" is set to "WITH". Refer to BCS-13, "
READ CONFIGURATION PROCE-
DURE" .
OK or NG
OK >> Continue preliminary check. Refer to LT- 4 2 , "INSPECTION FOR POWER SUPPLY AND
GROUND CIRCUIT" .
NG >> Change BCM configuration for "DTRL" to "WITH". Refer to BCS-16, "
WRITE CONFIGURATION
PROCEDURE" .
INSPECTION FOR POWER SUPPLY AND GROUND CIRCUIT
1. CHECK FUSES AND FUSIBLE LINK
Check for blown fuses or fusible link.
Refer to LT- 3 7 , "
Wiring Diagram — DTRL —" .
OK or NG
OK >> GO TO 2.
NG >> If fuse is blown, be sure to eliminate cause of blown fuse before installing new fuse. Refer to PG-
4, "POWER SUPPLY ROUTING CIRCUIT" .
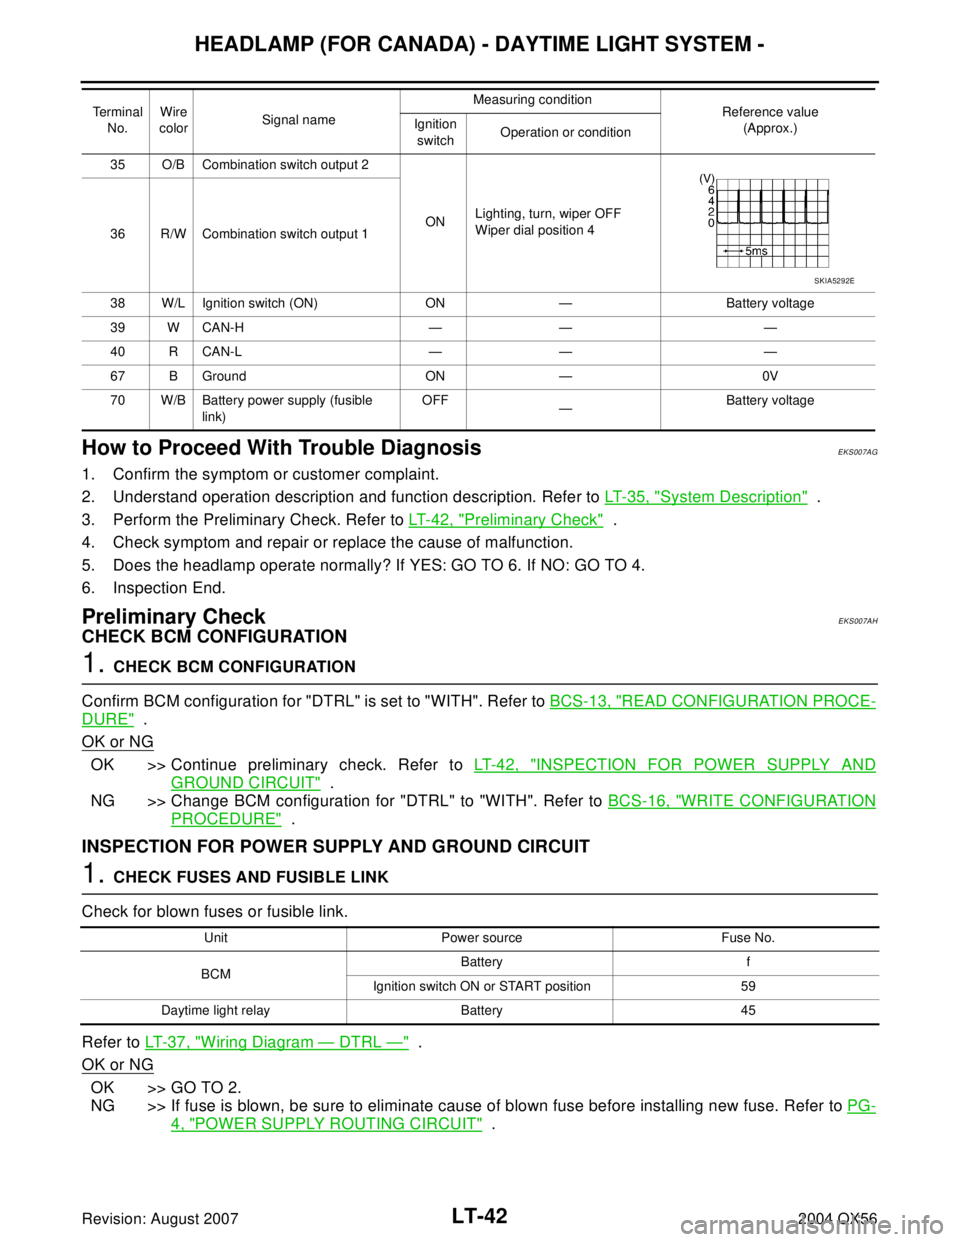
35 O/B Combination switch output 2
ONLighting, turn, wiper OFF
Wiper dial position 4
36 R/W Combination switch output 1
38 W/L Ignition switch (ON) ON — Battery voltage
39 W CAN-H — — —
40 R CAN-L — — —
67 B Ground ON — 0V
70 W/B Battery power supply (fusible
link)OFF
—Battery voltage Terminal
No.Wire
colorSignal nameMeasuring condition
Reference value
(Approx.) Ignition
switchOperation or condition
SKIA5292E
Unit Power source Fuse No.
BCMBattery f
Ignition switch ON or START position 59
Daytime light relay Battery 45
Page 2486 of 3371
AUTO LIGHT SYSTEM
LT-55
C
D
E
F
G
H
I
J
L
MA
B
LT
Revision: August 20072004 QX56
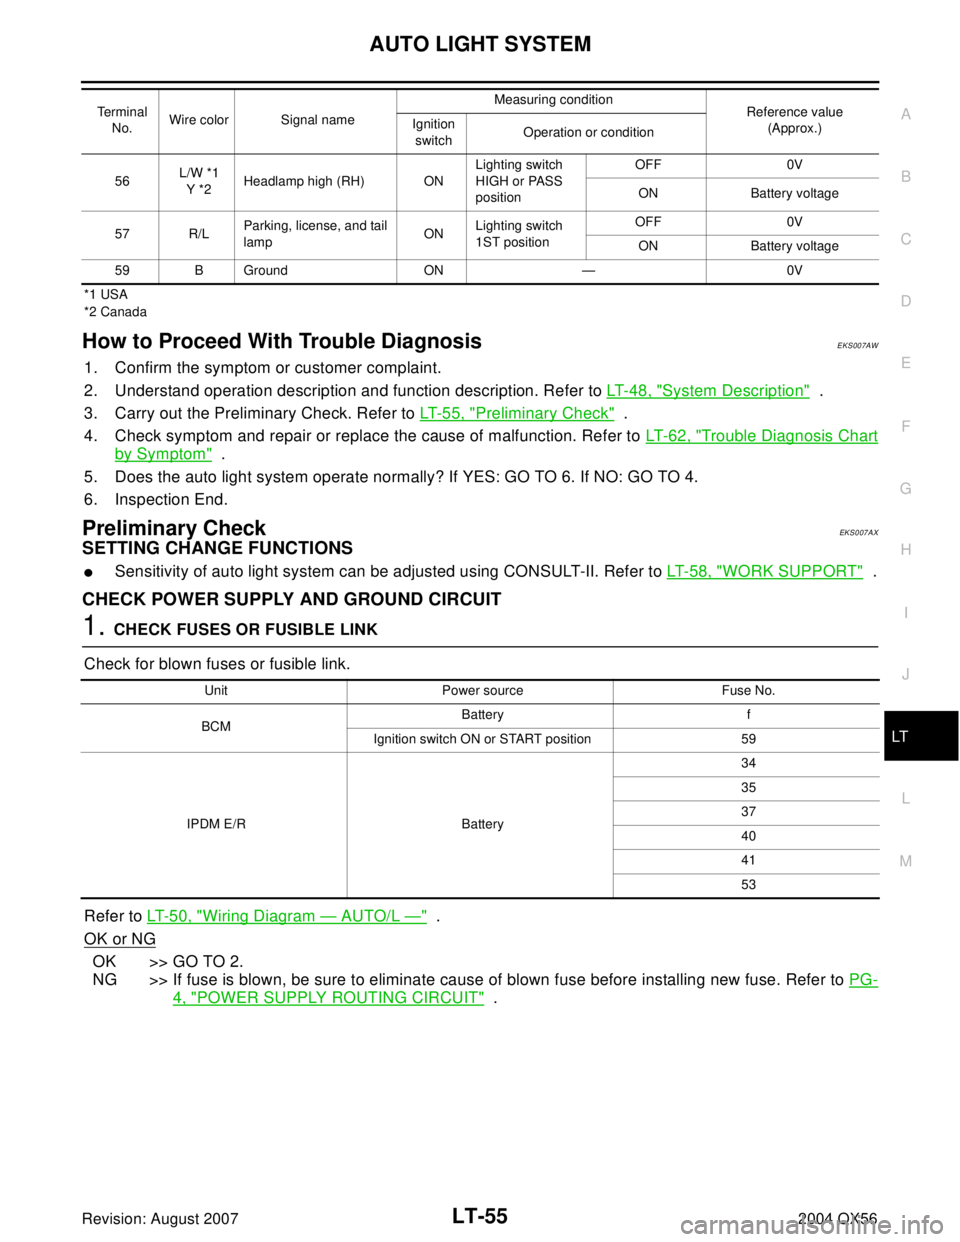
*1 USA
*2 Canada
How to Proceed With Trouble DiagnosisEKS007AW
1. Confirm the symptom or customer complaint.
2. Understand operation description and function description. Refer to LT- 4 8 , "
System Description" .
3. Carry out the Preliminary Check. Refer to LT- 5 5 , "
Preliminary Check" .
4. Check symptom and repair or replace the cause of malfunction. Refer to LT- 6 2 , "
Trouble Diagnosis Chart
by Symptom" .
5. Does the auto light system operate normally? If YES: GO TO 6. If NO: GO TO 4.
6. Inspection End.
Preliminary CheckEKS007AX
SETTING CHANGE FUNCTIONS
�Sensitivity of auto light system can be adjusted using CONSULT-II. Refer to LT-58, "WORK SUPPORT" .
CHECK POWER SUPPLY AND GROUND CIRCUIT
1. CHECK FUSES OR FUSIBLE LINK
Check for blown fuses or fusible link.
Refer to LT- 5 0 , "
Wiring Diagram — AUTO/L —" .
OK or NG
OK >> GO TO 2.
NG >> If fuse is blown, be sure to eliminate cause of blown fuse before installing new fuse. Refer to PG-
4, "POWER SUPPLY ROUTING CIRCUIT" .
56L/W *1
Y *2Headlamp high (RH) ONLighting switch
HIGH or PASS
positionOFF 0V
ON Battery voltage
57 R/LParking, license, and tail
lampONLighting switch
1ST positionOFF 0V
ON Battery voltage
59 B Ground ON — 0V Terminal
No.Wire color Signal nameMeasuring condition
Reference value
(Approx.) Ignition
switchOperation or condition
Unit Power source Fuse No.
BCMBattery f
Ignition switch ON or START position 59
IPDM E/R Battery34
35
37
40
41
53
Page 2506 of 3371
FRONT FOG LAMP
LT-75
C
D
E
F
G
H
I
J
L
MA
B
LT
Revision: August 20072004 QX56
Preliminary CheckEKS007BB
CHECK POWER SUPPLY AND GROUND CIRCUIT
1. CHECK FUSES OR FUSIBLE LINK
Check for blown fuses or fusible link.
Refer to LT- 7 1 , "
Wiring Diagram — F/FOG —" .
OK or NG
OK >> GO TO 2.
NG >> If fuse is blown, be sure to eliminate cause of blown fuse before installing new fuse. Refer to PG-
4, "POWER SUPPLY ROUTING CIRCUIT" .
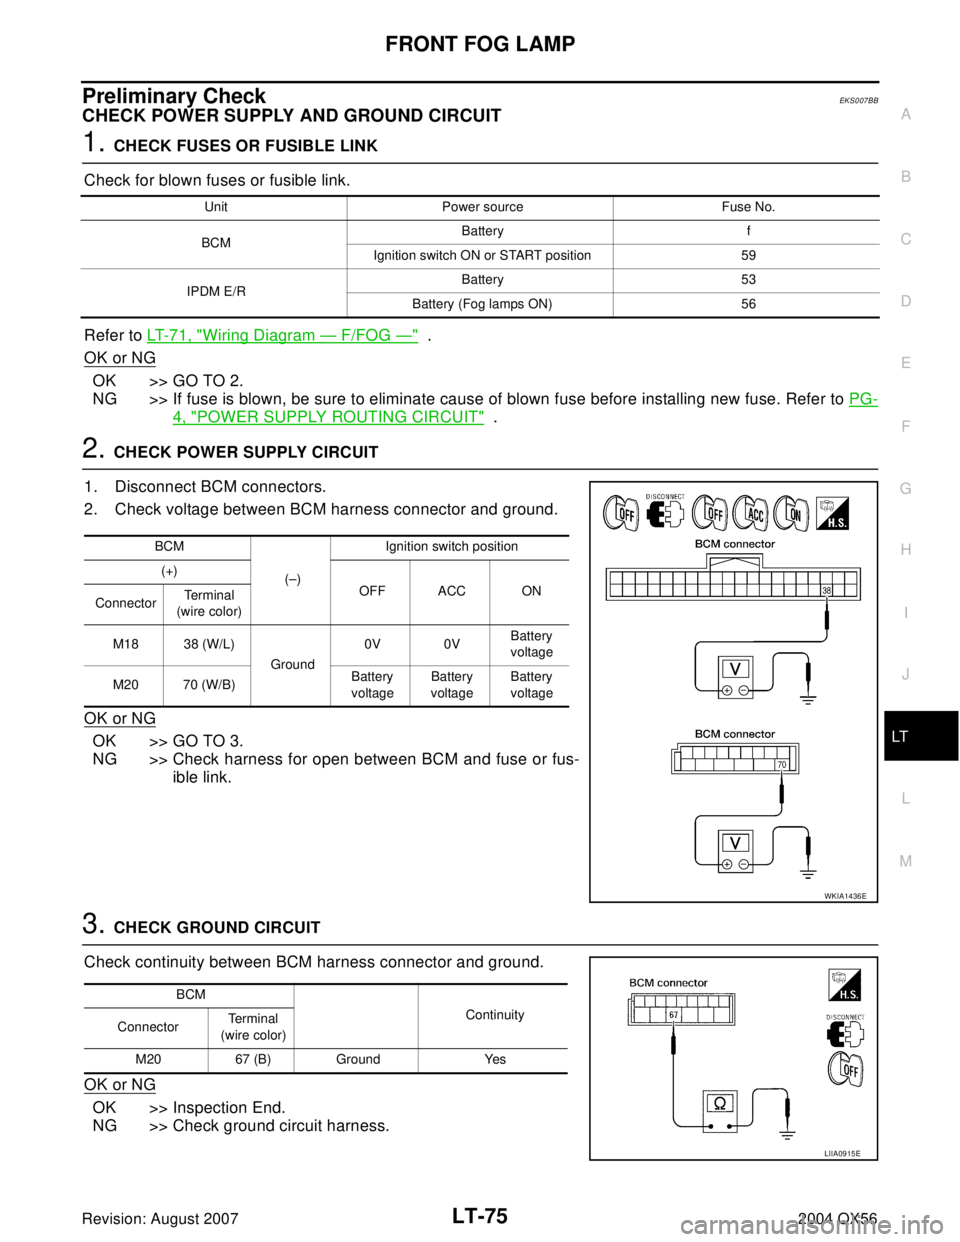
2. CHECK POWER SUPPLY CIRCUIT
1. Disconnect BCM connectors.
2. Check voltage between BCM harness connector and ground.
OK or NG
OK >> GO TO 3.
NG >> Check harness for open between BCM and fuse or fus-
ible link.
3. CHECK GROUND CIRCUIT
Check continuity between BCM harness connector and ground.
OK or NG
OK >> Inspection End.
NG >> Check ground circuit harness.
Unit Power source Fuse No.
BCMBattery f
Ignition switch ON or START position 59
IPDM E/RBattery 53
Battery (Fog lamps ON) 56
BCM
(–)Ignition switch position
(+)
OFF ACC ON
ConnectorTerminal
(wire color)
M18 38 (W/L)
Ground0V 0VBattery
voltage
M20 70 (W/B)Battery
voltageBattery
voltageBattery
voltage
WKIA1436E
BCM
Continuity
ConnectorTe r m i n a l
(wire color)
M20 67 (B) Ground Yes
LIIA0915E
Page 2518 of 3371
TURN SIGNAL AND HAZARD WARNING LAMPS
LT-87
C
D
E
F
G
H
I
J
L
MA
B
LT
Revision: August 20072004 QX56
Preliminary CheckEKS007BO
CHECK POWER SUPPLY AND GROUND CIRCUIT
1. CHECK FUSES OR FUSIBLE LINK
Check for blown fuses or fusible link.
Refer to LT- 8 3 , "
Wiring Diagram — TURN —" .
OK or NG
OK >> GO TO 2.
NG >> If fuse is blown, be sure to eliminate cause of blown fuse before installing new fuse. Refer to PG-
4, "POWER SUPPLY ROUTING CIRCUIT" .
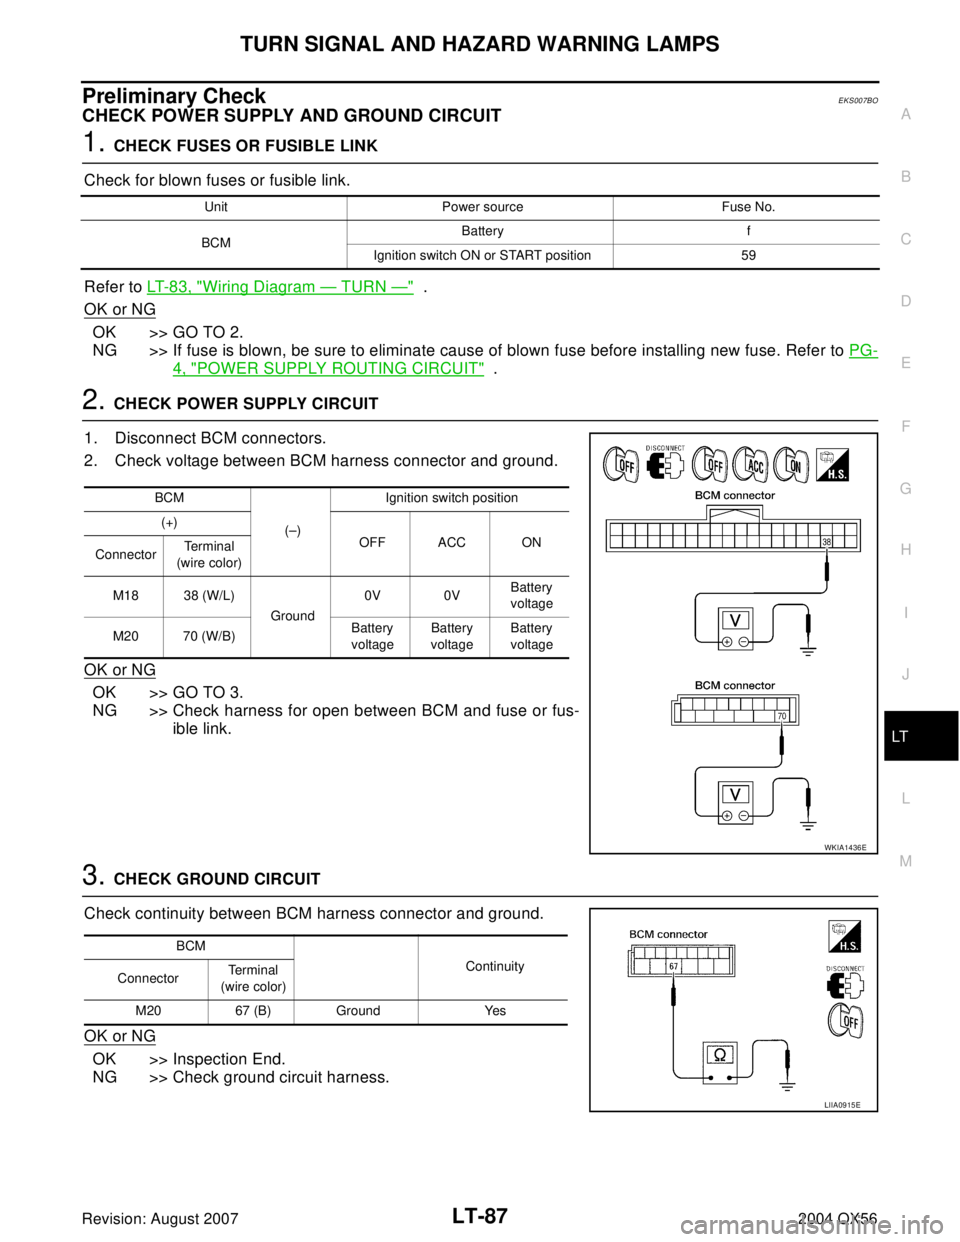
2. CHECK POWER SUPPLY CIRCUIT
1. Disconnect BCM connectors.
2. Check voltage between BCM harness connector and ground.
OK or NG
OK >> GO TO 3.
NG >> Check harness for open between BCM and fuse or fus-
ible link.
3. CHECK GROUND CIRCUIT
Check continuity between BCM harness connector and ground.
OK or NG
OK >> Inspection End.
NG >> Check ground circuit harness.
Unit Power source Fuse No.
BCMBattery f
Ignition switch ON or START position 59
BCM
(–)Ignition switch position
(+)
OFF ACC ON
ConnectorTerminal
(wire color)
M18 38 (W/L)
Ground0V 0VBattery
voltage
M20 70 (W/B)Battery
voltageBattery
voltageBattery
voltage
WKIA1436E
BCM
Continuity
ConnectorTe r m i n a l
(wire color)
M20 67 (B) Ground Yes
LIIA0915E
Page 2547 of 3371
LT-116
PARKING, LICENSE PLATE AND TAIL LAMPS
Revision: August 20072004 QX56
Preliminary CheckEKS007CL
CHECK POWER SUPPLY AND GROUND CIRCUIT
1. CHECK FUSES OR FUSIBLE LINK
Check for blown fuses or fusible link.
Refer to LT- 111 , "
Wiring Diagram — TAIL/L —" .
OK or NG
OK >> GO TO 2.
NG >> If fuse is blown, be sure to eliminate cause of blown fuse before installing new fuse. Refer to PG-
4, "POWER SUPPLY ROUTING CIRCUIT" .
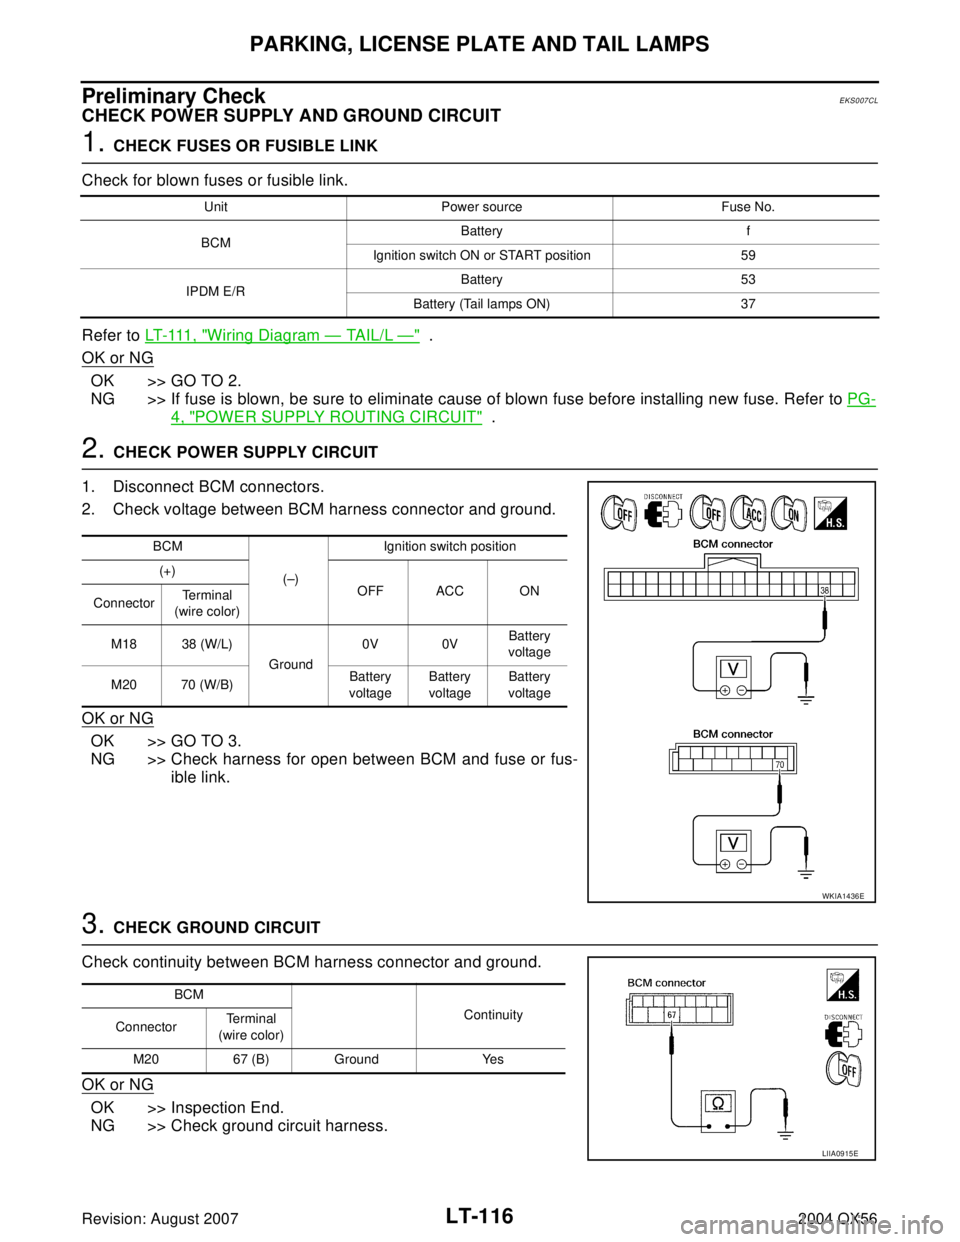
2. CHECK POWER SUPPLY CIRCUIT
1. Disconnect BCM connectors.
2. Check voltage between BCM harness connector and ground.
OK or NG
OK >> GO TO 3.
NG >> Check harness for open between BCM and fuse or fus-
ible link.
3. CHECK GROUND CIRCUIT
Check continuity between BCM harness connector and ground.
OK or NG
OK >> Inspection End.
NG >> Check ground circuit harness.
Unit Power source Fuse No.
BCMBattery f
Ignition switch ON or START position 59
IPDM E/RBattery 53
Battery (Tail lamps ON) 37
BCM
(–)Ignition switch position
(+)
OFF ACC ON
ConnectorTe r m i n a l
(wire color)
M18 38 (W/L)
Ground0V 0VBattery
voltage
M20 70 (W/B)Battery
voltageBattery
voltageBattery
voltage
WKIA1436E
BCM
Continuity
ConnectorTe r m i n a l
(wire color)
M20 67 (B) Ground Yes
LIIA0915E