Page 1976 of 3371
CYLINDER BLOCK
EM-93
C
D
E
F
G
H
I
J
K
L
MA
EM
Revision: August 20072004 QX56
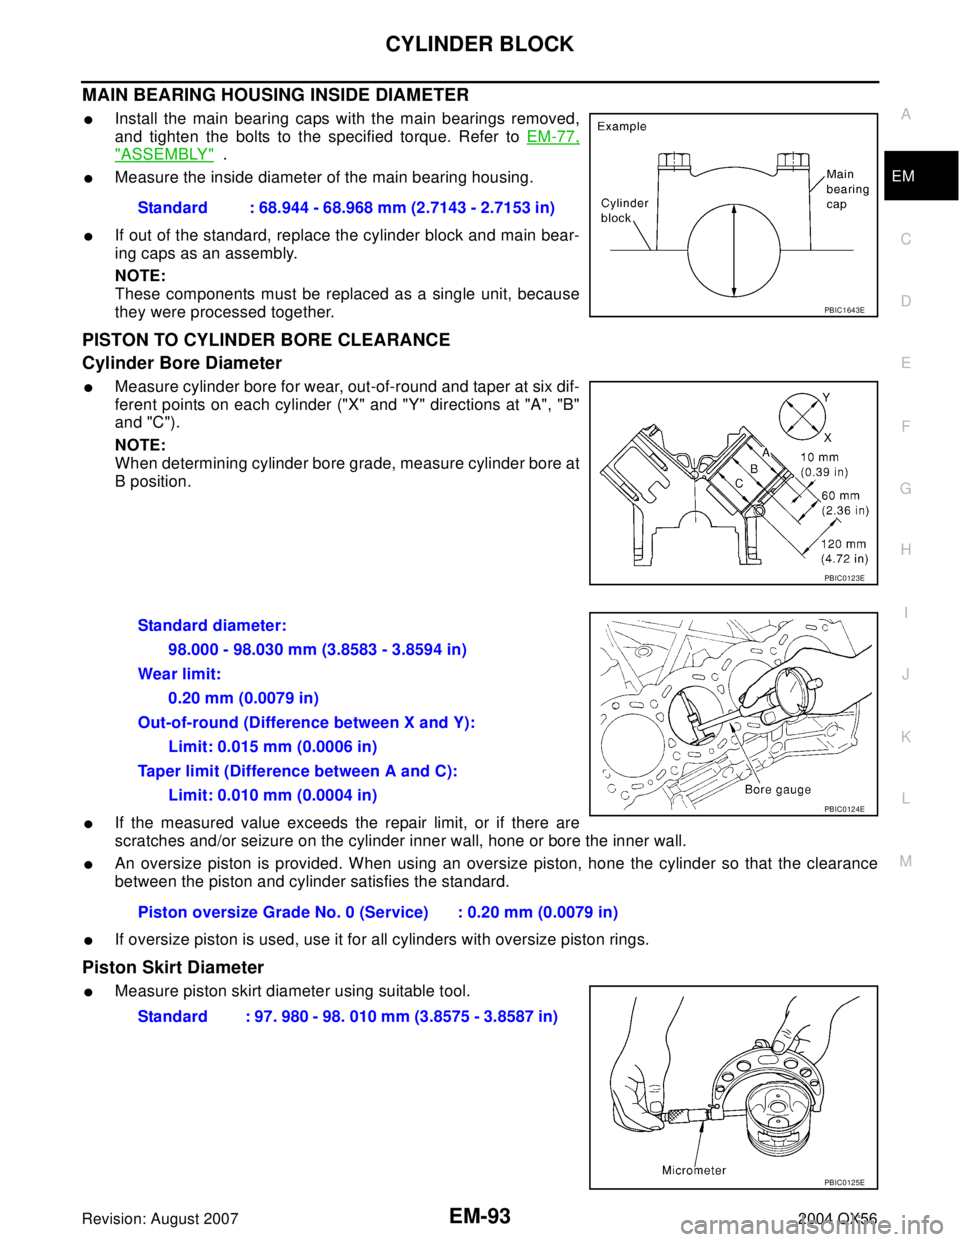
MAIN BEARING HOUSING INSIDE DIAMETER
�Install the main bearing caps with the main bearings removed,
and tighten the bolts to the specified torque. Refer to EM-77,
"ASSEMBLY" .
�Measure the inside diameter of the main bearing housing.
�If out of the standard, replace the cylinder block and main bear-
ing caps as an assembly.
NOTE:
These components must be replaced as a single unit, because
they were processed together.
PISTON TO CYLINDER BORE CLEARANCE
Cylinder Bore Diameter
�Measure cylinder bore for wear, out-of-round and taper at six dif-
ferent points on each cylinder ("X" and "Y" directions at "A", "B"
and "C").
NOTE:
When determining cylinder bore grade, measure cylinder bore at
B position.
�If the measured value exceeds the repair limit, or if there are
scratches and/or seizure on the cylinder inner wall, hone or bore the inner wall.
�An oversize piston is provided. When using an oversize piston, hone the cylinder so that the clearance
between the piston and cylinder satisfies the standard.
�If oversize piston is used, use it for all cylinders with oversize piston rings.
Piston Skirt Diameter
�Measure piston skirt diameter using suitable tool.Standard : 68.944 - 68.968 mm (2.7143 - 2.7153 in)
PBIC1643E
PBIC0123E
Standard diameter:
98.000 - 98.030 mm (3.8583 - 3.8594 in)
Wear limit:
0.20 mm (0.0079 in)
Out-of-round (Difference between X and Y):
Limit: 0.015 mm (0.0006 in)
Taper limit (Difference between A and C):
Limit: 0.010 mm (0.0004 in)
Piston oversize Grade No. 0 (Service) : 0.20 mm (0.0079 in)
PBIC0124E
Standard : 97. 980 - 98. 010 mm (3.8575 - 3.8587 in)
PBIC0125E
Page 1982 of 3371
SERVICE DATA AND SPECIFICATIONS (SDS)
EM-99
C
D
E
F
G
H
I
J
K
L
MA
EM
Revision: August 20072004 QX56
SERVICE DATA AND SPECIFICATIONS (SDS)PFP:00030
Standard and LimitEBS00IM0
GENERAL SPECIFICATIONS
DRIVE BELTS
EXHAUST MANIFOLD
Unit: mm (in) Cylinder arrangementV- 8
Displacement cm
3 (cu in)5,552 (338.80)
Bore and stroke mm (in)98 x 92 (3.86 x 3.62)
Valve arrangementDOHC
Firing order1-8-7-3-6-5-4-2
Number of piston ringsCompression 2
Oil 1
Number of main bearings5
Compression ratio9.8
Compression pressure
kPa (kg/cm
2 , psi)/rpmStandard 1,520 (15.5, 220)/200
Minimum 1,324 (13.5, 192)/200
Differential limit between cylinders 98 (1.0, 14)/200
Cylinder number
Va l v e t i m i n g
Unit: degree
abcde f
232 230 2 48 3 49
SEM 95 7C
PBIC0187E
Tension of drive belts Auto adjustment by auto tensioner
ItemsLimit
Surface distortion Exhaust manifold 0.3 (0.012)
Page 1983 of 3371
EM-100Revision: August 2007
SERVICE DATA AND SPECIFICATIONS (SDS)
2004 QX56
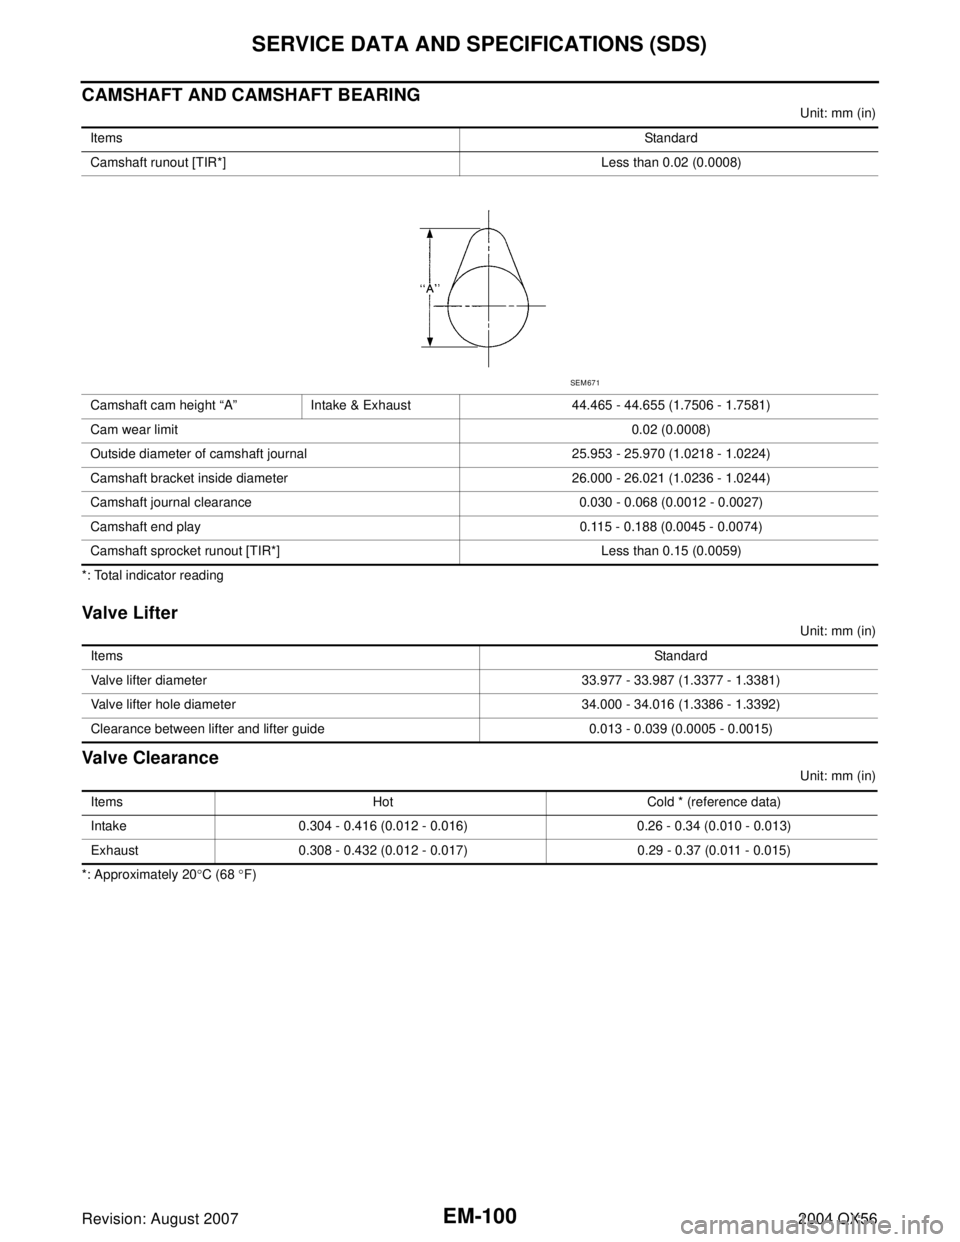
CAMSHAFT AND CAMSHAFT BEARING
Unit: mm (in)
*: Total indicator reading
Valve Lifter
Unit: mm (in)
Valve Clearance
Unit: mm (in)
*: Approximately 20°C (68 °F) ItemsStandard
Camshaft runout [TIR*] Less than 0.02 (0.0008)
Camshaft cam height “A” Intake & Exhaust 44.465 - 44.655 (1.7506 - 1.7581)
Cam wear limit0.02 (0.0008)
Outside diameter of camshaft journal 25.953 - 25.970 (1.0218 - 1.0224)
Camshaft bracket inside diameter 26.000 - 26.021 (1.0236 - 1.0244)
Camshaft journal clearance 0.030 - 0.068 (0.0012 - 0.0027)
Camshaft end play 0.115 - 0.188 (0.0045 - 0.0074)
Camshaft sprocket runout [TIR*] Less than 0.15 (0.0059)
SEM 67 1
ItemsStandard
Valve lifter diameter 33.977 - 33.987 (1.3377 - 1.3381)
Valve lifter hole diameter 34.000 - 34.016 (1.3386 - 1.3392)
Clearance between lifter and lifter guide 0.013 - 0.039 (0.0005 - 0.0015)
Items Hot Cold * (reference data)
Intake 0.304 - 0.416 (0.012 - 0.016) 0.26 - 0.34 (0.010 - 0.013)
Exhaust 0.308 - 0.432 (0.012 - 0.017) 0.29 - 0.37 (0.011 - 0.015)
Page 1984 of 3371
SERVICE DATA AND SPECIFICATIONS (SDS)
EM-101
C
D
E
F
G
H
I
J
K
L
MA
EM
Revision: August 20072004 QX56
Available Valve Lifter
Unit: mm (in)
Identification (stamped) Mark Thickness
N788 7.88 (0.3102)
N790 7.90 (0.3110)
N792 7.92 (0.3118)
N794 7.94 (0.3126)
N796 7.96 (0.3134)
N798 7.98 (0.3142)
N800 8.00 (0.3150)
N802 8.02 (03.157)
N804 8.04 (0.3165)
N806 8.06 (0.3173)
N808 8.08 (0.3181)
N810 8.10 (0.3189)
N812 8.12 (0.3197)
N814 8.14 (0.3205)
N816 8.16 (0.3213)
N818 8.18 (0.3220)
N820 8.20 (0.3228)
N822 8.22 (0.3236)
N824 8.24 (0.3244)
N826 8.26 (0.3252)
N828 8.28 (0.3260)
N830 8.30 (0.3268)
N832 8.32 (0.3276)
N834 8.34 (0.3283)
N836 8.36 (0.3291)
SEM 75 8G
Page 1985 of 3371
EM-102Revision: August 2007
SERVICE DATA AND SPECIFICATIONS (SDS)
2004 QX56
CYLINDER HEAD
Unit: mm (in)
Valve Dimensions
Unit: mm (in) Items Standard Limit
Head surface distortion 0.03 (0.0012) 0.1 (0.004)
Nominal cylinder head height “H” 126.3 (4.97)
KBIA2554E
Valve head diameter “D”Intake 37.0 - 37.3 (1.457 - 1.469)
Exhaust 31.2 - 31.5 (1.228 - 1.240)
Valve length “L”Intake 96.21- 96.71 (3.7878 - 3.8075)
Exhaust 93.74 - 94.24 (3.6905 - 3.7102)
Valve stem diameter “d”Intake 5.965 - 5.980 (0.2348 - 0.2354)
Exhaust 5.955 - 5.970 (0.2344 - 0.2350)
Valve seat angle “α”Intake
45°15′ - 45°45′
Exhaust
Valve margin “T”Intake 1.1 (0.043)
Exhaust 1.3 (0.051)
SEM188
Page 1986 of 3371
SERVICE DATA AND SPECIFICATIONS (SDS)
EM-103
C
D
E
F
G
H
I
J
K
L
MA
EM
Revision: August 20072004 QX56
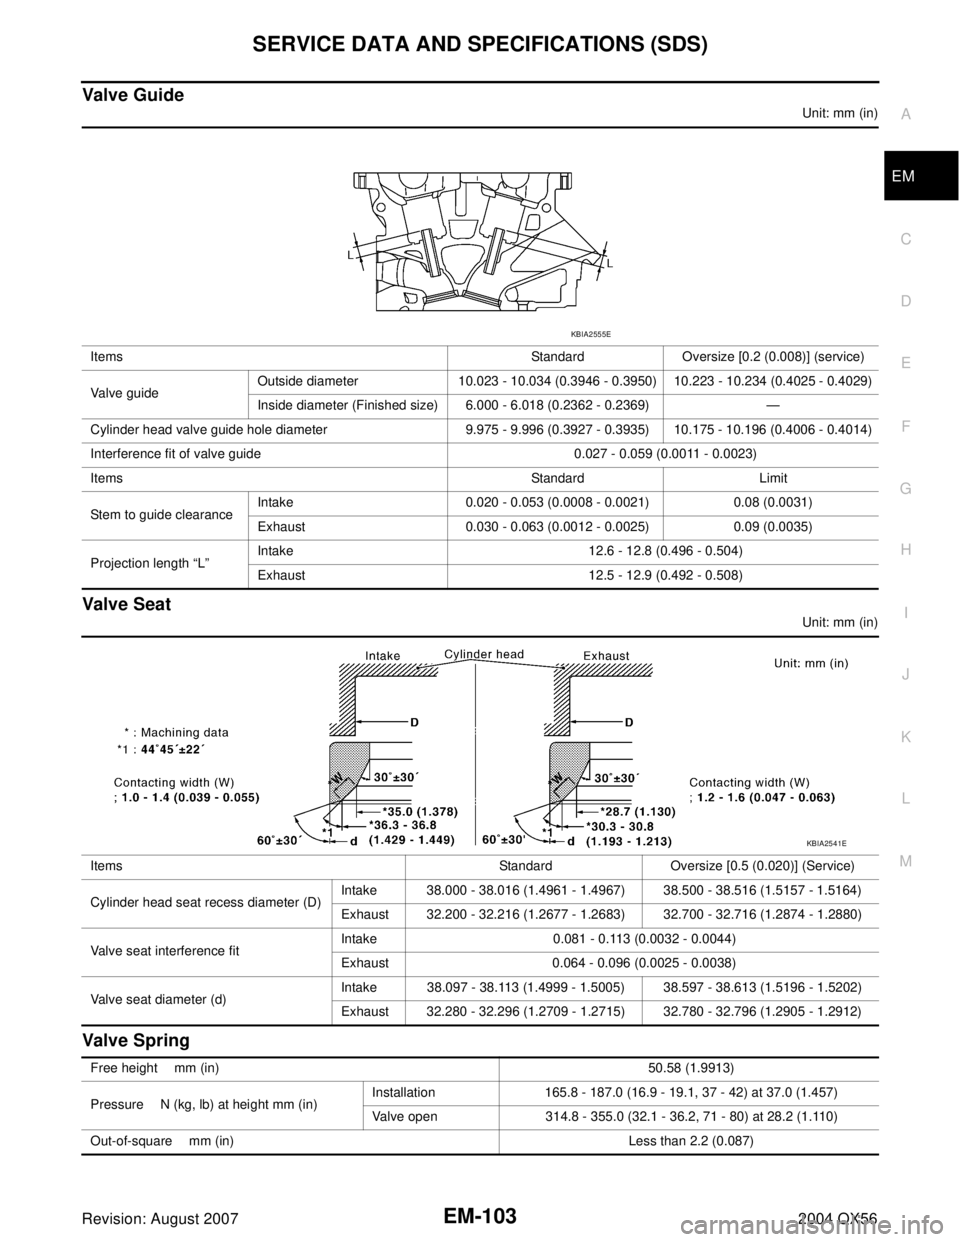
Valve Guide
Unit: mm (in)
Valve Seat
Unit: mm (in)
Valve Spring
Items Standard Oversize [0.2 (0.008)] (service)
Valve guideOutside diameter 10.023 - 10.034 (0.3946 - 0.3950) 10.223 - 10.234 (0.4025 - 0.4029)
Inside diameter (Finished size) 6.000 - 6.018 (0.2362 - 0.2369) —
Cylinder head valve guide hole diameter 9.975 - 9.996 (0.3927 - 0.3935) 10.175 - 10.196 (0.4006 - 0.4014)
Interference fit of valve guide 0.027 - 0.059 (0.0011 - 0.0023)
Items Standard Limit
Stem to guide clearanceIntake 0.020 - 0.053 (0.0008 - 0.0021) 0.08 (0.0031)
Exhaust 0.030 - 0.063 (0.0012 - 0.0025) 0.09 (0.0035)
Projection length “L”Intake 12.6 - 12.8 (0.496 - 0.504)
Exhaust 12.5 - 12.9 (0.492 - 0.508)
KBIA2555E
Items Standard Oversize [0.5 (0.020)] (Service)
Cylinder head seat recess diameter (D)Intake 38.000 - 38.016 (1.4961 - 1.4967) 38.500 - 38.516 (1.5157 - 1.5164)
Exhaust 32.200 - 32.216 (1.2677 - 1.2683) 32.700 - 32.716 (1.2874 - 1.2880)
Valve seat interference fitIntake 0.081 - 0.113 (0.0032 - 0.0044)
Exhaust 0.064 - 0.096 (0.0025 - 0.0038)
Valve seat diameter (d)Intake 38.097 - 38.113 (1.4999 - 1.5005) 38.597 - 38.613 (1.5196 - 1.5202)
Exhaust 32.280 - 32.296 (1.2709 - 1.2715) 32.780 - 32.796 (1.2905 - 1.2912)
KBIA2541E
Free height mm (in)50.58 (1.9913)
Pressure N (kg, lb) at height mm (in)Installation 165.8 - 187.0 (16.9 - 19.1, 37 - 42) at 37.0 (1.457)
Valve open 314.8 - 355.0 (32.1 - 36.2, 71 - 80) at 28.2 (1.110)
Out-of-square mm (in) Less than 2.2 (0.087)
Page 1987 of 3371
EM-104Revision: August 2007
SERVICE DATA AND SPECIFICATIONS (SDS)
2004 QX56
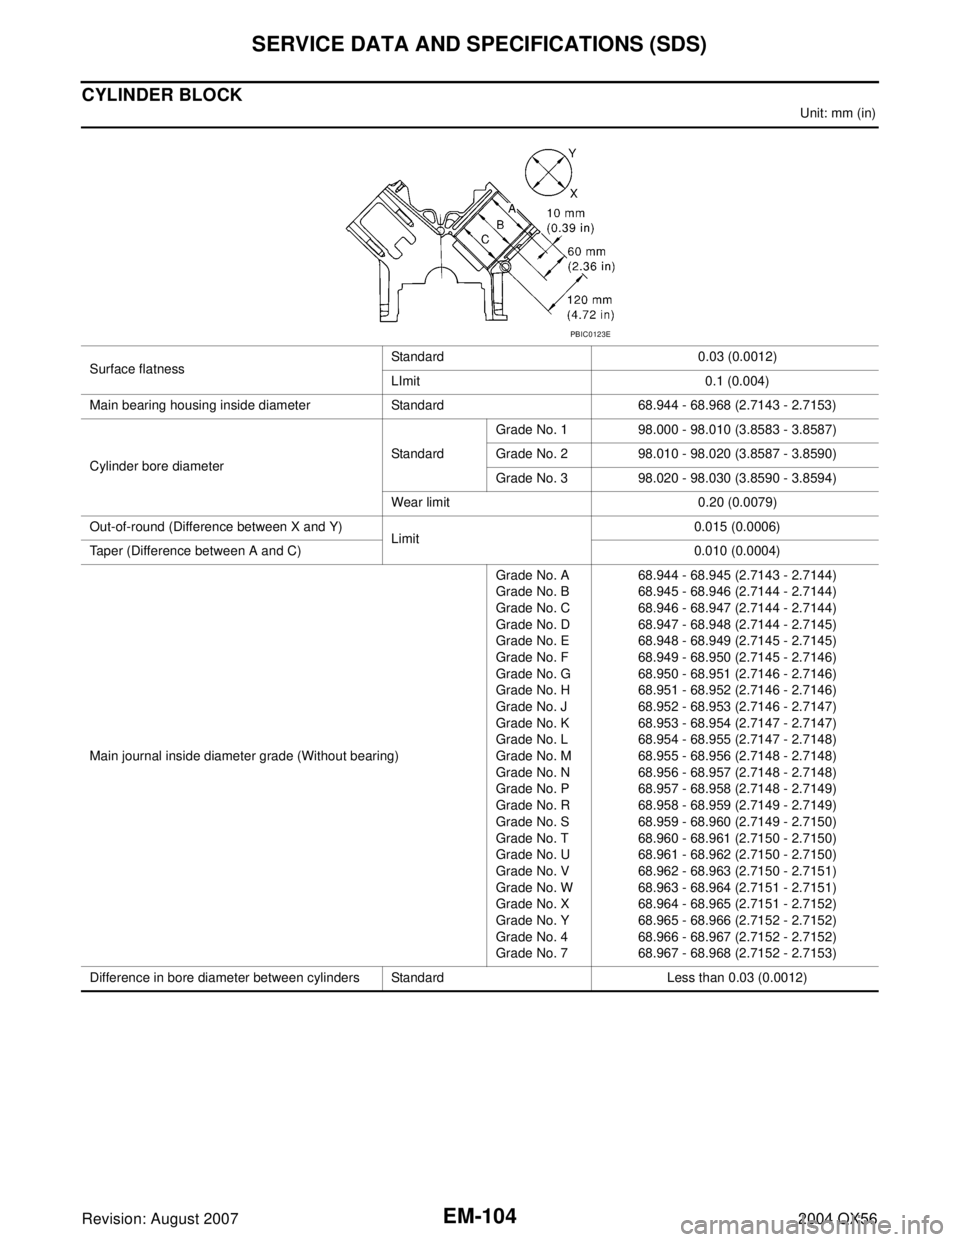
CYLINDER BLOCK
Unit: mm (in)
Surface flatnessStandard 0.03 (0.0012)
LImit 0.1 (0.004)
Main bearing housing inside diameter Standard 68.944 - 68.968 (2.7143 - 2.7153)
Cylinder bore diameterStandardGrade No. 1 98.000 - 98.010 (3.8583 - 3.8587)
Grade No. 2 98.010 - 98.020 (3.8587 - 3.8590)
Grade No. 3 98.020 - 98.030 (3.8590 - 3.8594)
Wear limit 0.20 (0.0079)
Out-of-round (Difference between X and Y)
Limit0.015 (0.0006)
Taper (Difference between A and C) 0.010 (0.0004)
Main journal inside diameter grade (Without bearing)Grade No. A
Grade No. B
Grade No. C
Grade No. D
Grade No. E
Grade No. F
Grade No. G
Grade No. H
Grade No. J
Grade No. K
Grade No. L
Grade No. M
Grade No. N
Grade No. P
Grade No. R
Grade No. S
Grade No. T
Grade No. U
Grade No. V
Grade No. W
Grade No. X
Grade No. Y
Grade No. 4
Grade No. 768.944 - 68.945 (2.7143 - 2.7144)
68.945 - 68.946 (2.7144 - 2.7144)
68.946 - 68.947 (2.7144 - 2.7144)
68.947 - 68.948 (2.7144 - 2.7145)
68.948 - 68.949 (2.7145 - 2.7145)
68.949 - 68.950 (2.7145 - 2.7146)
68.950 - 68.951 (2.7146 - 2.7146)
68.951 - 68.952 (2.7146 - 2.7146)
68.952 - 68.953 (2.7146 - 2.7147)
68.953 - 68.954 (2.7147 - 2.7147)
68.954 - 68.955 (2.7147 - 2.7148)
68.955 - 68.956 (2.7148 - 2.7148)
68.956 - 68.957 (2.7148 - 2.7148)
68.957 - 68.958 (2.7148 - 2.7149)
68.958 - 68.959 (2.7149 - 2.7149)
68.959 - 68.960 (2.7149 - 2.7150)
68.960 - 68.961 (2.7150 - 2.7150)
68.961 - 68.962 (2.7150 - 2.7150)
68.962 - 68.963 (2.7150 - 2.7151)
68.963 - 68.964 (2.7151 - 2.7151)
68.964 - 68.965 (2.7151 - 2.7152)
68.965 - 68.966 (2.7152 - 2.7152)
68.966 - 68.967 (2.7152 - 2.7152)
68.967 - 68.968 (2.7152 - 2.7153)
Difference in bore diameter between cylinders Standard Less than 0.03 (0.0012)
PBIC0123E
Page 1988 of 3371
SERVICE DATA AND SPECIFICATIONS (SDS)
EM-105
C
D
E
F
G
H
I
J
K
L
MA
EM
Revision: August 20072004 QX56
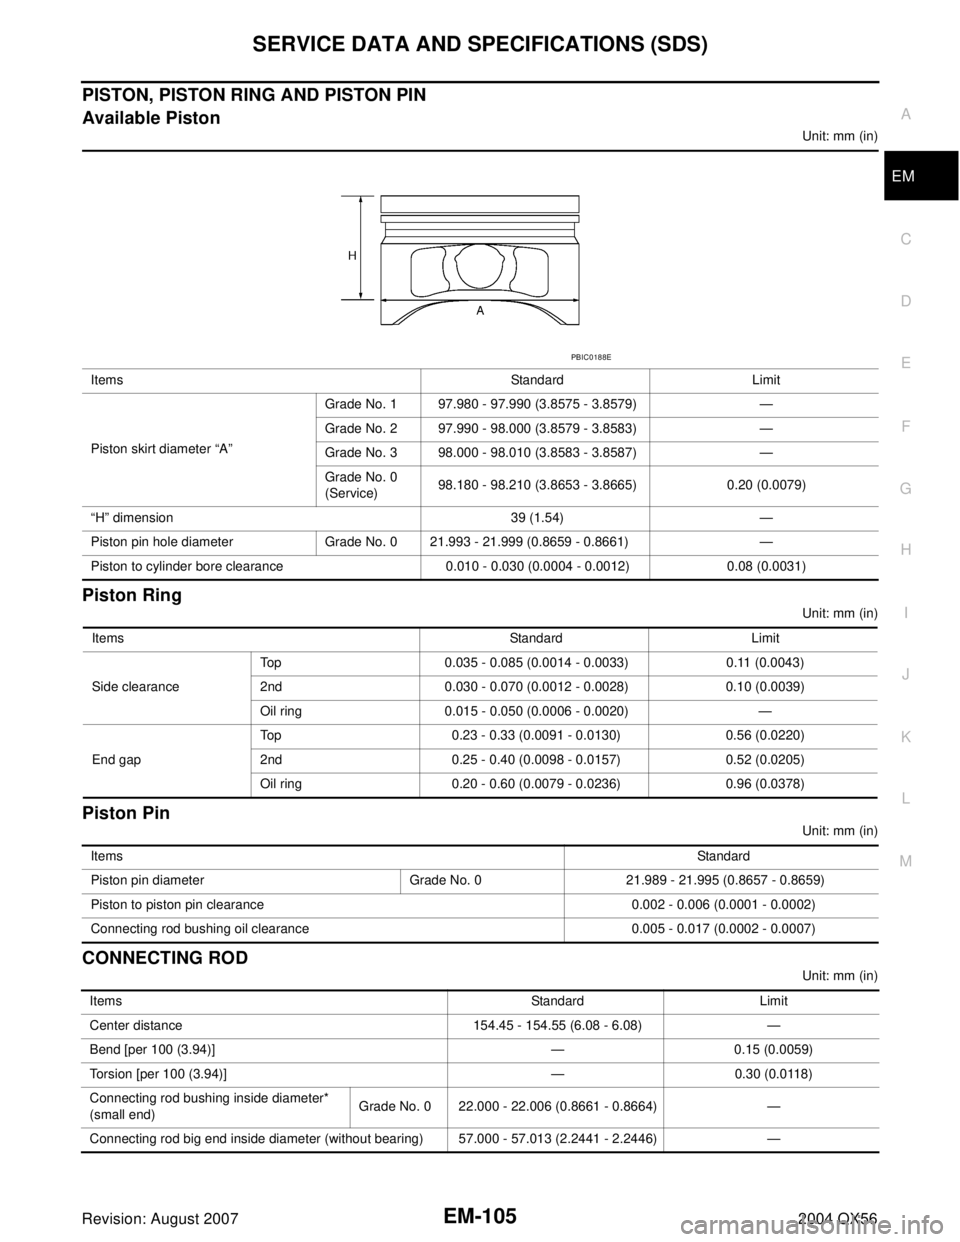
PISTON, PISTON RING AND PISTON PIN
Available Piston
Unit: mm (in)
Piston Ring
Unit: mm (in)
Piston Pin
Unit: mm (in)
CONNECTING ROD
Unit: mm (in) Items Standard Limit
Piston skirt diameter “A”Grade No. 1 97.980 - 97.990 (3.8575 - 3.8579) —
Grade No. 2 97.990 - 98.000 (3.8579 - 3.8583) —
Grade No. 3 98.000 - 98.010 (3.8583 - 3.8587) —
Grade No. 0
(Service)98.180 - 98.210 (3.8653 - 3.8665) 0.20 (0.0079)
“H” dimension 39 (1.54) —
Piston pin hole diameter Grade No. 0 21.993 - 21.999 (0.8659 - 0.8661) —
Piston to cylinder bore clearance 0.010 - 0.030 (0.0004 - 0.0012) 0.08 (0.0031)
PBIC0188E
Items Standard Limit
Side clearanceTop 0.035 - 0.085 (0.0014 - 0.0033) 0.11 (0.0043)
2nd 0.030 - 0.070 (0.0012 - 0.0028) 0.10 (0.0039)
Oil ring 0.015 - 0.050 (0.0006 - 0.0020) —
End gapTop 0.23 - 0.33 (0.0091 - 0.0130) 0.56 (0.0220)
2nd 0.25 - 0.40 (0.0098 - 0.0157) 0.52 (0.0205)
Oil ring 0.20 - 0.60 (0.0079 - 0.0236) 0.96 (0.0378)
ItemsStandard
Piston pin diameter Grade No. 0 21.989 - 21.995 (0.8657 - 0.8659)
Piston to piston pin clearance 0.002 - 0.006 (0.0001 - 0.0002)
Connecting rod bushing oil clearance 0.005 - 0.017 (0.0002 - 0.0007)
Items Standard Limit
Center distance 154.45 - 154.55 (6.08 - 6.08) —
Bend [per 100 (3.94)] — 0.15 (0.0059)
Torsion [per 100 (3.94)] — 0.30 (0.0118)
Connecting rod bushing inside diameter*
(small end)Grade No. 0 22.000 - 22.006 (0.8661 - 0.8664) —
Connecting rod big end inside diameter (without bearing) 57.000 - 57.013 (2.2441 - 2.2446) —