Page 2726 of 3371
ELECTRICAL UNITS LOCATION
PG-67
C
D
E
F
G
H
I
J
L
MA
B
PG
Revision: August 20072004 QX56
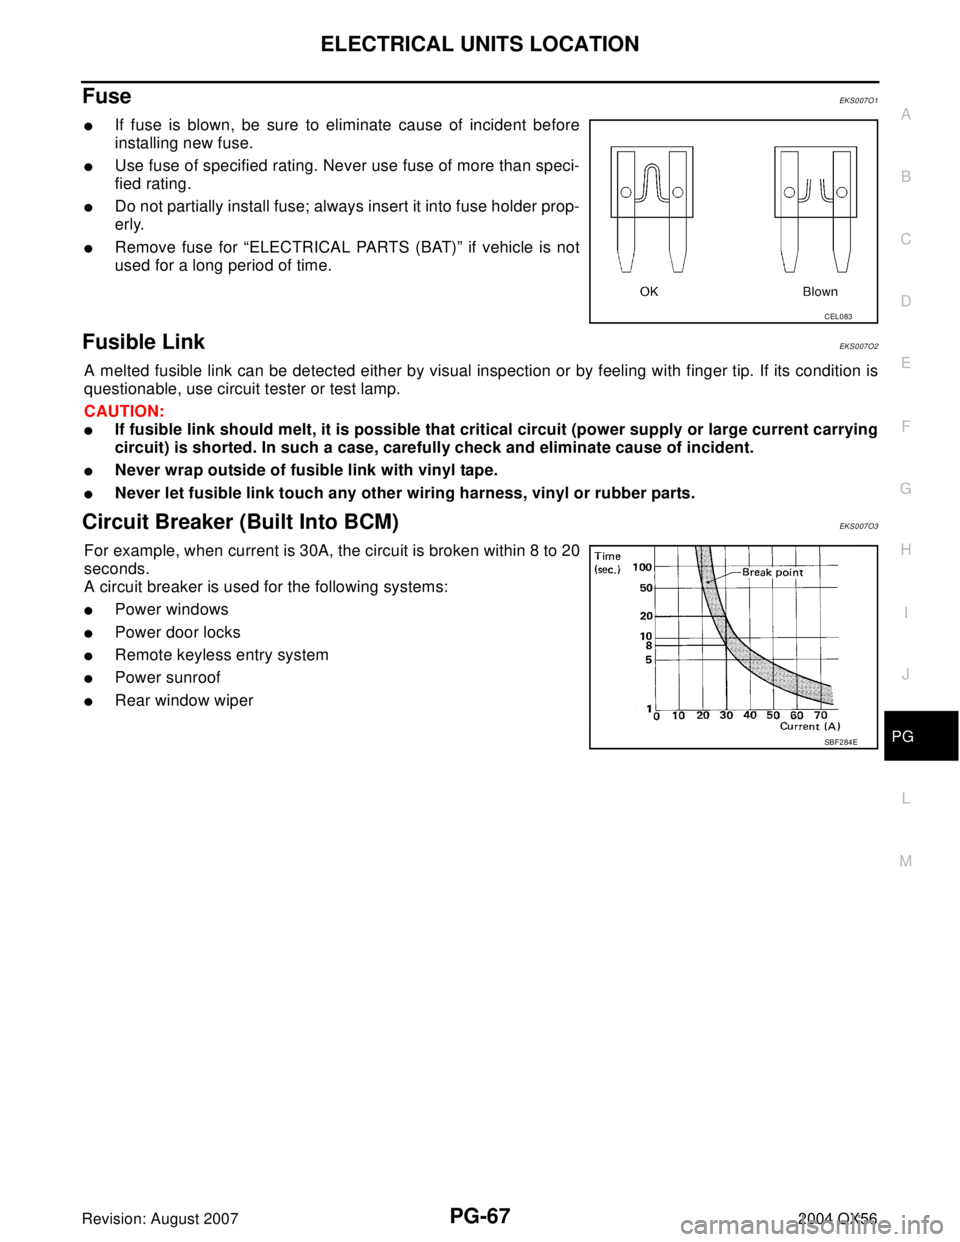
Fuse EKS007O1
�If fuse is blown, be sure to eliminate cause of incident before
installing new fuse.
�Use fuse of specified rating. Never use fuse of more than speci-
fied rating.
�Do not partially install fuse; always insert it into fuse holder prop-
erly.
�Remove fuse for “ELECTRICAL PARTS (BAT)” if vehicle is not
used for a long period of time.
Fusible Link EKS007O2
A melted fusible link can be detected either by visual inspection or by feeling with finger tip. If its condition is
questionable, use circuit tester or test lamp.
CAUTION:
�If fusible link should melt, it is possible that critical circuit (power supply or large current carrying
circuit) is shorted. In such a case, carefully check and eliminate cause of incident.
�Never wrap outside of fusible link with vinyl tape.
�Never let fusible link touch any other wiring harness, vinyl or rubber parts.
Circuit Breaker (Built Into BCM)EKS007O3
For example, when current is 30A, the circuit is broken within 8 to 20
seconds.
A circuit breaker is used for the following systems:
�Power windows
�Power door locks
�Remote keyless entry system
�Power sunroof
�Rear window wiper
CEL083
SBF 2 84 E
Page 2729 of 3371
PG-70
HARNESS CONNECTOR
Revision: August 20072004 QX56
HARNESS CONNECTOR (DIRECT-CONNECT SRS COMPONENT TYPE)
�SRS direct-connect type harness connectors are used on certain SRS components such as air bag mod-
ules and seat belt pre-tensioners.
�Always pull up to release black locking tab prior to removing connector from SRS component.
�Always push down to lock black locking tab after installing connector to SRS component. When locked,
the black locking tab is level with the connector housing.
CAUTION:
�Do not pull the harness or wires when removing connectors
from SRS components.
WHIA0103E
Page 2738 of 3371

PR-1
PROPELLER SHAFT
D DRIVELINE/AXLE
CONTENTS
C
E
F
G
H
I
J
K
L
M
SECTION PR
A
B
PR
Revision: August 20072004 QX56 PREPARATION ........................................................... 2
Commercial Service Tools ........................................ 2
NOISE, VIBRATION, AND HARSHNESS (NVH)
TROUBLESHOOTING ................................................ 3
NVH Troubleshooting Chart ..................................... 3
FRONT PROPELLER SHAFT .................................... 4
On-Vehicle Service ................................................... 4
PROPELLER SHAFT VIBRATION ........................ 4
INSPECTION ........................................................ 4
Removal and Installation .......................................... 4
REMOVAL ............................................................. 5
INSPECTION AFTER REMOVAL ......................... 5
INSTALLATION ..................................................... 5
Disassembly and Assembly ..................................... 5
DISASSEMBLY ..................................................... 5
ASSEMBLY ........................................................... 6REAR PROPELLER SHAFT ...................................... 8
On-Vehicle Service ................................................... 8
PROPELLER SHAFT VIBRATION ........................ 8
INSPECTION ........................................................ 8
Removal and Installation .......................................... 8
REMOVAL ............................................................. 9
INSPECTION AFTER REMOVAL ......................... 9
INSTALLATION ..................................................... 9
Disassembly and Assembly .................................... 10
DISASSEMBLY ................................................... 10
ASSEMBLY ......................................................... 11
SERVICE DATA AND SPECIFICATIONS (SDS) ...... 12
General Specifications ............................................ 12
Snap Ring ............................................................... 13
Page 2741 of 3371
PR-4
FRONT PROPELLER SHAFT
Revision: August 20072004 QX56
FRONT PROPELLER SHAFTPFP:37200
On-Vehicle ServiceEDS002JZ
PROPELLER SHAFT VIBRATION
NOTE:
If a vibration is present at high speed, inspect the propeller shaft run out first.
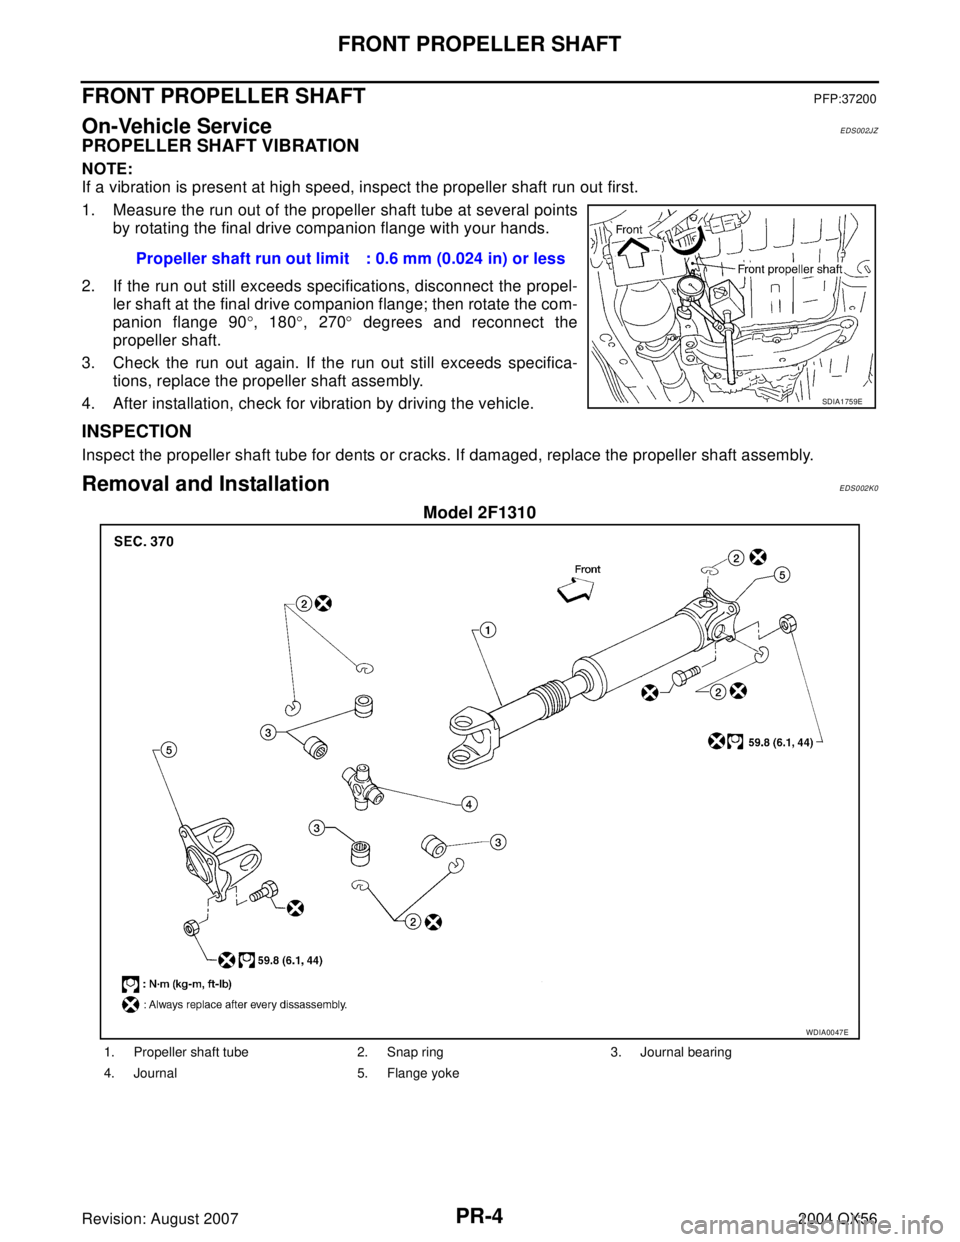
1. Measure the run out of the propeller shaft tube at several points
by rotating the final drive companion flange with your hands.
2. If the run out still exceeds specifications, disconnect the propel-
ler shaft at the final drive companion flange; then rotate the com-
panion flange 90°, 180°, 270° degrees and reconnect the
propeller shaft.
3. Check the run out again. If the run out still exceeds specifica-
tions, replace the propeller shaft assembly.
4. After installation, check for vibration by driving the vehicle.
INSPECTION
Inspect the propeller shaft tube for dents or cracks. If damaged, replace the propeller shaft assembly.
Removal and InstallationEDS002K0
Model 2F1310
Propeller shaft run out limit : 0.6 mm (0.024 in) or less
SDIA1759E
WDIA0047E
1. Propeller shaft tube 2. Snap ring 3. Journal bearing
4. Journal 5. Flange yoke
Page 2742 of 3371
FRONT PROPELLER SHAFT
PR-5
C
E
F
G
H
I
J
K
L
MA
B
PR
Revision: August 20072004 QX56
REMOVAL
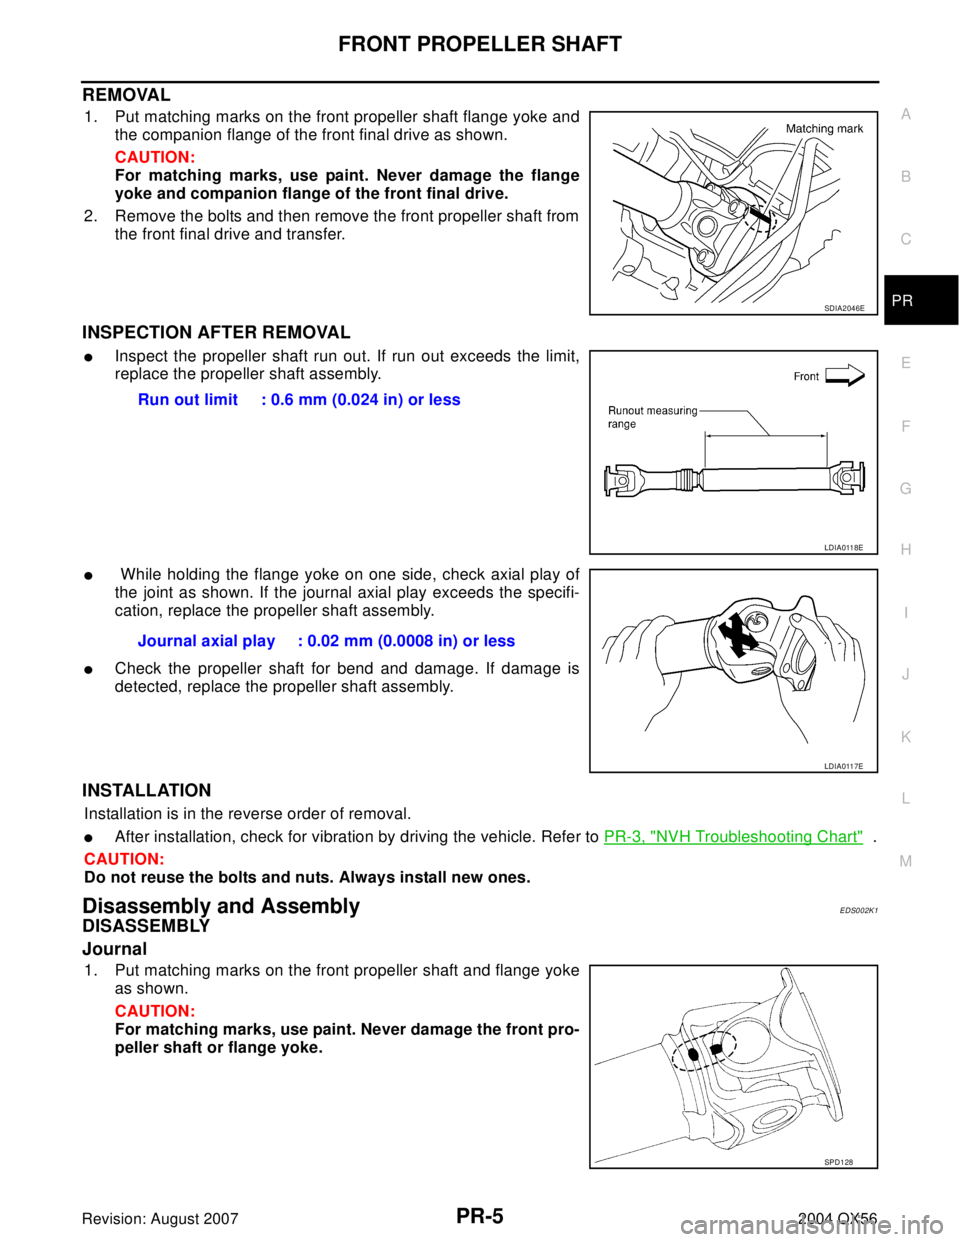
1. Put matching marks on the front propeller shaft flange yoke and
the companion flange of the front final drive as shown.
CAUTION:
For matching marks, use paint. Never damage the flange
yoke and companion flange of the front final drive.
2. Remove the bolts and then remove the front propeller shaft from
the front final drive and transfer.
INSPECTION AFTER REMOVAL
�Inspect the propeller shaft run out. If run out exceeds the limit,
replace the propeller shaft assembly.
� While holding the flange yoke on one side, check axial play of
the joint as shown. If the journal axial play exceeds the specifi-
cation, replace the propeller shaft assembly.
�Check the propeller shaft for bend and damage. If damage is
detected, replace the propeller shaft assembly.
INSTALLATION
Installation is in the reverse order of removal.
�After installation, check for vibration by driving the vehicle. Refer to PR-3, "NVH Troubleshooting Chart" .
CAUTION:
Do not reuse the bolts and nuts. Always install new ones.
Disassembly and AssemblyEDS002K1
DISASSEMBLY
Journal
1. Put matching marks on the front propeller shaft and flange yoke
as shown.
CAUTION:
For matching marks, use paint. Never damage the front pro-
peller shaft or flange yoke.
SDIA2046E
Run out limit : 0.6 mm (0.024 in) or less
LDIA0118E
Journal axial play : 0.02 mm (0.0008 in) or less
LDIA0117E
SPD1 28
Page 2744 of 3371
FRONT PROPELLER SHAFT
PR-7
C
E
F
G
H
I
J
K
L
MA
B
PR
Revision: August 20072004 QX56
2. Select snap rings that will provide the specified play in an axial
direction of the journal, and install them. Refer to PR-13, "
Snap
Ring" .
NOTE:
Select snap rings with a difference in thickness at both sides
within 0.02 mm (0.0008 in).
3. Adjust the thrust clearance between the bearing and snap ring
to zero by tapping the yoke.
4. Make sure that the journal moves smoothly and is below the
joint flex effort specification.
APD0 12
SPD7 32
Joint flex effort : 1.96 N·m (0.20 kg-m, 17 in-lb) or less
LDIA0119E
Page 2745 of 3371
PR-8
REAR PROPELLER SHAFT
Revision: August 20072004 QX56
REAR PROPELLER SHAFTPFP:37000
On-Vehicle ServiceEDS002K2
PROPELLER SHAFT VIBRATION
NOTE:
If vibration is present at high speed, check propeller shaft run out first, then check mounting between propeller
shaft and companion flange.
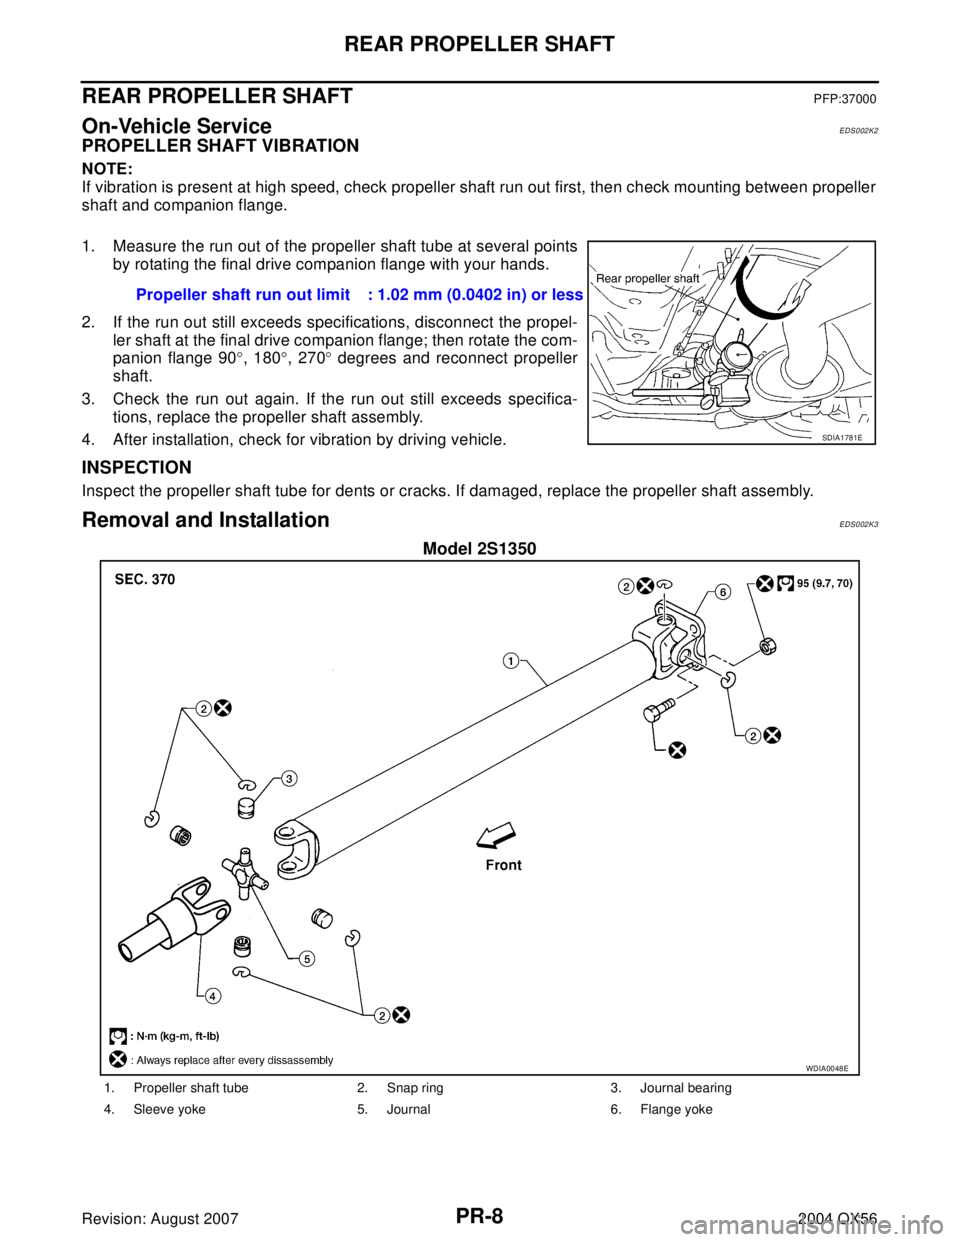
1. Measure the run out of the propeller shaft tube at several points
by rotating the final drive companion flange with your hands.
2. If the run out still exceeds specifications, disconnect the propel-
ler shaft at the final drive companion flange; then rotate the com-
panion flange 90°, 180°, 270° degrees and reconnect propeller
shaft.
3. Check the run out again. If the run out still exceeds specifica-
tions, replace the propeller shaft assembly.
4. After installation, check for vibration by driving vehicle.
INSPECTION
Inspect the propeller shaft tube for dents or cracks. If damaged, replace the propeller shaft assembly.
Removal and InstallationEDS002K3
Model 2S1350
Propeller shaft run out limit : 1.02 mm (0.0402 in) or less
SDIA1781E
WDIA0048E
1. Propeller shaft tube 2. Snap ring 3. Journal bearing
4. Sleeve yoke 5. Journal 6. Flange yoke
Page 2746 of 3371
REAR PROPELLER SHAFT
PR-9
C
E
F
G
H
I
J
K
L
MA
B
PR
Revision: August 20072004 QX56
REMOVAL
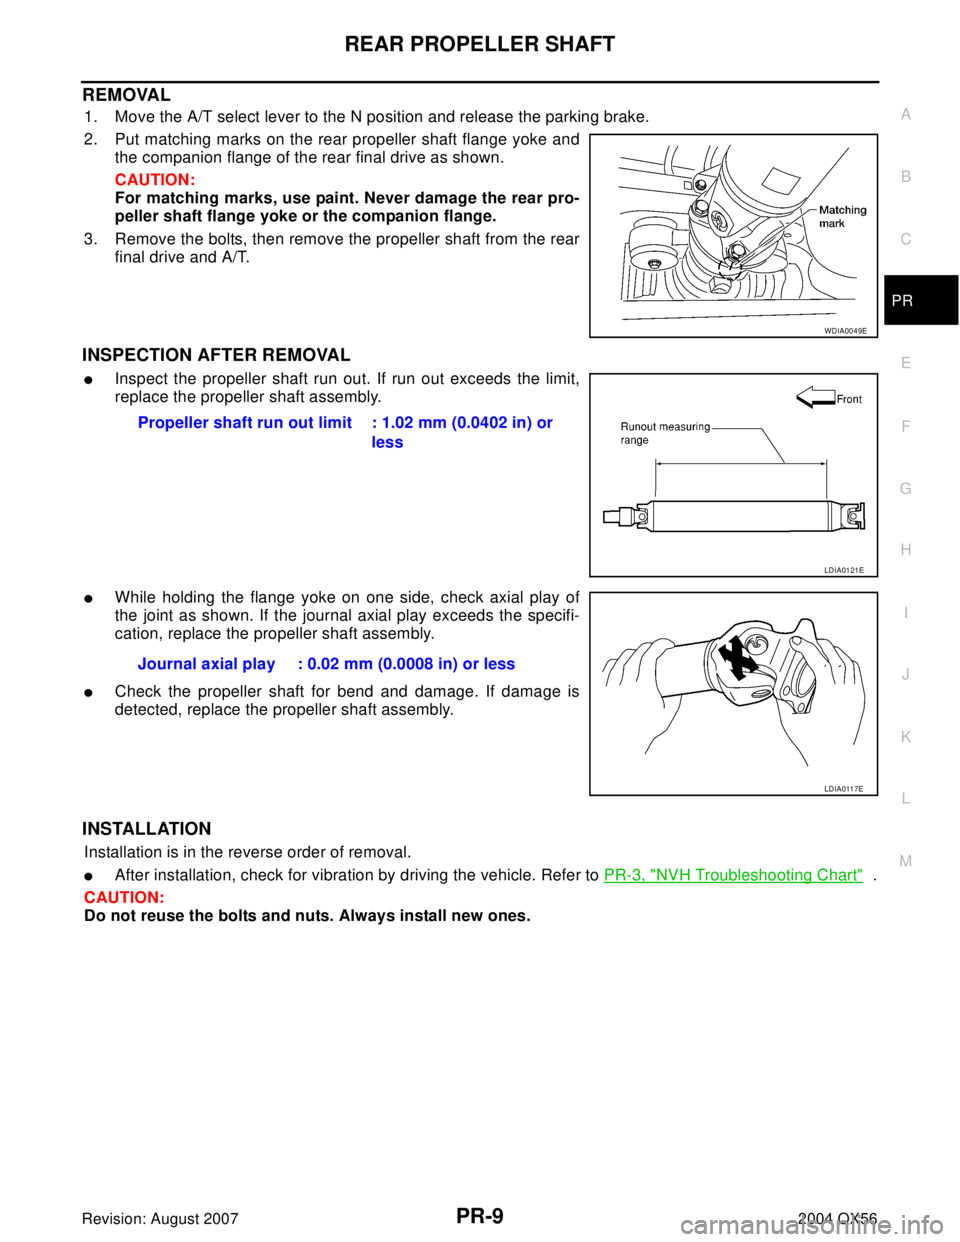
1. Move the A/T select lever to the N position and release the parking brake.
2. Put matching marks on the rear propeller shaft flange yoke and
the companion flange of the rear final drive as shown.
CAUTION:
For matching marks, use paint. Never damage the rear pro-
peller shaft flange yoke or the companion flange.
3. Remove the bolts, then remove the propeller shaft from the rear
final drive and A/T.
INSPECTION AFTER REMOVAL
�Inspect the propeller shaft run out. If run out exceeds the limit,
replace the propeller shaft assembly.
�While holding the flange yoke on one side, check axial play of
the joint as shown. If the journal axial play exceeds the specifi-
cation, replace the propeller shaft assembly.
�Check the propeller shaft for bend and damage. If damage is
detected, replace the propeller shaft assembly.
INSTALLATION
Installation is in the reverse order of removal.
�After installation, check for vibration by driving the vehicle. Refer to PR-3, "NVH Troubleshooting Chart" .
CAUTION:
Do not reuse the bolts and nuts. Always install new ones.
WDIA0049E
Propeller shaft run out limit : 1.02 mm (0.0402 in) or
less
LDIA0121E
Journal axial play : 0.02 mm (0.0008 in) or less
LDIA0117E