Page 1030 of 4449
IVIS (INFINITI VEHICLE IMMOBILIZER SYSTEM-NATS)
BL-223
C
D
E
F
G
H
J
K
L
MA
B
BL
Revision: 2004 November 2004 FX35/FX45
Diagnostic Procedure 5AIS004PQ
Self-diagnostic results:
“LOCK MODE” displayed on CONSULT-II screen
1. CONFIRM SELF-DIAGNOSTIC RESULTS
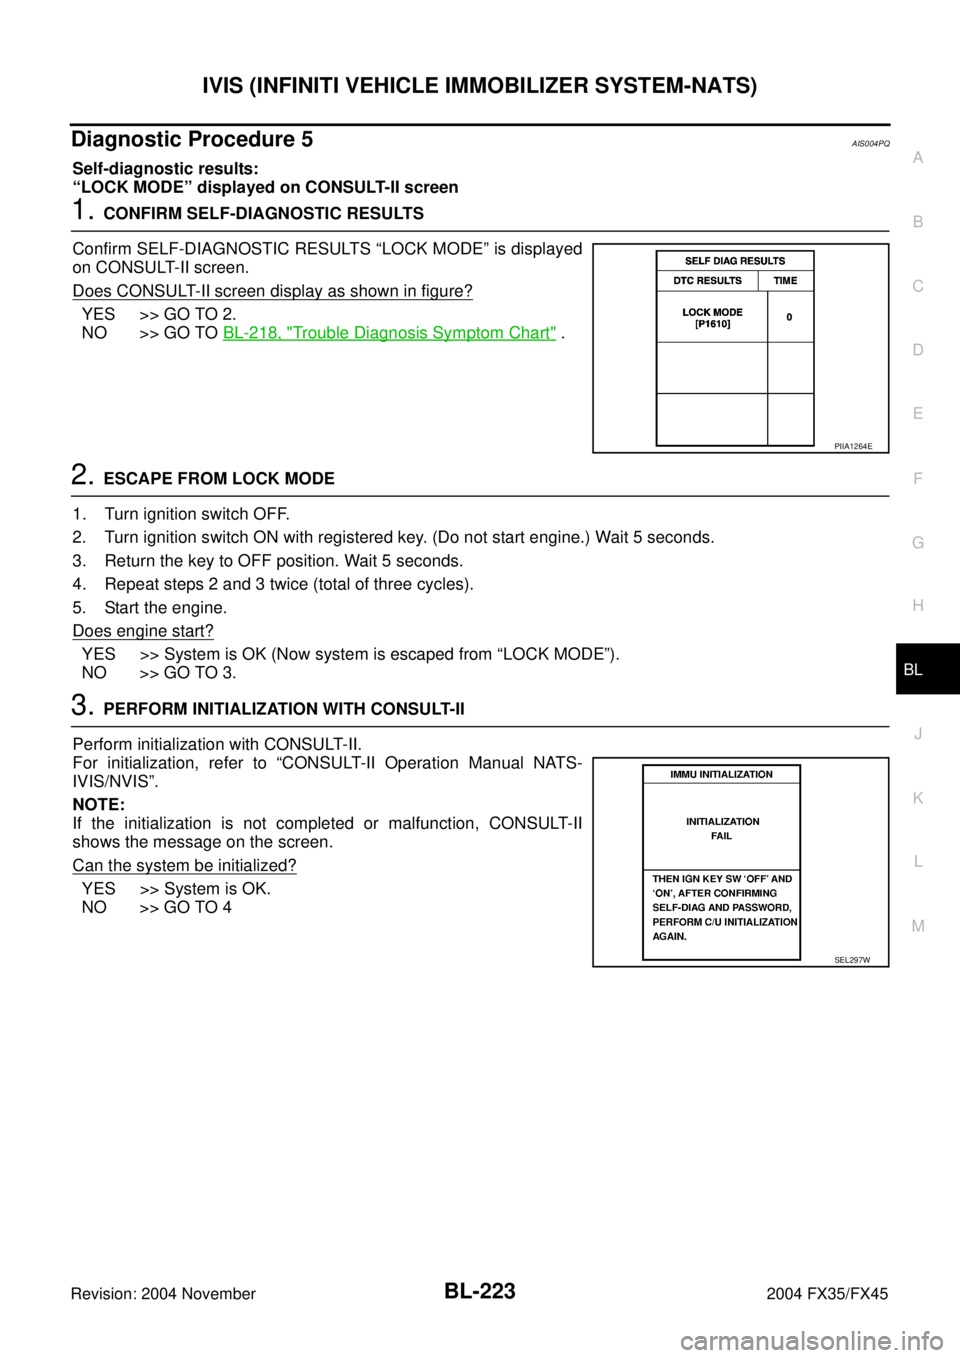
Confirm SELF-DIAGNOSTIC RESULTS “LOCK MODE” is displayed
on CONSULT-II screen.
Does CONSULT-II screen display as shown in figure?
YES >> GO TO 2.
NO >> GO TO BL-218, "
Trouble Diagnosis Symptom Chart" .
2. ESCAPE FROM LOCK MODE
1. Turn ignition switch OFF.
2. Turn ignition switch ON with registered key. (Do not start engine.) Wait 5 seconds.
3. Return the key to OFF position. Wait 5 seconds.
4. Repeat steps 2 and 3 twice (total of three cycles).
5. Start the engine.
Does engine start?
YES >> System is OK (Now system is escaped from “LOCK MODE”).
NO >> GO TO 3.
3. PERFORM INITIALIZATION WITH CONSULT-II
Perform initialization with CONSULT-II.
For initialization, refer to “CONSULT-II Operation Manual NATS-
IVIS/NVIS”.
NOTE:
If the initialization is not completed or malfunction, CONSULT-II
shows the message on the screen.
Can the system be initialized?
YES >> System is OK.
NO >> GO TO 4
PIIA1264E
SEL297W
Page 1033 of 4449
BL-226
IVIS (INFINITI VEHICLE IMMOBILIZER SYSTEM-NATS)
Revision: 2004 November 2004 FX35/FX45
7. CHECK NATS ANTENNA AMP. GROUND LINE CIRCUIT
1. Turn ignition switch “OFF”.
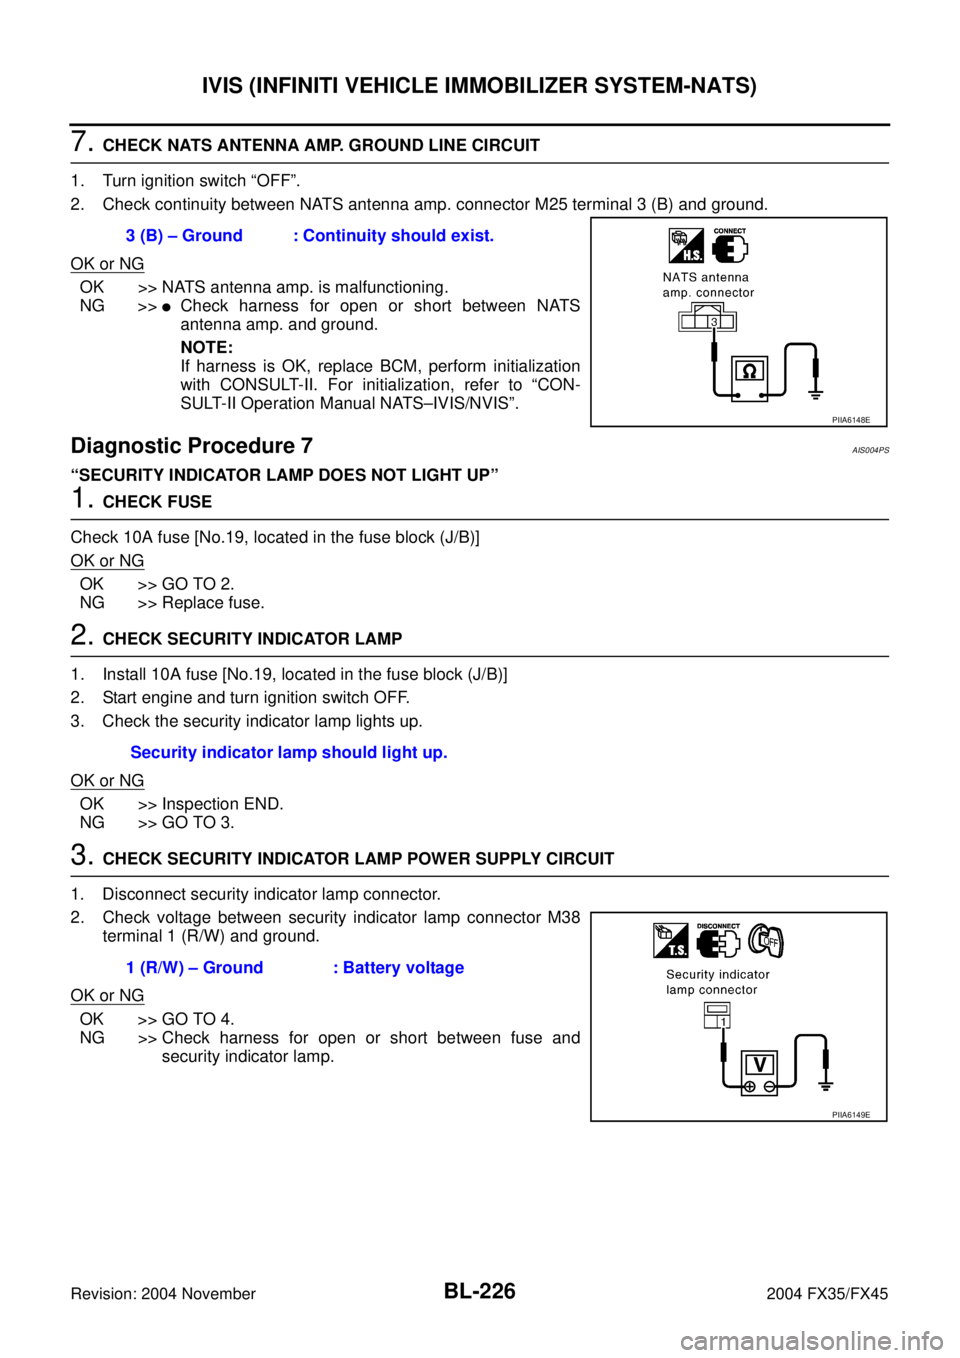
2. Check continuity between NATS antenna amp. connector M25 terminal 3 (B) and ground.
OK or NG
OK >> NATS antenna amp. is malfunctioning.
NG >>
�Check harness for open or short between NATS
antenna amp. and ground.
NOTE:
If harness is OK, replace BCM, perform initialization
with CONSULT-II. For initialization, refer to “CON-
SULT-II Operation Manual NATS–IVIS/NVIS”.
Diagnostic Procedure 7AIS004PS
“SECURITY INDICATOR LAMP DOES NOT LIGHT UP”
1. CHECK FUSE
Check 10A fuse [No.19, located in the fuse block (J/B)]
OK or NG
OK >> GO TO 2.
NG >> Replace fuse.
2. CHECK SECURITY INDICATOR LAMP
1. Install 10A fuse [No.19, located in the fuse block (J/B)]
2. Start engine and turn ignition switch OFF.
3. Check the security indicator lamp lights up.
OK or NG
OK >> Inspection END.
NG >> GO TO 3.
3. CHECK SECURITY INDICATOR LAMP POWER SUPPLY CIRCUIT
1. Disconnect security indicator lamp connector.
2. Check voltage between security indicator lamp connector M38
terminal 1 (R/W) and ground.
OK or NG
OK >> GO TO 4.
NG >> Check harness for open or short between fuse and
security indicator lamp. 3 (B) – Ground : Continuity should exist.
PIIA6148E
Security indicator lamp should light up.
1 (R/W) – Ground : Battery voltage
PIIA6149E
Page 1100 of 4449
BRAKE PEDAL
BR-7
C
D
E
G
H
I
J
K
L
MA
B
BR
Revision: 2004 November 2004 FX35/FX45
ADJUSTMENT
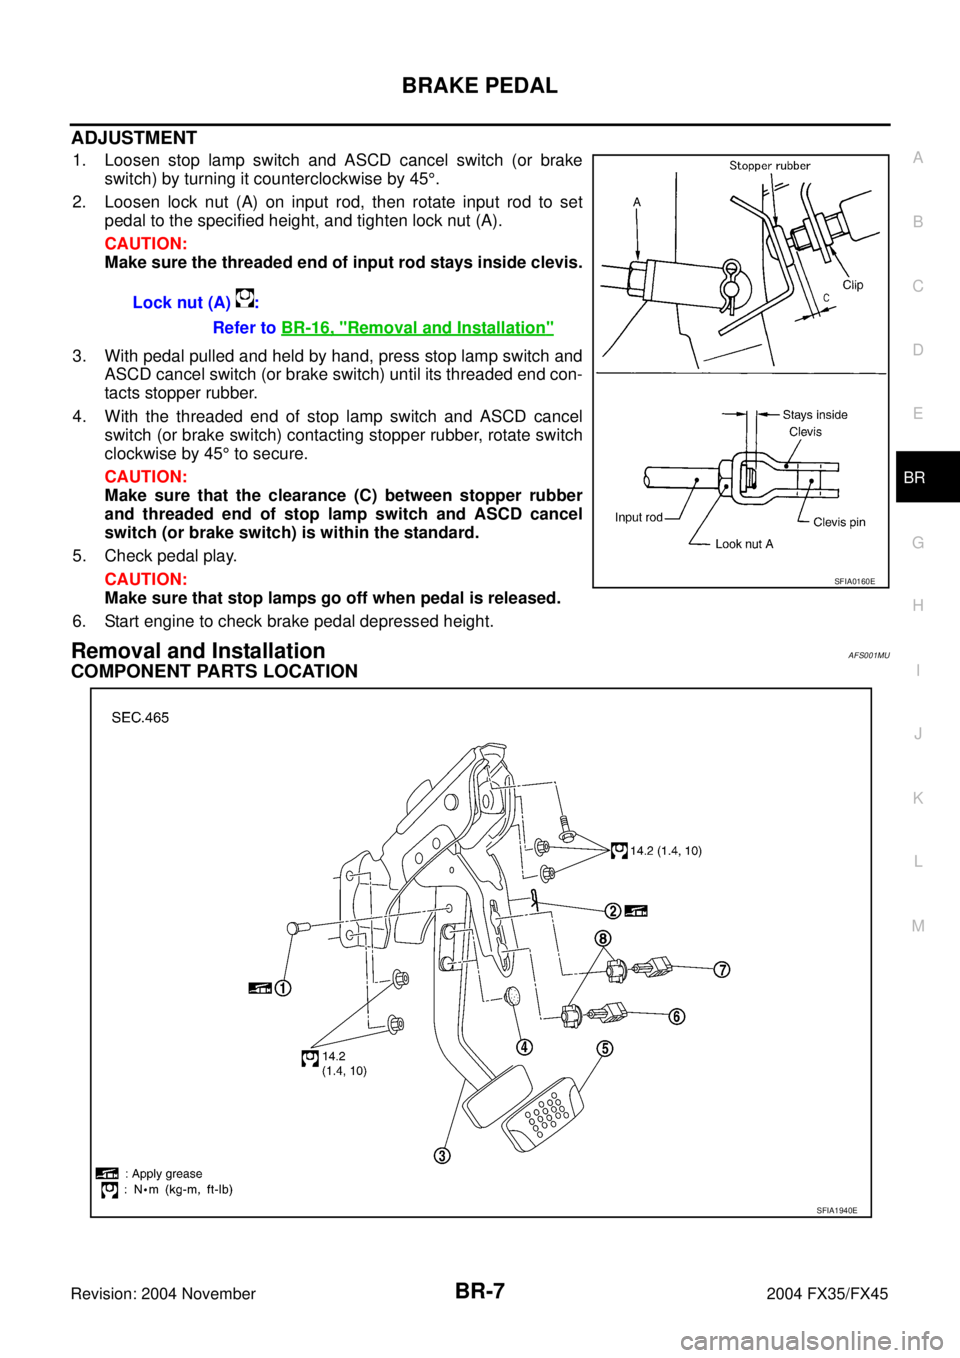
1. Loosen stop lamp switch and ASCD cancel switch (or brake
switch) by turning it counterclockwise by 45°.
2. Loosen lock nut (A) on input rod, then rotate input rod to set
pedal to the specified height, and tighten lock nut (A).
CAUTION:
Make sure the threaded end of input rod stays inside clevis.
3. With pedal pulled and held by hand, press stop lamp switch and
ASCD cancel switch (or brake switch) until its threaded end con-
tacts stopper rubber.
4. With the threaded end of stop lamp switch and ASCD cancel
switch (or brake switch) contacting stopper rubber, rotate switch
clockwise by 45° to secure.
CAUTION:
Make sure that the clearance (C) between stopper rubber
and threaded end of stop lamp switch and ASCD cancel
switch (or brake switch) is within the standard.
5. Check pedal play.
CAUTION:
Make sure that stop lamps go off when pedal is released.
6. Start engine to check brake pedal depressed height.
Removal and InstallationAFS001MU
COMPONENT PARTS LOCATION
Lock nut (A) :
Refer to BR-16, "
Removal and Installation"
SFIA0160E
SFIA1940E
Page 1104 of 4449
BRAKE PIPING AND HOSE
BR-11
C
D
E
G
H
I
J
K
L
MA
B
BR
Revision: 2004 November 2004 FX35/FX45
BRAKE PIPING AND HOSEPFP:46210
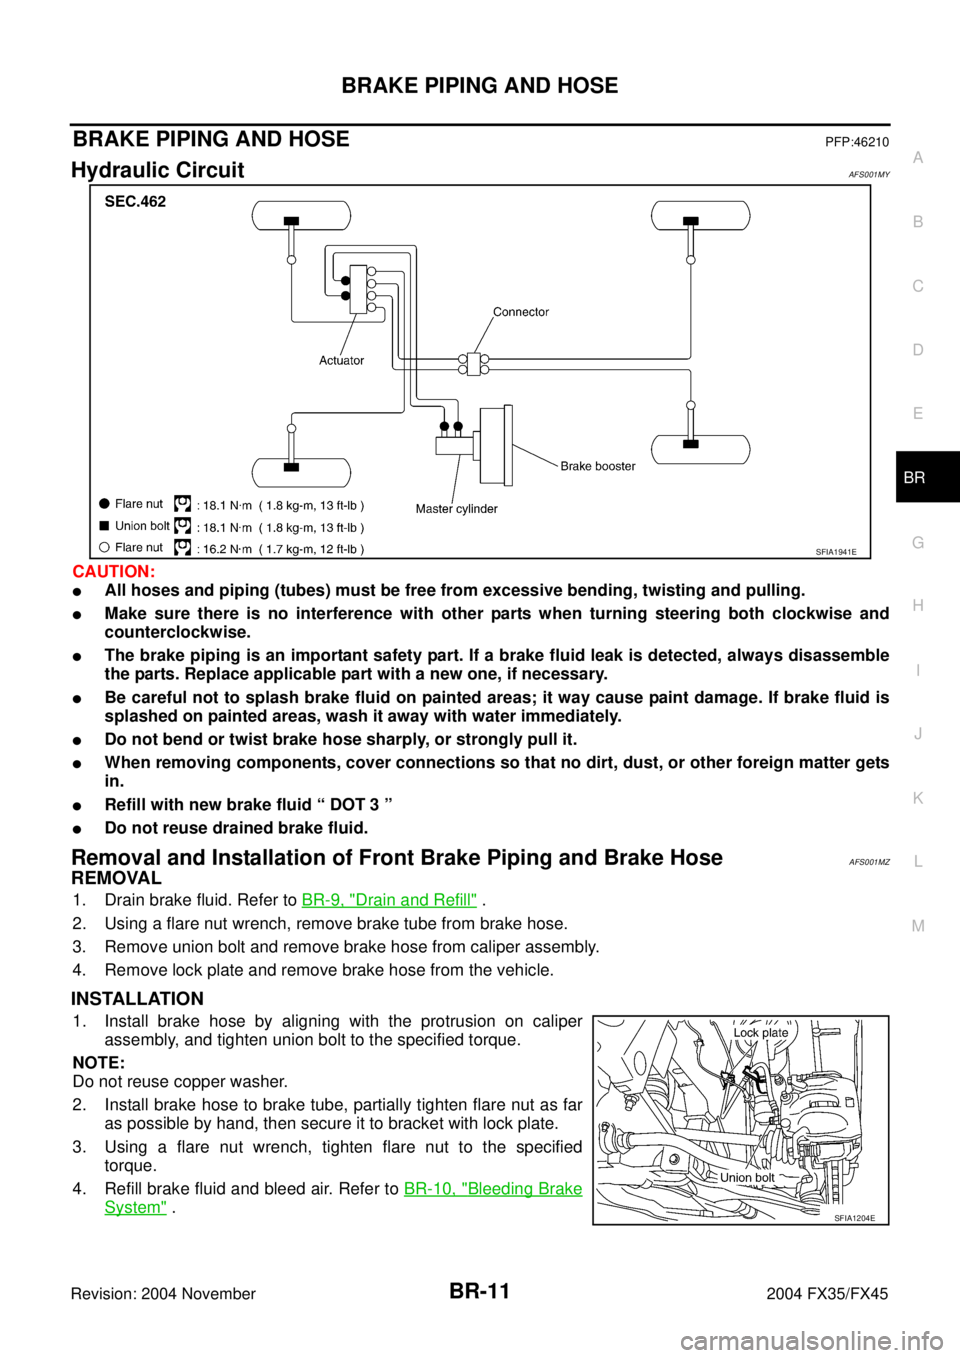
Hydraulic CircuitAFS001MY
CAUTION:
�All hoses and piping (tubes) must be free from excessive bending, twisting and pulling.
�Make sure there is no interference with other parts when turning steering both clockwise and
counterclockwise.
�The brake piping is an important safety part. If a brake fluid leak is detected, always disassemble
the parts. Replace applicable part with a new one, if necessary.
�Be careful not to splash brake fluid on painted areas; it way cause paint damage. If brake fluid is
splashed on painted areas, wash it away with water immediately.
�Do not bend or twist brake hose sharply, or strongly pull it.
�When removing components, cover connections so that no dirt, dust, or other foreign matter gets
in.
�Refill with new brake fluid “ DOT 3 ”
�Do not reuse drained brake fluid.
Removal and Installation of Front Brake Piping and Brake Hose AFS001MZ
REMOVAL
1. Drain brake fluid. Refer to BR-9, "Drain and Refill" .
2. Using a flare nut wrench, remove brake tube from brake hose.
3. Remove union bolt and remove brake hose from caliper assembly.
4. Remove lock plate and remove brake hose from the vehicle.
INSTALLATION
1. Install brake hose by aligning with the protrusion on caliper
assembly, and tighten union bolt to the specified torque.
NOTE:
Do not reuse copper washer.
2. Install brake hose to brake tube, partially tighten flare nut as far
as possible by hand, then secure it to bracket with lock plate.
3. Using a flare nut wrench, tighten flare nut to the specified
torque.
4. Refill brake fluid and bleed air. Refer to BR-10, "
Bleeding Brake
System" .
SFIA1941E
SFIA1204E
Page 1109 of 4449
BR-16
BRAKE BOOSTER
Revision: 2004 November 2004 FX35/FX45
Removal and InstallationAFS001N7
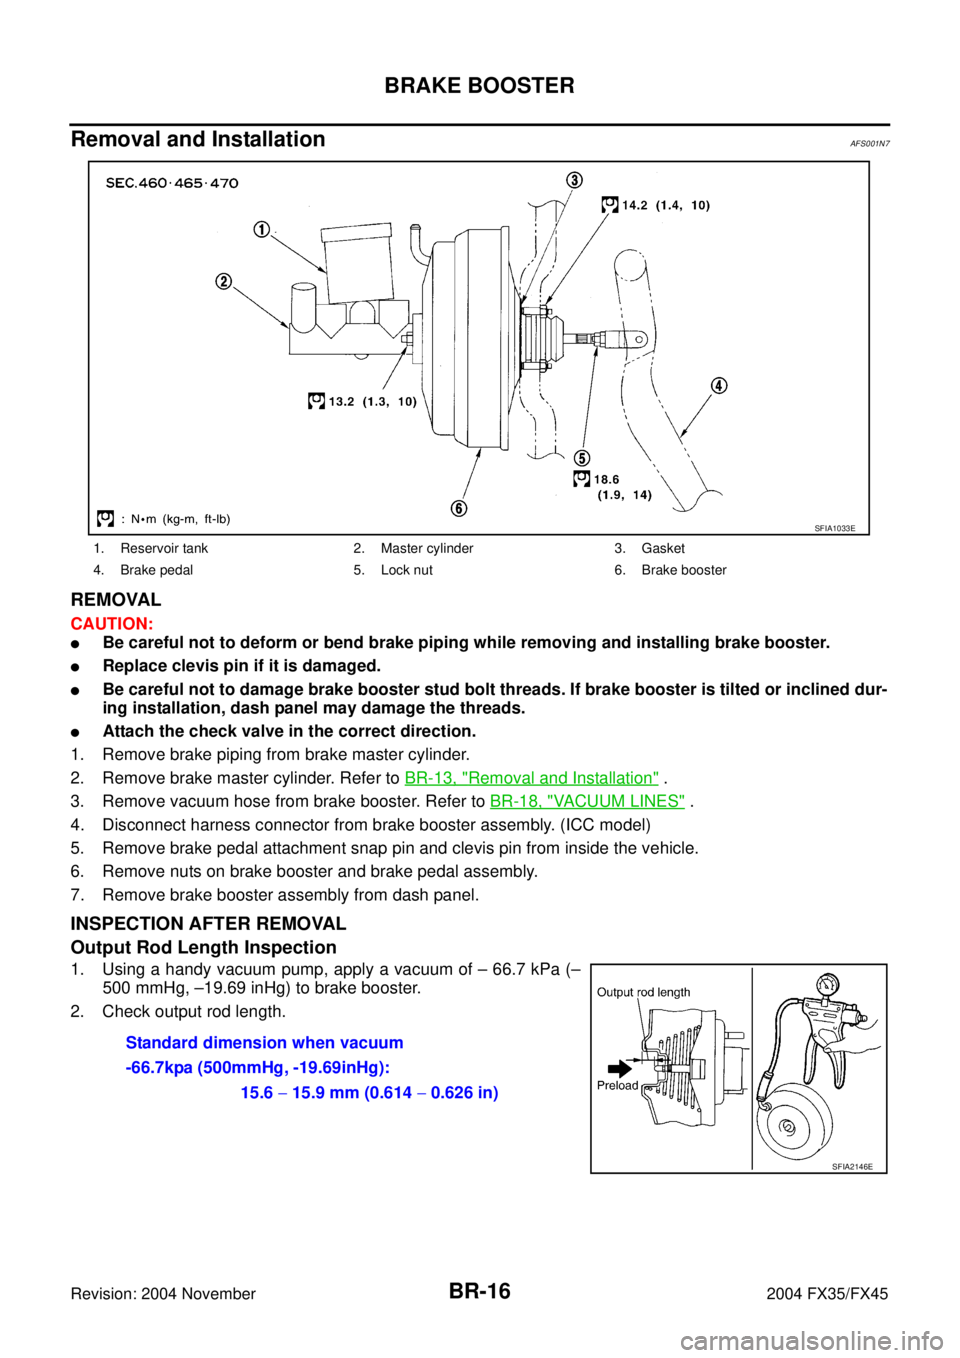
REMOVAL
CAUTION:
�Be careful not to deform or bend brake piping while removing and installing brake booster.
�Replace clevis pin if it is damaged.
�Be careful not to damage brake booster stud bolt threads. If brake booster is tilted or inclined dur-
ing installation, dash panel may damage the threads.
�Attach the check valve in the correct direction.
1. Remove brake piping from brake master cylinder.
2. Remove brake master cylinder. Refer to BR-13, "
Removal and Installation" .
3. Remove vacuum hose from brake booster. Refer to BR-18, "
VACUUM LINES" .
4. Disconnect harness connector from brake booster assembly. (ICC model)
5. Remove brake pedal attachment snap pin and clevis pin from inside the vehicle.
6. Remove nuts on brake booster and brake pedal assembly.
7. Remove brake booster assembly from dash panel.
INSPECTION AFTER REMOVAL
Output Rod Length Inspection
1. Using a handy vacuum pump, apply a vacuum of – 66.7 kPa (–
500 mmHg, –19.69 inHg) to brake booster.
2. Check output rod length.
1. Reservoir tank 2. Master cylinder 3. Gasket
4. Brake pedal 5. Lock nut 6. Brake booster
SFIA1033E
Standard dimension when vacuum
-66.7kpa (500mmHg, -19.69inHg):
15.6 − 15.9 mm (0.614 − 0.626 in)
SFIA2146E
Page 1110 of 4449
BRAKE BOOSTER
BR-17
C
D
E
G
H
I
J
K
L
MA
B
BR
Revision: 2004 November 2004 FX35/FX45
INSTALLATION
1. Loosen lock nut to adjust input rod length so that the length B (in
the figure) satisfies the specified value.
2. After adjusting “B”, temporarily tighten lock nut to install booster
assembly to the vehicle. At this time, make sure to install a gas-
ket between booster assembly and the dash panel.
3. Connect brake pedal with clevis of input rod.
4. Install pedal bracket mounting nuts and tighten them to the
specified torque.
5. Install brake piping from brake master cylinder to ABS actuator.
Refer to BR-11, "
Hydraulic Circuit" .
6. Install master cylinder to booster assembly. Refer to BR-16, "
Removal and Installation" .
7. Adjust the height and play of brake pedal.
8. Tighten lock nut of input rod to the specified torque.
9. Refill new brake fluid and bleed air. Refer to BR-10, "
Bleeding Brake System" . Length “B” : 125 mm (4.92 in)
SGIA0060E
Page 1115 of 4449
BR-22
FRONT DISC BRAKE
Revision: 2004 November 2004 FX35/FX45
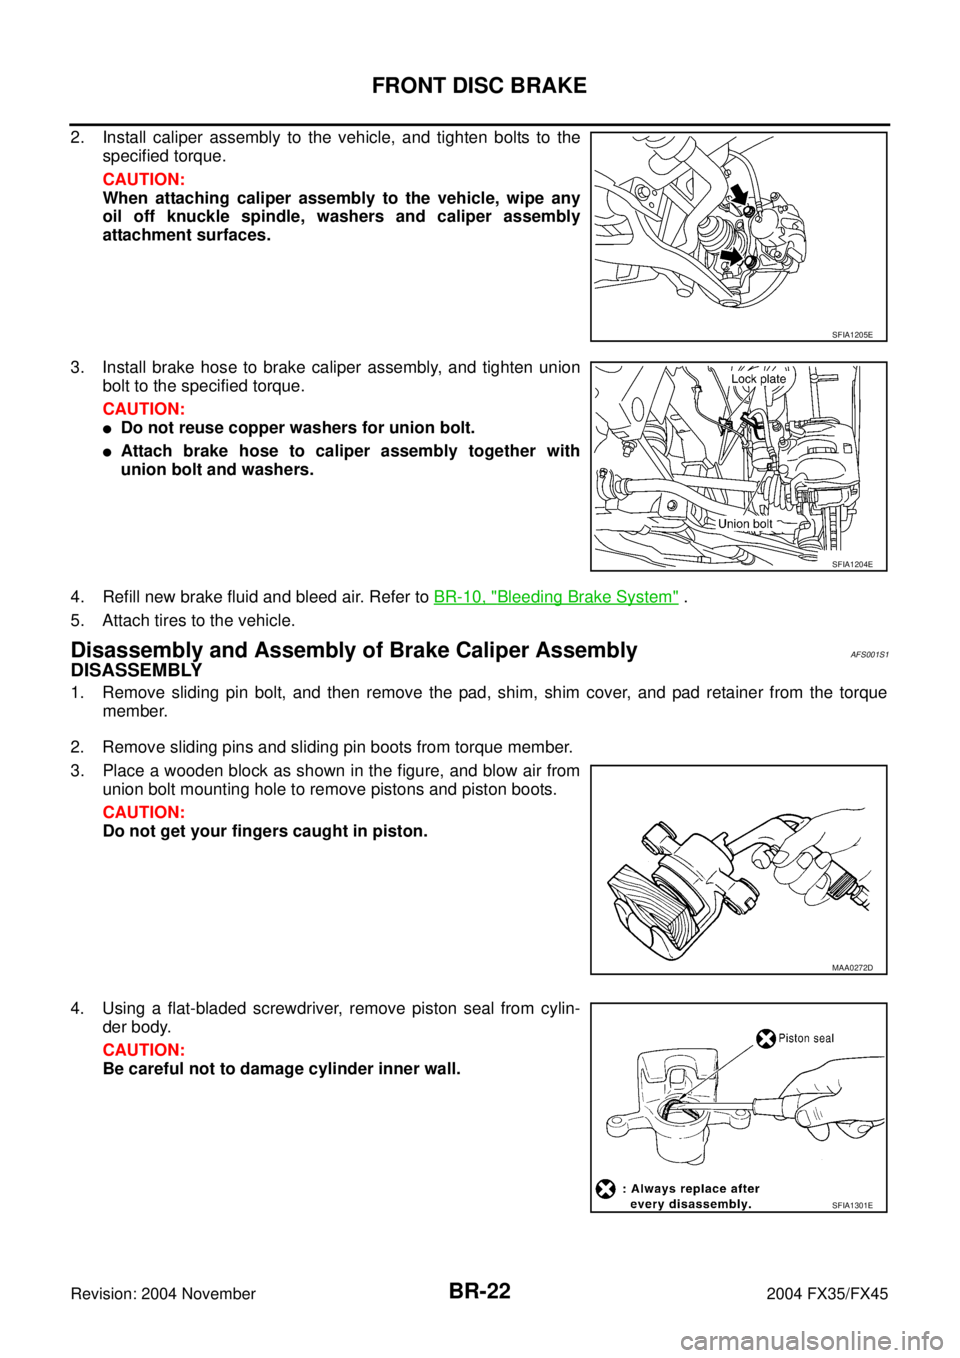
2. Install caliper assembly to the vehicle, and tighten bolts to the
specified torque.
CAUTION:
When attaching caliper assembly to the vehicle, wipe any
oil off knuckle spindle, washers and caliper assembly
attachment surfaces.
3. Install brake hose to brake caliper assembly, and tighten union
bolt to the specified torque.
CAUTION:
�Do not reuse copper washers for union bolt.
�Attach brake hose to caliper assembly together with
union bolt and washers.
4. Refill new brake fluid and bleed air. Refer to BR-10, "
Bleeding Brake System" .
5. Attach tires to the vehicle.
Disassembly and Assembly of Brake Caliper AssemblyAFS001S1
DISASSEMBLY
1. Remove sliding pin bolt, and then remove the pad, shim, shim cover, and pad retainer from the torque
member.
2. Remove sliding pins and sliding pin boots from torque member.
3. Place a wooden block as shown in the figure, and blow air from
union bolt mounting hole to remove pistons and piston boots.
CAUTION:
Do not get your fingers caught in piston.
4. Using a flat-bladed screwdriver, remove piston seal from cylin-
der body.
CAUTION:
Be careful not to damage cylinder inner wall.
SFIA1205E
SFIA1204E
MAA0272D
SFIA1301E
Page 1120 of 4449
REAR DISC BRAKE
BR-27
C
D
E
G
H
I
J
K
L
MA
B
BR
Revision: 2004 November 2004 FX35/FX45
CAUTION:
Before installing caliper assembly to the vehicle, wipe off oil and grease on washer seats on axle
assembly and mounting surface of caliper assembly.
3. Install brake hose to caliper assembly and tighten union bolt to the specified torque.
CAUTION:
�Do not reuse copper washer for union bolt.
�Securely attach brake hose to protrusion on caliper assembly.
4. Refill new brake fluid and bleed air. Refer to BR-10, "
Bleeding Brake System" .
5. Install tires to the vehicle.
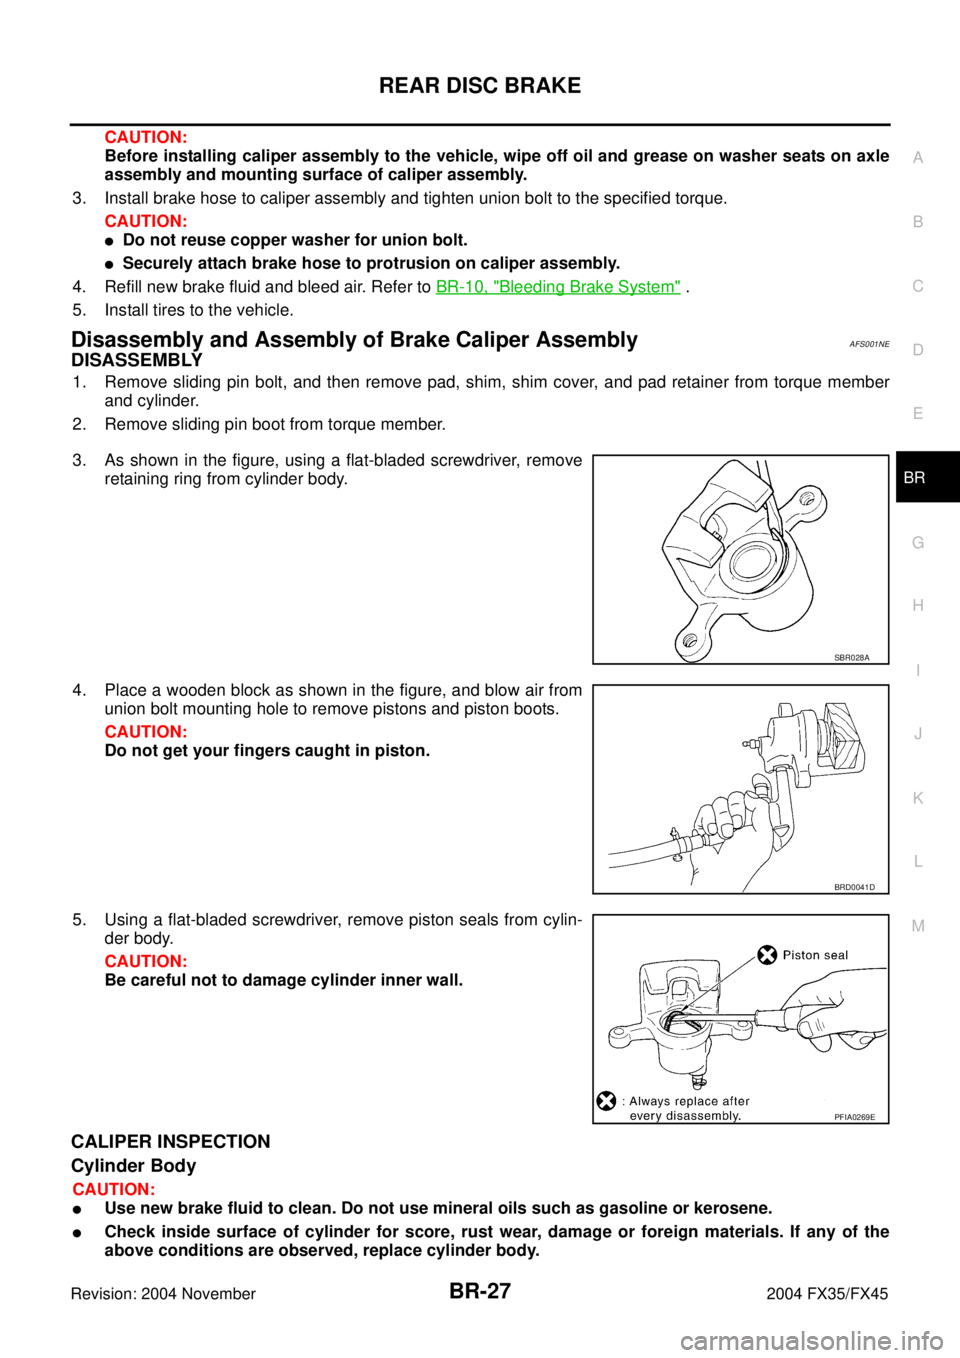
Disassembly and Assembly of Brake Caliper AssemblyAFS001NE
DISASSEMBLY
1. Remove sliding pin bolt, and then remove pad, shim, shim cover, and pad retainer from torque member
and cylinder.
2. Remove sliding pin boot from torque member.
3. As shown in the figure, using a flat-bladed screwdriver, remove
retaining ring from cylinder body.
4. Place a wooden block as shown in the figure, and blow air from
union bolt mounting hole to remove pistons and piston boots.
CAUTION:
Do not get your fingers caught in piston.
5. Using a flat-bladed screwdriver, remove piston seals from cylin-
der body.
CAUTION:
Be careful not to damage cylinder inner wall.
CALIPER INSPECTION
Cylinder Body
CAUTION:
�Use new brake fluid to clean. Do not use mineral oils such as gasoline or kerosene.
�Check inside surface of cylinder for score, rust wear, damage or foreign materials. If any of the
above conditions are observed, replace cylinder body.
SBR028A
BRD0041D
PFIA0269E